In order to quickly get started with PowerServer, we will use a local development machine for all roles (development PC, client, server, and database).
"A local development environment" does not mean the development PC only; it means all roles in one machine, as illustrated in the following graph. And this represents only one supported environment (not all), for example, the built-in Kestrel web server is used as the server here (although IIS etc. is also supported), the SQL Anywhere database is used as an example (although PostgreSQL, SQL Server, Oracle etc. can also be used), Chrome is used to browse the app (although Firefox and Edge can also be used). For all supported environment, refer to Installation > Installation requirements.
"A local development environment" aims to help you get started and get successful results quickly. It is not intended for production use.
After you have a successful result in Guide 1, you can proceed to Guide 2 to learn more about the various environment setup such as configuring IIS as the server.
The following steps will guide you through preparing "a local development environment".
Step 1: Prepare a Windows 11 or 10 (64-bit) machine.
PowerBuilder IDE can only run on Windows 11 or 10.
Step 2: Make sure this machine has the Internet connection.
The machine will need to access the NuGet site and the Appeon license site.
Step 3: Set up each individual role in this machine by installing the following software.
|
Role |
Requires the following software |
|---|---|
|
Server |
|
|
Database |
|
| Development PC | |
|
Development PC |
Step 1: Download the PowerBuilder Installer executable from the Downloads page on the Appeon User Center (login is required) and then run the PowerBuilder Installer. Step 2: Select the Programs tab and make sure the following programs are selected:
Step 3: Select the Components tab and make sure the following component is selected:
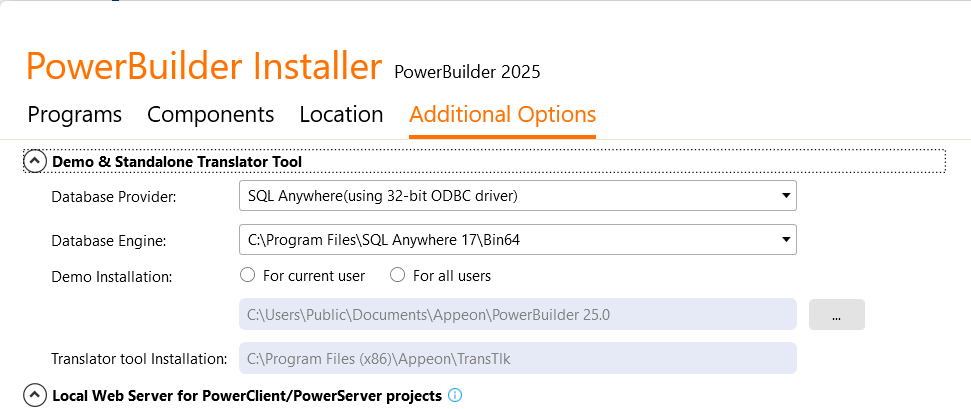
Step 4: Select the Additional Options tab and make sure the SQL Anywhere engine is selected. A 32-bit ODBC driver is required as PowerBuilder IDE is a 32-bit program. If you select to use the PostgreSQL engine for running the PowerBuilder demo database, make sure both the PostgreSQL client (included in Command Line Tools of the PostgreSQL Windows installer) and PostgreSQL ODBC driver (32-bit) are installed. The demo database file is automatically installed to %Public%\Documents\Appeon\PowerBuilder [version]\ and the corresponding ODBC data source is automatically created during the PowerBuilder installation.
|
|
Client PC |
|


