You can specify the application shortcut name and the shortcut icon in the PowerServer project painter > Application page > Basic tab, and then deploy the application to make the settings effective. For details, refer to Application page.
After deployment, if you want to replace the application shortcut name and the shortcut icon without deploying the application again, you can use the following methods to replace them separately.
-
To replace the application shortcut name without deploying the application again:
Step 1: Go to the server root > [appname] folder (named after the App name configured in IDE, for example "C:\inetpub\wwwroot\salesdemo_cloud"), and open the apprun.json file in a text editor.
Step 2: Add the "deployment_settings" section to the apprun.json file. The value for "shortcut_name" will be shown as the display name of the application shortcut icon on desktop.
{ "deployment_urls": { "launcher": "CloudAppPublisher/CloudAppInstall 25.0", "runtime": "CloudAppPublisher/runtime/25.0.0.3018", "web_api": "http://localhost:5099" }, "deployment_settings": { "shortcut_name": "testshortcutname" } } -
To replace the application shortcut icon without deploying the application again:
Note
You cannot replace the default shortcut icon. That is to say, if you haven't selected a shortcut icon in the PowerServer project painter > Application page > Basic tab, then the default icon will be used, and the default icon cannot be replaced after deployment.
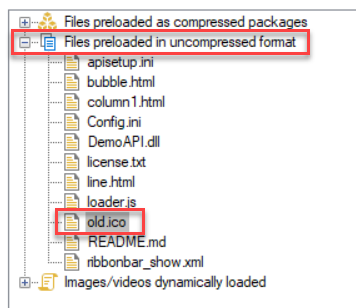
If you select a shortcut icon in the Application page > Basic tab (the icon file must be added to External Files first before it can be selected), it will be deployed to the server and can be replaced after deployment. It is recommended that the icon file is added to Files preloaded in uncompressed format when added to External Files, so that it can be deployed as a single file.
Take the following picture as an example, the "old.ico" file added to Files preloaded in uncompressed format will be deployed as "old.ico.zip" (it is NOT a compressed file although it has a ".zip" extension) to the server root > [appname] folder > [version] folder. You can now follow steps below to replace it.
Step 1: Open Command Prompt and navigate to the server root folder > [appname] folder > [version] folder. Make sure you navigate to the folder of the current deployment version, for example, C:\inetpub\wwwroot\salesdemo_cloud\1.01.
Step 2: Execute the CustomizeDeploy.dll file using the dotnet command to replace the old icon.
For example,
dotnet CustomizeDeploy.dll -src=new.ico -dest=old.ico.zip
For more about CustomizeDeploy.dll, refer to the section Change the deployed app using commands.


