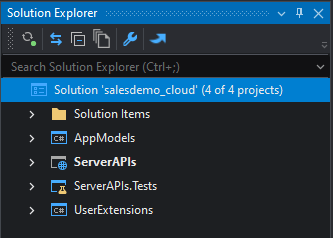
The PowerServer C# solution is generated when you build the PowerServer project in the IDE. It is an ASP.NET Core solution which can be opened in a C# editor such as SnapDevelop, Visual Studio, etc.
After the solution is generated, you can launch the PowerServer C# solution in SnapDevelop from the PowerBuilder IDE; or go to the location where the solution is generated; and double click to launch the solution in SnapDevelop or other C# editor such as Visual Studio.
The PowerServer C# solution contains the following projects:
-
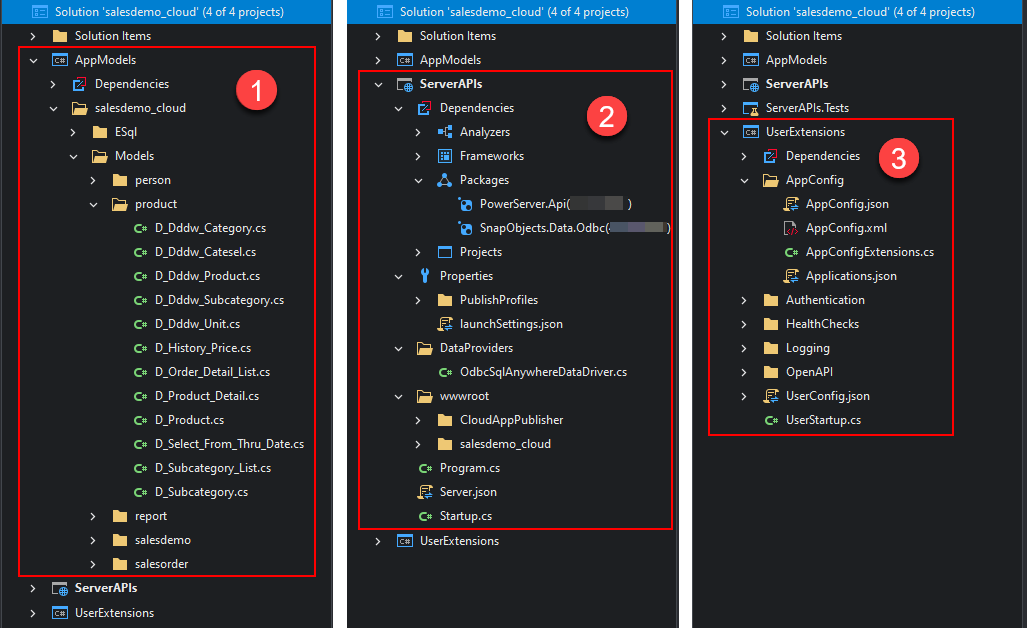
The AppModels project (①) contains the PowerServer C# models (converted from the PowerBuilder DataWindows/DataStores) and the embedded SQLs (ESQL) from the PowerBuilder application. They are automatically exposed via REST/JSON APIs.
-
The ServerAPIs project (②) contains the PowerServer Web APIs. The PowerServer Web APIs are RESTFul APIs for handling the database connections, data processing, PowerServer license activation etc. The ServerAPIs project is the default startup project for starting the PowerServer Web APIs. You can compile and run the ServerAPIs project in a C# editor or run the compiled ServerAPIs.exe file to start the PowerServer Web APIs.
The ServerAPIs project also includes a "wwwroot" sub-folder where the static files such as the cloud app launcher, runtime files and the application files are deployed by default.
-
The UserExtensions project (③) contains miscellaneous tools such as logging, authentication, management APIs etc. And as the project name suggests, you can also customize and enhance this project by adding additional code and functionalities in this project, and they will remain unchanged and unaffected even when the solution is upgraded.
The PowerServer C# solution needs to download the following NuGet packages: PowerServer.Core, PowerServer.API (read more), and the corresponding data provider for .NET Core.
The AppModels project should NOT be modified after generation. Only the ServerAPIs and UserExtensions projects contain configurable files and controllers. The following highlights the important files and settings only.
ServerAPIs project:
-
Properties\launchSettings.json: This file contains the environment settings for running the PowerServer Web APIs in the local development environment. For more information, refer to About PowerServer Web APIs and Kestrel.
UserExtensions project:
-
AppConfig folder
-
AppConfig.json: This file specifies the environment (such as the DB connection profile) to be used when starting PowerServer Web APIs.
"POWERSERVER_ENVIRONMENTTYPE": Specifies the DB connection profile used for starting PowerServer Web APIs. By default, the DB connection profile that is currently selected in the project painter > Database page is set in this file. Refer to Create the DB connection profile for more information.
"ConnectionStrings": Specifies the connection string of the database. You could store the database connection (including the cache, application settings, and transaction-to-cache mappings) in the database instead of in Applications.json or Applications.[DBConnectionProfile].json, so that you could modify, add, or delete the database connection through APIs. For more, refer to Managing database connections using APIs.
"POWERSERVER_ENVIRONMENTTYPE": "Default", "ConnectionStrings": { "AppConfig": "<appconfig connection string>" } -
AppConfig.xml: This file sets the environment (mainly the DB connection profile) to be used when publishing the PowerServer Web APIs.
The default value is empty, meaning that all of the configured DB connection profiles will be deployed.
<POWERSERVER_ENVIRONMENTTYPE></POWERSERVER_ENVIRONMENTTYPE>
-
Applications.json or Applications.[DBConnectionProfile].json: This file contains the basic information of the deployed applications and the database connection cache settings.
-
"Applications": This block includes a list of the deployed applications and the mappings of transactions and connection caches, timeout values for transaction, session, and request, and run mode (0-normal mode, 1-test mode) of each deployed application.
Take the following settings for example, in the "salesdemo_cloud" application, the "sqlca" transaction object is mapped to the "sales" database cache. Refer to Managing transaction-to-cache mappings in PowerServer for more information.
To understand and set appropriate timeout values for "Transaction", "Session" and "Request", refer to Configure the timeout settings.
You must run the application in test mode ("RunMode": 1) if you want to perform load-testing for the application. For more, refer to Load testing.
The MaxSPCache setting specifies the maximum number of stored procedures for which the driver caches information. The driver retrieves information from the server about a stored procedure's parameters the first time the stored procedure is called and caches that information. The next time the procedure is called, the driver retrieves the information from the cache to improve performance. The information is retrieved based on the stored procedure's name. The name is case sensitive. If you call two different stored procedures with the same name, you can turn off caching by setting the value of MaxSPCache to 0.
"Applications": { "salesdemo_cloud": { "CloudTransactions": { "sqlca": { "CacheName": "sales" } }, "Transaction": { "Timeout": 120, "TransactionException": true }, "Session": { "Timeout": 3600 }, "Request": { "Timeout": 3600 }, "RunMode": 0, "MaxSPCache": 50 } }, -
"Connections": This block includes a list of the cache groups and caches. Refer to Managing database caches in PowerServer for more information.
  "Connections": {
    "Default": {
      "local-sa": {
        "ConnectionType": "Odbc",
        "OdbcName": "PB Demo DB V2025",
        "OdbcDriver": "SqlAnywhere",
        "UserID": "dba",
        "Password": "eyJQYX...",
        "CommandTimeout": 30,
        "SecurityOptions": null,
        "OtherOptions": null,
        "DynamicConnection": false
      }
    }
  }
-
-
-
Authentication folder: This folder contains the template and built-in server for the selected authentication type. Refer to Authenticate for more information.
-
Controllers folder
-
ApplicationController.cs: This file provides APIs for dynamically adding, modifying or removing the application settings and transaction mappings.
-
ConnectionController.cs: This file provides APIs for dynamically adding, modifying or removing the cache or cache group.
-
LicenseController.cs: This file provides APIs for dynamically accessing the license information.
-
SessionController.cs: This file provides APIs for getting all user sessions or killing a particular user session.
-
StatisticsController.cs: This file provides APIs for getting statistics of the request and transaction.
-
TransactionController.cs: This file provides APIs for getting all transactions or rolling back a particular transaction.
For documentation of these APIs, refer to Use PowerServer Management APIs.
-
-
HealthChecks folder: For more information, refer to Check the status of Web APIs and the readme.txt file under Solution Items.
-
Logging folder: For more information, refer to Configure the log settings.
-
OpenAPI folder: The OpenAPI Specification for exposing the API documentation in Swagger UI.
-
UserConfig.json or UserConfig.Development.json: This file contains settings related with the server. As you can use multiple environments in ASP.NET Core (read more), there can be multiple configuration files, for example, UserConfig.json will take effect in the production environment (for example, when Web APIs are published and running in IIS, docker etc.), while UserConfig.Development.json will take effect in the development environment (for example, when Web APIs is running from the PowerBuilder IDE or SnapDevelop IDE).
-
"AllowedHosts": Specifies the host names to bind with PowerServer. Refer to Host filtering for more information.
-
"PowerServer": This block specifies the settings for PowerServer.
-
"LicenseKey" & "LicenseCode": PowerServer license information. Refer to Importing the PowerServer license for more information.
-
"EncryptedSensitiveData": Sensitive data refers to the database login password which is used to create the database connection cache in Applications.json. If the password is an encrypted value (encrypted automatically by IDE or manually by the CustomizeDeploy.dll tool), this setting should be set to True; if the password is not encrypted (still a plain-text string), this setting should be set to False so that PowerServer will encrypt the password for you and store the encrypted value to the database. If this setting is set to True and you input a plain-text password, the plain-text password will be directly stored to the database.
-
"EnableHMACAuthentication": Whether to use the HMAC (Hash-based Message Authentication Code) algorithm to safeguard the request data from tampering. When the client sends a request, it generates a unique authentication code based on the request data; the server receives the request and verifies the authentication code to ensure the data has not been altered. Note: the response data is not authenticated using HMAC. Changes to this option will not take effect until the server is re-started.
-
"ProxyOptions": The IP address and login credentials of the proxy server. If the Web API host server connects to Internet through a proxy server, you will need to configure the proxy server settings here. The password for the proxy server must be an encrypted value (encrypted by the CustomizeDeploy.dll tool).
-
"EmailOptions": This block must be configured first if you want to get notifications for license expiration. The settings include the SMTP server settings, sender email settings, and recipients. Refer to Configuring the email settings for more information.
-
"StatisticsOptions": This block determines which type of transaction statistics will be generated and cached in the memory. Some settings are disabled by default to lower memory usages. You can also take advantage of the StatisticsController APIs in PowerServer to get the statistics.
"PathBase": null, "AllowedHosts": "*", "PowerServer": { "LicenseKey": "DSCE-IHFG-CHEI-51H3-G0BE", "LicenseCode": "eyJQYXlsb2FkIjoiVT*****", "EncryptedSensitiveData": false, "EnableHMACAuthentication": false, "AppModelsAssemblyNames": [ "AppModels.dll" ], "ProxyOptions": { ... }, "EmailOptions": { ... }, "StatisticsOptions": { ... }, -
-
For files that are not mentioned here, refer to the readme.txt file under Solution Items for more information.
New solution vs. existing solution
Depending on whether multiple applications will use the same PowerServer or each application will use its own PowerServer, you can choose to create a new PowerServer C# solution or use an existing solution. If you want one PowerServer to be used by all applications, you can choose an existing solution; and then deploy the app (as well as the others) to this solution. If you re-deploy an app to an existing solution, the application data models and ESQLs will get updated in the solution, and if you deploy a new app to an existing solution, the application data models and ESQLs will be added to the existing solution. Apps deployed to the same solution can share settings such as the PowerServer license, Web APIs, database configurations etc. and can take advantage of new developments added by the user such as authorization etc.
If you plan to host the PowerServer (in a docker container, for example) on the cloud server, and want to use one PowerServer for all applications, you can select an existing solution and deploy the applications to the same solution.
If you plan to host the PowerServer in the IIS server, as IIS allows you to create multiple websites in a single server, you can host the PowerServer on its own dedicated website, and each application has its own dedicated PowerServer. This means, if you have more than one application, each application and each PowerServer can be hosted on its own dedicated website. In this case, you can select to create a new solution for each application.
For configuring the solution for the PowerServer project, refer to Configure the solution basics for details.


