-
Setting up the client machine
In this guide, we will set up the client machine with the following OS and software. For other supported environment, please refer to Client PC in installation guide.
-
Windows 10
-
Google Chrome, Firefox, or Edge (Chromium-based)
-
-
Setting up the database server
In this guide, we will set up the salesdemo SQL Anywhere database server running in an independent machine. For other supported databases, please refer to Database in installation guide.
-
Windows Server 2019 (64-bit)
-
SQL Anywhere 17
Click here to download the installer for the free trial of SQL Anywhere developer edition.
This guide takes SQL Anywhere database as an example. You can also install the other databases by following the documentation from the vendor.
Note that the SQL Anywhere database can only be connected through an ODBC driver. You will need to create the same ODBC data source in both the development PC and the web server. The data source in the development PC is for converting DataWindows to models, and the data source in the web server is for accessing data from the database. The following sections have detailed instructions for how to create the ODBC data source.
Note
For optimal runtime performance, it is highly recommended that the PowerServer Web APIs should be published to a server that locates on the same LAN as the database server. If the database is not on the same network as the Web APIs, every request has to go a long way from PowerServer to the database, it is highly possible that there will be performance and security issues.
-
-
Setting up the development PC
In this guide, we will set up the development machine with the following OS and software. For more information, please refer to Development PC in installation guide.
Please install the software in the order listed:
-
Windows 10 (64-bit)
-
SQL Anywhere 17
-
PowerBuilder IDE 2025
-
PowerBuilder Runtime 2025
-
PowerServer Toolkit 2025
-
SnapDevelop 2025 (optional)
-
Google Chrome (optional)
-
-
Setting up the web server
In this guide, we will set up IIS as the web server. For other supported servers, please refer to Server in installation guide.
Step 1: Set up the server with the following OS and software:
-
Windows Server 2019 (64-bit)
-
SQL Anywhere 17
-
Microsoft IIS
The section Installing IIS has detailed installation instructions.
Step 2: (IMPORTANT) Configure Secure Sockets Layer (SSL) for the server, so that HTTPS can be used to secure the connections between the client and the server.
Step 3: Make sure the server can connect to the Appeon license server (for activating and validating the PowerServer license).
Note
If the server connects to Internet through a proxy server, make sure to configure the proxy server settings in the PowerServer Web APIs as well (the "solutionname]_API" folder > UserConfig.json file > "ProxyOptions" block). The password for the proxy server (if any) must be an encrypted value (encrypted by the CustomizeDeploy.dll tool).
Step 4: If firewall is turned on, and if you want to use a port number other than the default 80, you will need to configure the firewall to allow the port number. The section "Configuring Windows Defender Firewall" has detailed instructions.
Note
For optimal runtime performance, it is highly recommended that the PowerServer Web APIs should be published to a server that locates on the same LAN as the database server. If the database is not on the same network as the Web APIs, every request has to go a long way from PowerServer to the database, it is highly possible that there will be performance and security issues.
-
-
Setting up the auth server
It is strongly recommended for security concerns, that in the production environment, you shall safeguard the server resources through implementing an authentication server with PowerServer.
If you have selected an authentication template (built-in JWT server, built-in AWS Cognito server, etc.) in the project settings, make sure to follow the relevant instructions to modify the PowerBuilder app and re-deploy the PowerServer project. If you have selected to use built-in AWS Cognito server, you also need to make changes to the deployed authentication template.
Step 1: Download the database file (pbdemo2025_for_sqlanywhere.zip) from https://github.com/Appeon/PowerBuilder-Project-Example-Database to the database server.
You can also copy the database file from a machine where PowerBuilder IDE is installed: copy the file (pbdemo2025.db) from the PowerBuilder demo installation folder (%Public%\Documents\Appeon\PowerBuilder [version]\) instead of downloading from network.
Step 2: Start this database file on the salesdemo database server using SQL Anywhere Network Server (dbsrv17.exe).
To support network connections, the database server must be started as a network server (not a personal server).
"C:\Program Files\SQL Anywhere 17\Bin64\dbsrv17.exe" -x tcpip(port=2638) -n salesdemo "C:\DB\pbdemo2025.db"
This section is required only when the SQL Anywhere or ASE database is used.
A database connection needs to be established between the development PC and the database server (for converting DataWindows to models), and between the web server and the database server (for retrieving data). Currently the SQL Anywhere database can only be connected through an ODBC driver, therefore, you will need to create the same ODBC data source in both:
-
the development PC, and
-
the web server
The same ODBC data source means the data source has the same name, for example, "SalesDemo DB" in this guide.
The steps are the same.
Step 1: Install SQL Anywhere 17.
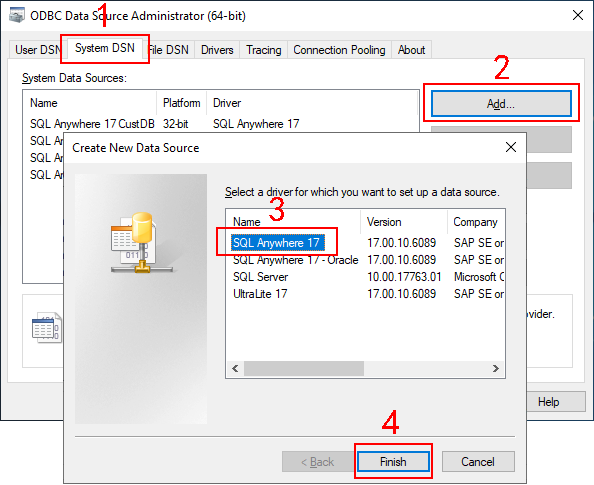
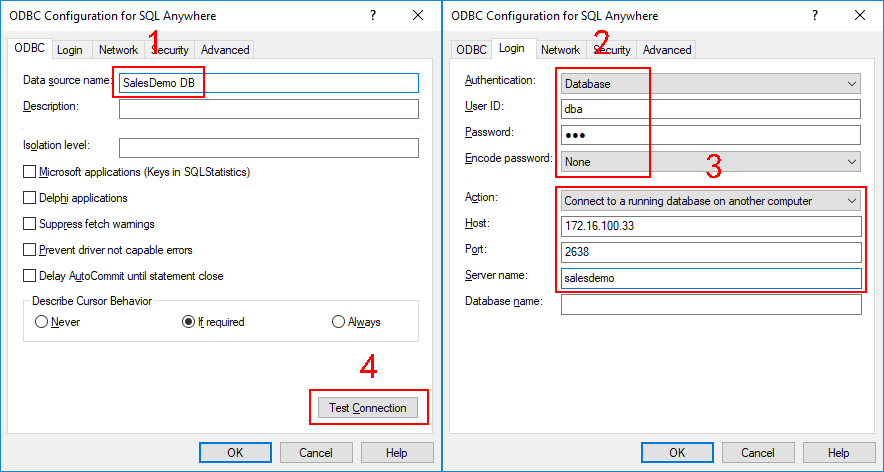
Step 2: Create a 64-bit ODBC data source and name it as "SalesDemo DB". The data source name must be the same in both the development PC and the web server. The data source should connect to the salesdemo SQL Anywhere database server (which is set up in the previous section).
IMPORTANT: Make sure you use the 64-bit version of ODBC administrator to create the data source, because only 64-bit ODBC data sources are supported for the PowerServer project.
Step 3: Click Test Connection to ensure the connection settings are correct.


