You can package the client app (including the cloud app launcher, PowerBuilder runtime files, and the application files) into a zipped file and then copy and extract the zipped file to the physical path of the IIS website.
Step 1: Double click the salesdemo_cloud project file in salesdemo.pbl. The PowerServer project painter displays.
Step 2: On the .NET Server page, specify the Web API URL, for example, http://172.16.100.35:82.
The client app will access this URL when it needs to call the Web APIs at runtime. This URL is stored with the client app, and you can modify it using the command-line tool (CustomizeDeploy.dll), without needing to modify and package the client app again. See this section for more details.
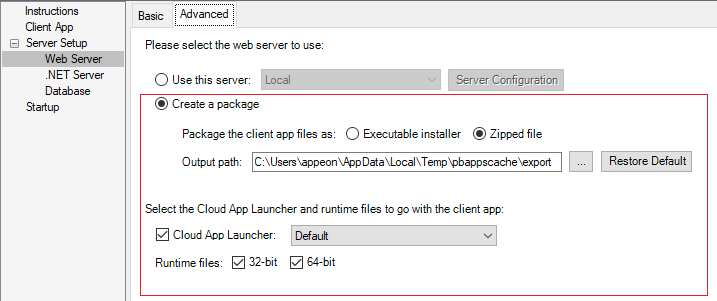
Step 3: On the Web Server page > Advanced tab, select Create a package, and then select Zipped file, Package Cloud App Launcher, and Package all runtime files (32-bit and 64-bit).
Step 4: Save the project settings and then click the Build & Deploy PowerServer Project button in the toolbar to generate the package.
When the packaging process is completed, the folder that contains the generated package will be displayed.
Step 5: Copy and extract the zip file to the physical path of the IIS website.
To extract the zip file, right click the .zip file and select Extract. You should get two extracted folders ("CloudAppPublisher" and the application folder). Copy these two folders to the physical path of the IIS website, as shown in the figure below.


