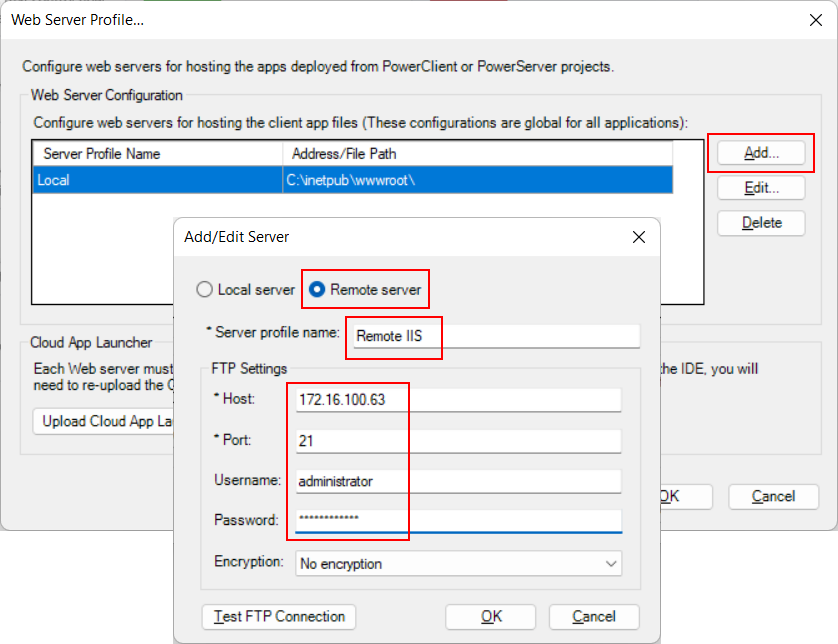
If you have created an FTP site in the Web server (Creating an IIS FTP site) and want to deploy the client app to the Web server through the FTP protocol, you will need to create a Web server profile (that connects with the FTP server).
Step 1: Go to the development PC, select Windows Start | Appeon PowerBuilder 2022, and then right-click Example Sales App and select More | Run as administrator. The SalesDemo workspace is loaded in the PowerBuilder IDE.
Step 2: Select Tools>Web Server Profile from the PowerBuilder menu bar to open the Web Server Profile window.
Step 3: In the Web Server Profile window, click Add.
Step 4: Select Remote server, and then specify the settings for connecting to the FTP site.
In this tutorial, specify the following values (or the values you chose):
-
Server profile name: Any text, for example, Remote IIS, Remote Apache, Remote Nginx, etc.
-
Host: IP address or host name of the FTP site, for example, 172.16.100.63.
-
Port: Port number of the FTP site, for example, 21.
-
Username: Windows user name.
-
Password: Windows user password.
Step 5: Click Test FTP Connection and make sure connection to the FTP site is successful.
Tip
In case connection errors occur, try the following to resolve them:
-
Check if the Windows Defender Firewall on the FTP server allows the FTP port (21 in this tutorial) to go through.
-
Check if the port (21 in tutorial) is occupied by any other program.
Tip: You can execute the command "netstat -ano | findstr 21" to check if the port number is occupied by any other program. For more details, refer to Choosing an appropriate port number.
-
Input a username and password for logging to the FTP site, instead of using anonymous login.
-
Check if the user has read and write permissions to the FTP root.


