Let's first prepare a machine that will be used as the remote server.
Step 1: Prepare a Windows Server 2019 (64-bit) machine.
Obtain the IP address of the machine by executing "ipconfig" in a command prompt window. The IP address used in this guide is 172.16.100.35. You should replace it with the IP address of your own server.
Step 2: Make sure the machine can connect to the Appeon license server (for activating and validating the PowerServer license).
Note
If the machine connects to Internet through a proxy server, make sure to configure the proxy server settings in the PowerServer Web APIs as well (the ServerAPIs project > Server.json file > "ProxyOptions" block). The password for the proxy server (if any) must be an encrypted value (encrypted by the CustomizeDeploy.dll tool).
Step 3: If firewall is turned on, configure the firewall to allow the port number (81 and 82 in this guide or any port number you choose). The section "Configuring Windows Defender Firewall" has detailed instructions.
It is very important that the port number to be used by the IIS web site is not occupied by any other program. You can verify by the following steps:
Step 1: On the server machine, run the command prompt as an administrator.
Step 2: Execute the following command to find out if a port number is used by any program.
netstat -ano | findstr portnumberIf the command prompt returns no information, it means the port number is not occupied by any program, as shown in the figure below.
If the command prompt returns information, it means the port number is being used. For example, the process (whose PID is 4) is currently using the port number 81, as shown in the following figure. The last column shows the ID of the process that uses the port number.
If the port number is being used, you will have to choose another port number (and use the netstat command to make sure it is not used); or you can go to the task manager, find the process that is currently using the port number according to the PID and terminate the process to release the port number. But notice that you may not be able to terminate a system process. In that case, you can only choose a different port number.
Let's now install IIS on this machine.
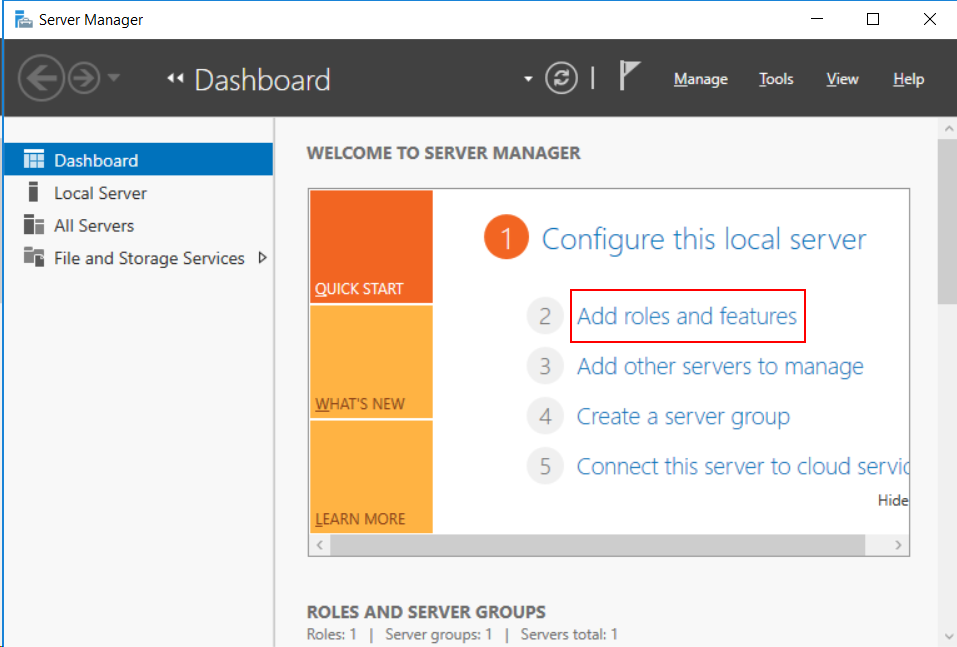
Step 1: In Windows Server 2019, open Server Manager, and then select Add roles and features.
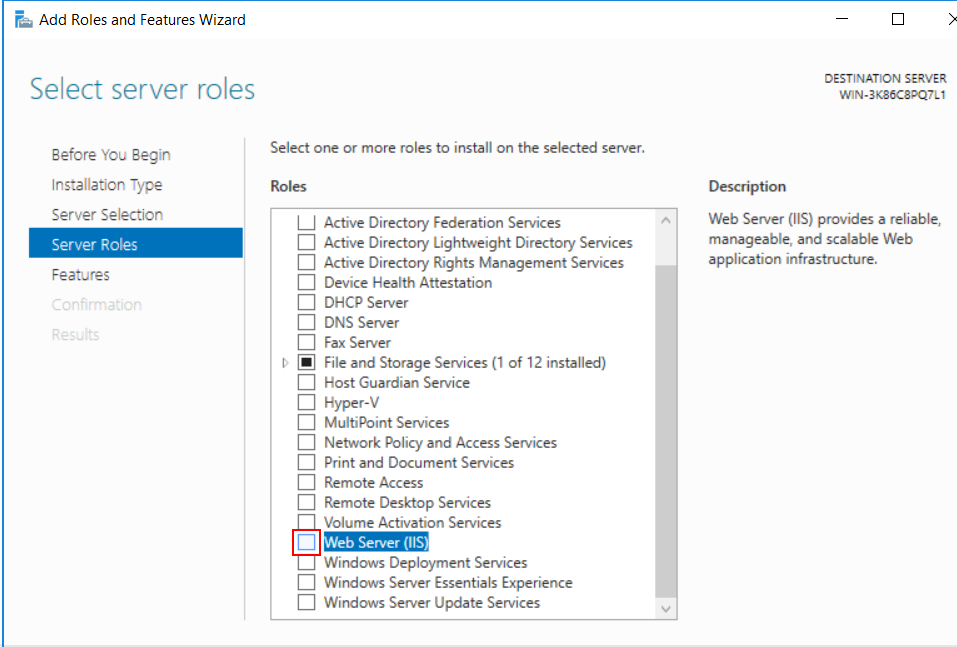
Step 2: In the Add Roles and Features Wizard, click Next several times until the Server Roles section displays; then select the check box of Web Server (IIS).
Step 3: Click Add Features when asked whether to add features required for Web server.
Step 4: Make sure the Web Server (IIS) check box is selected, and click Next.
Step 5: Click Next several times until the Role Services section displays. Make sure the following role services are selected.
Step 6: Click Next and then click Install.
After IIS is installed, a Default Web Site (using port 80) is automatically created.
Step 7: Open a Web browser and run the URL of the Default Web Site.
http://172.16.100.35:80/
The server IP used in this guide is 172.16.100.35. You should replace it with the IP address of your own server.
If the IIS welcome screen displays, IIS and the default web site are working properly.
In this guide, we will host the client app and the PowerServer Web APIs under the same IIS server; for clarity, we will create two web sites: one for hosting the client app and the other for hosting the Web APIs. Do not try to host them in the same web site.
Note
Be aware of the following when hosting the application under IIS:
-
Do not place the client app and the PowerServer Web APIs in the same web site (they should be placed to different web sites).
-
Do not use any web site that is already hosting applications or pages for hosting the client app or Web APIs. It is highly recommended that you create a new site and make sure the site contains the client app or Web APIs only (no other apps or pages).
-
If you have multiple Web APIs, you can deploy each Web APIs to a different web site or deploy multiple Web APIs to different sub-folders of the same web site.
For new users or those who are setting up a test or development environment, deploying each Web APIs to a separate web site is recommended, because it is easier to configure and succeed.
For experienced users or those who are setting up a production environment, deploying multiple Web APIs to different sub-folders of the same web site is recommended, because it is easier to manage multiple Web APIs, but you will have to convert the sub-folder to an IIS sub-application first (see Deploying multiple Web APIs to IIS).
-
If you have multiple client apps, you can deploy multiple client apps to the different sub-folders of the same web site. You don't need to convert the sub-folder to application (like Web APIs). You only need to deploy or copy the client app files to the sub-folder and then include the sub-folder in the URL when accessing the client app.
Step 1: In Server Manager, click the Tools menu and then select Internet Information Services (IIS) Manager.
Step 2: In IIS Manager, open the server's node in the Connections panel, right-click the Sites folder, and then select Add Website.
Step 3: Specify the following values and then click OK to create the first site.
-
Site name: the display name of the site. Input any text you like, for example, clientapp.
-
Physical path: C:\inetpub\wwwroot\clientapp in this example. Remember this path as this is where the client app will be deployed later.
-
Port: 81 in this example. Remember this port number as it will be used to run the client app later.
The IIS web site is created and started.
Step 4: Repeat the above steps to create the second web site (suppose using the following settings).
-
Site name: the display name of the site. Input any text you like, for example, webapis.
-
Physical path: C:\inetpub\wwwroot\webapis in this example. Remember this path as this is where the Web APIs will be published later.
-
Port: 82 in this example. Remember this port number as it will be used to access the Web APIs later.
Note
If firewall is turned on, make sure you have configured the firewall on the server to allow the port number (81 and 82 or any port number you choose) to go through. The section "Configuring Windows Defender Firewall" has detailed instructions.
Open a Web browser and run the URLs of the web sites to verify that they are working properly.
http://172.16.100.35:81/
http://172.16.100.35:82/
You should be able to see the page displaying server error: 403 - Forbidden. This is normal behavior.
Now the two IIS web sites are ready to host files:
-
http://172.16.100.35:81/ whose physical path is C:\inetpub\wwwroot\clientapp -- After you copy the client app to the physical path of this site later, you should be able to access the client app via http://172.16.100.35:81/app_name.
-
http://172.16.100.35:82/ whose physical path is C:\inetpub\wwwroot\webapis -- After you copy the Web APIs to the physical path of this site later, you should be able to access the Web APIs via http://172.16.100.35:82/.
Download and install ASP.NET Core Hosting Bundle 3.1.
This component is required if you want the IIS process manager to automatically launch the client app and the Web APIs deployed to the IIS web site.


