Before making changes to the PowerBuilder client app, let's follow the steps below to make sure 1) the PowerBuilder application can run successfully, 2) the app has been deployed as an installable cloud app successfully, and 3) the PowerServer C# solution has been successfully generated.
In this tutorial, we will take Sales Demo as an example.
Step 1: Select Windows Start | Appeon PowerBuilder 2022, and then right-click Example Sales App and select More | Run as administrator.
Step 2: When the SalesDemo workspace is loaded in the PowerBuilder IDE, click the Run button in the PowerBuilder toolbar.
Step 3: When the application main window is opened, click the Address icon in the application ribbon bar and make sure data can be successfully retrieved.
Step 4: Create and configure a PowerServer project for the Sales Demo app (detailed instructions are provided in Quick Start > Guide 1).
IMPORTANT: In the .NET Server page > Advanced tab, select Use external Azure Active Directory service from the Auth Template list box.

Step 5: Deploy the application as an installable cloud app. The PowerServer C# solution is generated, but the installable cloud app cannot run yet because further settings and changes are required, as explained in the subsequent sections.
The PowerServer C# solution provides templates for configuring the address of the authentication server like Azure AD or Azure AD B2C.
-
Authentication.json contains the settings for enabling the authentication feature ("PowerServer:EnableAuthentication") and specifying the address of the authentication server ("Authentication:Authority"). The PowerServer Web APIs will validate the token against the authentication server; and if validation is successful, data will be obtained from the database.
The "PowerServer:EnableAuthentication" setting is set to true by default. Setting it to false will turn off the authentication feature.
The "Authentication:Authority" setting is set for JWT by default; you can set the address of Azure AD and Azure AD B2C.

The following outlines the key steps:
Step 1: Set up an Azure AD tenant.
For detailed instructions, refer to Quickstart: Set up a tenant.
Step 2: Register an application with the Microsoft identity platform.
For detailed instructions, refer to Quickstart: Register an application.
Step 3: Configure an application to expose a web API.
For detailed instructions, refer to Quickstart: Register and expose a web API - Microsoft Entra | Microsoft Docs.
Step 4: Configure a client application to access a web API.
For detailed instructions, refer to Quickstart: Configure an app to access a web API - Microsoft Entra | Microsoft Docs.
During the process of creating the tenant, write down the following information:
-
Tenant ID: for example, 0ffb9ae0-c080-4913-aa94-ed08b5de4d40
-
Primary domain: for example, powerservertest.onmicrosoft.com
-
Application (client) ID: for example, 49cddad2-721d-4fbc-bd64-1cfa2b183e00
-
Client secret: for example, 2ig8hfliVu.u1kl_79RbyZuh~.X_b~e~3M
-
Application ID URI: for example, api://49cddad2-721d-4fbc-bd64-1cfa2b183e00
-
Scope: for example, 49cddad2-721d-4fbc-bd64-1cfa2b183e00/.default
The above information will be used later.
In this section, we will modify the PowerBuilder application source code and the PowerServer project settings to achieve the following results:
-
Gets the user credential from the application login window, then authenticates it with the Azure AD tenant and gets a token.
-
Uses the token to access data from the PowerServer Web API.
-
Refreshes the token when necessary.
Step 1: Declare the following global variables.
//Token expiresin
Long gl_Expiresin
//Refresh token clockskew
Long gl_ClockSkew = 3
Step 2: Define a global function and name it f_Authorization().
Select from menu File > New; in the New dialog, select the PB Object tab and then select Function and click OK to add a global function.
This global function uses the HTTP Post method to send the user credentials to the authorization server and then gets the identity token from the HTTP Authorization header.
Add scripts to the f_Authorization() function to implement the following scenario:
-
Scenario 1: Supports Client Credentials (GrantType="client_credentials") and gets the client ID and secret from the application.
-
Scenario 2: Supports Resource Owner Password (GrantType="password") and gets the username and password from a login window.
Scripts for scenario 1:
When the application starts, the application uses the client ID and secret stored in the application to get the token from Azure AD, and when the token expires, it automatically refreshes the token.
//Integer f_Authorization() for client_credentials
//UserName & Password from login window
OAuthClient    loac_Client
TokenRequest   ltr_Request
TokenResponse  ltr_Response
String  ls_url, ls_UserName, ls_UserPass
String  ls_TokenType, ls_AccessToken
String  ls_type, ls_description, ls_uri, ls_state
Integer  li_Return, li_rtn

li_rtn = -1
ls_url = profilestring("CloudSetting.ini","setup","TokenURL","")
//TokenRequest
ltr_Request.tokenlocation = ls_url
ltr_Request.Method = "POST"
ltr_Request.clientid = "49cddad2-721d-4fbc-bd64-1cfa2b183e00"
ltr_Request.clientsecret = "2ig8hfliVu.u1kl_79RbyZuh~~.X_b~~e~~3M"
ltr_Request.granttype = "client_credentials"
ltr_Request.Scope = "49cddad2-721d-4fbc-bd64-1cfa2b183e00/.default"

loac_Client = Create OAuthClient
li_Return = loac_Client.AccessToken( ltr_Request, ltr_Response )
If li_Return = 1 and ltr_Response.GetStatusCode () = 200 Then
 ls_TokenType = ltr_Response.gettokentype( )
 ls_AccessToken = ltr_Response.GetAccessToken()
 //Application Set Authorization Header
 Getapplication().SetHttpRequesTheader("Authorization", ls_TokenType + " " + ls_AccessToken, true)
 //Set Global Variables
 gl_Expiresin = ltr_Response.getexpiresin( )

 li_rtn = 1
Else
 li_Return = ltr_Response.GetTokenError(ls_type, ls_description, ls_uri, ls_state)
 MessageBox( "AccessToken Falied", "Return :" + String ( li_Return ) + "~r~n" + ls_description )
End If

If IsValid ( loac_Client ) Then DesTroy ( loac_Client )

Return li_rtn
Scripts for scenario 2:
When the application starts, the client ID and secret stored in the application as well as the username and password from the login window will be sent to Azure AD to get the token, and when the token expires, the login window displays for the user to input the username and password again.
The following scripts hard code the username and password instead of getting them from the login window. You can change the scripts to use the login window after you implement the login window and return the username and password to the f_Authorization() function.
//Integer f_Authorization() for password
//UserName & Password from login window
OAuthClient    loac_Client
TokenRequest   ltr_Request
TokenResponse  ltr_Response
String  ls_url, ls_UserName, ls_UserPass
String  ls_TokenType, ls_AccessToken
String  ls_type, ls_description, ls_uri, ls_state
Integer  li_Return, li_rtn

li_rtn = -1
ls_url = profilestring("CloudSetting.ini","setup","TokenURL","")

//TokenRequest
ltr_Request.tokenlocation = ls_url
ltr_Request.Method = "POST"
ltr_Request.clientid = "49cddad2-721d-4fbc-bd64-1cfa2b183e00"
ltr_Request.clientsecret = "2ig8hfliVu.u1kl_79RbyZuh~~.X_b~~e~~3M"
ltr_Request.scope = "49cddad2-721d-4fbc-bd64-1cfa2b183e00/.default"
ltr_Request.granttype = "password"

//login window can be implemented to return username & password according to actual needs
//Open(w_login)
//Return:UserName & Password

ls_UserName = "appeon2@powerservertest.onmicrosoft.com"
ls_UserPass = "Test2008aaBB"

If IsNull ( ls_UserName ) Or Len ( ls_UserName ) = 0 Then
 MessageBox( "Tips", "UserName is empty!" )
 Return li_rtn
End If
If IsNull ( ls_UserPass ) Or Len ( ls_UserPass ) = 0 Then
 MessageBox( "Tips", "Password is empty!" )
 Return li_rtn
End If

ltr_Request.UserName = ls_UserName
ltr_Request.Password = ls_UserPass

loac_Client = Create OAuthClient
li_Return = loac_Client.AccessToken( ltr_Request, ltr_Response )
If li_Return = 1 and ltr_Response.GetStatusCode () = 200 Then
 ls_TokenType = ltr_Response.gettokentype( )
 ls_AccessToken = ltr_Response.GetAccessToken()
 //Application Set Authorization Header
 Getapplication().SetHttpRequesTheader("Authorization", ls_TokenType + " " +ls_AccessToken, true)
 //Set Global Variables
 gl_Expiresin = ltr_Response.getexpiresin( )

 li_rtn = 1
Else
 li_Return = ltr_Response.GetTokenError(ls_type, ls_description, ls_uri, ls_state)
 MessageBox( "AccessToken Falied", "Return :" + String ( li_Return ) + "~r~n" + ls_description )
End If

If IsValid ( loac_Client ) Then DesTroy ( loac_Client )

Return li_rtn
Step 3: Insert a timing object (timing_1) to the application and add the following scripts to the Timer event of timing_1.
1) Open the application object and then select from menu Insert > Object > Timing to add a timing object to the application.

2) Add the following scripts to the Timer event of timing_1.
//Authorization
f_Authorization()
When displayed in the source editor, the Timer event looks like this:
event timer;//Authorization
f_Authorization()
end event

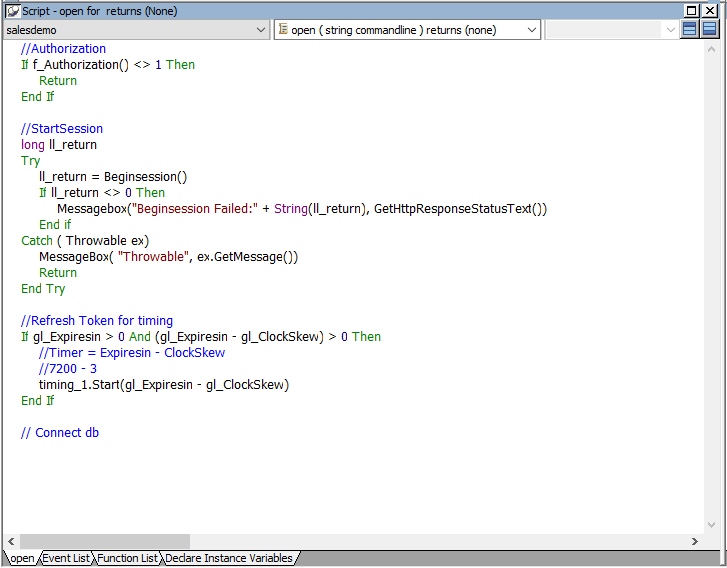
Step 4: Add the following scripts to the application Open event.
Place the scripts before the database connection is established. The scripts get the token from Azure AD and then start the user session (using the BeginSession function) to include the token information in the session.
//Authorization
If f_Authorization() <> 1 Then
 Return
End If

//StartSession
long ll_return
Try
 ll_return = Beginsession()
 If ll_return <> 0 Then
  Messagebox("Beginsession Failed:" + String(ll_return), GetHttpResponseStatusText())
 End if
Catch (Throwable ex)
 MessageBox("Throwable", ex.GetMessage())
 Return
End Try

//Refresh Token for timing
If gl_Expiresin > 0 And (gl_Expiresin - gl_ClockSkew) > 0 Then
 //Timer = Expiresin - ClockSkew
 //7200 - 3
 timing_1.Start(gl_Expiresin - gl_ClockSkew)
End If

// Connect db
Step 5: Add the following scripts to the SystemError event.
The scripts will trigger the SystemError event when the session or license encounters an error; and if the token is invalid or expires, the scripts will call the f_Authorization function to get the token again.
Choose Case error.Number
 Case 220  to 229 //Session Error
  MessageBox ("Session Error", "Number:" + String(error.Number) + "~r~nText:" + error.Text )
 Case 230  to 239 //License Error
  MessageBox ("License Error", "Number:" + String(error.Number) + "~r~nText:" + error.Text )
 Case 240  to 249 //Token Error
  MessageBox ("Token Error", "Number:" + String(error.Number) + "~r~nText:" + error.Text )
  //Authorization
  f_Authorization()
 Case Else
  MessageBox ("SystemError", "Number:" + String(error.Number) + "~r~nText:" + error.Text )
End Choose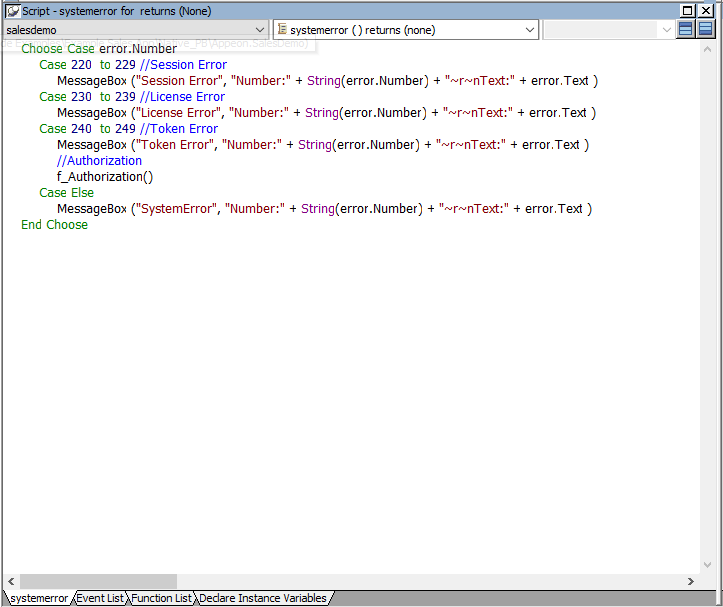
Create an INI file in the same location as the PBT file and name it CloudSetting.ini.
The INI file specifies the URL for requesting the token from Azure AD.
[Setup]
TokenURL=https://login.microsoftonline.com/0ffb9ae0-c080-4913-aa94-ed08b5de4d40/oauth2/v2.0/token
By default, the user session is automatically created when the application starts; and the session includes no token. For the session to include the token, the session must be started manually by code instead of automatically.
To start the session manually by code,
Step 1: Enable "Begin session by code" in the PowerBuilder IDE. (Steps: Open the application object painter, click Additional Properties in the application's Properties dialog; in the Application dialog, select the PowerServer tab and then select the Begin session by code option, and click Apply.)
After this option is enabled, when the BeginSession function in the application Open event is called, it will create a session that includes the token information (See scripts in step 4 in "Add scripts").

Step 1: Add the INI file CloudSetting.ini to the Files preloaded in uncompressed format section under the Client App page.

Step 2: Select RESTClient Support under the Runtime files group in the Client App page > Advanced tab.

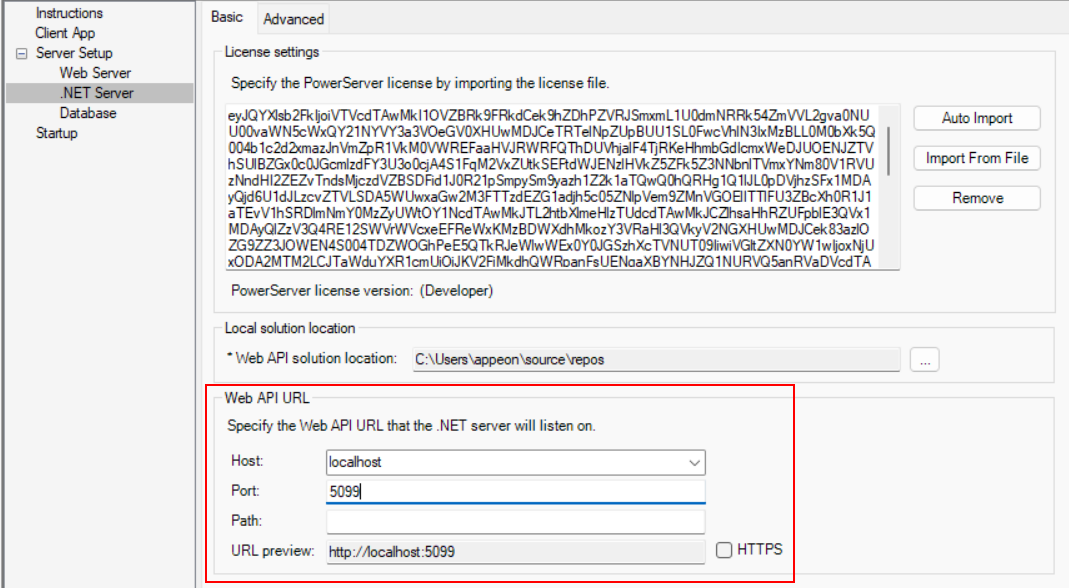
Step 3: Double check the URL of the PowerServer Web APIs in the .NET Server page.
Make sure the port number is not occupied by any other program. You can execute the command "netstat -ano | findstr portnumber" to check if the port number is occupied by any other program. For details, refer to Choosing an appropriate port number.
Step 4: Double check that Use external Azure Active Directory service is selected from the Auth Template list box in the .NET Server page > Advanced tab.
Step 5: Save the changes and deploy the PowerServer project (using the "Build & Deploy PowerServer Project" option) so that the above settings can take effect in the installable cloud app.
The Azure AD server address must be provided so that the PowerServer Web APIs can use it to validate the token passed from the client. And if validation is successful, it can get data from the database.
Note
The authentication template will be restored if the "Auth Template" option is changed and the PowerServer C# solution is re-built from the PowerBuilder IDE. Therefore, do not change the "Auth Template" option if you have made changes to the template in the solution.
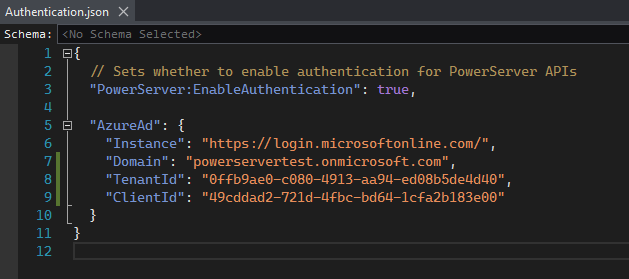
Get the Domain, TenantId and ClientId from Creating an Azure AD tenant, then open the Authentication.json file to modify the authentication template.
"AzureAd": {
    "Instance": "https://login.microsoftonline.com/",
    "Domain": "powerservertest.onmicrosoft.com",
    "TenantId": "0ffb9ae0-c080-4913-aa94-ed08b5de4d40",
    "ClientId": "49cddad2-721d-4fbc-bd64-1cfa2b183e00"
  }