The client-side of the installable cloud app can be hosted in the following Web servers:
-
Windows IIS
-
Windows/Linux Apache
-
Windows/Linux Nginx
This tutorial will take Windows IIS as an example. For detailed instructions of the other Web servers, refer to Setting up a Web server.
In this tutorial, we will set up a Web server and an FTP server running on the same IIS instance.
Step 1: Set up the Web server with the following OS and software:
-
Windows Server 2019 (64-bit)
-
Microsoft IIS
The next section Installing Web Server (IIS) has detailed installation instructions.
Step 2: Configure Secure Sockets Layer (SSL) for the Web server, so that HTTPS can be used to secure the connections between the client and the Web server.
For how to configure SSL on IIS, refer to https://docs.microsoft.com/en-us/iis/manage/configuring-security/how-to-set-up-ssl-on-iis.
Step 3: If firewall is turned on in the Web server, configure it to allow the FTP port (21 in this tutorial).
The section "Configuring Windows Defender Firewall" has detailed instructions.
Step 1: In Windows Server 2019, open Server Manager, and then select Add roles and features.
Step 2: In the Add Roles and Features Wizard, click Next several times until the Server Roles section displays.
Step 3: Click the check box of Web Server (IIS); and then click Add Features when asked whether to add features required for Web server.
Step 4: Make sure the check box of Web Server (IIS) is selected.
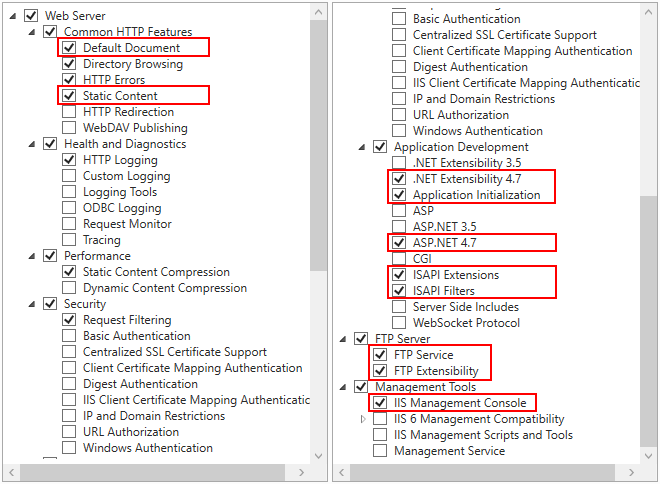
Step 5: Click Next until the Role Services section displays. Make sure the following role services are selected.
-
Default Document
-
Static Content
-
.NET Extensibility 4.7
-
Application Initialization
-
ASP.NET 4.7
-
ISAPI Extensions
-
ISAPI Filters
-
IIS Management Console
-
FTP Service
-
FTP Extensibility
FTP Service & FTP Extensibility must be enabled if you want to create an IIS FTP site for transferring files from a remote development machine to the Web server.
Step 6: Click Next and then click Install.
After IIS is installed, a Default Web Site (with port 80) is automatically created (you could also create new websites with different port numbers).
Step 7: Open a Web browser and run the following URLs to access the Default Web Site.
http://localhost:80/
http://your_server_ip:80/
TIP: You can use "localhost" or the IP address to access the IIS website on the local computer. To obtain the IP address, open a command prompt window and then type ipconfig<Enter>. Write down the IP address as it is needed when you configure the Web server profile in PowerBuilder.
If the IIS welcome screen displays, the IIS website is working properly.
Also, remember the physical path for Default Web Site which is C:\inetpub\wwwroot by default (or any other path you have changed to). This is where the client app will be deployed, or the FTP site will point to.
The following steps will walk you through setting up an IIS FTP site on the Web server, so that PowerBuilder can deploy files to the remote server through the FTP protocol.
In the previous section, if you have selected to enable FTP Service & FTP Extensibility, you can create an IIS FTP site to be used by the remote deployment.
Step 1: In the IIS Manager, right click Sites, select Add FTP Site.
Step 2: Specify a name for the FTP site, and set the physical path to the Web root of the IIS Web server (C:\inetpub\wwwroot in this tutorial). Click Next.
Step 3: Use the default port 21 (or specify a different port if you like). If no certificate is available, you can select No SSL. Use the default values for the other settings. Click Next.
For how to configure SSL on an IIS FTP site, refer to Configure an SSL-based FTP server.
Step 4: Select Anonymous and Basic authentication. Select All users or specify the users that are allowed to access the FTP site, and then select the Read and Write permissions. Click Finish.
The FTP site is created.
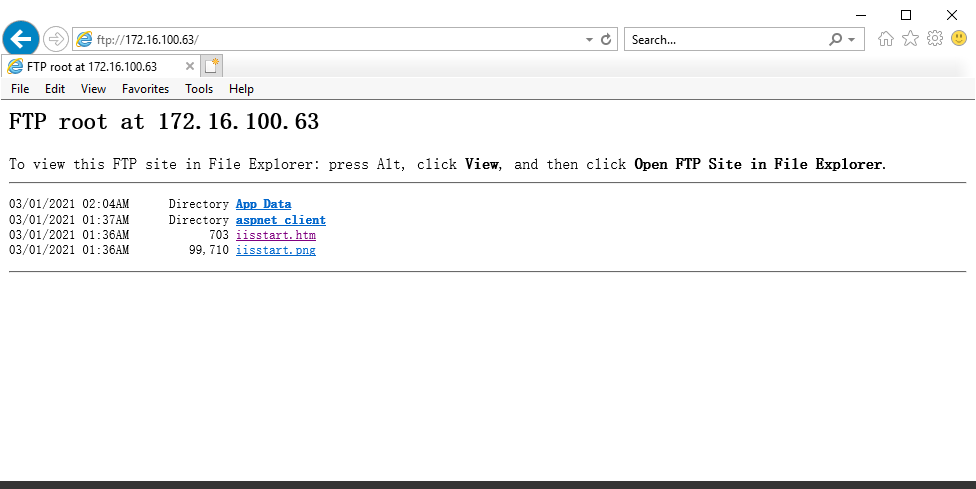
Step 5: Open a Web browser and run the following URL to access the FTP site.
ftp://your_server_ip:21/
If the FTP root displays, then the FTP site is working properly.
To deploy the app files from the local development PC to the remote Web server, you can choose:
-
Method 1: Deploy the app files to the remote server through the FTP protocol.
Follow Creating an IIS FTP site to set up an FTP server and then follow Deploying the PowerServer project to remote servers to deploy the app files from the development machine to the remote server through the FTP server.
-
Method 2: Package the app files and then copy (or install) the package to the Web root of the Web server.
Follow Packaging and copying the client app to package the app files and then copy (or install) the package to the Web server.


