- Creating a cache for the SQL Anywhere database
- Creating a cache for the PostgreSQL database
- Creating a cache for the SQL Server database
- Creating a cache for the MySQL database
- Creating a cache for the Informix database
- Creating a cache for the Oracle database
- Creating a cache for the Adaptive Server Enterprise database
- Troubleshooting
The SQL Anywhere database can be connected using the ODBC driver only for the PowerBuilder installable cloud app.
To configure ODBC for SQL Anywhere (using SQL Anywhere 17 as an example):
-
Install the ODBC driver of SQL Anywhere 17.
-
Open the ODBC Data Source Administrator (64-bit) tool (in the Windows search bar (or press Win + Q), type "ODBC" and then select ODBC Data Source (64-bit)).
-
On the System DSN tab, click Add. In the Create New Data Source dialog, select SQL Anywhere 17 driver which was just installed, and then click Finish.

-
Create an ODBC data source by following the numerical order in the figure below. Remember to replace the database information with your own ones.

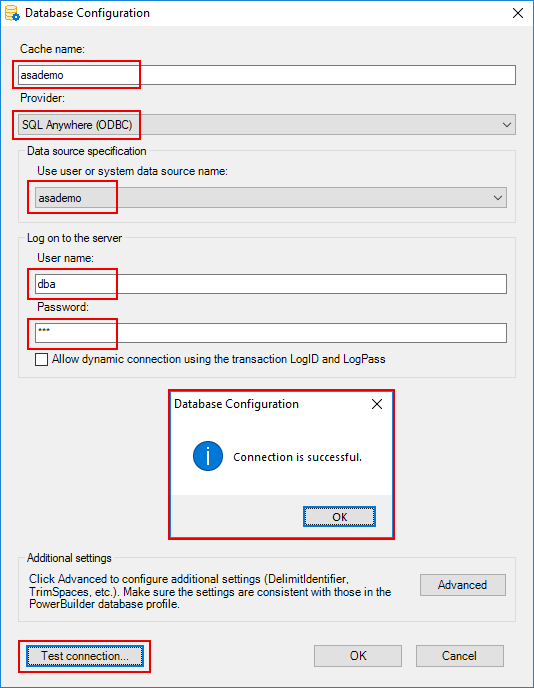
After the ODBC data source is created successfully, you should be able to select it in the Database Configuration dialog box. You can create a database connection cache for the SQL Anywhere database with the following steps:
-
In the Database Configuration dialog box, enter any text as the cache name.
-
Select SQL Anywhere (ODBC) from the Provider list and then select the data source created just now from the Use user or system data source name list.
-
Enter the Username and Password for the database connection.
-
Click Test Connection to make sure the connection is successful.
There are two connection methods for the PostgreSQL database: General connection and SSL connection. We will show you how to use these methods one by one.
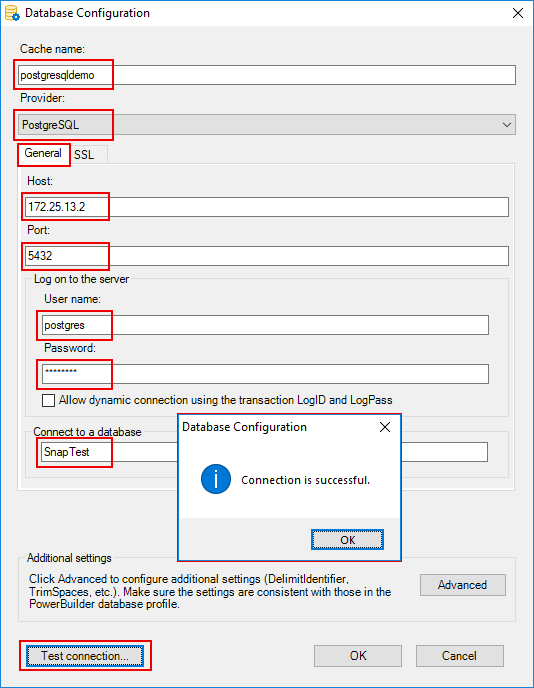
To create a database connection cache for the PostgreSQL database using the General method:
-
In the Database Configuration dialog box, enter any text as the cache name.
-
Select PostgreSQL from the Provider list, and then select the General tab.
-
Input the IP address (for connecting with the remote database) or machine name (for connecting with the local database) in Host.
-
Input the port number.
-
Enter your Username and Password for logging into the server.
-
Enter your database name in Connect to a database.
-
Click Test Connection to make sure the connection is successful.
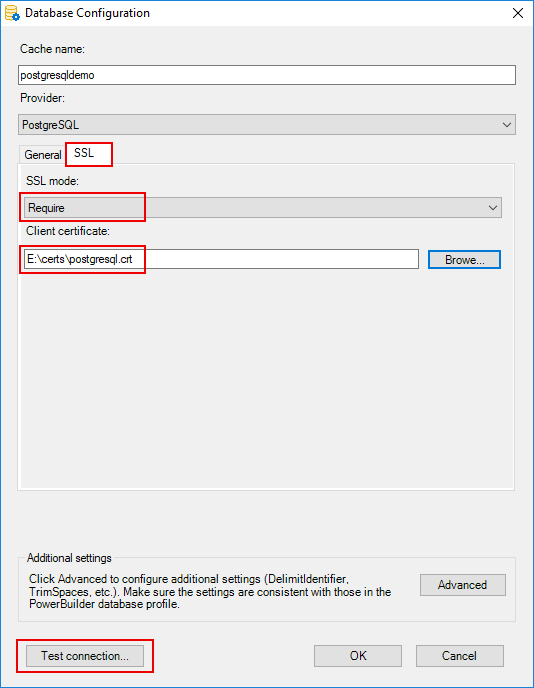
To create a database connection cache for the PostgreSQL database using the SSL method:
-
After configuring the settings in the General tab, select the SSL tab.
-
Select the SSL mode.
-
Disable -- Client is using an unencrypted connection.
-
Prefer -- Client attempts to connect using encryption, falling back to an unencrypted connection if an encrypted connection cannot be established.
-
Require -- Client requires an encrypted connection and fail if one cannot be established.
-
-
Enter or select your client certificate.
-
Click Test Connection to make sure the connection is successful.
The SQL Server database can be connected through the TCP/IP, Shared Memory, or Named Pipes protocol. To connect via any of these protocols, make sure the protocol has been enabled at the database server.
Of the authentication modes provided by SQL Server Management Studio (SSMS), the following modes are supported for connect with the SQL Server database.
-
Windows Authentication
-
SQL Server Authentication
-
Active Directory Password Authentication
-
Active Directory Integrated Authentication
The modes are available as options in the Authentication dropdown when you set up the connection to SQL Server in the Database Configuration dialog box. Be aware of the following before deciding which mode to select:
-
If SSMS uses the SQL Server Authentication or Active Directory Password Authentication mode, you may directly select the same mode in the Authentication dropdown.
-
If SSMS uses the Windows Authentication or Active Directory Integrated Authentication mode, it means that the SQL server has integrated Windows authentication. There is an important difference between how the mode works in traditional c/s app and installable cloud apps:
-
In traditional c/s apps, the Windows Authentication or Active Directory Integrated Authentication mode would use the Windows user account at the client machine for authentication by the SQL Server;
-
In installable cloud apps, the Windows Authentication or Active Directory Integrated Authentication mode would use the Windows user account at the .NET server for authentication by the SQL Server;
If you cannot accept the difference, it is strongly recommended that you change the authentication mode at both SSMS and then here in the Authentication dropdown to be SQL Server Authentication or Active Directory Password Authentication.
-
To enable the protocol on the SQL Server database server (using SQL Server 2019 on Windows Server 2019 64-bit as an example):
-
Open SQL Server 2019 Configuration Manager from the Windows Start menu > SQL Server 2019 > SQL Server 2019 Configuration Manager.
-
Select the instance to be connected under SQL Server Network Configuration (such as Protocols for MSSQLSERVER), and then enable the protocols on the right-hand side.

For more bout these protocols, refer to Choosing a Network Protocol.
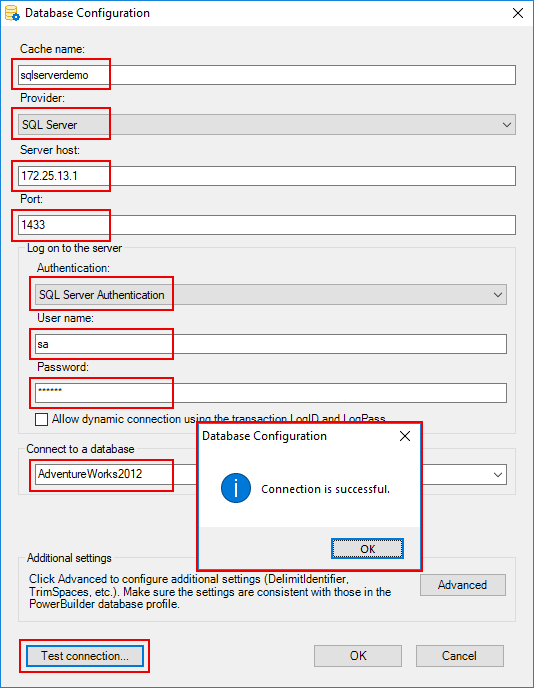
To create a database connection cache for the SQL Server database over the TCP/IP protocol:
Specify the Server host field according to the following table. The TCP/IP protocol will be used by default.
|
Server name |
Connection String |
Description |
|---|---|---|
|
172.25.13.1 |
Data Source=172.25.13.1;Initial Catalog=SnapTest;User ID=sa;Password=appeon; |
Connect by IP |
|
127.0.0.1\sql2016 |
Data Source=172.25.13.1\sql2016;Initial Catalog=SnapTest;User ID=sa;Password=appeon; |
Connect to the specific instance by IP |
|
RemoteDBMachineName |
Data Source=RemoteDBMachineName;Initial Catalog=SnapTest;User ID=sa;Password=appeon; |
Connect to the remote database by its machine name |
|
RemoteDBMachineName\instancename |
Data Source=RemoteDBMachineName\instancename;Initial Catalog=SnapTest;User ID=sa;Password=appeon; |
Connect to the specific instance by its machine name |
|
tcp:(local)\MSSQLSERVER01 |
Data Source=tcp:(local)\MSSQLSERVER01;Initial Catalog=SnapTest;User ID=sa;Password=appeon;" |
Force to use TCP/IP protocol to connect to the specified local instance |
The Shared Memory protocol can only be used locally, therefore, this protocol is used only when connecting with a local database.
To create a database connection cache for the SQL Server database over the Shared Memory protocol:
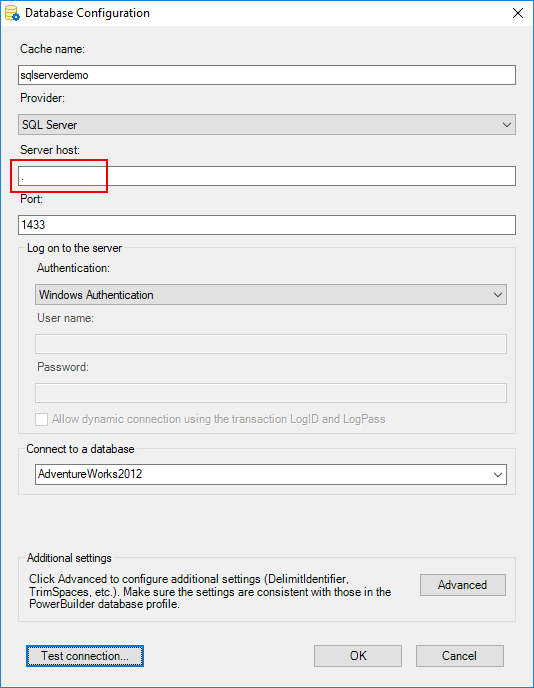
Input the local machine name, or a dot (.), or localhost (or local) in the Server host field. This indicates that a local database will be connected and the Shared Memory protocol will be used by default. (Note that if the server host is set to the local IP address, TCP/IP will be used.)
To configure the Named Pipes protocol on the SQL Server database server (using SQL Server 2019 on Windows Server 2019 64-bit as an example):
-
Open SQL Server Configuration Manager from the Windows Start menu > SQL Server 2019 > SQL Server 2019 Configuration Manager.
-
Select the instance to be connected under SQL Server Network Configuration (such as Protocols for MSSQLSERVER), and then double click on Named Pipes on the right-hand side. In the dialog box that pops up, write down the Pipe Name which is by default '\\.\pipe\sql\query', or double click on Pipe Name to modify the pipe name and then write down the new pipe name. The pipe name will be used for connection later.
-
Make sure the status of Named Pipes is set to "Enabled".
For more about Named Pipes configuration, refer to Named Pipes Properties.

To create a database connection cache for the SQL Server database over the Named Pipes protocol:
Specify the Server host field according to the following connection strings:
Data Source=\\.\pipe\sql\query;Initial Catalog=MyDB;User ID=sa;Password=mypwd;
Data Source=\\.\pipe\MSSQL$MSSQLSERVER01\sql\query;Initial Catalog=SnapTest;User ID=sa;Password=mypwd;
Data Source=np:\\172.0.0.1\pipe\sql\query;Initial Catalog=SnapTest;User ID=sa;Password=mypwd;
Data Source=np:MyMachineName;Initial Catalog=MyDB;User ID=sa;Password=mypwd;

Tips:
You can check which protocol is currently used by executing the following SQL statement:
SELECT net_transport FROM sys.dm_exec_connections WHERE session_id =@@SPID;
You can specify the protocol in the server host by adding the following prefix before the server name: np:, tcp:, or lcp:.
If you add the "tcp:" prefix to the server host, then TCP/IP protocol will be used even though it connects with a local database.
If the server host is entered with an IP address, even if the "lcp:" prefix is added, it will still connect to the database over TCP/IP.
If you want to connect to the specified instance, you can add "\"+"instance name" to the server host, for example ".\MSSQLSERVER01".
For the first time to connect to the MySQL database, you will need to install the corresponding .NET Core driver. When you select MySQL from the Provider list in the Database Configuration dialog box, you will be prompted to have PowerBuilder automatically download and install the driver from www.nuget.org or manually download the driver from NuGet and then specify the location of driver on your local computer.
-
If you select to install the driver from www.nuget.org, it indicates that you agree with the license agreement. The driver will be automatically downloaded from www.nuget.org to your local path (%USERPROFILE%\.nuget\packages and %USERPROFILE%\.sd\19.0\dbDrivers).
-
If the driver has already been downloaded from www.nuget.org to your computer, you can select The driver already exists locally and specify the location of the driver.
It must be the .NET Core driver (MySql.Data 8.0.25) downloaded from www.nuget.org, otherwise installation will fail.

There are two connection methods for the MySQL database: General connection and SSL connection. We will show you how to use these methods one by one.
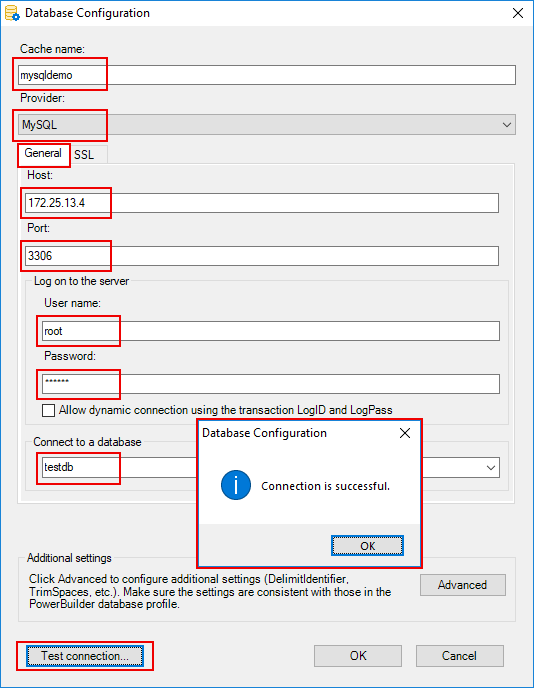
To create a database connection cache for the MySQL database using the General method:
-
In the Database Configuration dialog box, enter any text as the cache name.
-
Select MySQL from the Provider list, and then select the General tab.
-
Input your IP address or your machine name to Host.
-
Input the port number.
-
Enter your Username and Password.
-
Enter or select your database name from the Connect to a database list.
-
Click Test Connection to make sure the connection is successful.
To configure the MySQL database connection using the SSL method:
-
After configuring the settings in the General tab, select the SSL tab.
-
Select the SSL mode.
Currently only Preferred and Required modes are supported.
-
None -- Client is using an unencrypted connection.
-
Preferred -- Client attempts to connect using encryption, falling back to an unencrypted connection if an encrypted connection cannot be established.
-
Required -- Client requires an encrypted connection and fail if one cannot be established.
-
VerifyCA -- Client requires an encrypted connection and the CA certificate needs to be verified.
-
VerifyFull -- Client requires an encrypted connection. Both CA certificate and client certificate need to be verified.
For more, refer to Using encrypted connections.
-
-
Specify the SSL private key.
-
Specify the SSL CA certification.
-
Specify the SSL certification.
-
Click Test Connection to make sure the connection is successful.
For the first time to connect to the Informix database, you will need to install the corresponding .NET Core driver. When you select Informix from the Provider list in the Database Configuration dialog box, you will be prompted to have PowerBuilder automatically download and install the driver from www.nuget.org or manually download the driver from NuGet and then specify the location of driver on your local computer.
-
If you select to install the driver from www.nuget.org, it indicates that you agree with the license agreement. The driver will be automatically downloaded from www.nuget.org to your local path (%USERPROFILE%\.nuget\packages and %USERPROFILE%\.sd\19.0\dbDrivers).
-
If the driver has already been downloaded from www.nuget.org to your computer, you can select The driver already exists locally and specify the location of the driver.
It must be the .NET Core driver (IBM.Data.DB2.Core 2.2.0.100) downloaded from www.nuget.org, otherwise installation will fail.

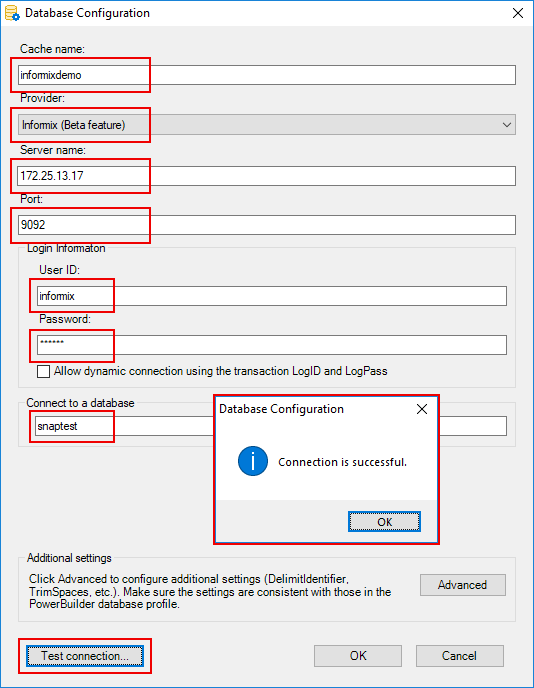
To create a database connection cache for the Informix database:
-
In the Database Configuration dialog box, enter any text as the cache name.
-
Select Informix from the Provider list.
-
Input your IP address or your machine name to Server name.
-
Input the port number (9089 by default).
This port number should be the TCP port number for the DRDA protocol (not the SQLI protocol).
-
Enter your Username and Password.
-
Enter your database name to Connect to a database.
-
Click Test Connection to make sure the connection is successful.
For the first time to connect to the Oracle database, you will need to install the corresponding .NET Core driver. When you select Oracle from the Provider list in the Database Configuration dialog box, you will be prompted to have PowerBuilder automatically download and install the driver from www.nuget.org or manually download the driver from NuGet and then specify the location of driver on your local computer.
-
If you select to install the driver from www.nuget.org, it indicates that you agree with the license agreement. The driver will be automatically downloaded from www.nuget.org to your local path (%USERPROFILE%\.nuget\packages and %USERPROFILE%\.sd\19.0\dbDrivers).
-
If the driver has already been downloaded from www.nuget.org to your computer, you can select The driver already exists locally and specify the location of the driver.
It must be the .NET Core driver (Oracle.ManagedDataAccess.Core 2.19.110) downloaded from www.nuget.org, otherwise installation will fail.

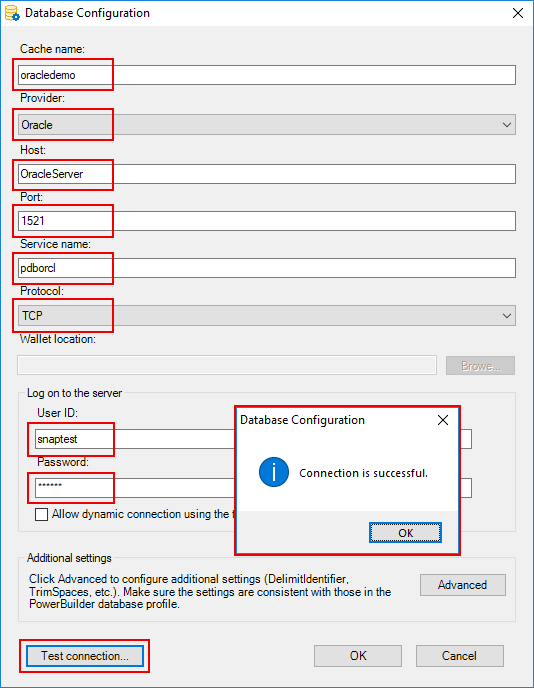
To create a database connection cache for the Oracle database:
-
In the Database Configuration dialog box, enter any text as the cache name.
-
Select Oracle from the Provider list.
-
Input your IP address or your machine name to Host.
-
Input the port number.
-
Enter the Service name.
-
Use the default TCP protocol; or select the TCPS protocol and then input or select the wallet location.
-
Enter your Username and Password for logging into the server.
-
Click Test Connection to make sure the connection is successful.
The ASE database can be connected using the ODBC driver only for the PowerBuilder installable cloud app.
To configure ODBC for Adaptive Server Enterprise (using ASE 16 as an example):
-
Install the ODBC driver for ASE 16.
-
Open the ODBC Data Source Administrator (64-bit) tool (in the Windows search bar (or press Win + Q), type "ODBC" and then select ODBC Data Source (64-bit)).
-
On the System DSN tab, click Add. In the Create New Data Source dialog, select Adaptive Server Enterprise driver which was just installed, and then click Finish.

-
Create an ODBC data source by following the numerical order in the figure below. Remember to replace the database information with your own ones.

After the ODBC data source is created successfully, you should be able to select it in the Database Configuration dialog box. You can create a database connection cache for the ASE database with the following steps:
-
In the Database Configuration dialog box, enter any text as the cache name.
-
Select Adaptive Server Enterprise (ODBC) from the Provider list and then select the data source created just now from the Use user or system data source name list.
-
Enter the Username and Password for the database connection.
-
Click Test Connection to make sure the connection is successful.

If you are using Named Pipes to connect to a remote database, you may need to add Windows Credentials. Refer to the following steps:
-
Open the Windows search bar (or press Win + Q), enter "Windows Credentials" and then select Manage Windows Credentials.
-
Click Add a Windows credential.
-
Enter the IP address, username and password of the remote database.

If the PostgreSQL CA certificate is a self-signed certificate, you will need to install the certificate on the client machine to make Windows trust the certificate.
When connecting to the Informix database in the Database Configuration dialog, you see an error message that is similar to the following:
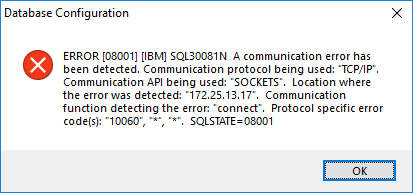
A common mistake is to specify a SQLI port number in the Database Configuration dialog. The IBM Data Server .NET Provider uses the DRDA protocol (not the SQLI protocol) to communicate with Informix, therefore, a DRDA port number must be specified in the Database Configuration dialog.
By default Informix is installed with DRDA support and the port number is 9089. However, if Informix is installed without the DRDA support, you will need to enable the DRDA support by following instructions in the IBM Informix Developer's Handbook > the "Enabling DRDA support" section.


