In this tutorial, we will learn how to set up Windows IIS as the reverse proxy server which redirects requests to the PowerServer Web APIs running on the Kestrel server. This is also known as the IIS out-of-process hosting which runs the PowerServer Web APIs in a process separate from the IIS worker process and forwards the requests made to the IIS reverse proxy to the Kestrel server.
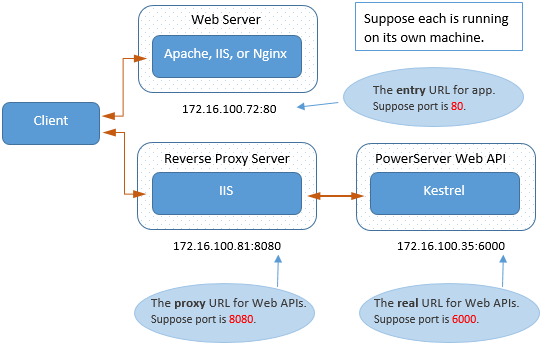
In this tutorial, we will configure and use the following server environment and URLs. Be careful to use the correct port number and make sure the port is not occupied by any other program.
Step 1: Set up the reverse proxy server with the following OS and software (install the software in the order listed).
-
Windows Server 2019 (64-bit)
-
IIS
The section Installing Web Server (IIS) has detailed installation instructions.
-
IIS URL Rewrite
Download and install the URL Rewrite extension.
URL Rewrite must be installed prior to ARR, as ARR depends on URL Rewrite.
-
IIS Application Request Routing (ARR)
Download and install the Application Request Routing extension.
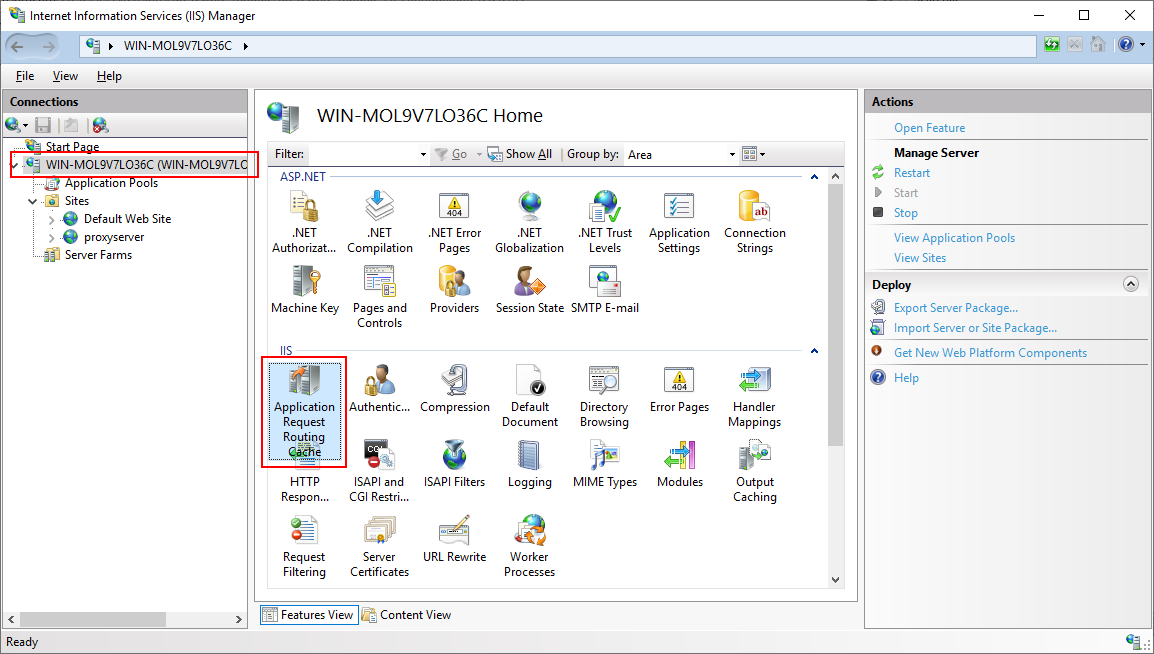
After installation, you should be able to see the Application Request Routine Cache and URL Rewrite features in the IIS manager.
Step 2: Make sure the server can connect to the NuGet site: NuGet site (for installing PowerServer NuGet packages) and the following Appeon sites (through port number 80): https://apips.appeon.com and https://apipsoa.appeon.com (or https://apips.appeon.net and https://apipsoa.appeon.net) (for validating the PowerServer license).
Note
If the server connects to Internet through a proxy server, make sure to configure the proxy server settings in the PowerServer Web API as well (the ServerAPIs project > Server.json file > "ProxyOptions" block). The password for the proxy server, if any, must be an encrypted value (encrypted by the CustomizeDeploy.dll tool).
Step 3: Configure Windows Defender Firewall on the server to allow the port number (80 and 8080 in this tutorial or any port number you choose). The section "Configuring Windows Defender Firewall" has detailed instructions.
This section is to configure IIS as a reverse proxy server.
Step 1: Open the IIS manager, select the server in the Connections pane, and then double click Application Request Routing Cache to open the feature.
Step 2: In the Actions pane, click Server Proxy Settings.
Step 3: On the Application Request Routing page, select Enable Proxy; and then in the Actions pane, click Apply. This enable ARR as a proxy at the server level.
Step 4: Select the website (listening on port 8080 in this tutorial) in the Connections pane, and then double click URL Rewrite to open the feature.
Step 5: In the Actions pane, click Add Rule(s).
Step 6: In the Add Rule(s) dialog, select Reverse Proxy and click OK.
Step 7: In the Add Reverse Proxy Rules dialog, input the URL of the PowerServer Web API running on the Kestrel server (https://172.16.100.35:6000/ in this tutorial). Click OK.
The following modifications are made to the PowerServer project created in the Quick Start guide. If you have not created a PowerServer project yet, please follow the instructions in the Quick Start guide to create one.
Step 1: Modify the Web API URL to point to the IIS reverse proxy server.
On the Web APIs tab of the PowerServer project painter, specify the URL of the IIS reverse proxy server, for example, https://172.16.100.81:8080. It is highly recommended that you specify an HTTPS URL for the production environment.
All requests for the PowerServer Web APIs will be first made to https://172.16.100.81:8080 and then redirected by the IIS reverse proxy server to the PowerServer Web APIs running on the Kestrel server (for example, https://172.16.100.35:6000).
Step 2: Select a Web server for deploying the app files.
On the Client Deployment tab of the PowerServer project painter, select a local or remote Web server (IIS, Apache, Nginx, etc.) you have configured properly.
The Web server and the IIS reverse proxy server can reside in the same or different machine. If the Web server is an IIS HTTP server, it can be the same or different server instance with the IIS reverse proxy server.
In this tutorial, we choose to deploy the app files to a local IIS Web server.
To use the same IIS server instance as the IIS HTTP server and the reverse proxy server, you can choose from these two options:
-
If you choose the "Directly deploy to the server" option, make sure you have configured the FTP settings properly for the server. See Setting up IIS > Creating an IIS FTP site for detailed instructions.
-
If you choose the "Package the compiled app and manually deploy later" option, follow the instructions in Packaging and copying the client app.
Step 3: Save the PowerServer project settings and then build and deploy the PowerServer project for the changes to take effect.
Now let's run the PowerServer Web APIs and verify that the requests are forwarded successfully from the reverse proxy server to the PowerServer Web APIs.
In order to view the logs easily, let's directly start the PowerServer Web APIs as a console application on its internal Kestrel web server, using either of the following methods:
-
Execute the "dotnet run --project PowerServer19\ServerAPIs\ServerAPIs.csproj" command, or
-
Open the PowerServer C# solution in the SnapDevelop IDE and then click the Run button.
Make sure the PowerServer Web APIs is running on the correct IP address and port number. For example, https://172.16.100.35:6000/ in this tutorial. You may modify the port number in the launchSettings.json file of the ServerAPIs project of the PowerServer C# solution when running in the development environment.
Run the application (https://172.16.100.72:80/pssales in this tutorial). You should be able to see from the console that the requests are going through successfully.
Once you have verified that the reverse proxy server works properly, you can run the PowerServer Web APIs as a service, as described in Running Web APIs on Kestrel.


