The following modifications are made to the existing PowerServer project. If you have not created a PowerServer project yet, please follow the instructions in the Quick Start guide to create one.
You need to make sure the client app knows where to call the PowerServer Web APIs before containerizing the application (as the CustomizeDeploy.dll tool cannot be executed after containerized).
Go to the Web APIs tab of the PowerServer project painter, specify the URL of the PowerServer Web APIs, for example, https://demok8s.appeon.com:9005, or https://52.143.79.245:9005.
If you input the domain name (in this tutorial, demok8s.appeon.com) here, make sure the domain name is associated with the IP address. The IP address should be the Azure static public IP address (in this tutorial, 52.143.79.245) created in Creating public IP address.
The port number should be the same one specified later in the YAML manifest file that defines the Kubernetes pod for running the Web API docker image (in this tutorial, the pre-defined port number is 9005).

Notes:
-
Make sure the Kubernetes pod for the Web API will be run at the same domain name/IP address and port number later.
-
If the domain name/IP address and port number are changed later, you will need to modify the settings here and build the PowerServer project again in the PowerBuilder IDE.
In Creating a database, you have already created a SQL Server database in Azure.
Now you will need to modify the database connection cache to point to this database created in Azure.
Step 1: At the bottom of the Web APIs tab of the PowerServer project painter, click the Database Configuration button.
Step 2: In the Database Configuration window, click DB Drivers in the upper part to make sure the SQL Server driver and the option "I have read and agree to the license ..." both are selected.
Step 3: In the Database Configuration window, click New in the upper part to create a new connection cache.
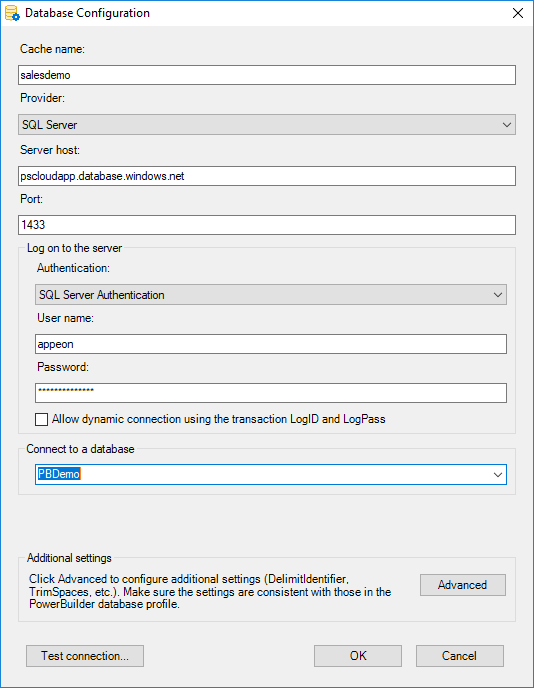
Step 4: In the dialog box that displays, specify the database connection settings. For example, you specify the settings as shown below to connect to the Azure SQL database in Creating a database.
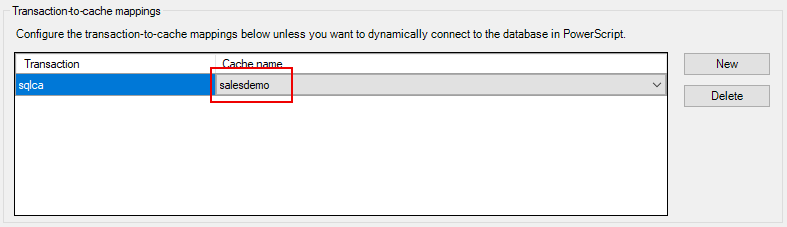
Step 5: When the cache is created successfully, make sure to select this new cache to map with the transaction object in the lower part of the Database Configuration dialog.
To deploy the client app to a Web server which runs as a docker container image, you will have to package the client app as a zipped file first and then manually deploy it to the image.
Go to the Client Deployment tab of the PowerServer project painter, and then click Package the compiled app and manually deploy later. Specify to generate the package as a compressed zip file, and select to package the cloud app launcher and the PowerBuilder Runtime files.

When the project is built in the next step, a zipped file of the client app will be generated.
After you made changes to the PowerServer project settings, save the project settings and then click the Build & Deploy PowerServer Project button in the toolbar.
When the build process completes, the following will be generated:
-
a zipped file of the client app
-
a C# solution of PowerServer Web APIs
They will be used to create the docker container images in the next step.
