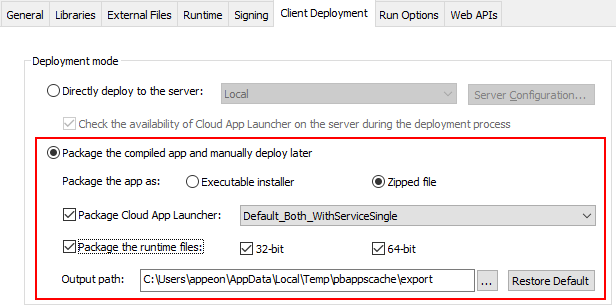
After you configure the PowerServer project properly, you can compile and package the client app (including the cloud app launcher, PowerBuilder runtime files, and the application files) into an executable installer or a zipped file.
To package the client app (including launcher, runtime files and app files):
-
Go to the Client Deployment tab of the PowerServer project painter, and then select Package the compiled app and manually deploy later.
-
Specify to generate the package as an executable installer or a compressed zip file.
-
If you select Zipped file, an appname_Installer.zip file is generated in the specified path. You can copy the zip file to the server and then decompress it to the Web root.
-
If you select Executable installer, an appname_Installer.exe file is generated in the specified path. You can copy the executable file to the server and then run it to install the application to the Web root.
-
-
Select Package Cloud App Launcher. If you have customized the launcher, select the customized launcher from the profile list.
-
Select Package the runtime files and 32-bit and/or 64-bit.
-
Specify the location where the package will be generated.
-
Save the project settings.
-
Click the Build & Deploy PowerServer Project button (
 ) in the toolbar to compile the project and
generate the package.
When the build & deploy process completes successfully, you should be able to find the package generated in the output path.


