The following steps take Windows Server 2019 as an example:
Step 1: In Windows Server 2019, open Server Manager, and then select Add roles and features.
Step 2: In the Add Roles and Features Wizard, click Next several times until the Server Roles section displays.
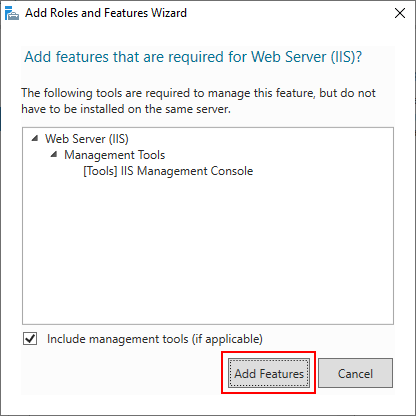
Step 3: Select the check box of Web Server (IIS); and then click Add Features when asked whether to add features required for Web server.
Step 4: Make sure the Web Server (IIS) check box is selected, and click Next.
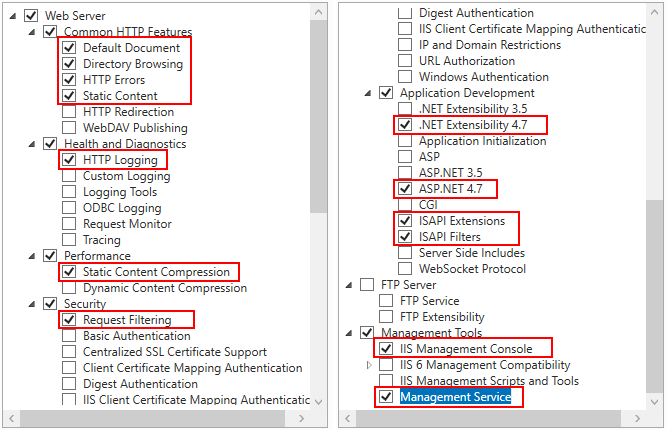
Step 5: Click Next until the Role Services section displays. Make sure the following role services are selected.
IMPORTANT: Management Service must be selected and installed otherwise the IIS remote management will not be supported. If IIS remote management is not supported, then you will not be able to deploy to IIS from a remote computer; you will only be able to deploy to IIS from the local computer.
Management Service is only available on Windows Server OS; and is not available on Windows Desktop OS (such as Windows 10); which means if you have installed IIS on Windows 10, you can only do a local deployment (instead of remote deployment) to IIS.
Step 6: Click Next and then click Install.
After IIS is installed, a Default Web Site (with port 80) is automatically created (you could also create new websites with different port numbers).
Step 7: Open a Web browser and run the following URLs to access the Default Web Site.
http://localhost:80/
http://your_server_ip:80/
TIP: You can use "localhost" or the IP address to access the IIS website on the local computer. To obtain the IP address, open a command prompt window and then type ipconfig<Enter>.
If the IIS welcome screen displays, the IIS website is working properly.


