The following modifications are made to the PowerServer project created in the Quick Start guide. If you have not created a PowerServer project yet, please follow the instructions in the Quick Start guide to create one.
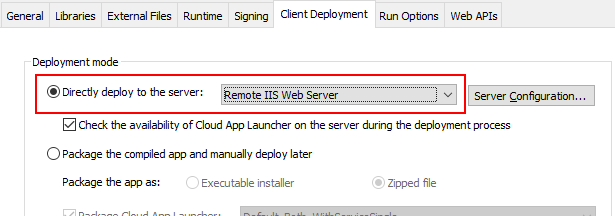
Step 1: Select the profile for the remote server (instead of the local server).
On the Client Deployment tab of the PowerServer project painter, select "Directly deploy to the server" and then select a server profile (such as "Remote IIS Web Server", "Remote Apache HTTP Server", or "Remote Nginx") in the Deployment mode section.
The server profile is created in the section Creating a Web server profile for remote deployment.
Step 2: Select the authentication template.
It is strongly recommended for security concerns, that in the production environment, you shall safeguard the server resources through implementing an authentication server with PowerServer.
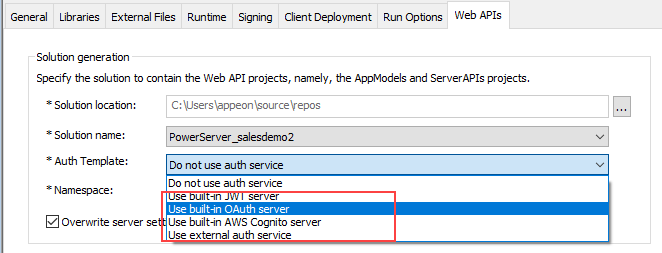
Select a template type from the Auth Template list.
-
Use built-in JWT server: Includes a built-in authentication server that supports JWT or bearer tokens. See Tutorial 6: Authenticating your apps > Using JWT for more information.
-
Use built-in OAuth server: Includes a built-in authentication server based on IdentityServer4 framework that works with the OAuth 2.0 authorization flows. See Tutorial 6: Authenticating your apps > Using OAuth 2.0 for more information.
-
Use built-in AWS Cognito server: Includes a built-in authentication server that works with the Amazon Cognito user pool. See Tutorial 6: Authenticating your apps > Using Amazon Cognito for more information.
-
Use external auth service: Includes templates that can be easily extended to support the other identity providers that work with the OAuth flows or JWT, such as Azure AD or Azure AD B2C. See Tutorial 6: Authenticating your apps > Using other auth servers for more information.
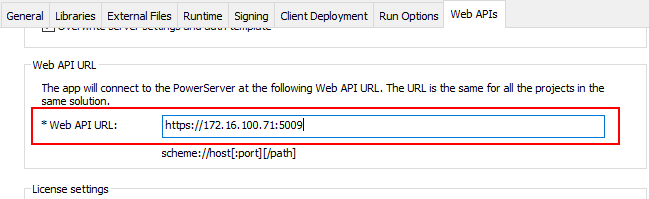
Step 3: Specify the Web API URL. The Web API URL is used by the client app to call the Web APIs.
On the Web APIs tab of the PowerServer project painter, specify the Web API URL, for example, https://172.16.100.71:5009. This indicates that the client app will call the Web APIs running on the server at https://172.16.100.71:5009.
It is highly recommended that you specify an HTTPS URL for the production environment.
Note
-
Make sure the Web API is running on the specified IP address (or host name) and port number. For how to start the Web API, see the next section.
-
If the IP address and port number of the .NET server are changed later, you will need to modify the settings here and then deploy the project again (using the "Deploy PowerServer Project" option).
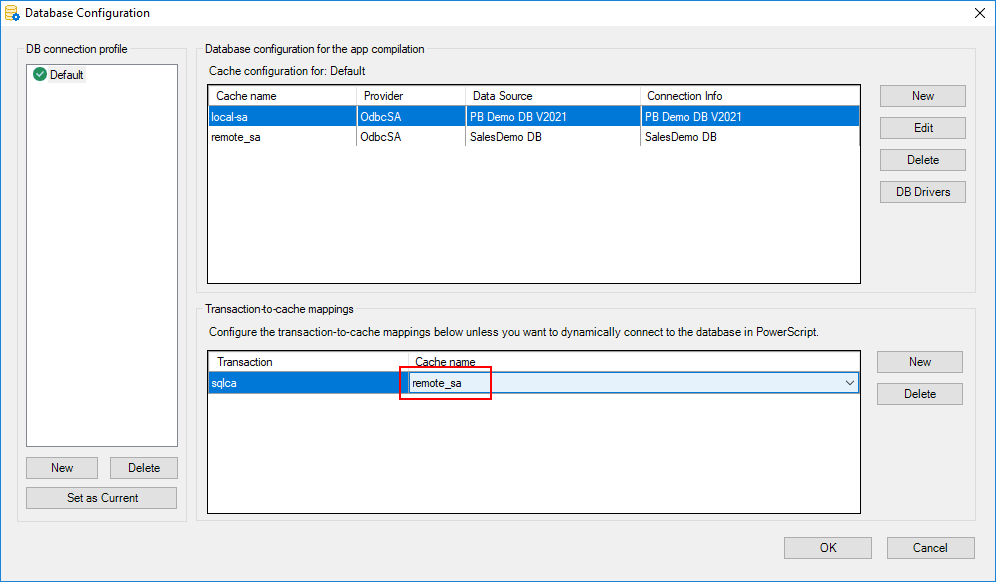
Step 4: Select the "SalesDemo DB" ODBC data source (created in Creating the ODBC data source).
At the bottom of the Web APIs tab of the PowerServer project painter, click the Database Configuration button.
In the Database Configuration window, click DB Drivers in the upper part to make sure the corresponding database driver and the option "I have read and agree to the license ..." both are selected.
In the Database Configuration window, click New in the upper part to create the database connection that will be used by the deployment.
In the dialog box that displays, configure the database connection with the following settings:
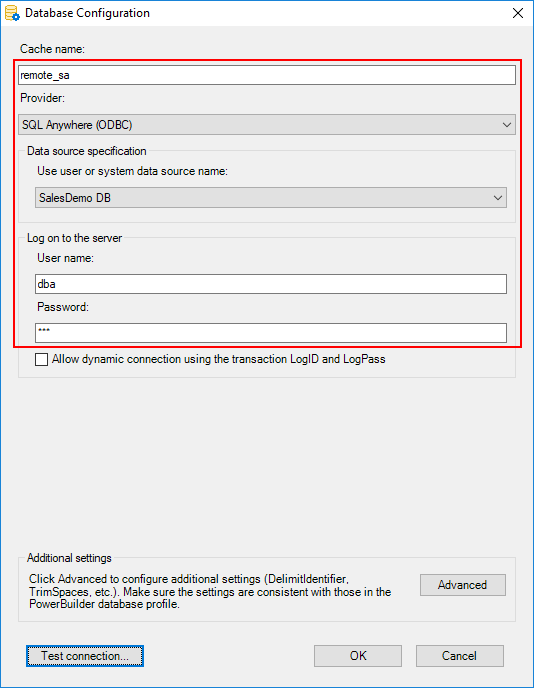
Then select the database cache you created just now to map with the "sqlca" transaction object.
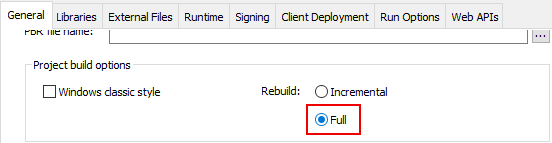
Step 5: Make sure the Full option is selected on the General tab.
It is highly recommended that the Full option should be selected when you build and deploy the project to the production environment.
Step 6: Save the PowerServer project settings.
Step 7: Build and deploy the PowerServer project (using the "Build & Deploy PowerServer Project" option) for the changes to take effect.
When the deployment is finished, go to the Web server and verify that the application folder (for example, "pssales") exists under the Web root.
Step 8: Go to the specified location (C:\Users\appeon\source\repos in this tutorial) and copy the PowerServer C# solution folder to the .NET server.
