The exported build file contains all the settings required for building and deploying the PBL files of the Example Sales App and some additional settings:
|
Build file content |
Description |
|---|---|
    "MetaInfo": {
        "IDEVersion": "210",
        "RuntimeVersion": "21.0.0.1311"
}, |
This section contains the version number of the PowerBuilder IDE and PowerBuilder Runtime currently in use. |
    "BuildPlan": {
        "SourceControl": {
            "PreCommand": "",
            "SVN": [
                ...
            ],
            "Git": [
                ...
            ],
            "VSS": [
                ...
            ],
            "Merging": [
                ...
            ],
            "PostCommand": ""
        },
        "BuildJob": {
            "PreCommand": "",
            "Projects": [
                ...
       ],
            "PostCommand": ""
        }
}, |
This section contains settings for source control and build jobs.
Both the "SourceControl" and "BuildJob" blocks contain a "PreCommand" key and a "PostCommand" key which allow you to specify commands that can be executed before and/or after that particular block is executed. See Executing additional commands for more examples. The commands in "PreCommand" and "PostCommand" can be executed in synchronous (default) or asynchronous mode, and the command window can be visible or invisible (default). For example, "PostCommand": "postcmd.bat /show /async" |
    "Projects": {
        "project1": {
            ...
        },
        "project2": {
            ...
        },
        "project3": {
            ...
        },
        ...
} |
This section lists the project(s) that has been exported. Every single setting that can be found in the project painter can also be found here. You can modify the settings here when necessary. Besides the settings of the project painter, you could also configure the "UFAReport" key to enable/disable unsupported feature analysis for the PowerServer project (equivalent to the "During compilation, report unsupported PowerScript features for PowerServer deployment" option). |
It is recommended that you make a copy of the exported build file and place it to the same location or a location near your PowerBuilder application target, so that you could manage the file path (especially the relative file path) easily.
Note: the relative path specified in the build file is relative to the build file.
You can configure the exported build file to download source code from SVN, Git, or VSS before the build process starts.
Step 1: Open the build file in a text editor, locate the "BuildPlan" block and then configure the corresponding keys.
The following example shows how to download source code from Git:
If the computer connects to Git or SVN through a proxy server, make sure to configure the proxy server in the "Proxy" part.
    "BuildPlan": {
        "SourceControl": {
            "PreCommand": "",
            "SVN": [
                {"SrcPath": "","User": "","Password": "","DestPath": "","Proxy": {"Ip": "","Port": 0,"Username": "","Password": ""}}
            ],
            "Git": [
                {"SrcPath": "https://github.com/Appeon/PowerBuilder-AutoBuild-Sales-SourceCode", "User": "tester@appeon.com", "Password": "YGRrYjc6OzU=", "DestPath": ".\\Build_Sales", "Proxy": {"Ip": "","Port": 0,"Username": "","Password": ""}}
            ],
You can also download source code from multiple targets at one time:
           "Git": [
                {"SrcPath": "https://github.com/Appeon/PowerBuilder-AutoBuild-Sales-SourceCode", "User": "tester@appeon.com", "Password": "YGRrYjc6OzU=", "DestPath": ".\\Build_Sales", "Proxy": {"Ip": "","Port": 0,"Username": "","Password": ""}},
                {"SrcPath": "https://github.com/Appeon/PowerBuilder-AutoBuild-Examples-SourceCode", "User": "tester@appeon.com", "Password": "YGRrYjc6OzU=", "DestPath": ".\\Build_Examples", "Proxy": {"Ip": "","Port": 0,"Username": "","Password": ""}}
            ],
The following example shows how to download source code from VSS:
    "BuildPlan": {
        "SourceControl": {
            "PreCommand": "",
            "SVN": [
                {"SrcPath": "","User": "","Password": "","DestPath": "","Proxy": {"Ip": "","Port": 0,"Username": "","Password": ""}}
            ],
           "Git": [
                {"SrcPath": "","User": "","Password": "","DestPath": "","Proxy": {"Ip": "","Port": 0,"Username": "","Password": ""}}
            ],
            "VSS": [
                {"SrcPath": "\\\\192.168.0.100\\Project_VSS\\\"$/Salesdemo/native_pb/appeon.salesdemo\", YYOAAAAA","User": "tester","Password": "","DestPath": ".\\Build_Sales"}
            ],
Notes:
1) Connecting to Git or SVN through a proxy server is supported; but connecting to VSS through a proxy server is not supported yet.
2) The password for VSS is not supported. The VSS login window will be displayed for you to input the password before downloading the source code. The password for SVN or Git must be an encrypted value which is generated from the original password by executing "PBAutoBuild220.exe /p", as shown below.
Step 2: If the source code downloaded from SVN, Git, or VSS is not the PBL file but objects in ws_objects, then you will need to merge the objects to the PBL file. Locate the "Merging" block in the build file and then configure as below:
Setting "RefreshPbl" to true if you want to refresh the PBL files by deleting and then generating the PBL files again.
            "Merging": [
                {"Target": ".\\Build_Sales\\salesdemo.pbt", "LocalProjectPath": ".\\Build_Sales", "RefreshPbl": true}
            ],
You can also merge source code for multiple targets at one time:
            "Merging": [
                {"Target": ".\\Build_Sales\\salesdemo.pbt", "LocalProjectPath": ".\\Build_sales", "RefreshPbl": true},
                {"Target": ".\\Build_Examples\\examples.pbt", "LocalProjectPath": ".\\Build_Examples", "RefreshPbl": true}
            ],
At the same time, make sure to double check the target location is set correctly in the "Projects" block, for example,
        "BuildJob": {
            "PreCommand": "",
            "Projects": [
                {"Target": ".\\Build_Sales\\salesdemo.pbt", "Name": "ps_salesdemo"}
                {"Target": ".\\Build_Examples\\examples.pbt", "Name": "pb_examplesdemo"}
            ],
            "PostCommand": ""
        }
Merging will not only merge the source code but also upgrade the source code to the current version. However, it will not check or upgrade the PBD files used in the library list (you will need to replace the PBD files with the corresponding version).
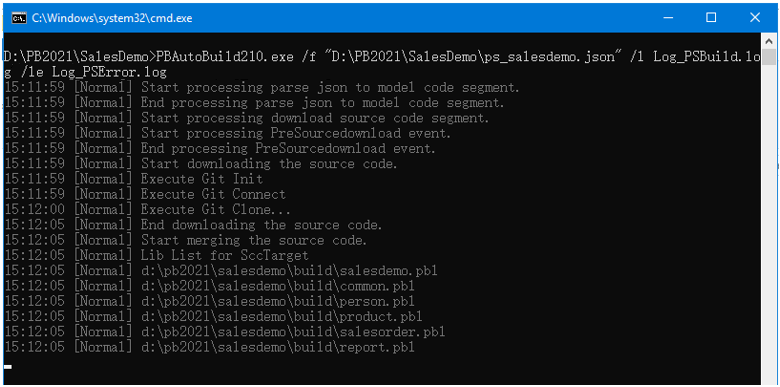
When the PBAutoBuild220.exe command is executed later, it will first download the source code from the Git server and then merge the source code, as shown below.
The entire build & deploy process is made up of several steps, and additional commands can be executed before and/or after some particular steps such as the "SourceControl" and "BuildJob" steps.
Example 1: to add commands to remove the "build" folder before downloading the source code.
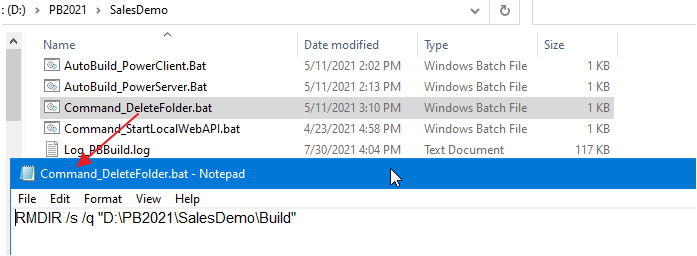
Step 1: Create a bat file which contains the following command, and save the bat file as Command_DeleteFolder.bat.
RMDIR /s /q "D:\PB2022\SalesDemo\Build"
Step 2: In the build file, locate the "BuildPlan" block and then the "PreCommand" setting; and add the file path and name of Command_DeleteFolder.bat.
    "BuildPlan": {
        "SourceControl": {
            "PreCommand": "Command_DeleteFolder.bat",
            "SVN": [
                ...
            ],
When the PBAutoBuild220.exe command is executed later, it will execute the commands in Command_DeleteFolder.bat before it downloads the source code.
Besides the "PreCommand" setting, there is also a "PostCommand" setting for the "SourceControl" and "BuildJob" steps, which allows you to execute commands after that particular step. See Example 2 and 3 for more details.
Example 2: to add commands to start the PowerServer Web APIs after building the PowerServer project in the PowerBuilder IDE.
Step 1: Create a bat file which contains the following command, and save the bat file as startwebapi.bat.
dotnet.exe run --no -build --project C:\Users\appeon\source\repos\PowerServer_salesdemo\ServerAPIs\ServerAPIs.csproj
Step 2: In the build file, locate the "BuildJob" block and then the "PostCommand" setting; and add the file path and name of startwebapi.bat.
        "BuildJob": {
            "PreCommand": "",
            "Projects": [
                ...
            ],
            "PostCommand": "startwebapi.bat /show / sync"
        }
When the PBAutoBuild220.exe command is executed later, it will execute the commands in startwebapi.bat after it finishes building the PowerServer project.
Example 3: to publish the PowerServer Web API after building the PowerServer project in the PowerBuilder IDE.
Step 1: Create a bat file which contains the following command, and save the bat file as publish.bat.
dotnet.exe publish C:\Users\appeon\source\repos\PowerServer_salesdemo\ServerAPIs\ServerAPIs.csproj -c release -o C:\Publish
Step 2: In the exported build file, locate the "BuildJob" block and then the "PostCommand" setting; and add the file path and name of publish.bat.
        "BuildJob": {
            "PreCommand": "",
            "Projects": [
                ...
            ],
            "PostCommand": "publish.bat /show / sync"
        }
When the PBAutoBuild220.exe command is executed later, it will execute the commands in publish.bat after it finishes building the PowerServer project.
Note
The dotnet commands can also be integrated with Jenkins. See Task 5 for more details.


