Note
Be aware of the following when hosting the Web APIs under IIS:
-
Do not use any website that is already hosting applications or pages for hosting the Web APIs. It is highly recommended that you create a new site for hosting the Web APIs.
If you use an existing website where default settings have been changed, you will probably encounter runtime errors, for example:
-
If the "Enable 32-Bit Applications" option is set to True, then IIS worker process will run as a 32-bit app and it will fail to work with the 64-bit Web APIs and 64-bit database; if "Enable 32-Bit Applications" is set to False, then IIS worker process will run as a 64-bit app and it will fail to work with the 32-bit Web APIs and 32-bit database.
For more, refer to "HTTP Error 500.32 - Failed to load .NET Core host" error in Troubleshooting Guide.
-
If the "CGI-exe" handler is enabled (it is disabled by default), IIS will fail to download the executable installer of Cloud App Launcher.
For how to disable the CGI-exe handler, refer to "HTTP Error 404.2 - Not Found" or "HTTP Error 502.2 - Bad Gateway" error in Troubleshooting Guide.
-
If the file extension (such as .json) is removed from the MIME type list in IIS, the corresponding static files (such as LauncherSetup.json, apprun.json etc.) cannot be accessed from IIS.
For how to add the file extensions, refer to Failed to access the *.json file in Troubleshooting Guide.
-
-
If you have multiple Web APIs, you can deploy each Web APIs to a separate website or deploy multiple Web APIs to different sub-folders of the same website.
For new users or for those who are setting up a test or development environment, deploying each Web APIs to a separate website is recommended, because it is easier to configure and succeed.
For experienced users or for those who are setting up a production environment, deploying multiple Web APIs to different sub-folders of the same website is recommended, because it is easier to manage multiple Web APIs, but you will have to convert the sub-folder to an IIS sub-application (see Deploying multiple apps to one site).
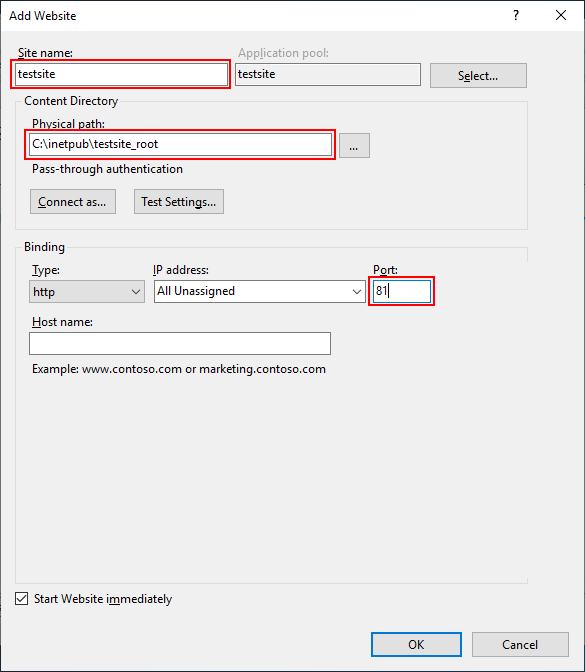
Step 1: In IIS Manager, open the server's node in the Connections panel, right-click the Sites folder, and then select Add Website from the contextual menu.
Step 2: Specify the following values and then click OK to create the site.
-
Site name: testsite in this example
-
Physical path: C:\inetpub\testsite_root in this example. This is where the folders and files of Web APIs will be deployed.
-
Port: 81 in this example. Remember this port number as you will use it to access the PowerServer Web APIs (for example, http://localhost:81/) and the health-ui page (for example, http://localhost:81/health-ui/). Make sure the port number is not occupied by another program. For how to verify if a port number is occupied, follow the instructions in Choosing an appropriate port number.
The IIS website is created and started.
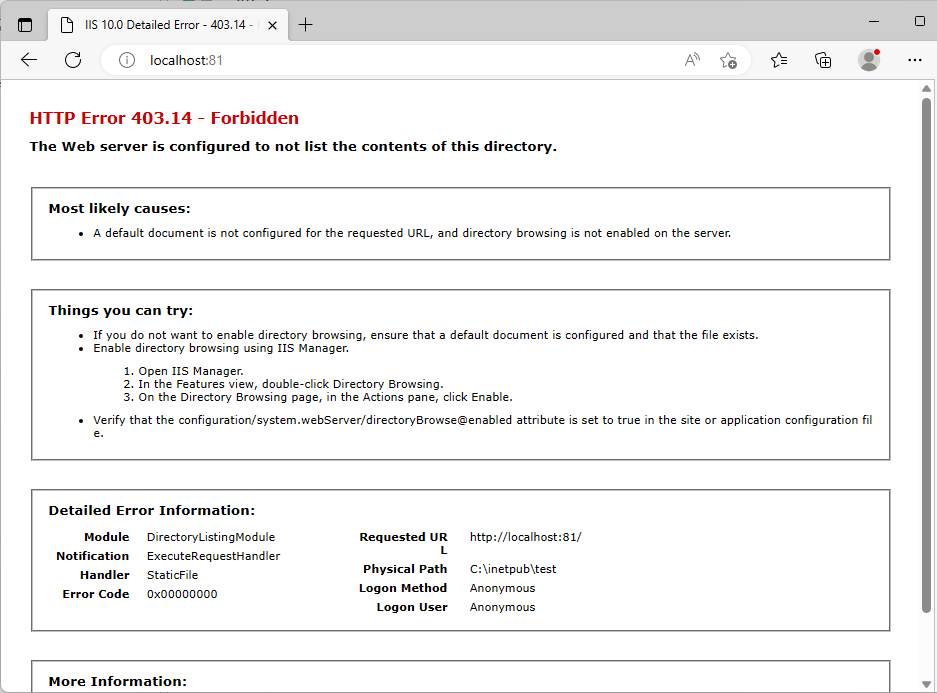
Open a Web browser and run the following URLs to verify the new website.
http://localhost:81/
http://your_server_ip:81/
If the IIS page displays (it is normal that the page displays the HTTP Error: 403.14 - Forbidden), the website is ready to use.


