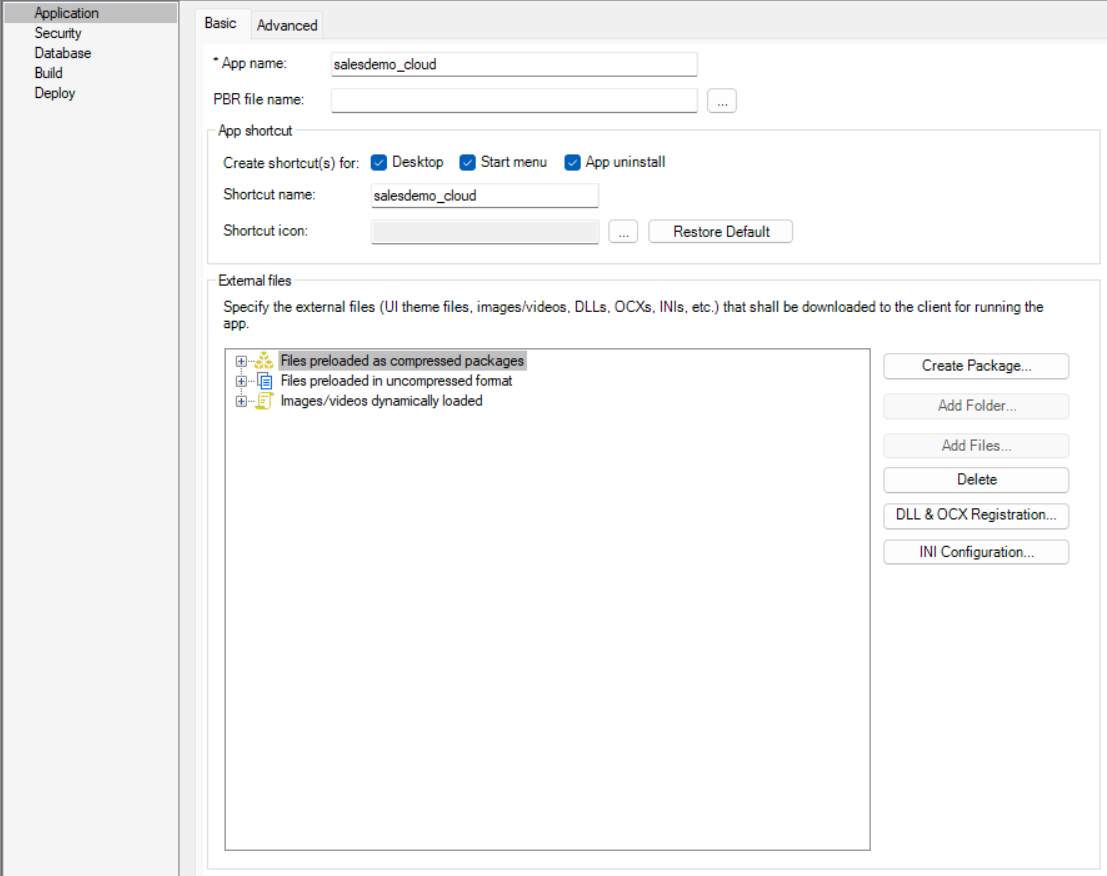
The Application page > Basic tab has the following settings:
|
Option or option group |
What you specify |
|---|---|
|
App name |
Specify a name for the application. The application name is mainly used in the following places:
|
|
PBR file name |
(Optional) Specify a PowerBuilder resource file (PBR) for your application if you dynamically reference resources (such as bitmaps and icons) in your scripts and you want the resources included in the application instead of having to distribute the resources separately. You can type the name of a PBR file in the box or click the button next to the box to browse your directories for the PBR file you want to include. The PBR file as well as the resources it references must reside in the application directory or subdirectory; and only relative paths of the PBR file and the resources will be accepted. For more about PBRs, see Distributing resources in PowerBuilder User Guide. |
|
"App shortcut" group |
You can specify whether to create shortcuts for:
You can also customize the app shortcut name and the shortcut icon.
|
|
"External files" group |
Specify the custom user external files and/or the resource files that are referenced in the PowerScript. Make sure all these files are placed in the same folder or sub-folder of the application target (.pbt) file. The custom user external files may include the following:
Files preloaded as compressed packages and Files preloaded in uncompressed format The custom user external files will be downloaded from the server before the application starts. It is recommended that you deploy the files which are large or stay unchanged most of the time (such as UI theme files) as one compressed package, so that it can be transferred faster; and deploy the files which may be modified (hence downloaded) frequently as individual files, or deploy them as a separate package because they need to be downloaded frequently.
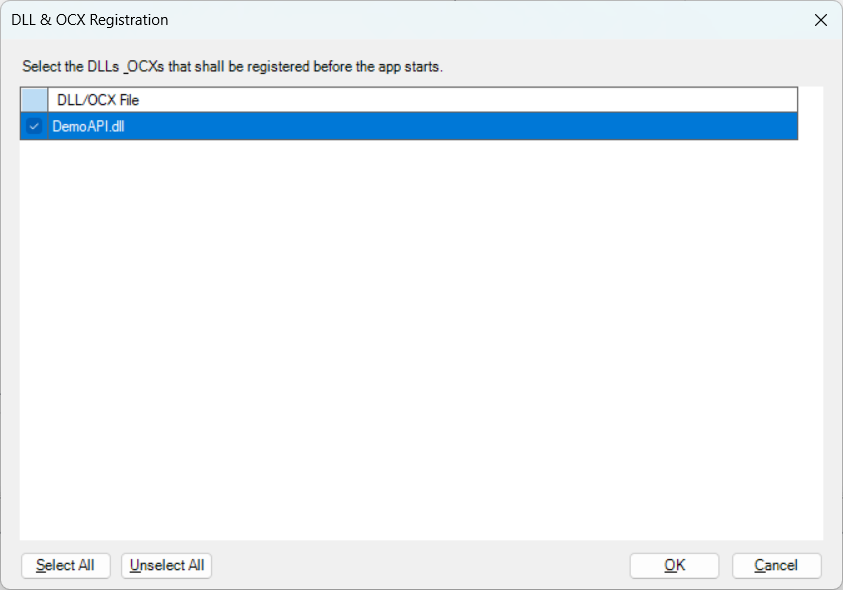
Images/videos dynamically loaded The resource files (such as images, videos etc.) are downloaded from the server at the moment when they are used by the application. You can select Images/videos dynamically loaded and then click Add Folder or Add Files to add the folder or files under it. Note1) After these files are added to External Files, they will be deployed together with the other application files to the server. If these files are changed later, you must re-deploy the application, or replace these files on the server using the CustomizeDeploy.dll tool without needing to deploy the application again. For more information, refer to Change the deployed app using commands. 2) When external files are deployed to the server, they are appended with the file extension ".zip", but they are not compressed files (the only exception is package). For example, if apisetup.ini is selected in the External Files tab, it will be deployed as apisetup.ini.zip to the server, however, apisetup.ini.zip is not a compressed file and it can be directly opened in a text editor just like apisetup.ini. 3) If you have added or removed files from the folder after it is added to External Files, the file list will not be automatically refreshed, thus, you may be prompted for missing files during deployment. In this case, you can remove the folder and then add it back again to External Files, in order to correctly refresh the file list. If the application uses DLL/OCX files and if these DLL/OCX files must be registered before use, you can choose the following methods to register the files:
Note1) For DLL/OCX files that do not need to be registered or those that will be registered by scripts, please do not select them in the DLL & OCX Registration dialog, because unnecessary registration will affect the app startup performance. 2) PowerServer itself does not require any DLL/OCX file registration, please select and register only those DLL/OCX files that are required by the application. INI Configuration When the application is updated, the INI file can be updated with the specified strategy. Click the INI Configuration button and then select one or more INI files and configure the strategy for them at one time; or select and configure for the INI file one by one.
NoteThe external files cannot contain any file that has the same name as the application, or the PBD or p-code file to be generated, otherwise duplicate name error occurs. For example, [appname].exe, [appname].xml, [appname].manifest file etc. cannot be added to External Files. For another example, test.pbl will be deployed as test.pbd, therefore, test.pbd cannot be added to External Files. |
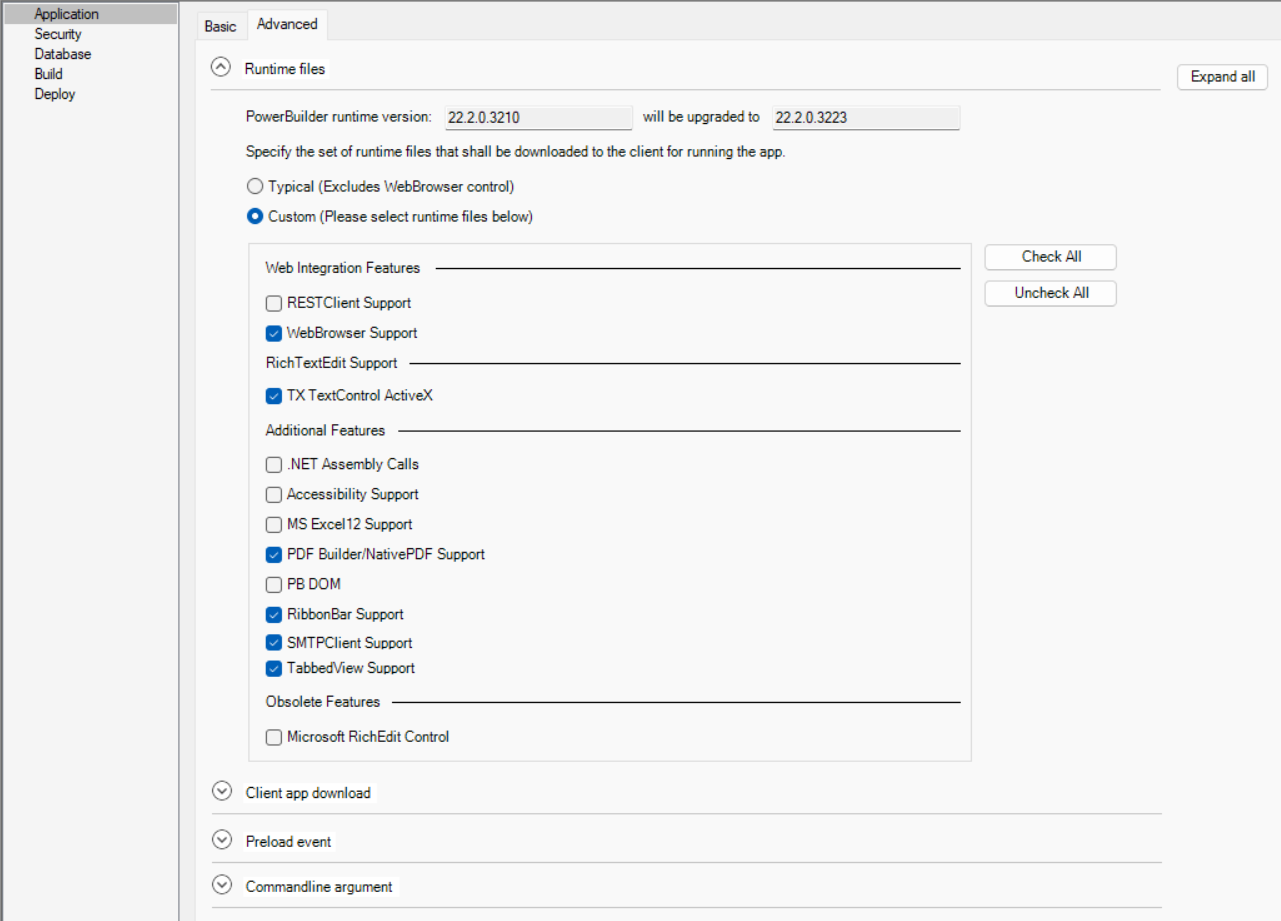
The Application page > Advanced tab has the following settings:
|
Option group |
What you specify |
|---|---|
|
Runtime files |
Select the runtime files according to the features used in the application. The runtime files will be downloaded from the server to the client, for the application to run. You can select Typical to automatically select all files (except the WebBrowser control), or select Custom to select files manually. The deployment tool does not actually deploy the files, instead it notifies the application to download such files (corresponding to the runtime version displayed) from the server directly, therefore, you will need to make sure the corresponding version of PowerBuilder Runtime is uploaded to the server when you upload the Cloud App Launcher to the server (view detailed instructions). When the project is opened, if the runtime version configured in the System Options dialog (Tools > System Options) is different from the runtime version last saved with the project, they both will be displayed (as shown below); and then when the project is saved, the runtime version in the System Options dialog (the second text box) will be saved with the project.  |
|
"Client app download" group |
Specify when to download the application files -- before the application starts or at the moment when they are called by the application at runtime. If you select "Download the app files as necessary", the following files will be downloaded before the app runs: 1) the PowerBuilder Runtime files, 2) the application executable, and 3) the files you selected to be preloaded in External Files; the other files will be downloaded at the moment they are called by the app. If you select "Download all the app files at app startup", the runtime files, app executable, the application files, and external files are all downloaded at the startup, except for the image files that are set to be dynamically loaded in the External Files settings. |
|
"Client app download" group > Show the loading animation before the app runs |
Specify whether to show the loading image of the launcher (as shown below) when the application prepares for startup. The image will disappear when the application's first window displays. This option should not be selected if the application starts with no user interface; otherwise the image will not disappear. You can deploy your own image to replace the default one (as shown above). For detailed steps, refer to Cloud app launcher > Customize. |
|
"Preload event" group |
(Optional) Specify the commands that will be executed immediately after files are downloaded and before the application starts. For example, you can specify commands to register DLL/OCX files that cannot be registered by Regsrv32 or Regasm or require administrator rights to register; or any other commands that need to be executed with administrator rights. For another example, if your application contains .NET DLLs which have dependencies on the .NET runtime, you can also create a batch file to check and install the .NET runtime on the client and then assign the batch file in the preload event. If the commands need to be executed with the administrator rights, you should select the Run as administrator option. You can specify how often the commands should be executed: if you select "Only when the app first starts or is updated", the commands will be executed for only one time when the application is launched for the first time or when the application is updated; if you select "Every time the app starts", the commands will be executed every time when the application runs. The commands can be any Windows commands or user-defined commands. For example, suppose there is a DLL file from the application that needs to be registered on the client, you can enter the following commands: cd /d "C:\Windows\Microsoft.NET\Framework\v4.0.30319" regasm "%AppData%\Appeon\PBCloud\demo.appeon.com_app1\EncryptDecryptClass.dll" /tlb:testappeon.tlb /codebase /nologo Note: As the commands are executed silently, any commands that will pause the execution and wait for user input will cause the application to wait endlessly. |
|
Commandline argument |
Specify the command line arguments for the application. The arguments will be directly passed to the application when the application is run. The arguments will be automatically saved and updated to the app startup icon on the desktop and the app shortcut menu in Windows start. The arguments specified here are static and cannot be modified at runtime. If you want to pass the argument dynamically at runtime, you can specify the argument in the application URL (for example, http://localhost/salesdemo/?arg=1). But note that the arguments appended to the application URL cannot contain special characters such as "?", "#", as they have special meanings in HTTP URL; if you want to use these characters in the argument name or value, you can specify them in Commandline argument as static arguments, so that they can be passed to the application directly instead of being sent as part of the URL. You can also pass arguments to the EXE directly. If there are multiple arguments, please include them in quotation marks or separate them with a delimiter (instead of a space), for example, C:\Users\<username>\AppData\Roaming\PBApps\Applications\localhost_<appname>\<appname>.exe "parm1 parm2 parm3" C:\Users\<username>\AppData\Roaming\PBApps\Applications\localhost_<appname>\<appname>.exe parm1/parm2/parm3 If the commandline argument is specified on the client, in the URL or desktop shortcut, and if you want to save the argument in pbapp.ini for future access, you can select the "Save the argument(s) in the pbapp.ini file for future access" option. By default, the arguments will not be saved to the pbapp.ini file. |


