CacheName (read more)
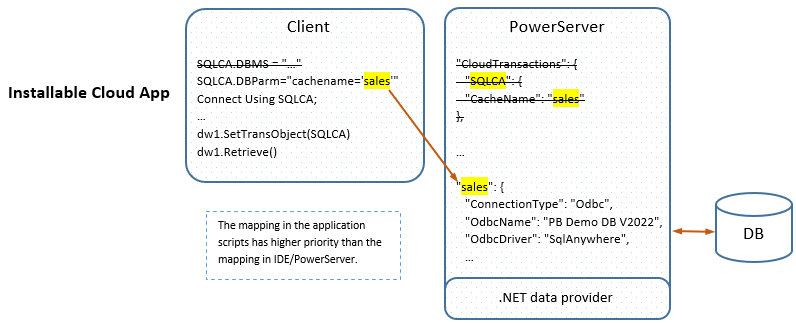
Besides mapping the transaction object with the cache through the IDE or PowerServer, you can also map the transaction object with the cache through the application scripts (using the DBParm CacheName property, as shown below).
SQLCA.DBParm="cachename='sales'"
CacheGroup (read more)
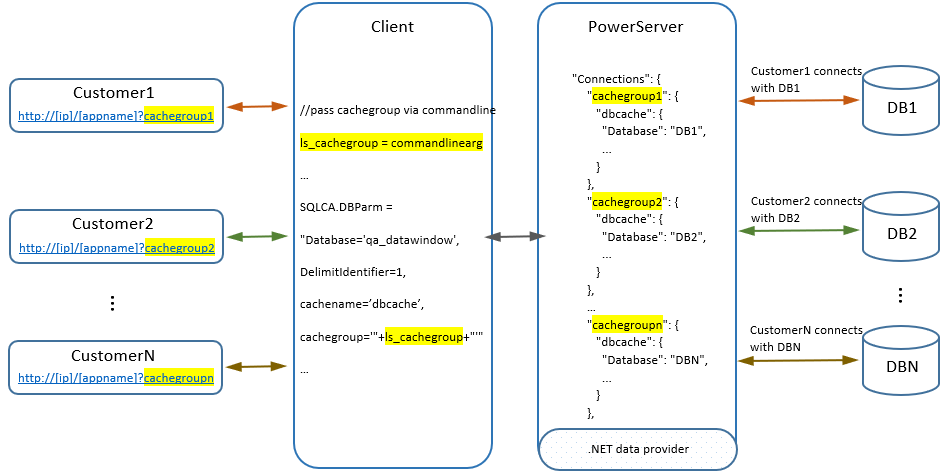
You can also define multiple cache groups (each group contains one or more caches) in PowerServer. With cache groups, one application can support different database scenarios while no code change is needed.
SQLCA.DBParm = "Database='qa_datawindow',DelimitIdentifier=1,cachename='dbcache',cachegroup='"+ls_cachegroup+"'"
LogID and LogPass (read more)
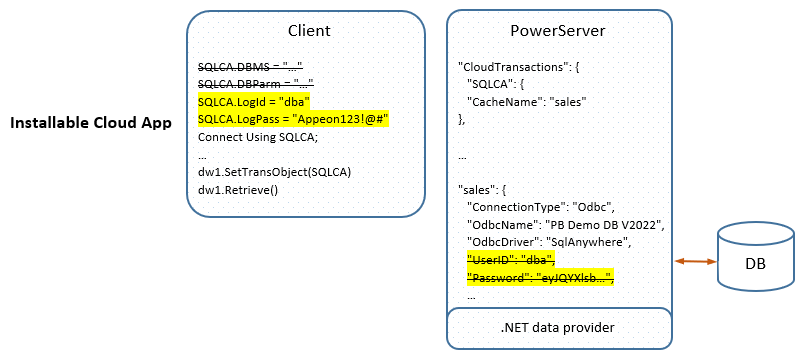
You can also use the LogID and LogPass property values of the Transaction object to log in to the database server (instead of using the user name and password in the cache). This makes the installable cloud app to be able to connect to the database based on the user credentials provided at runtime.
The Applications.json file is generated under the compiled Web API > AppConfig folder (or in the solution > UserExtensions project > AppConfig folder).
It contains the following settings of each deployed application:
You can directly modify this file in the Web APIs and then restart Web APIs for the changes to take effect.
{
  "Applications": {
    "salesdemo_cloud": {
      "CloudTransactions": {
        "sqlca": {
          "CacheName": "sales"
        }
      },
      "Transaction": {
        "Timeout": 120,
        "TransactionException": true
      },
      "Session": {
        "Timeout": 3600
      },
      "Request": {
        "Timeout": 3600
      },
      "RunMode": 0,
      "MaxSPCache": 50
    }
  },
  "Connections": {
    "Default": {
      "sales": {
        "ConnectionType": "Odbc",
        "OdbcName": "PB Demo DB V2022R2",
        "OdbcDriver": "SqlAnywhere",
        "UserID": "dba",
        "Password": "eyJQY...",
        "CommandTimeout": 30,
        "SecurityOptions": null,
        "OtherOptions": null,
        "DynamicConnection": false
      }
    }
  }
}


