The Cloud App Launcher is a lightweight helper program that must be installed on the client machine. It enables installation, launching, and updating of applications over HTTP/HTTPS, and also allows users to start the application via a web browser.
Why it is needed
The cloud app launcher is required when running the following PowerBuilder applications:
-
PowerServer-deployed applications (three-tier architecture where database interactions can be hosted in the cloud)
-
PowerClient-deployed applications (traditional client/server architecture with direct database connection)
It works as a "helper" application that
-
Installs, launches, and updates applications over HTTP/HTTPS.
-
Allows applications to be launched from a web browser (the web browser launches the cloud app launcher; and then the cloud app launcher launches the application)
-
Enforces security by:
-
Downloading only from allowed URLs (as defined in apprun.json).
-
Executing only applications flagged with "appeon".
-
Versions and admin rights
The cloud app launcher is available in two versions:
|
Standard version |
Public version |
|
|---|---|---|
|
Administrator rights required? |
No No admin rights are required to install, use, upgrade, and uninstall this version. |
Yes Admin rights are required to install, upgrade, and uninstall this version. Once installed, this version can be used by all users without admin rights. |
|
Upload to server |
When the Default launcher is uploaded to the server, both versions will be uploaded. When the customized launcher is uploaded, only the version selected in the customized launcher will be uploaded. |
|
|
Setup file download/install |
The setup file is automatically downloaded from the server when the user accesses the application URL; and installed when the user runs the setup file. |
The administrator gets the setup file from the server and installs it manually. |
|
Installation path |
Installed to the user's local folder %localappdata%\CloudAppLauncher_V3. |
Installed to the system programs folder %programfiles(x86)%\Appeon\CloudAppLauncherPublic_V3 folder. |
|
Launching |
Started and used by each user. The launcher starts when the user launches an app, and stays active until manually ended. |
Started automatically and used by all users. The launcher starts automatically with the system and stays active until manually ended. |
|
Priority |
The public version takes precedence if both versions are installed (even if the user has installed the standard version under his own account). |
|
|
Upgrading |
Automatically upgrade. |
Rely on the administrator to upgrade. If the administrator does not promptly upgrade it to the latest version, when the user runs the application, s/he will be prompted to contact the administrator to upgrade the launcher. |
|
Uninstallation |
Uninstalled by each user. |
Uninstalled by the administrator. |
Install the standard version
The standard version will be automatically downloaded when the user runs the application for the first time. If the download does not start automatically, the user will need to click the Download the Launcher button to download the setup file, and then run the setup file to install the cloud app launcher.
The standard version is installed to %localappdata%\CloudAppLauncher_V3, for example C:\Users\appeon\AppData\Local\CloudAppLauncher_V3.
The application and runtime are installed to %appdata%\PBApps, for example, C:\Users\appeon\AppData\Roaming\PBApps\Applications\.
Install the public version
The public version must be installed by the administrator so that once installed it can be used by all users on that client machine.
The setup file of the public version can be obtained from the server after the launcher was uploaded, for example, C:\inetpub\wwwroot\CloudAppPublisher\CloudAppInstall [version]\CloudAppLauncherPublic_Installer.exe (or CloudAppLauncherPublic_Installer.msi).
To install the public version, the administrator can directly run the setup file (EXE or MSI).
The public version is installed to %programfiles(x86)%\Appeon\CloudAppLauncherPublic_V3, for example C:\Program Files (x86)\Appeon\CloudAppLauncherPublic_V3.
The application and runtime are installed to %appdata%\PBApps, for example, C:\Users\appeon\AppData\Roaming\PBApps\Applications\.
Silent installation (EXE)
For public version:
CloudAppLauncherPublic_Installer.exe /s /AppInstallPath=""%appdata%\PBApps"" /CalInstallPath=""%programfiles(x86)%\Appeon\CloudAppLauncherPublic_V3""
For standard version:
CloudAppLauncher_Installer.exe /s /AppInstallPath=""%appdata%\PBApps"" /CalInstallPath=""%localappdata%\CloudAppLauncher_V3""
-
/s - starts the silent installation mode.
-
/AppInstallPath -- (optional) specifies the installation path for the application.
-
/CalInstallPath -- (optional) specifies the installation path for the cloud app launcher.
Silent installation (MSI)
For public version:
CloudAppLauncherPublic_Installer.msi /qn APPINSTALLPATH=""%appdata%\PBApps"" CALINSTALLPATH=""%programfiles(x86)%\Appeon\CloudAppLauncherPublic_V3""
For standard version:
CloudAppLauncher_Installer.msi /qn APPINSTALLPATH=""%appdata%\PBApps"" CALINSTALLPATH=""%localappdata%\CloudAppLauncher_V3""
-
/qn - starts the silent installation mode.
-
APPINSTALLPATH -- (optional) specifies the installation path for the application.
-
CALINSTALLPATH -- (optional) specifies the installation path for the cloud app launcher.
Note
The MSI file doe not prompt for permission errors. Ensure all paths are accessible by the user.
If the MSI file is used, you will need to make sure the installation path for the application and the cloud app launcher can be accessed and executed by the end user, otherwise, the application or the cloud app launcher may fail to run. The end user will not be prompted for the permission issue (this is a limitation with MSI file).
If the EXE file is used, the end user will be prompted to select a different path if s/he has no sufficient rights to install to the specified path for the application or the cloud app launcher; they cannot proceed with the installation process until they select an appropriate path.
Uninstallation
You can run the launcher uninstall program from Windows > Add or remove programs. For public version, uninstall "Cloud App Launcher Service V3", for standard version, uninstall "Cloud App Launcher V3".
To silently uninstall the launcher, run the SilentUninstall.bat file under the installation path.
Installed EXE files
The following executable files are installed (same for both versions):
-
AppLauncher_V3.exe
-
CloudAppUninstall.exe
-
execmd.exe
-
LauncherSetup.exe (or LauncherPublic.exe for public version)
Multiple version (V2 & V3) coexistence
Cloud App Launcher V3 (from PowerBuilder 2025) can coexist with Cloud App Launcher V2 (from PowerBuilder 2022 R3).
(1) Launcher V3 supports applications deployed in PowerBuilder 2025.
(2) Launcher V2 supports applications deployed in PowerBuilder 2022, 2022 R2, or 2022 R3.
As to the launchers of version 2019 R3 and 2021, these two launchers will not coexist on the server and the client; only one of them will exist (either 2019 R3 or 2021). And the application deployed in 2019 R3 or 2021 can work with either of them. View here for more information.
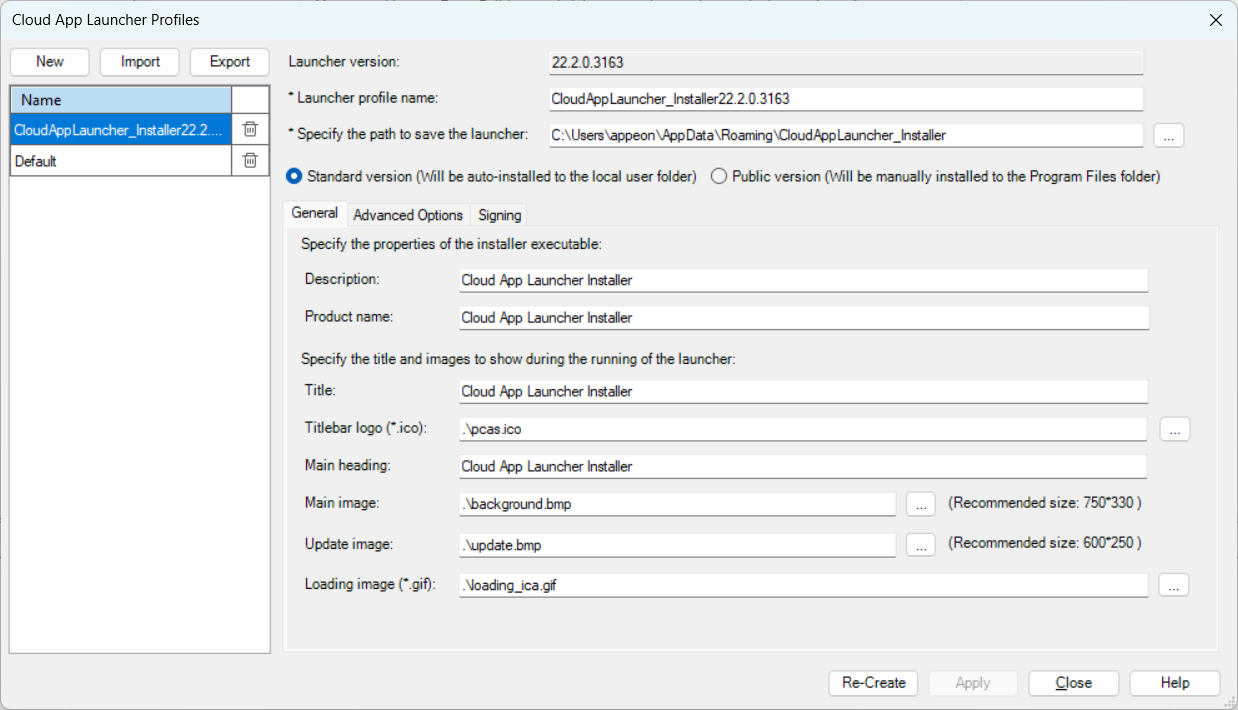
Instead of uploading the default app launcher, you can create your own launcher and upload it.
To create and customize the launcher:
-
Click the Cloud App Launcher Profile button on the PowerClient Toolkit toolbar, or select PowerClient > Cloud App Launcher Profile from the menu bar. The Cloud App Launcher Profiles window appears.
-
In the Cloud App Launcher Profiles window, select an existing profile on the left, and then modify the settings on the right (you can also delete, import, or export a profile).
The Default profile cannot be modified, exported, or deleted.
To create a new launcher profile, you can click the New button.
In the New Launcher Profile window, create the profile with the following settings:
-
Specify a profile name for the new launcher.
-
Select the version of the launcher: standard version or public version. If you are not sure which version to select, refer to the previous section About cloud app launcher for their differences.
-
Specify where to save the launcher profile on the local machine.
-
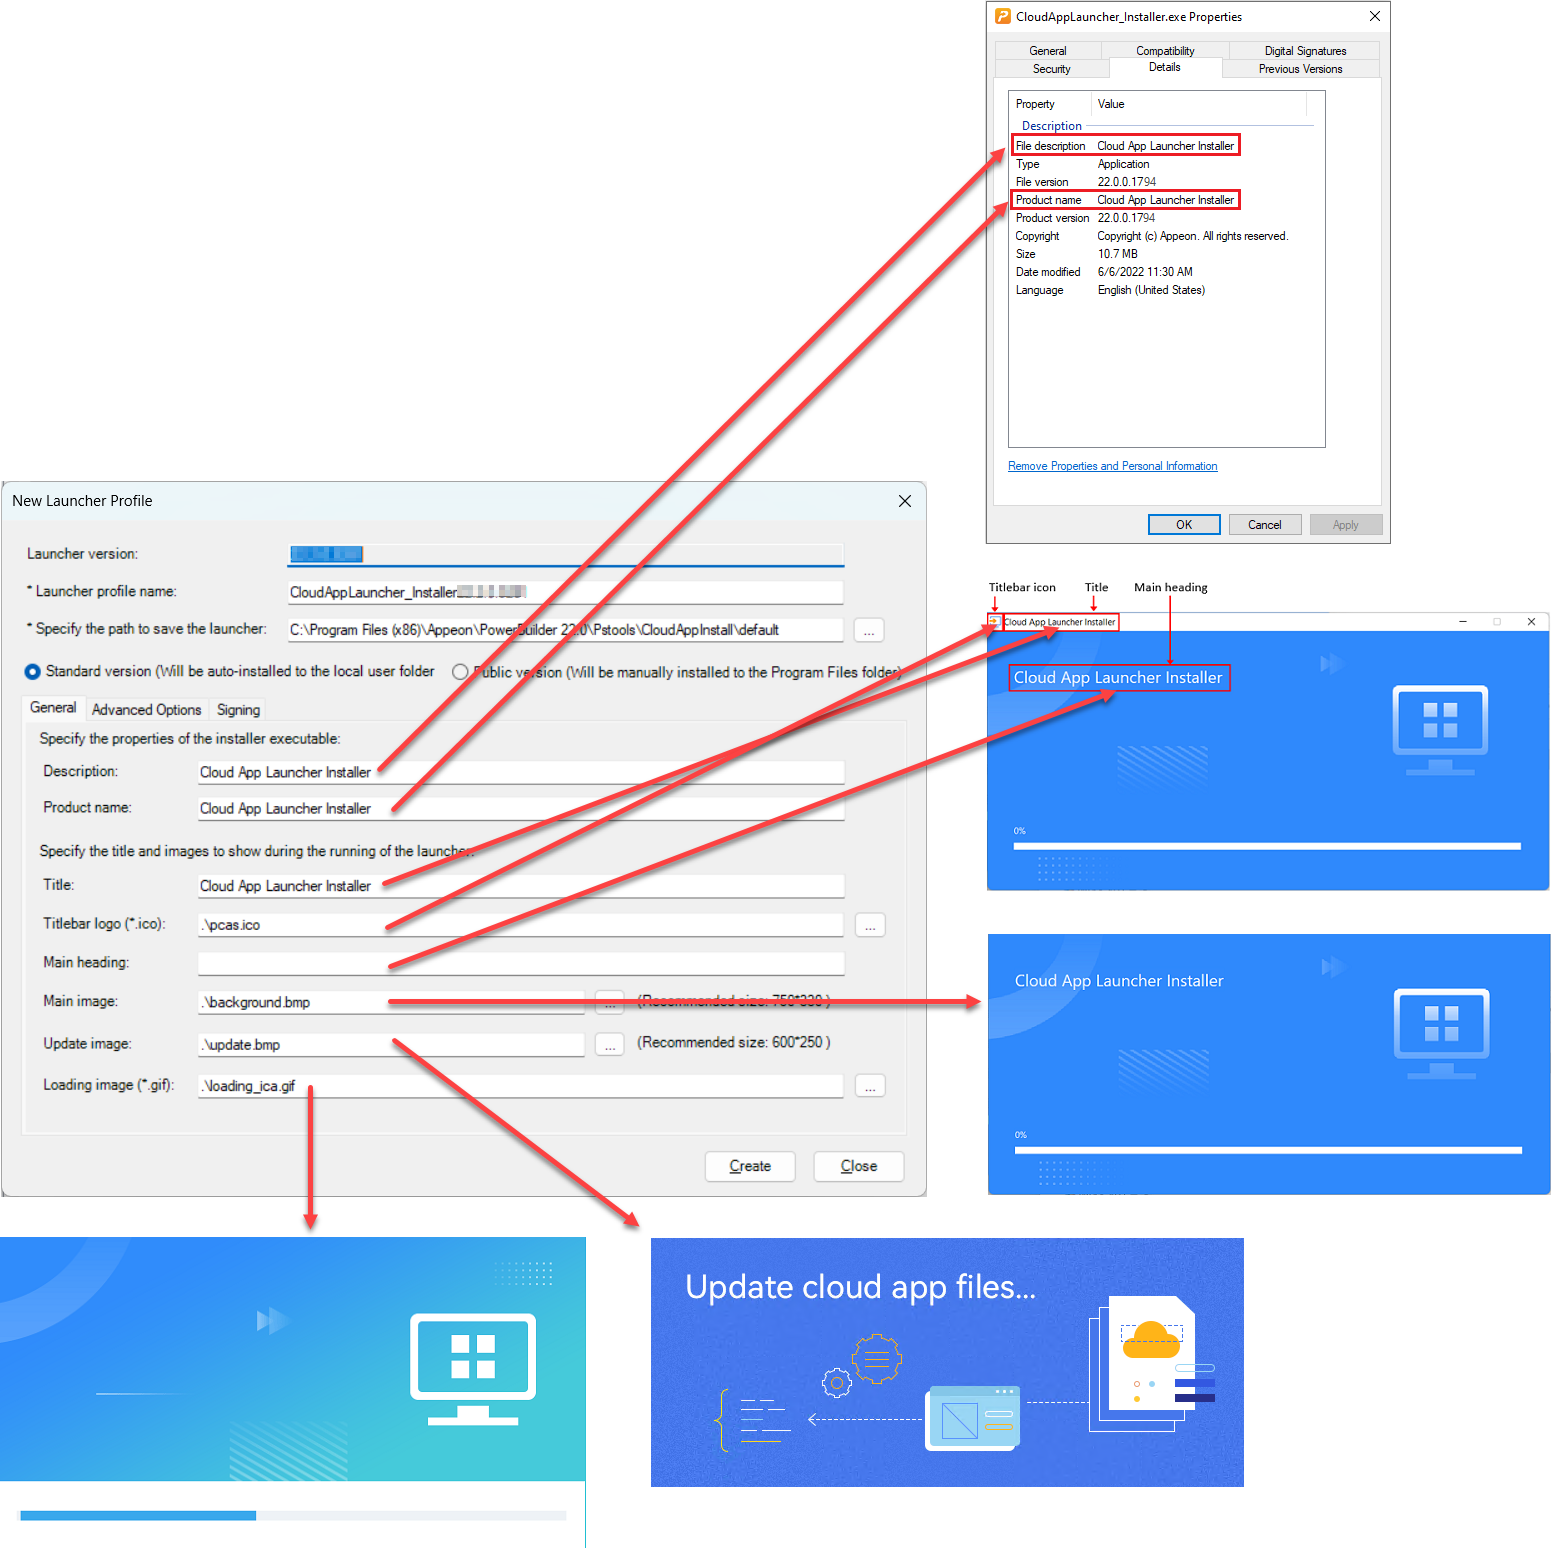
On the General tab, specify the following settings:
-
the description and product name that will be shown in the Properties page of the launcher EXE file
-
the title, titlebar logo (ICO format), main image (background), update image, and loading image that will be shown during the launcher installation and startup progress
The titlebar logo can be in the ICO format only.
The main image can be in the following formats: JPG, JPEG, PNG, and BMP.
The update image can be in the following formats: JPG, JPEG, PNG, and BMP.
The loading image can be in the GIF format only.
Make sure the path and file name are correct. You can specify an absolute path or relative path of the image. If it is a relative path, it is relative to the path of launcher template, for example, the full path of ".\pcas.ico" is "C:\Program Files (x86)\Appeon\PowerBuilder [version]\Pstools\CloudAppInstall\pcas.ico. The file name is not necessarily the same as the default, for example, you can specify "D:\custom\launcher.ico" as the titlebar logo.
The specified images will be packaged with the launcher. However, if the path or file name is incorrect, then the default image will be packaged.
-
-
On the Advanced Options tab, specify where to install the application on the client. The path in the App path field will be used as the default installation path. If you want to allow the user to select where to install the application during the installation process, you can select "Allow the user to change the path".
-
On the Advanced Options tab, specify where to install the cloud app launcher on the client. The path in the Install path field will be used as the default installation path. If you want to allow the user to select where to install the cloud app launcher during the installation process, you can select "Allow the user to change the install path".
-
If "standard version" is selected, you can specify whether to allow the user to change the installation path of launcher, but the standard version should not be installed to the same location where the public version is installed.
-
If "public version" is selected, you should not allow the user to change the installation path of launcher.
If the end user has no sufficient rights to install to the default or specified path for the application or the cloud app launcher, they will be prompted to select an appropriate path before they can proceed with the installation process.
-
-
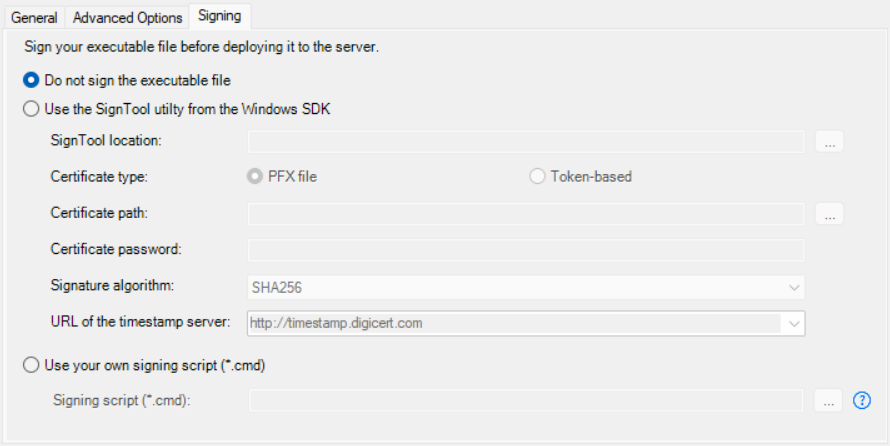
On the Signing tab, select whether to digitally sign the launcher executable file (CloudAppLauncher_Installer.exe).
For more information, refer to Signing.
After the executable file is generated and before it is uploaded to the server, PowerBuilder will sign the executable file using your own signing scripts or using the SignTool settings you specified.
Note
If you want to sign your customized Cloud App Launcher using the SignTool utility, ensure that the current Windows OS account that runs the PowerBuilder IDE has permission to access the specified URL of the timestamp server. Otherwise, the signing may fail.
-

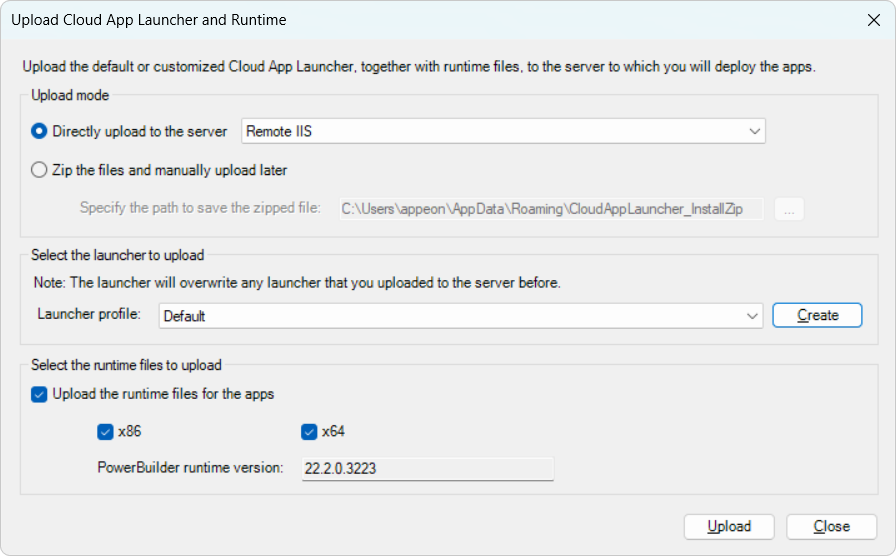
The app launcher and the runtime files must be uploaded to the Web server, and then installed to the client when the application is run for the first time. Apps deployed to the same server and directory will use the same app launcher and the same runtime files. There will be only one app launcher in the specified server and directory, although there can be multiple versions of runtime files. The app launcher will be overwritten without notice by the one uploaded later to the same server and directory.
-
In the Upload Cloud App Launcher and Runtime window, select whether to directly upload the app launcher and runtime files to the server or create a zip package and manually upload it to the server later.
-
To directly upload the app launcher and runtime files to the server, select a local server or a remote server where the app launcher and the runtime files will be uploaded.
IMPORTANT: the app launcher and runtime files must be uploaded to the same web root where the application will be deployed. If you have not configured the server yet, follow instructions in Configuring a deployment server to configure the server first.
-
To create a zip package which will be manually uploaded later, specify where the zip package will be created.
-
-
Select a launcher profile from the Launcher profile list box.
You can select the default or customized app launcher.
-
Select the check boxes to upload the runtime files, 32-bit Runtime file, and/or 64-bit Runtime files.
The version of runtime files is determined by the runtime version selected in the IDE > System Options dialog. Multiple versions of runtime files can co-exist on the same server and directory.
-
Click Upload.
Note
When uploading Cloud App Launcher to the server directly, if you receive the "Error code: 6" error, it means that you have no right to write in the server folder. The solution is to run PowerBuilder IDE as administrator.