When the application is deployed to the server, the app files and configuration files are generated with hash codes, to prevent files changed illegally from running. Therefore, you cannot directly change the deployed settings/files on the server, instead you will have to make changes in the project painter and then deploy the application again, or modify the settings/files using commands (CustomizeDeploy.dll) without needing to re-deploy the application.
Note
You need to run the command line tool (the CustomizeDeploy.dll tool) as an administrator, otherwise, you may encounter the error: Access to the path '...\salesdemo_local\1.01\appconfig.json.zip' is denied.
The CustomizeDeploy.dll tool allows you to:
-
Change the External Files -- The "External Files" refers to the packages, folders, and files (such as INI files, DLL/OCX etc.) that are deployed from External Files in the PowerClient project painter > Application page.
-
Ignore server certificate errors -- You can configure ignoring the server certificate without deploying the application again.
The CustomizeDeploy.dll tool is located in the server: %WebRoot%\[appname]\[version]\CustomizeDeploy.dll.
To execute the CustomizeDeploy.dll file using the dotnet command, you will need to install the ASP.NET Core Runtime 3.1 or later in the server.
To run CustomizeDeploy.dll in Windows Web server:
-
Install the ASP.NET Core Runtime 3.1 or later.
-
Open the command prompt. (You'd better run the command prompt using an administrator by right-clicking it and then selecting "Run as administrator").
-
Navigate to the Web server root folder > [appname] folder > [version] folder (for example, C:\inetpub\wwwroot\salesdemo_local\1.01).
-
Execute the CustomizeDeploy.dll file using the dotnet command.
To run CustomizeDeploy.dll in Linux Web server:
-
Install the ASP.NET Core Runtime 3.1 or later.
dnf install aspnetcore-runtime-5.0
-
Go to the Web server root folder > [appname] folder > [version] folder (for example, /var/www/html/salesdemo_local/1.01, or /usr/share/nginx/html/salesdemo_local/1.01).
-
Right click the blank area within the folder and then select Open in Terminal.
-
Execute the CustomizeDeploy.dll file using the dotnet command. Notice that the command and file name are all case-sensitive in the Linux OS.
The "External Files" refers to the packages, folders, and files (such as INI files, DLL/OCX etc.) that are deployed from External Files in the PowerClient project painter > Application page.
To replace the External Files (such as INI, DLL/OCX etc.) for a deployed application:
-
Install the ASP.NET Core Runtime 3.1 or later.
-
Open the command prompt. (You'd better run the command prompt using an administrator by right-clicking it and then selecting "Run as administrator").
-
Navigate to the server root folder > [appname] folder > [version] folder.
If you have created multiple deployment versions for the application, you will have multiple sub-folders, such as 1.01, 1.02, etc., make sure you navigate to the folder of the current deployment version, for example, C:\inetpub\wwwroot\salesdemo_cloud\1.01.
-
Execute the CustomizeDeploy.dll file using the dotnet command.
dotnet CustomizeDeploy.dll -src=<source file> -dest=<destination file>
The "src" argument should point to the new file that you want to use to replace the old file.
The "dest" argument should point to the old file that you want to replace with the new file.
When external files are deployed to the server, they are appended with the file extension ".zip", but they are not compressed files (the only exception is package). For example, if apisetup.ini is selected in External Files, it will be deployed as apisetup.ini.zip to the server, however, apisetup.ini.zip is not a compressed file and it can be directly opened in a text editor just like apisetup.ini.
And to replace the file, you should prepare the source file without .zip extension.
For example,
dotnet CustomizeDeploy.dll -src=/new/apisetup.ini -dest=apisetup.ini.zip
Or
dotnet CustomizeDeploy.dll -src=/new/new.ini -dest=apisetup.ini.zip
The only exception is the package which is indeed compressed as the zip format (with file extension ".zip.zip"). Therefore, you should prepare the source file for the package in the compressed zip format.
For example,
dotnet CustomizeDeploy.dll -src=/new/theme.zip -dest=theme.zip.zip
Or
dotnet CustomizeDeploy.dll -src=/new/aaa.zip -dest=theme.zip.zip
Note
The tool will replace the package as a whole (and refresh the hash code of the package) but it will not validate the individual files included in the package. Therefore you need to make sure the files included in the package are correct and complete.
You can configure whether to ignore server certificate in the PowerClient project painter > Security page, and then deploy the application to make the settings effective. For details, refer to Security page.
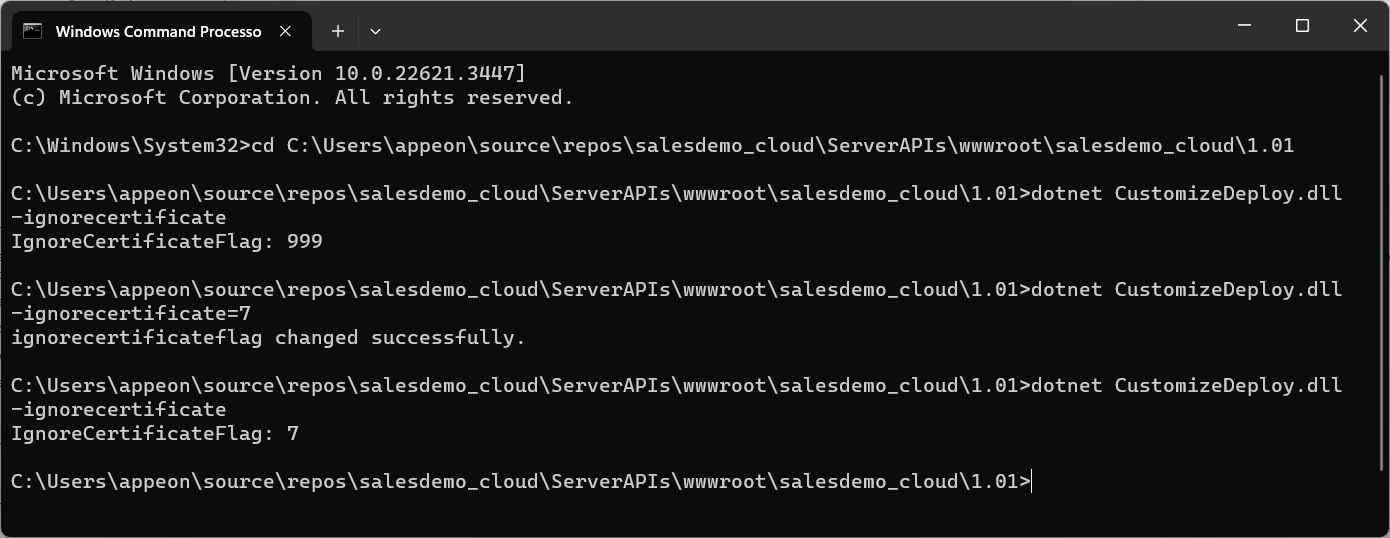
After the deployment, if you want to set the ignore option without deploying the application again, you can use the CustomizeDeploy.dll tool.
Step 1: Open Command Prompt and navigate to the server root folder > [appname] folder > [version] folder. Make sure you navigate to the folder of the current deployment version, for example, C:\inetpub\wwwroot\salesdemo_cloud\1.01.
Step 2: Execute the CustomizeDeploy.dll file using the dotnet command to get and set the value.
The value of "ignorecertificate" can be 0, 1, 2, 4, 8, 999, or a sum of two or more values of 1, 2, 4, 8. If "ignorecertificate" is specified without a value, the current value will be returned.
To get the current value, execute
dotnet CustomizeDeploy.dll -ignorecertificate
To set the value, execute
dotnet CustomizeDeploy.dll -ignorecertificate=<value>