Besides building your client/server application project in the PowerBuilder IDE, you can also build your client/server application project using a command line tool (PBAutoBuild250.exe).
For convenience, you can directly export the configuration of an existing client/server application project from the PowerBuilder IDE to a JSON build file. Therefore, you will need to prepare a proper environment first.
Step 1: Install the following software to set up the PowerBuilder development environment.
-
Windows 11 or 10
-
PowerBuilder IDE 2025
-
PowerBuilder Runtime 2025
Step 2: Created and build the Application project for the Example Sales Demo successfully in the PowerBuilder IDE.
Now let's export the Application project settings of the Example Sales Demo to a JSON file.
You can export the current project or all projects from the workspace (or target).
To export the current project:
-
Open the workspace for the Example Sales App in the PowerBuilder IDE, and then double-click the Application project object to open the Application project painter.
-
When the Application project painter is opened, click the Export Build File button (
 ) in the toolbar.
-
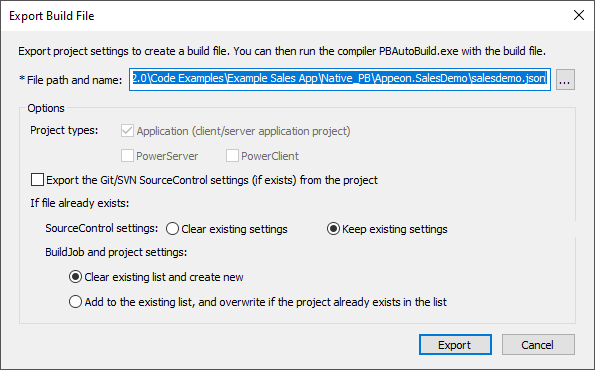
In the Export Build File dialog box, specify the settings, write down the path and filename to be exported, and then click Export.
For more information about the settings, refer to Building a client/server application with commands.
The current project will be exported to the build file.
To export all of the projects from the workspace (or target):
-
Open the workspace for the Example Sales App in the PowerBuilder IDE, and then right click the workspace (or target) in the System Tree and select Export Build File.
-
In the Export Build File dialog box, select which target(s) to be exported.
If the workspace contains multiple targets, then by default all targets will be exported to the same build file.
-
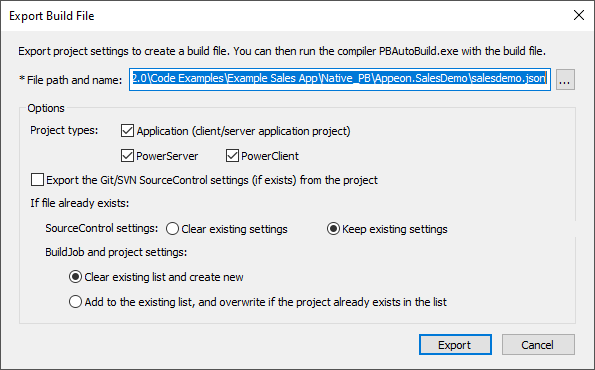
Select which project type(s) to be exported.
By default, all project types under the workspace (or target) will be exported to the build file.
-
Specify the settings, write down the path and filename to be exported, and then click Export.
The exported build file contains all the settings required for building and deploying the PBL of the Example Sales App and some additional settings:
|
Build file content |
Description |
|---|---|
    "MetaInfo": {
        "IDEVersion": "250",
        "RuntimeVersion": "25.0.0.1311"
}, |
This section contains the version number of the PowerBuilder IDE and PowerBuilder Runtime currently in use. |
    "BuildPlan": {
        "SourceControl": {
            "PreCommand": "",
            "ClearSrcBeforeDownload": false,
            "SVN": [
                ...
            ],
            "Git": [
                ...
            ],
            "VSS": [
                ...
            ],
            "Merging": [
                ...
            ],
            "PostCommand": ""
        },
        "BuildJob": {
            "PreCommand": "",
            "Projects": [
                ...
       ],
            "PostCommand": ""
        }
}, |
This section contains settings for source control and build jobs.
Both the "SourceControl" and "BuildJob" blocks contain a "PreCommand" setting and a "PostCommand" setting which allow you to specify commands that can be executed before and/or after that particular block is executed. See Executing additional commands for more examples. The commands in "PreCommand" and "PostCommand" can be executed in synchronous (default) or asynchronous mode, and the command window can be visible or invisible (default). For example, "PostCommand": "postcmd.bat /show /async" |
    "Projects": {
        "project1": {
            ...
        },
        "project2": {
            ...
        },
        "project3": {
            ...
        },
        ...
} |
This section lists the project(s) that has been exported. Every single setting that can be found in the project painter can also be found here. You can modify the settings here when necessary. |
Settings in the build file are independent from each other; they run in sequence but do not rely on other settings or execution results, for example, if there is already source code in ws_objects, then you only need to set the Merging setting, and leave Git, SVN, and VSS empty as there is no need to download source code; or if there are PBLs in your Git server, then you only need to set the Git setting (to download PBLs) and leave the Merging setting empty. If you do not want a setting to run, just leave that setting with no values; or add "\\" in front of the setting name, for example, "\\Git" or "\\SourceControl", to skip the setting.
It is recommended that you make a copy of the exported build file and place it to the same location or a location near your PowerBuilder application target, so that you could manage the file path (especially the relative file path) easily.
Note: the relative path specified in the build file is relative to the build file.
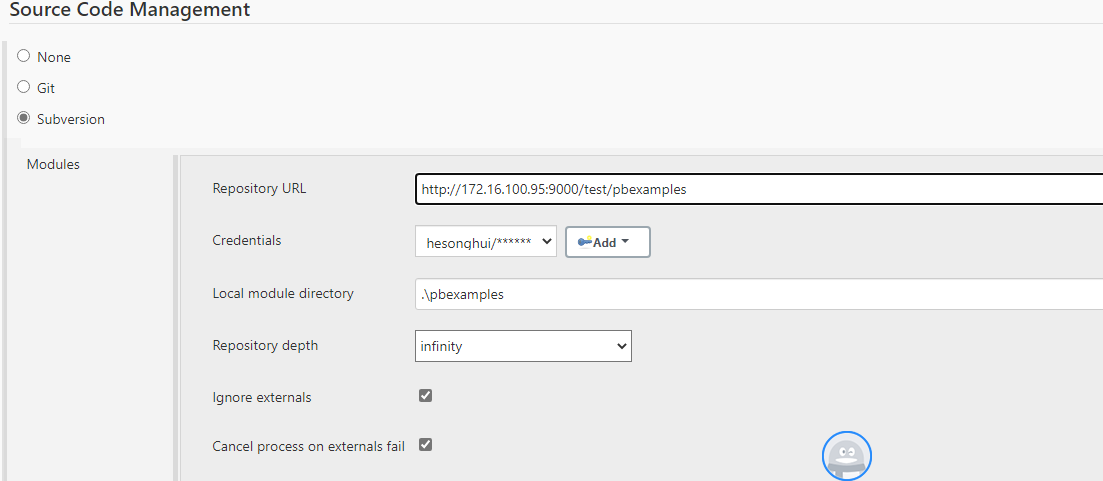
You can configure the exported build file to download source code from SVN, Git, or VSS before the build process starts.
Step 1: Make a copy of the exported build file and place it to a location near your PowerBuilder application target, so that you could manage the file path (especially the relative file path) easily.
Note: the relative path will be relative to the build file.
Step 2: Open the build file in a text editor, locate the "BuildPlan" section and then configure the corresponding part.
If the computer connects to Git or SVN through a proxy server, make sure to configure the proxy server settings in the "Proxy" part.
The following example shows how to download source code from Git:
    "BuildPlan": {
        "SourceControl": {
            "PreCommand": "",
            "ClearSrcBeforeDownload": false,
            "SVN": [
                {"SrcPath": "","User": "","Password": "","DestPath": "","Proxy": {"Ip": "","Port": 0,"Username": "","Password": ""}}
            ],
            "Git": [
                {"SrcPath": "https://github.com/Appeon/PowerBuilder-AutoBuild-Sales-SourceCode", "User": "tester@appeon.com", "Password": "YGRrYjc6OzU=", "DestPath": ".\\Build", "Branch": "", "Proxy": {"Ip": "","Port": 0,"Username": "","Password": ""}}
            ],
You can also download source code from multiple targets at one time:
           "Git": [
                {"SrcPath": "https://github.com/Appeon/PowerBuilder-AutoBuild-Sales-SourceCode", "User": "tester@appeon.com", "Password": "YGRrYjc6OzU=", "DestPath": ".\\Build_Sales", "Branch": "", "Proxy": {"Ip": "","Port": 0,"Username": "","Password": ""}},
                {"SrcPath": "https://github.com/Appeon/PowerBuilder-AutoBuild-Examples-SourceCode", "User": "tester@appeon.com", "Password": "YGRrYjc6OzU=", "DestPath": ".\\Build_Examples", "Branch": "", "Proxy": {"Ip": "","Port": 0,"Username": "","Password": ""}}
            ],
The following example shows how to download source code from Team Foundation Server (TFS) or Azure DevOps Server:
IMPORTANT: To download source code from Team Foundation Server (TFS) or Azure DevOps Server, you will need to configure the "Git" section, and input your Personal Access Token (PAT) as the user name and password for connection.
    "BuildPlan": {
        "SourceControl": {
            "PreCommand": "",
            "ClearSrcBeforeDownload": false,
            "SVN": [
                {"SrcPath": "","User": "","Password": "","DestPath": "","Proxy": {"Ip": "","Port": 0,"Username": "","Password": ""}}
            ],
            "Git": [
                {"SrcPath": "https://402977329@dev.azure.com/402977329/kittytest/_git/kittytest","User": "402977329@qq.com","Password": "ZHFgcXVsZndtY2hicHJkZHxuMXlicXxufjF7OzVzOzB8ejpmcjthZz15eWB5aW0/bDV+eQ==","DestPath": "C:\\TFStest\\bug1853_1","Branch": "master","Proxy": {"Ip": "","Port": 0,"Username": "","Password": ""}}
            ],
The following example shows how to download source code from VSS:
    "BuildPlan": {
        "SourceControl": {
            "PreCommand": "",
            "ClearSrcBeforeDownload": false,
            "SVN": [
                {"SrcPath": "","User": "","Password": "","DestPath": "","Proxy": {"Ip": "","Port": 0,"Username": "","Password": ""}}
            ],
           "Git": [
                {"SrcPath": "","User": "","Password": "","DestPath": "","Branch": "","Proxy": {"Ip": "","Port": 0,"Username": "","Password": ""}}
            ],
            "VSS": [
                {"SrcPath": "\\\\192.168.0.100\\Project_VSS\\\"$/Salesdemo/native_pb/appeon.salesdemo\", YYOAAAAA","User": "tester","Password": "","DestPath": ".\\Build"}
            ],
Notes:
1) Connecting to Git or SVN through a proxy server is supported; but connecting to VSS through a proxy server is not supported yet.
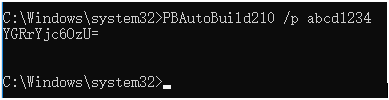
2) The password for VSS is not supported. The VSS login window will be displayed for you to input the password before downloading the source code. The password for SVN or Git must be an encrypted value which is generated from the original password by executing "PBAutoBuild250.exe /p", as shown below.
3) Getting an SVN/VSS branch is completely unsupported. Getting a Git branch can be supported by using the "Branch" setting.
Note
Merging source code into PBLs is required only for the workspace format.
If the source code downloaded from SVN, Git, or VSS is not the PBL file but objects in ws_objects, then you will need to merge the objects to the PBL file. Locate the "Merging" section in the build file and then configure as below:
Setting "RefreshPbl" to true if you want to refresh the PBL by deleting and then generating the PBL again.
            "Merging": [
                {"Target": ".\\Build\\salesdemo.pbt", "LocalProjectPath": ".\\Build", "RefreshPbl": false}
            ],
You can also merge source code for multiple targets at one time:
            "Merging": [
                {"Target": ".\\Build_Sales\\salesdemo.pbt", "LocalProjectPath": ".\\Build_sales", "RefreshPbl": true},
                {"Target": ".\\Build_Examples\\examples.pbt", "LocalProjectPath": ".\\Build_Examples", "RefreshPbl": true}
            ],
Merging will not only merge the source code but also upgrade the source code to the current version. However, it will not check or upgrade the PBD files used in the library list (you will need to replace the PBD files with the corresponding version).
At the same time, make sure to double check the target location is set correctly in the "Projects" section, for example,
        "BuildJob": {
            "PreCommand": "",
            "Projects": [
                {"Target": ".\\Build_Sales\\salesdemo.pbt", "Name": "salesdemo_pbnative"}
                {"Target": ".\\Build_Examples\\examples.pbt", "Name": "examplesdemo_pbnative"}
            ],
            "PostCommand": ""
        }
When the PBAutoBuild250.exe command is executed later, it will first download the source code from the Git server and then merge the source code in three steps:
-
Create PBL file
-
Import objects into each PBL
-
Compile objects in the PBL.
The entire build process is made up of several steps, and additional commands can be executed before and/or after some particular steps such as the "SourceControl" and "BuildJob" steps.
For example, to add commands to remove a folder before downloading the source code.
Step 1: Create a bat file which contains the following command, and save the bat file as Command_DeleteFolder.bat.
RMDIR /s /q "D:\PB2025\SalesDemo\test"
Step 2: In the build file, locate the "BuildPlan" section and then the "PreCommand" sub-section; and add the file path and name of Command_DeleteFolder.bat.
    "BuildPlan": {
        "SourceControl": {
            "PreCommand": "Command_DeleteFolder.bat",
            "ClearSrcBeforeDownload": false,
            "SVN": [
               ...
            ],
When the PBAutoBuild250.exe command is executed later, it will execute the commands in Command_DeleteFolder.bat before it downloads the source code.
Besides the "PreCommand" setting, there is also a "PostCommand" setting for the "SourceControl" and "BuildJob" steps, which allows you to execute commands after that particular step. See Example 2 and 3 for more details.
Note
The dotnet commands can also be integrated with Jenkins. See Task 2 for more details.
To build and deploy the client/server application project using the command line tool (instead of within PowerBuilder IDE), install the following software.
-
Windows 11 or 10, or Windows Server 2025, 2022, 2019, or 2016
-
PowerBuilder Utilities 2025
The command line tool (PBAutoBuild250.exe) is included in PowerBuilder Utilities.
-
PowerBuilder Runtime 2025
The runtime files from the runtime packager are not sufficient for PBAutoBuild to run; you need to install PowerBuilder Runtime by following instructions in the section called “Installing PowerBuilder Runtime” in Application Techniques or install PowerBuilder Runtime in the silent mode by following instructions in the section called “Installing in Silent (Unattended) Mode” in Installation Guide.
The PBAutoBuild250.exe tool can automate the entire build and deploy process outside PowerBuilder (without needing any PowerBuilder license).
Step 1: Copy the exported JSON build file to the current machine and double check the file paths in the build file are appropriate to the current environment.
Step 2: Copy the application source code (including PBT, PBL, PBR, images, INI etc.) to the current machine, or configure the build file to download source code from the source control server.
Step 3: In the command line window, execute the PBAutoBuild250.exe file and the build file. For example,
PBAutoBuild250.exe /f "D:\PB2025\SalesDemo\salesdemo_pbnative.json" /l Log_PBBuild.log /le Log_PBError.log
The PBAutoBuild250.exe file can be running with parameters. For a complete list of supported parameters, refer to PBAutoBuild supported parameters.
Step 4: Carefully check the information in the command line window to make sure the build process is successful.
The build file and commands used in this tutorial can be downloaded from https://github.com/Appeon/PowerBuilder-AutoBuild-Sales-Example. After you download these files to D:\PB2025\SalesDemo\, you can follow instructions in the readme file.
After executing the PBAutoBuild250.exe file and the build file,
you can check if the execution is successful via the Windows
command errorlevel:
-
errorlevel = 0 indicates the process was successful.
-
errorlevel = non-zero number indicates the process encountered an error.
For example, you can write scripts like below to check the execution result:
Echo off
PBAutoBuild250.exe /f "D:\PB2025\SalesDemo\salesdemo_pbnative.json" /l Log_PBBuild.log /le Log_PBError.log
If %ERRORLEVEL% == 0 (
    echo Run PBAutoBuild successfully.
) Else (
    echo Failed to run PBAutoBuild, Errorlevel is %ERRORLEVEL%.
)The PBAutoBuild250 command can integrate with Jenkins to automate the build process for Application projects. Refer to the Jenkins user documentations for how to use Jenkins.
Following gives a few examples on how to integrate the PBAutoBuild250 command with Jenkins.
For example, to execute the PBAutoBuild250 command and the build file.

For example, to download source code from SVN, Git, or VSS, and then execute the PBAutoBuild250 command and the build file. (Double check that the PBT location is the same one in all required areas.)