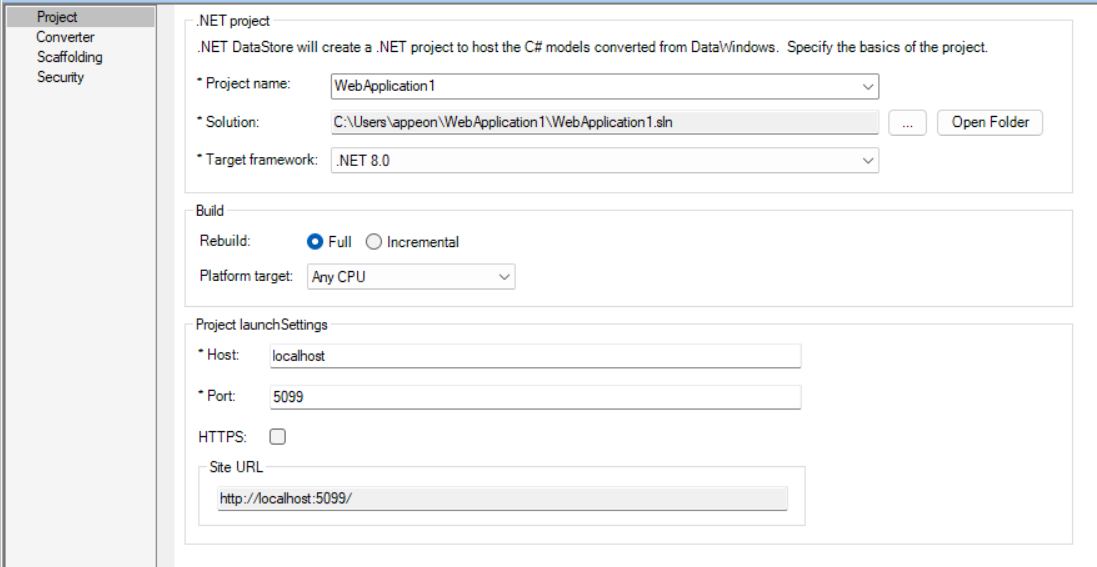
Once you have created a .NET DataStore project, you can open it from the System Tree and modify the properties if necessary. The Project painter for the .NET DataStore project looks like this.
The following sections describe each of the options you can specify in the Project painter for .NET DataStore.
Note
If you want to view an example of the .NET DataStore project, you can open the demo app, for example, from Windows Start | Appeon PowerBuilder [version] | Example Sales App, and view the .NET DataStore project included in the demo.
The Project page has the following settings:
-
.NET Project
Project name -- Specify a name for the .NET project.
Project location -- Specify the location for the .NET project.
Target framework -- Specify the .NET version that the project is targeted to. Currently only .NET 8.0 is supported.
-
Build
Rebuild -- Specify whether to perform a full or incremental build to the .NET project when running from the IDE (when you click the Run Project button in the toolbar, the .NET project will be built and run locally).
Platform target -- Select which platform (32-bit, 64-bit, ARM32, ARM64, or any) the .NET project will target when running from the IDE.
-
Project launch settings
Host -- Specify the host name or IP address of the API server.
Port -- Specify the port number of the API server.
HTTPS -- Specify the connection method for the API server.
Site URL -- The site URL is automatically generated based on the host name, port number, & connection method.
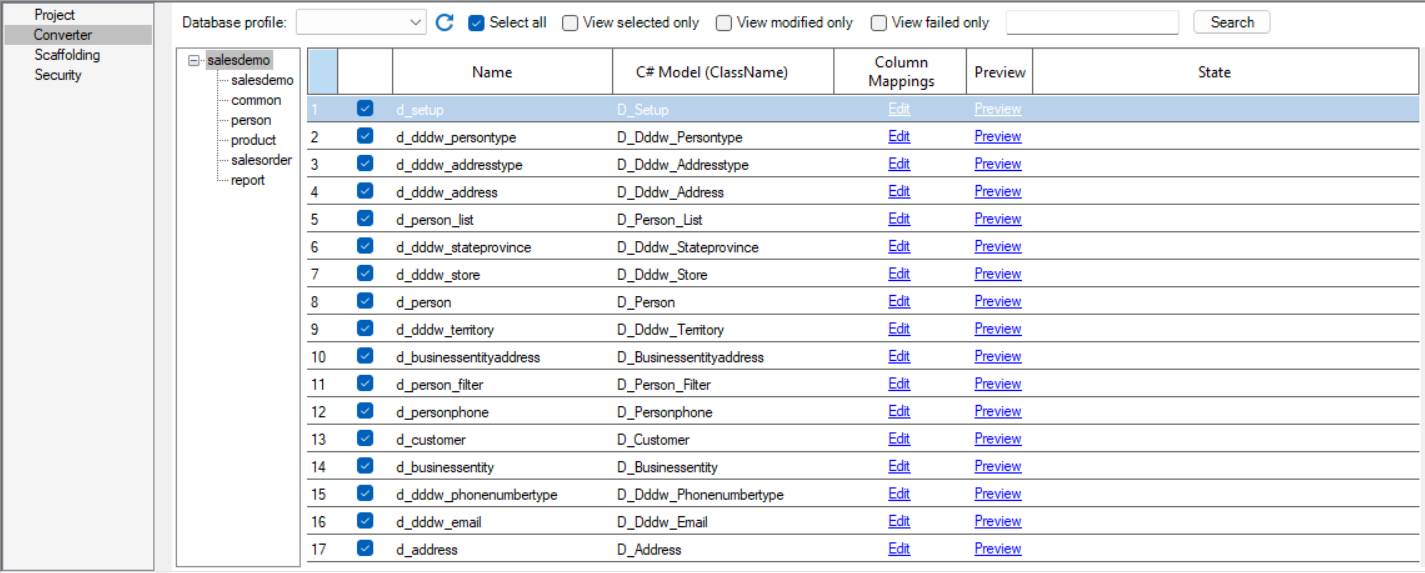
The Converter page allows you to:
-
Create the database connection
Select an existing connection or select Choose connection from the Database profile list to create a new connection.
-
Locate the DataWindow object
All of the DataWindow objects contained in the current target are selected by default in the project painter > Converter page.
You can quickly find and/or select the DataWindow objects you want, for example, you can select the check box before PBL to select all of the DataWindow objects contained in it, you can input the object name in the search box to find the DataWindow, or you can select to show the modified or failed DataWindow objects which you can make corrections.
-
View selected only -- Shows only the DataWindow objects that are selected right now.
-
View modified only -- Shows only the DataWindow objects whose C# class names or property names have been modified.
-
View failed only -- Shows only the DataWindow objects which failed to be parsed.
-
Search box -- Searches for a particular DataWindow object.
-
-
Modify the class name or property name
For each C# class that is generated from the DataWindow object, it will be named after the DataWindow object by default; and likewise, for each C# property that is generated from the DataWindow column, it will be named after the DataWindow column by default. Instead of using these default names, you can modify the name of the C# class and property to be generated.
To add name prefix and/or suffix to the name of all of the model classes at one time, you can specify the Model name settings in the Options window (clicking the Converter Settings button in the toolbar to show the Options window).
To modify the name of each individual C# class, you can click the class name and then change it.
To modify the name of each individual C# property, you can click the Edit button and then click the property name and modify it.
After you modify the class name or the property name, the corresponding object will be shown when you select View modified only.
The Scaffolding page has the following settings:
-
Generate Service(s) -- Select this option if you want to generate services from the models.
Template: Select a template from the list, to generate the services/APIs for different use cases.
-
Repository_Pattern_Service_DataStore_for_PBClient -- The generated APIs handle the data in the DataWindow JSON format which is specific to the PowerBuilder DataWindow object and can be directly called by the PowerBuilder RESTClient object (via functions such as RetrieveWithModel, UpdateWithModel, RetrieveOrUpdateWithModels, Submit). Choose this template if your API will primarily be used by PowerBuilder DataWindows. This reduces the need for data transformation or manual conversions, improving efficiency and minimizing development overhead.
-
Repository_Pattern_Service_DataStore_for_NonPBClient -- The generated APIs handle the data in the plain JSON format which can be easily called by languages such as JavaScript, Java, Python etc. Choose this template if your API will be used by various platforms, third-party systems, or client applications beyond just PowerBuilder. This ensures better cross-platform compatibility and simplifies integration with different technologies.
-
Repository_Pattern_Service_DataStore_for_AnyClient -- Generates both of the above APIs.
Method: Select to generate asynchronous or synchronous methods.
Subfolder: Specify the folder where you want to generate the target services. You can select a folder from the list, or choose New Folder to create a new one.
Namespace: Designate the namespace in the target services.
DataContext: The data source that the target service will use.
Base Class: Specify a base class for the target service. If you specify a base class that already exists in the current project, the base class can be directly used for the target services; if you specify a base class that does not exist, the base class will first be created, and then will be used for the target services.
-
-
Generate Controller(s) -- Select this option if you want to generate controllers from the models.
Subfolder: Specify the folder where you want to generate the target controllers. You can select a folder from the list, or choose New Folder to create a new one.
Namespace: Designate the namespace in the target controllers.
-
Specify scaffolding items: Modify the default name of the target service(s) and controller(s).
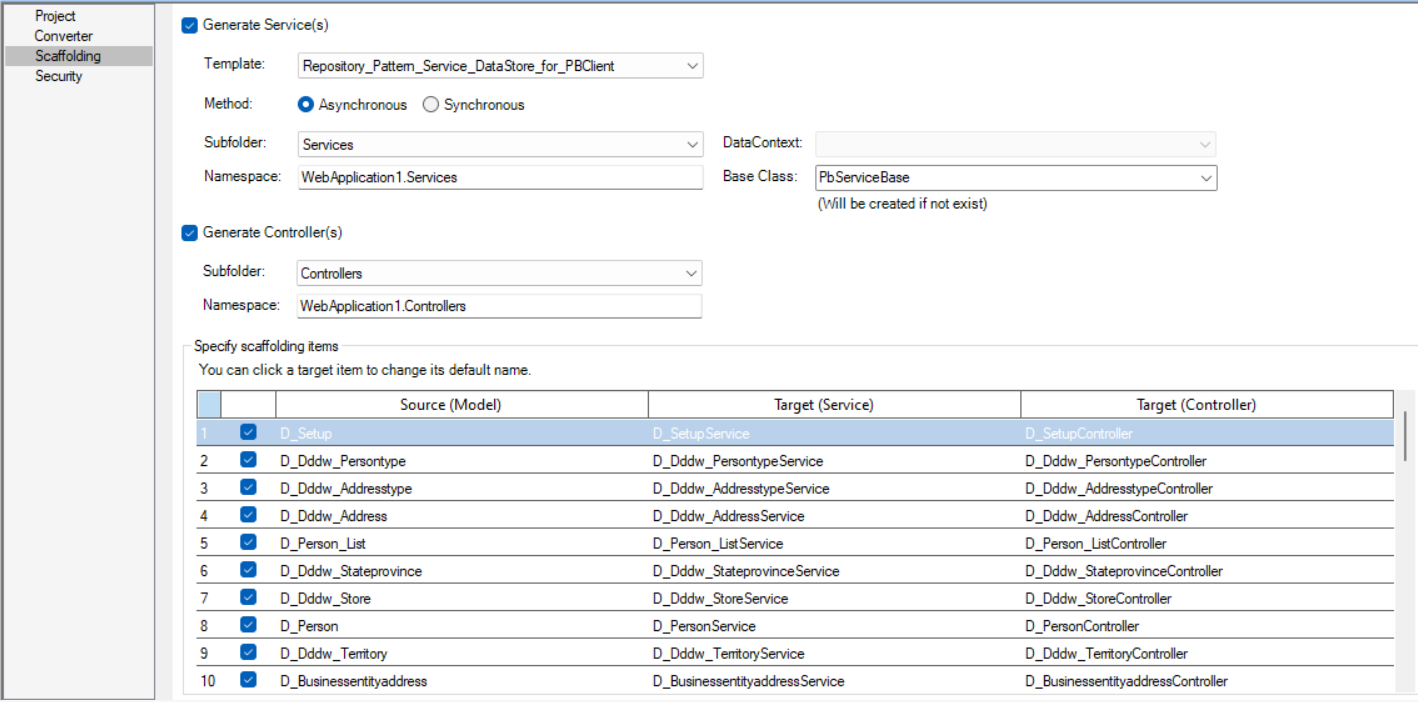
These settings will be used to generate services and controllers (when Generate & Build Project is clicked).
The Security page has the following settings:
Auth template -- Specify the authentication template for the Web APIs. The .NET project will automatically include the corresponding built-in auth server and/or template.
-
Do not use auth service: Provides no authentication template.
-
Use built-in JWT server: Includes a built-in authentication server that supports JWT or bearer tokens. See Authenticate > Using JWT for more information.
-
Use built-in AWS Cognito server: Includes a built-in authentication server that works with the Amazon Cognito user pool. See Authenticate > Using Amazon Cognito for more information.
-
Use external Microsoft Entra ID service: Includes templates that work with Microsoft Entra ID (formerly known as Azure AD or Azure Active Directory) or Azure AD B2C. See Authenticate > Using Microsoft Entra ID for more information.
-
Use external auth service: Includes templates that can be easily extended to support the other identity providers that work with the OAuth flows or JWT, such as Okta OIDC (OpenID Connect). See Authenticate > Using other auth servers for more information.

