Sometimes an application does not behave the way you think it will. Perhaps a variable is not being assigned the value you expect, or a script does not perform as desired. In these situations, you can examine your application by running it in debug mode.
When you run the application in debug mode, PowerBuilder stops execution before it executes a line containing a breakpoint (stop). You can then step through the application and examine its state.
To debug an application:
-
Open the debugger.
-
Set breakpoints at places in the application where you have a problem.
-
Run the application in debug mode.
-
When execution is suspended at a breakpoint, look at the values of variables, examine the properties of objects in memory and the call stack, or change the values of variables.
-
Step through the code line by line.
-
As needed, add or modify breakpoints as you run the application.
When you uncover a problem, fix your code and run it in the debugger again.
To open the debugger
-
Do one of the following:
-
In the System Tree, highlight a target and select Debug from the pop-up menu
-
Click the Debug or Select and Debug button on the PowerBar
-
Select Run>Debug or Run>Select and Debug from the menu bar
The Debug button opens the debugger for the current target. The current target displays in bold in the System Tree and its name displays in the Debug button tool tip. The Select and Debug button opens a dialog box that lets you select the target to be debugged.
-
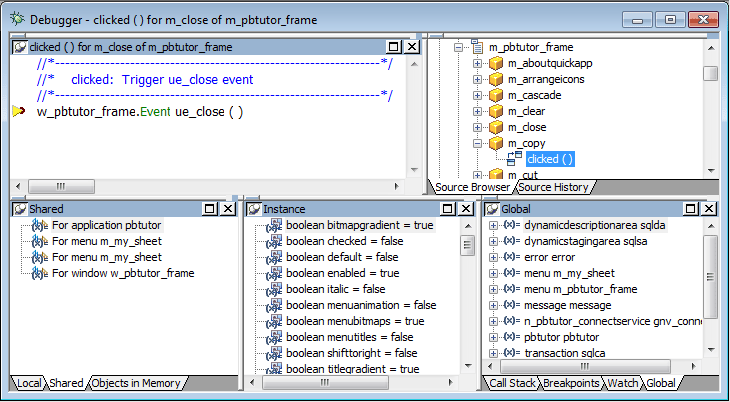
Views in the debugger
The debugger contains several views. Each view shows a different kind of information about the current state of your application or the debugging session. The following table summarizes what each view shows and what you can do from that view.
|
View |
What it shows |
What you can do |
|---|---|---|
|
Breakpoints |
A list of breakpoints with indicators showing whether the breakpoints are currently active or inactive |
Set, enable, disable, and clear breakpoints, set a condition for a breakpoint, and show source for a breakpoint in the Source view. |
|
Call Stack |
The sequence of function calls leading up to the function that was executing at the time of the breakpoint, shown as the script and line number from which the function was called |
Examine the context of the application at any line in the call stack. |
|
Instances |
Instances of remote objects and their current status |
Change the context of the debugging session to a different instance. This view has content only if you are debugging a remote component. |
|
Objects in Memory |
An expandable list of objects currently in memory |
View the names and memory locations of instances of each memory object and property values of each instance. This view is not used if you are debugging a remote component. |
|
Source |
The full text of a script |
Go to a specific line in a script, find a string, open another script, including ancestor and descendant scripts, manage breakpoints, and use TipWatch and QuickWatch. |
|
Source Browser |
An expandable hierarchy of objects in your application |
Select any script in your application and display it in the Source view. |
|
Source History |
A list of the scripts that have been displayed in the Source view |
Select any script in the Source History and display it in the Source view. |
|
Variables |
An expandable list of all the variables in scope |
Select which kinds of variables are shown in the view, change the value of a variable, and set a breakpoint when a variable changes. You cannot change the value of a variable in a remote component. |
|
Watch |
A list of variables you have selected to watch as the application proceeds |
Change the value of a variable, set a breakpoint when a variable changes, and add an arbitrary expression to the Watch view. |
Changing Variable views
The default debugger layout contains a separate view for each variable type in a stacked pane. You can combine two or more Variables views in a single pane. For example, you might want to combine local and global variables in a single view that you keep at the top of the stacked pane.
To display multiple variable types in a single view
-
Display the pop-up menu for a pane that contains a Variables view you want to change.
-
Click the names of the variable types you want to display.
A check mark displays next to selected variable types. The pop-up menu closes each time you select a variable type or clear a check mark, so you need to reopen the menu to select an additional variable type.
When you select or clear variable types, the tab for the pane changes to show the variable types displayed on that pane.

A breakpoint is a point in your application code where you want to interrupt the normal execution of the application while you are debugging. If you suspect a problem is occurring in a particular script or function call, set a breakpoint at the beginning of the script or at the line where the function is called.
When you close the debugger, any breakpoints you set are written to a file called targetname.usr.opt in the same directory as the target, where targetname is the name of the target. The breakpoints are available when you reopen the debugger. When you clear breakpoints, they are permanently removed from the usr.opt file (if it is not marked readonly).
Sharing targets
If multiple developers use the same target without using source control (a practice that is not recommended) individual developers can save the breakpoints they set in a separate file by adding the following entry to the [pb] section of their pb.ini file:
UserOptionFileExt=abc
where abc might be the developer's name or initials. Breakpoints set by the developer would be saved in a file called appname_abc.usr.opt.
Setting a simple breakpoint
This procedure describes setting a breakpoint in the Source view in the debugger. You can also set a breakpoint by selecting Add Breakpoint from the pop-up menu in the Script view when you are not running the debugger.
To set a breakpoint on a line in a script
-
Display the script in a Source view and place the cursor where you want to set the breakpoint.
For how to change the script shown in the Source view, see Using the Source view.
-
Double-click the line or select Add Breakpoint from the pop-up menu.
PowerBuilder sets a breakpoint and a red circle displays at the beginning of the line. If you select a line that does not contain executable code, PowerBuilder sets the breakpoint at the beginning of the next executable statement.
Setting special breakpoints
Breakpoints can be triggered when a statement has been executed a specified number of times (an occasional breakpoint), when a specified expression is true (a conditional breakpoint), or when the value of a variable changes.
You use the Edit Breakpoints dialog box to set and edit occasional and conditional breakpoints. You can also use it to set a breakpoint when the value of a variable changes. The Edit Breakpoints dialog box opens when you:
-
Click the Edit Stop button on the PainterBar
-
Select Breakpoints from the pop-up menu in the Source, Variables, Watch, or Breakpoints view
-
Select Edit>Breakpoints from the menu bar
-
Double-click a line in the Breakpoints view
Setting occasional and conditional breakpoints
If you want to check the progress of a loop without interrupting execution in every iteration, you can set an occasional breakpoint that is triggered only after a specified number of iterations. To specify that execution stops only when conditions you specify are met, set a conditional breakpoint. You can also set both occasional and conditional breakpoints at the same location.
-
If you specify an occurrence
Each time PowerBuilder passes through the specified location, it increments a counter by one. When the counter reaches the number specified, it triggers the breakpoint and resets the counter to zero.
-
If you specify a condition
Each time PowerBuilder passes through the specified location, it evaluates the expression. When the expression is true, it triggers the breakpoint.
-
If you specify both an occurrence and a condition
Each time PowerBuilder passes through the specified location, it evaluates the expression. When the expression is true, it increments the counter. When the counter reaches the number specified, it triggers the breakpoint and resets the counter to zero.
For example, if you specify an occurrence of 3 and the condition notisNull(val), PowerBuilder checks whether val is NULL each time the statement is reached. The breakpoint is triggered on the third occurrence of a non-NULL val, then again on the sixth occurrence, and so forth.
To set an occasional or conditional breakpoint
-
On the Location tab in the Edit Breakpoints dialog box, specify the script and line number where you want the breakpoint.
You can select an existing location or select New to enter a new location.
Set a simple breakpoint first
You must specify a line that contains executable code. Set a simple breakpoint on the line before opening the Edit Breakpoints dialog box to ensure the format and line number are correct.
-
Specify an integer occurrence, a condition, or both.
The condition must be a valid boolean PowerScript expression (if it is not, the breakpoint is always triggered). PowerBuilder displays the breakpoint expression in the Edit Breakpoints dialog box and in the Breakpoints view. When PowerBuilder reaches the location where the breakpoint is set, it evaluates the breakpoint expression and triggers the breakpoint only when the expression is true.
Setting a breakpoint when a variable changes
You can interrupt execution every time the value of a variable changes. The variable must be in scope when you set the breakpoint.
To set a breakpoint when a variable changes
-
Do one of the following:
-
Select the variable in the Variables view or Watch view and select Break on Change from the pop-up menu.
-
Drag the variable from the Variables view or Watch view to the Breakpoints view.
-
Select New on the Variable tab in the Edit Breakpoints dialog box and specify the name of a variable in the Variable box.
The new breakpoint displays in the Breakpoints view and in the Edit Breakpoints dialog box if it is open. PowerBuilder watches the variable at runtime and interrupts execution when the value of the variable changes.
-
Disabling and clearing breakpoints
If you want to bypass a breakpoint for a specific debugging session, you can disable it and then enable it again later. If you no longer need a breakpoint, you can clear it.
To disable a breakpoint
-
Do one of the following:
-
Click the red circle next to the breakpoint in the Breakpoints view or Edit Breakpoints dialog box
-
Select Disable Breakpoint from the pop-up menu in the Source view
-
Select Disable from the pop-up menu in the Breakpoints view
The red circle next to the breakpoint is replaced with a white circle.
You can enable a disabled breakpoint from the pop-up menus or by clicking the white circle.
Disabling all breakpoints
To disable all breakpoints, select Disable All from the pop-up menu in the Breakpoints view.
-
To clear a breakpoint
-
Do one of the following:
-
Double-click the line containing the breakpoint in the Source view
-
Select Clear Breakpoint from the pop-up menu in the Source view
-
Select Clear from the pop-up menu in the Breakpoints view
-
Select the breakpoint in the Edit Breakpoints dialog box and select Clear
The red circle next to the breakpoint disappears.
Clearing all breakpoints
To clear all breakpoints, select Clear All in the Edit Breakpoints dialog box or from the pop-up menu in the Breakpoints view.
-
After you have set some breakpoints, you can run the application in debug mode. The application executes normally until it reaches a statement containing a breakpoint. At this point it stops so that you can examine the application. After you do so, you can single-step through the application, continue execution until execution reaches another breakpoint, or stop the debugging run so that you can close the debugger and change the code.
To run an application in debug mode
-
If necessary, open the debugger by clicking the Debug or Select and Debug button.
The Debug button opens the debugger for the target you last ran or debugged. Use the Select and Debug button if you want to debug a different target in the workspace.
-
Click the Start button in the PainterBar or select Debug>Start from the menu bar.
The application starts and runs until it reaches a breakpoint. PowerBuilder displays the debugger, with the line containing the breakpoint displayed in the Source view. The yellow arrow cursor indicates that this line contains the next statement to be executed. You can now examine the application using debugger views and tools.
For more information, see Examining an application at a breakpoint and Stepping through an application.
To continue execution from a breakpoint
-
Click the Continue button in the PainterBar or select Debug>Continue from the menu bar
Execution begins at the statement indicated by the yellow arrow cursor and continues until the next breakpoint is hit or until the application terminates normally.
To terminate a debugging run at a breakpoint
-
Click the Stop Debugging button in the PainterBar or select Debug>Stop from the menu bar
PowerBuilder resets the state of the application and all the debugger views to their state at the beginning of the debugging run. You can now begin another run in debug mode, or close the debugger.
Cleaning up
When you terminate a debugging run or close the debugger without terminating the run, PowerBuilder executes the application's close event and destroys any objects, such as autoinstantiated local variables, that it would have destroyed if the application had continued to run and exited normally.
When an application is suspended at a breakpoint, use QuickWatch, TipWatch, and the Variables, Watch, Call Stack, and Objects in Memory views to examine its state.
About icons used in debugging views
The Variables, Watch, and Objects in Memory views use many of the icons used in the PowerBuilder Browser as well as some additional icons: I represents an Instance; F, a field; A, an array; and E, an expression.
The debugger provides three different ways to examine the values of variables: TipWatch, QuickWatch, and the Variables view.
TipWatch
TipWatch is a quick way to get the current value of a variable of a simple datatype. When execution stops at a breakpoint, you can place the edit cursor over a variable in the Source view to display a pop-up tip window that shows the current value of that variable. You can also select a simple expression to display its current value.
TipWatch has some limitations: if the variable you select is an object type, the tip window shows only an internal identifier. For array types, it shows {...} to indicate that more information is available. To show complete information for object type and array type variables, use QuickWatch instead.
TipWatch does not evaluate function, assignment, or variable value modification expressions. If TipWatch cannot parse the string you select, the pop-up window does not display.
Remote debugging
When you are debugging a remote component, Tip Watch does not evaluate expressions or indirect variables.
QuickWatch provides the current value of simple variables and detailed information about object variables, including the values of all fields in the variable. QuickWatch can also evaluate function expressions, and you can use it to change the values of variables, evaluate expressions, and add variables and expressions to the Watch view.
Exercise caution when evaluating expressions
QuickWatch evaluates all kinds of expressions, including functions, in local debugging. If you select a function and activate QuickWatch, the function is executed. This may have unexpected results. For example, if you select dw_1.print() and activate QuickWatch, the DataWindow is printed.
To open the QuickWatch dialog box
-
When execution stops at a breakpoint, move the edit cursor to a variable or select an expression in the Source view, and do one of the following:
-
Select QuickWatch from the Debug or pop-up menu
-
Press Shift+F9
-
To change the value of a variable from the QuickWatch dialog box
-
Select an item in the tree view and do one of the following:
-
Click Change Value
-
Double-click the tree view item
-
-
In the Modify Variable dialog box, type a new value for the variable in the New Value box, or select the Null check box to set the value of the variable to null, and click OK.
-
Close the QuickWatch dialog box and continue debugging the application with the variable set to the new value.
To evaluate an expression in the QuickWatch dialog box and add it to the Watch view
-
Change the variable or expression in the Expression box.
-
Click Reevaluate to display the new value in the tree view.
-
(Optional) Click Add Watch to add the expression to the Watch view.
Remote debugging
When you are debugging a remote component, expressions and indirect variables are not evaluated, and you cannot modify variable values.
Using Variables views
Each Variables view shows one or more types of variables in an expandable outline. Double-click the variable names or click on the plus and minus signs next to them to expand and contract the hierarchy. If you open a new Variables view, it shows all variable types.
|
Variable type |
What the Variables view shows |
|---|---|
|
Local |
Values of variables that are local to the current script or function |
|
Global |
Values of all global variables defined for the application and properties of all objects (such as windows) that are open |
|
Instance |
Properties of the current object instance (the object to which the current script belongs) and values of instance variables defined for the current object |
|
Parent |
Properties of the parent of the current instance |
|
Shared |
Objects, such as application, window, and menu objects, that have been opened and the shared variables associated with them |
About Instance and Parent variables
In the following illustration, an application has stopped at a breakpoint in the script for the Clicked event for the Close menu item on a frame's File menu. The Instance Variables view shows the properties of the current instance of the Close menu item. The Parent Variables view shows the properties of its parent, an instance of the File menu. Navigating through the hierarchy in the Global Variables view shows the same objects.
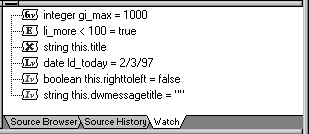
The Watch view lets you monitor the values of selected variables and expressions as the application runs.
If the variable or expression is in scope, the Watch view shows its value. Empty quotes indicate that the variable is in scope but has not been initialized. A pair of glasses in the Watch view indicates that the variable or expression is not in scope.
Setting variables and expressions in the Watch view
You can select variables you want to watch as the application runs by copying them from a Variables view. You can also set a watch on any PowerScript expression. When you close the debugger, any watch variables and expressions you set are saved.
Using QuickWatch
You can also add variables and expressions to the Watch view from the QuickWatch dialog box. See QuickWatch.
To add a variable to the Watch view
-
Select the variable in the Variables view.
-
Do one of the following:
-
Drag the variable to the Watch view
-
Click the Add Watch button on the PainterBar
-
Select Debug>Add Watch from the menu bar
PowerBuilder adds the variable to the watch list.
-
To add an expression to the Watch view
-
Select Insert from the pop-up menu.
-
Type any valid PowerScript expression in the New Expression dialog box and click OK.
PowerBuilder adds the expression to the watch list.
To edit a variable in the Watch view
-
Select the variable you want to edit.
-
Double-click the variable, or select Edit Variable from the pop-up menu.
-
Type the new value for the variable in the Modify Variable dialog box and click OK.
To edit an expression in the Watch view
-
Select the expression you want to edit.
-
Double-click the expression, or select Edit Expression from the pop-up menu.
-
Type the new expression in the Edit Expression dialog box and click OK.
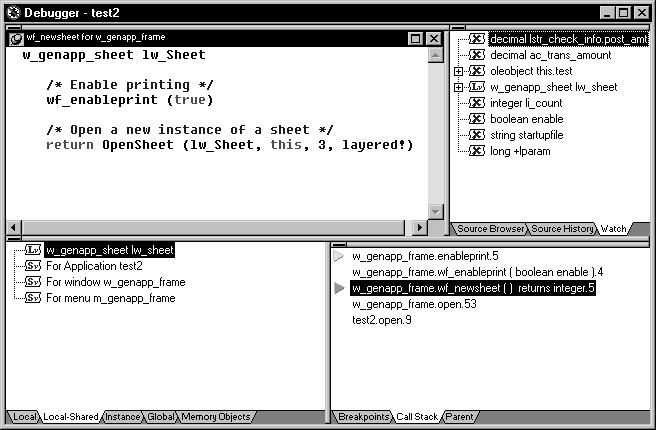
The Call Stack view shows the sequence of function calls leading up to the script or function that was executing at the time of the breakpoint. Each line in the Call Stack view displays the name of the script and the line number from which the call was made. The yellow arrow shows the script and line where execution was suspended.
You can examine the context of the application at any line in the call stack.
To show a different context from the Call Stack view
-
Select a line in the Call Stack view.
-
Do one of the following:
-
Double-click the line
-
Select Set Context from the pop-up menu
-
Drag the line into the Source view
A green arrow indicates the script that you selected. The Source view shows the script and line number you selected, and the Variables and Watch views show the variables and expressions in scope in that context.
-
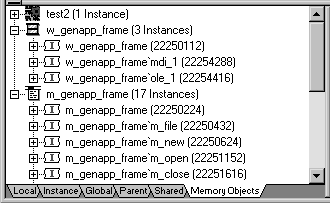
The Objects in Memory view shows an expandable list of objects currently in memory. Double-click the name of an object or click the plus sign next to it to view the names and memory locations of instances of each object and property values of each instance.
The Source view displays the full text of a script. As you run or step through the application, the Source view is updated to show the current script with a yellow arrow indicating the next statement to be executed.
Multiple Source views
You can open more than one source view. If there are multiple source views open, only the first one opened is updated to show the current script when the context of an application changes.
Copying from the Source view
When text is selected in the Source view, you can select Copy from the pop-up menu in the Source view to copy the string to the clipboard. You can then paste the string into another dialog box to search for the string, insert a watch, or add a conditional breakpoint.
Changing the Source view
From the pop-up menu, you can navigate backward and forward through the scripts that have been opened so far, open ancestor and dependent scripts, and go to a specific line in the current script. There are several other ways to change the script from other views or from the menu bar.
To change the script displayed in a Source view
-
Do one of the following:
-
Drag the name of a script to the Source view from the Call Stack, Source Browser, or Source History views
-
Select a line and then select Open Source from the pop-up menu in the Breakpoints, Source Browser, or Source History views
-
Select Edit>Select Script from the menu bar
-
The Source Browser shows all the objects in your application in an expandable hierarchy. It provides a view of the structure of the application and a quick way to open any script in the Source view.
To open a script from the Source Browser
-
Double-click the object that the script belongs to or click the plus sign next to the object to expand it.
-
Do one of the following:
-
Double-click the script
-
Select the script and select Open Source from the pop-up menu
-
Drag the script onto a Source view
When you double-click or select Open Source, a new Source view opens if there was none open. If several Source views are open, the script displays in the view that was used last.
-
The Source History view lists all the scripts that have been opened in the current debugging session. Use the same techniques as in the Source Browser view to display a selected script in the Source view.
Source History limit
The Source History view shows up to 100 scripts and is not cleared at the end of each debugging run. It is cleared when you close the debugger, or you can clear the list from the pop-up menu.
When you have stopped execution at a breakpoint, you can use several commands to step through your application code and use the views to examine the effect of each statement. As you step through the code, the debugger views change to reflect the current context of your application and a yellow arrow cursor indicates the next statement to be executed.
Updating the Source view
When the context of your application changes to another script, the Source view is updated with the new context. If you have multiple Source views open, only the first one opened is updated.
Single-stepping through an application
You can use either Step In or Step Over to step through an application one statement at a time. They have the same result except when the next statement contains a call to a function. Use Step In if you want to step into a function and examine the effects of each statement in the function. Use Step Over to execute the function as a single statement.
To step through an application entering functions
-
Click the Step In button in the PainterBar, or select Debug>Step In from the menu bar.
To step through an application without entering functions
-
Click the Step Over button in the PainterBar, or select Debug>Step Over from the menu bar.
Using shortcut keys
To make it easier to step through your code, the debugger has standard keyboard shortcuts for Step In, Step Out, Step Over, Run To Cursor, and Continue. If you prefer to use different shortcut key combinations, select Tools>Keyboard Shortcuts to define your own.
Stepping out of a function
If you step into a function where you do not need to step into each statement, use Step Out to continue execution until the function returns.
To step out of a function
-
Click the Step Out button in the PainterBar, or select Debug>Step Out from the menu bar.
Stepping through multiple statements
As you step through an application, you might reach sections of code that you are not interested in examining closely. The code might contain a large loop, or it might be well-tested code that you are confident is free of errors. You can use Run To Cursor to select a statement further down in a script or in a subsequent script where you want execution to stop.
To step through multiple statements
-
Click on the line in the script where you want to resume single stepping.
-
Click the Run To Cursor button in the PainterBar, or select Debug>Run To Cursor from the menu bar.
PowerBuilder executes all intermediate statements and the yellow arrow cursor displays at the line where you set the cursor.
Bypassing statements
You can use Set Next Statement to bypass a section of code that contains a bug, or to test part of an application using specific values for variables. Execution continues from the statement where you place the cursor. Be cautious when you use Set Next Statement, because results may be unpredictable if, for example, you skip code that initializes a variable.
To set the next statement to be executed
-
Click on the line in the script where you want to continue execution.
-
Click the Set Next Statement button in the PainterBar, or select Debug>Set Next Statement from the menu bar.
-
If necessary, change the values of variables.
-
Continue execution using Continue, Step In, or Step Over.
If you select Continue, PowerBuilder begins execution at the statement you specified and continues to the next breakpoint. If you select Step In or Step Over, PowerBuilder sets the next statement and displays the yellow arrow cursor at the line where you set the cursor.
Changing a variable's value
As you step through the application, you can change the values of variables that are in scope. You may want to do this to examine different flows through the application, to simulate a condition that is difficult to reach in normal testing, or if you are skipping code that sets a variable's value.
Limitations
You cannot change the values of enumerated variables, and you cannot change the value of any variable when you are debugging a remote component.
To change the value of a variable
-
Select the variable in the Variables view or the Watch view.
-
From the pop-up menu, select Edit Variable.
-
Type a value for the variable or select the Null check box and click OK.
The value you enter must conform to the type of the variable. If the variable is a string, do not enclose the string in quotes. When you continue execution, the new value is used.
Fixing your code
If you find an error in a script or function during a debugging session, you must close the debugger before you fix it. After you have fixed the problem, you can reopen the debugger and run the application again in debug mode. The breakpoints and watchpoints set in your last session are still defined.
One way to open a window is by declaring a local variable of type window and opening it through a string. For example:
window mywin
string named_window
named_window = sle_1.Text
Open(mywin, named_window)
The problem
Normally, you cannot debug windows opened this way after the script ends because the local variable (mywin in the preceding script) goes out of scope when the script ends.
The solution
If you want to debug windows opened this way, you can declare a global variable of type window and assign it the local variable. If, for example, GlobalWindow is a global window of type window, you could add the following line to the end of the preceding script:
GlobalWindow = mywin
You can look at and modify the opened window through the global variable. When you have finished debugging the window, you can remove the global variable and the statement assigning the local to the global.
If you are running your application in regular mode (using the Run button) and you notice that the application is behaving incorrectly, just-in-time debugging lets you switch to debug mode without terminating the application.
When you open the debugger while running an application, the application does not stop executing. The Source, Variables, Call Stack, and Objects in Memory views are all empty because the debugger does not have any context. To suspend execution and examine the context in a problem area, open an appropriate script and set breakpoints, then initiate the action that calls the script.
If just-in-time debugging is enabled and a system error occurs while an application is running in regular mode, the debugger opens automatically, showing the context where the error occurred.
You can also use the DebugBreak function to break into the debugger.
You must enable just-in-time debugging before you run your application to take advantage of this feature.
To enable just-in-time debugging
-
Select Tools>System Options.
-
Check the Just In Time Debugging check box and click OK.
To debug an application while running in regular mode
-
Enable just-in-time debugging.
-
Run the application.
-
Click the PowerBuilder button on the Windows Taskbar.
-
Click the Debug button in the dialog box that displays.
-
Open a script in the Source view and set breakpoints.
The application is suspended when it hits a breakpoint and the Source, Variable, Call Stack, and Objects in Memory views show the current context. You can now debug the application.
You can use the syntax #IF DEFINED followed by a predefined preprocessor symbol to mark a block of code for specialized processing before it is compiled. The block of conditional code is automatically parsed by a PowerBuilder preprocessor before it is passed to the compiler. Most of the predefined preprocessor symbols are used only for .NET targets, but the DEBUG symbol can be used in standard PowerBuilder targets as well.
The symbol is useful if you want to add code to your application to help you debug while you are testing the application. For example, you might add a block like the following:
#if defined DEBUG then
   MessageBox("Debugging","Ctr value is " + string(i))
#end if
When you run or debug the application in the development environment, the code is always parsed and you always see the message box. When you run the executable file, the code is parsed only if the DEBUG symbol is enabled on the General page in the Project painter. While you are still testing the application, turning the DEBUG symbol can help you find differences in behavior in the development environment and the executable file.
Although you would not typically enable the DEBUG symbol in a release build, if a problem is reported in a production application, you can redeploy the release build with the DEBUG symbol enabled to help determine the nature or location of the problem.
Adding breakpoints in a DEBUG block
When you use the DEBUG symbol, you can add breakpoints in the DEBUG block only for lines of code that are not in an ELSE clause that removes the DEBUG condition. If you attempt to add a breakpoint in the ELSE clause, the debugger automatically switches the breakpoint to the last line of the clause defining the DEBUG condition. Consider this code:
#if defined DEBUG then
   /*debugging code*/
#else
   /* other action*/
#end if
In this example, if you add a breakpoint to the line /* other action*/, the breakpoint would automatically switch to the line /*debugging code*/.
Code in ELSE clause is parsed
Note that any code that you place in the ELSE clause will be parsed by the compiler when you build an executable file with the DEBUG symbol disabled.
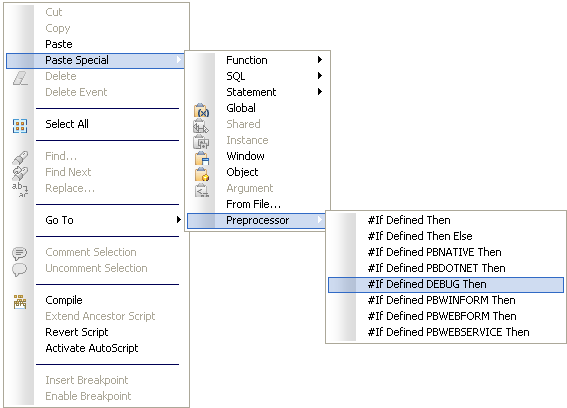
Pasting a DEBUG block into a script
You can use the Paste Special>Preprocessor>#If Defined DEBUG Then pop-up menu item in the Script view to paste a template into a script.
Limitations
Conditional compilation is not supported in DataWindow syntax, structure or menu objects. You cannot edit the source code for an object to include conditional compilation blocks that span function, event, or variable definition boundaries.
You must rebuild your application after you add a DEBUG conditional block.
When an application throws an exception while it is being debugged, the debugger sees the exception before the program has a chance to handle it.The debugger can allow the program to continue or it can handle the exception. This is usually referred to as the debugger's first chance to handle the exception. If the debugger does not handle the exception, the program sees the exception. If the program does not handle the exception, the debugger gets a second chance to handle it.
You can control whether the debugger handles first chance exceptions in the Exception Setting dialog box. To open the dialog box, open the Debugger and select Exceptions from the Debug menu. By default, all exceptions inherit from their parent and all are set to Continue. In the following illustration, the DivideByZeroError and DWRuntimeError exceptions have been set to "Break into the debugger."
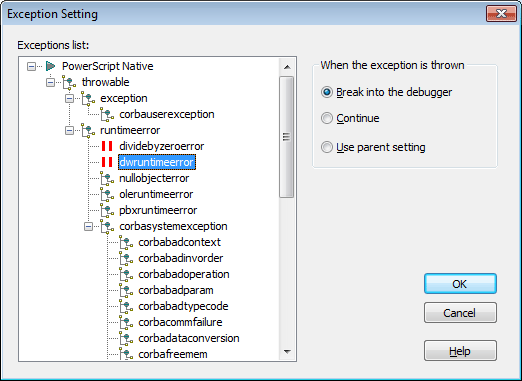
When one of these exceptions is thrown, a dialog box displays so that you can choose whether to open the debugger (Break) or pass the exception to the program (Ignore).

