PowerBuilder provides a direct connection to external SCC-compliant source control systems. It no longer requires you to register PowerBuilder objects in a separate work PBL before you can check them into or out of the source control system.
For information on migrating PowerBuilder applications and objects previously checked into source control through a registered PBL, see Migrating existing projects under source control.
Before you can perform any source control operations from PowerBuilder, you must set up a source control connection profile for your PowerBuilder workspace, either from the System Tree or from the Library painter. Even if you use the PBNative check in/check out utility, you must access source-controlled objects through an SCC interface that you define in the Workspace Properties dialog box.
The source control connection profile assigns a PowerBuilder workspace to a source control project. Setting up a source control project is usually the job of a project manager or administrator. See Project manager's tasks.
Creating a new source control project
Although you can create a project in certain source control systems directly from PowerBuilder, it is usually best to create the project from the administrative tool for your source control system before you create the connection profile in PowerBuilder.
In PowerBuilder you can set up a source control connection profile at the workspace level only. Local and advanced connection options can be defined differently on each computer for PowerBuilder workspaces that contain the same targets.
Local connection options
Local connection options allow you to create a trace log to record all source control activity for your current workspace session. You can overwrite or preserve an existing log file for each session.
You can also make sure a comment is included for every file checked into source control from your local computer. If you select this connection option, the OK button on the Check In dialog box is disabled until you type a comment for all the objects you are checking in.
The following table lists the connection options you can use for each local connection profile:
|
Select this option |
To do this |
|---|---|
|
Log All Source Management Activity (not selected by default) |
Enable trace logging. By default the log file name is PBSCC190.LOG, which is saved in your workspace directory, but you can select a different path and file name. |
|
Append To Log File (default selection when logging is enabled) |
Append source control activity information to named log file when logging is enabled. |
|
Overwrite Log File (not selected by default) |
Overwrite the named log file with source control activity of the current session when logging is enabled. |
|
Require Comments On Check In (not selected by default; not available for PBNative source control) |
Disable the OK button on the Check In dialog box until you type a comment. |
|
This Project Requires That I Sometimes Work Offline (not selected by default) |
Disable automatic connection to source control when you open the workspace. |
|
Delete PowerBuilder Generated Object Files (not selected by default) |
Remove object files (such as SRDs) from the local directory after they are checked into source control. This may increase the time it takes for PowerBuilder to refresh source control status, but it minimizes the drive space used by temporary files. You cannot select this option for the Perforce, ClearCase, or Continuus source control systems. |
|
Perform Diff On Status Update |
Permit display of out-of-sync icons for local objects that are different from objects on the source control server. Selecting this also increases the time it takes to refresh source control status. You cannot select this option for Perforce. |
|
Suppress prompts to overwrite read-only files |
Avoid message boxes warning that read-only files exist on your local project directory. |
|
Show warning when opening objects not checked out |
Avoid message boxes when opening objects that are still checked in to source control. |
|
Status Refresh Rate (5 minutes by default) |
Specifies the minimum time elapsed before PowerBuilder automatically requests information from the source control server to determine if objects are out of sync. Valid values are between 1 and 59 minutes. Status refresh rate is ignored when you are working offline. |
Advanced connection options
Advanced connection options depend on the source control system you are using to store your workspace objects. Different options exist for different source control systems.
Applicability of advanced options
Some advanced options might not be implemented or might be rendered inoperable by the PowerBuilder SCC API interface. For example, if an advanced option allows you to make local files writable after an Undo Check Out operation, PowerBuilder still creates read-only files when reverting an object to the current version in source control. (PowerBuilder might even delete these files if you selected the Delete PowerBuilder Generated Object Files option.)
To set up a connection profile
-
Right-click the Workspace object in the System Tree (or in the Tree view of the Library painter) and select Properties from the pop-up menu.
-
Select the Source Control tab from the Workspace Properties dialog box.
-
Select the system you want to use from the Source Control System drop-down list.
Only source control systems that are defined in your registry (HKEY_LOCAL_MACHINE\SOFTWARE\SourceCodeControlProvider\InstalledSCCProviders) appear in the drop-down list.
-
Type in your user name for the source control system.
Some source control systems use a login name from your registry rather than the user name that you enter here. For these systems (such as Perforce or PVCS), you can leave this field blank.
-
Click the ellipsis button next to the Project text box.
A dialog box from your source control system displays. Typically it allows you to select or create a source control project.
The dialog box displayed for PBNative is shown below:
-
Fill in the information required by your source control system and click OK.
The Project field on the Source Control page of the Workspace Properties dialog box is typically populated with the project name from the source control system you selected. However, some source control systems (such as Perforce or Vertical Sky) do not return a project name. For these systems, you can leave this field blank.
-
Type or select a path for the local root directory.
All the files that you check into and out of source control must reside in this path or in a subdirectory of this path.
-
(Option) Select the options you want for your local workspace connection to the source control server.
-
(Option) Click the Advanced button and make any changes you want to have apply to advanced options defined for your source control system.
The Advanced button might be grayed if you are not first connected to a source control server. If Advanced options are not supported for your source control system, you see only a splash screen for the system you selected and an OK button that you can click to return to the Workspace Properties dialog box.
-
Click Apply or click OK.

After a PowerBuilder workspace is assigned to an external SCC-compliant source control project through a connection profile, icons in the PowerBuilder System Tree display the source control status of all objects in the workspace. The same icons are also displayed for objects in the Library painter if the workspace to which they belong is the current workspace for PowerBuilder.
Source control icons
The icons and their meanings are described in the following tables.
|
Icon |
SCC-compliant source control status of object displaying icon |
|---|---|
|
|
The object resides only locally and is not under source control. |
|
|
The object is under source control and is not checked out by anyone. The object on the local computer is in sync with the object on the server unless the icon for indeterminate status also appears next to the same object. |
|
|
The object is checked out by the current user. |
|
|
The object is checked out by another user. |
|
|
The current status of an object under source control has not been determined. You are likely to see this icon only if the Perform Diff On Status Update check box is not selected and if diffs are not performed for your source control system based on version number. This icon can appear only in conjunction with the icon for a registered object (green dot icon) or for an object checked out by another user (red x icon). |
|
|
The object on the local computer is registered to source control, but is out of sync with the object on the server. This icon can also appear with the icon for an object checked out by another user. The Perform Diff On Status Update check box must be selected for this icon to display. |


Compound icons with a red check mark can display only if your SCC provider permits multiple user checkouts. These icons are described in the following table:
|
Icon |
Source control status of object displaying icon |
|---|---|
|
|
The object is under source control and is checked out nonexclusively by another user. PowerBuilder allows a concurrent checkout by the current user. |
|
|
The object is checked out by both the current user and another user. |
|
|
The object is checked out nonexclusively by another user and the version in the current user's local path is out of sync. |


For more information on allowing multiple user checkouts, see Checking objects out from source control.
Pop-up menus
Pop-up menus for each object in the workspace change dynamically to reflect the source control status of the object. For example, if the object is included in a source-controlled workspace but has not been registered to source control, the Add To Source Control menu item is visible and enabled in the object's pop-up menu. However, other source control menu items such as Check In and Show Differences are not visible until the object is added to source control.
Library painter Entry menu
Additional status functionality is available from the Entry menu of the Library painter. Depending on the source control system you are using, you can see the owner of an object and the name of the user who has the object checked out. For most source control systems, you can see the list of revisions, including any branch revisions, as well as version labels for each revision.
Library painter selections
When a painter is open, menu commands apply to the current object or objects in the painter, not the current object in the System Tree. This can get confusing with the Library painter in particular, since Library painter views list objects only (much like the System Tree), and do not provide a more detailed visual interface for viewing current selections, as other painters do.
To view the status of source-controlled objects
-
In a Library painter view, select the object (or objects) whose status you want to determine.
-
Select Entry>Source Control>Source Control Manager Properties.
A dialog box from your source control system displays. Typically it indicates if the selected file is checked in, or the name of the user who has the file checked out. It should also display the version number of the selected object.
Displaying the version number in the Library painter
You can display the version number of all files registered in source control directly in the Library painter. You add a Version Number column to the Library painter List view by making sure the SCC Version Number option is selected in the Options dialog box for the Library painter.
For more information, see Controlling columns that display in the List view.
Viewing status information offline
You can work offline and still see status information from the last time you were connected to source control. However, you cannot perform any source control operations while you are offline, and you cannot save changes to source-controlled objects that you did not check out from source control before you went offline.
To be able to work offline, you should select the option on the Source Control page of the Workspace Properties dialog box that indicates you sometimes work offline. If you select this option, a dialog box displays each time you open the workspace. The dialog box prompts you to select whether you want to work online or offline.
For more information about setting source control options for your workspace, see Setting up a connection profile.
About the PBC file
If you opt to work offline, PowerBuilder looks for (and imports) a PBC file in the local root directory. The PBC file is a text file that contains status information from the last time a workspace was connected to source control. PowerBuilder creates a PBC file only from a workspace that is connected to source control. Status information is added to the PBC file from expanded object nodes (in the System Tree or in a Library painter view) at the time you exit the workspace.
If a PBC file already exists for a workspace that is connected to source control, PowerBuilder merges status information from the current workspace session to status information already contained in the PBC file. Newer status information for an object replaces older status information for the same object, but older status information is not overwritten for objects in nodes that were not expanded during a subsequent workspace session.
Backing up the PBC file
You can back up the PBC file with current checkout and version information by selecting the Backup SCC Status Cache menu item from the Library painter Entry>Source Control menu, or from the pop-up menu on the current workspace item in the System Tree. The Library painter menu item is only enabled when the current workspace file is selected.
The Backup SCC Status Cache operation copies the entire contents of the refresh status cache to the PBC file in the local project path whether the status cache is dirty or valid. To assure a valid status cache, you can perform a Refresh Status operation on the entire workspace before backing up the SCC status cache.
For information about refreshing the status cache, see Refreshing the status of objects.
PowerBuilder uses an array of object file names that it passes to a source control system in each of its SCC API requests. The SCC specification does not mention an upper limit to the number of files that can be passed in each request, but the default implementation in PowerBuilder limits SCC server requests to batches of 25 objects.
A PB.INI file setting allows you to override the 25-file limit on file names sent to the source control server in a batched request. You can make this change in the Library section of the PB.INI file by adding the following instruction:
SccMaxArraySize=nn
where nn is the number of files you want PowerBuilder to include in its SCC API batch calls. Like other settings in the PB.INI file, the SccMaxArraySize parameter is not case sensitive.
When you connect to a source control system, PowerBuilder instantiates a Java VM by default. For certain SCC programs, such as Borland's StarTeam or Serena's TrackerLink, the Java VM instantiated by PowerBuilder conflicts with the Java VM instantiated by the SCC program. To prevent Java VM conflicts, you must add the following section and parameter setting to the PB.INI file:
[JavaVM]
CreateJavaVM=0
By adding this section and parameter setting to the PB.INI file, you prevent PowerBuilder from instantiating a Java VM when it connects to a source control system.
The following schema shows a directory structure for files in the local PowerBuilder workspace and on the source control server. File types in the local root path that can be copied to the source control server from PowerBuilder are displayed in bold print. File types displayed in normal print are not copied. Asterisks shown before a file extension indicate variable names for files of the type indicated by the extension. The asterisk included in a file extension is also a variable. The variable for the extension depends on the type of object exported from a PBL, so it would be "w" for a window, "u" for a user object, and so on.
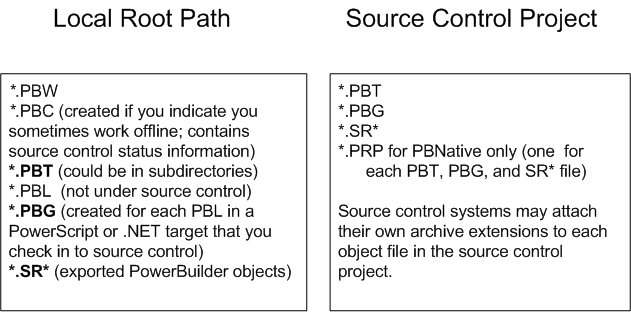
Typically, the source control server files are stored in a database but preserve the file system structure. Files in any deployment configuration directories can be regenerated automatically by building and deploying the files in the Source directory.
Temporary files in local root path
When you add or check in a PowerScript object to source control, PowerBuilder first exports the object as a temporary file (*.SR*) to your local target directory. For some source control systems, you might choose to delete temporary files from the local root path.
- Adding objects to source control
- Checking objects out from source control
- Checking objects in to source control
- Clearing the checked-out status of objects
- Synchronizing objects with the source control server
- Refreshing the status of objects
- Comparing local objects with source control versions
- Displaying the source control version history
- Removing objects from source control
The following source control operations are described in this section:
Source control operations on workspace and PBL files are performed on the objects contained in the current workspace or in target PBLs, not on the actual PBW and PBL files. The PBW and PBL files cannot be added to source control through the PowerBuilder interface. Source control operations are not enabled for target PBD files or for any of the objects in target PBD files.
You add an object to your source control project by selecting the Add To Source Control menu item from the object's pop-up menu in the System Tree or in the Library painter. You can also select an object in a Library painter view and then select Entry>Source Control>Add To Source Control from the Library painter menu bar.
What happens when you add objects to source control
When you add an object to source control, the icon in front of the object changes from a plus sign to a green dot, indicating that the object on the local computer is in sync with the object on the server.
PowerBuilder creates read-only object files in the local root directory for each PowerBuilder object that you add to source control. These files can be automatically deleted if you selected the Delete PowerBuilder Generated Object Files option as a source control connection property (although you cannot do this for certain SCC systems such as Perforce or ClearCase).
Read-only attributes are not changed by PowerBuilder if you later remove a workspace containing these files from source control.
Adding multiple objects to source control
If the object you select is a PowerBuilder workspace, a dialog box displays listing all the objects for that workspace that are not currently under source control (although the workspace PBW and target PBLs are not included in the list). If the object you select is a PowerBuilder target, and at least one of the objects in that target has not been registered with the current source control project, PowerBuilder displays a dialog box that prompts you to:
-
Select multiple files contained in the target
-
Register the target file only
If you select the multiple files radio button, another dialog box displays with a list of objects to add to source control. A check box next to each object lets you select which objects you want to add to source control. By default, check boxes are selected for all objects that are not in your source control project. They are not selected for any object already under source control.

You can resize all source control dialog boxes listing multiple files by placing a cursor over the edge of a dialog box until a two-headed arrow displays, then dragging the edge in the direction of one of the arrow heads.
Selecting multiple files from a PBL
If you select Add To Source Control for a target PBL, you immediately see the list of multiple files from that PBL in the Add To Source Control dialog box. There is no need for an intervening dialog box as there is for a target or workspace, since you cannot register a PBL file to source control from the PowerBuilder UI -- you can only register the objects contained in that PBL.
You can also select multiple objects to add to source control from the List view of the Library painter (without selecting a workspace, target, or PBL).
The Add To Source Control menu item is disabled for all objects that are registered in source control except workspaces and targets. If you select the Add To Source Control menu item for a workspace or target in which all the objects are already registered to source control, PowerBuilder displays the Add To Source Control dialog box with an empty list of files. You cannot add objects to your source control project that are already registered with that project.
Creating a mapping file for target PBLs
When you add a target or an object (in a target that is not under source control) to source control, PowerBuilder creates a PBG file. A PBG file maps objects in a target to a particular PBL in a PowerScript or .NET target. One PBG file is created per PBL, so there can be multiple PBG files for these types of target.
If a PBG file already exists for a target PBL containing the object you are adding to source control, PowerBuilder checks the PBG file out of source control and adds the name of the object to the names of objects already listed in the PBG file. It then checks the PBG file back into source control.
The PBG files are used by PowerBuilder to make sure that objects are distributed to the correct PBLs and targets when you check the objects out (or get the latest versions of the objects) from source control.
If your source control system requires comments on registration and check-in, you get separate message boxes for the PBG file and the objects that you are adding to source control. If your source control system gives you the option of adding the same comments to all the objects you are registering, you can still get additional message boxes for PBG files, since PBG files are checked in separately.
Because it is possible for PBG files to get out of sync, it is important that the project manager monitor these files to make sure they map all objects to the correct PBLs and contain references to all objects in the source control project. However, you cannot explicitly check in or check out PBG files through the PowerBuilder SCC API.
For more information on modifying PBG files, see Editing the PBG file for a source-controlled target.
What happens on checking out an object
When you check out an object, PowerBuilder:
-
Locks the object in the archive so that no one else can modify it -- unless your source control system permits multiple user checkouts
-
Copies the object to the directory for the target to which it belongs
-
For a PowerScript object, compiles the object and regenerates it in the target PBL to which it is mapped
-
Displays a check mark icon next to the object in your System Tree and in your Library painter to show that the object has been checked out
Checking out multiple objects
If you select the Check Out menu item for a PowerBuilder target that is not already checked out, and at least one of the objects in that target is available for checkout, PowerBuilder displays a dialog box that prompts you to:
-
Select multiple files contained in the target
-
Check out the target file only
If you select the multiple file option, or if the target file is already checked out, the Check Out dialog box displays the list of objects from that target that are available for checkout. A check box next to each object in the list lets you choose which objects you want to check out. By default, check boxes are selected for all objects that are not currently checked out of source control.
The Deselect All button in the Check Out dialog box lets you clear all the check boxes with a single click. When none of the objects in the list is selected, the button text becomes Select All, and you can click the button to select all the objects in the list.
You can also select multiple objects (without selecting a target) in the List view of the Library painter. The PowerBuilder SCC API does not let you check out an object that you or someone else has already checked out or that is not yet registered with source control. If you use multiple object selection to select an object that is already checked out, PowerBuilder does not include this object in the list view of the Check Out dialog box.
Multiple user checkout. Checking out an object from a source control system usually prevents other users from checking in modified versions of the same object. Some source control systems, such as Serena Version Manager (formerly Merant PVCS) and MKS Source Integrity, permit multiple user checkouts. In these systems, you can allow shared checkouts of the same object.
By default, PowerBuilder recognizes shared checkouts from SCC providers that support multiple user checkouts. PowerBuilder shows a red check mark as part of a compound icon to indicate that an object is checked out to another user in a shared (nonexclusive) mode. You can check out an object in shared mode even though another user has already checked the object out.
Managing multiple user check-ins
If you allow multiple user checkouts, the SCC administrator should publish a procedure that describes how to merge changes to the same object by multiple users. Merge functionality is not automatically supported by the SCC API, so checking in an object in shared mode might require advanced check-in features of the source control system. Merging changes might also require using the source control administration utility instead of the PowerBuilder user interface.
If your SCC provider permits multiple user checkouts, you can still ensure that an item checked out by a user is exclusively reserved for that user until the object is checked back in, but only if you add the following instruction to the Library section of the PB.INI file:
[Library]
SccMultiCheckout=0
After you add this PB.INI setting, or if your SCC provider does not support multiple user checkouts, you will not see the compound icons with red check marks, and all items will be checked out exclusively to a single user. For source control systems that support multiple user checkouts, you can re-enable shared checkouts by setting the SccMultiCheckout value to 1 or -1.
Creating a source control branch
If your source control system supports branching and its SCC API lets you check out a version of an object that is not the most recent version in source control, you can select the version you want in the Advanced Check Out dialog box (that you access by clicking the Advanced button in the Check Out dialog box). When you select an earlier version, PowerBuilder displays a message box telling you it will create a branch when you check the object back in. You can click Yes to continue checking out the object or No to leave the object unlocked in the source control project. If this is part of a multiple object checkout, you can select Yes To All or No To All.
If you want just a read-only copy of the latest version of an object
Instead of checking out an object and locking it in the source control system, you can choose to get the latest version of the object with a read-only attribute. See Synchronizing objects with the source control server.
To check out an object from source control:
-
Right-click the object in the System Tree or in a Library painter view and select Check Out from the pop-up menu
or
Select the object in a Library painter view and select Entry>Source Control>Check Out from the Library painter menu.
The Check Out dialog box displays the name of the object you selected. For PowerScript objects, the object listing includes the name of the PBL that contains the selected object.
If you selected multiple objects, the Check Out dialog box displays the list of objects available for checkout. You can also display a list of available objects when you select a target file for checkout. A check mark next to an object in the list marks the object as assigned for checkout.
-
Make sure that the check box is selected next to the object you want to check out, and click OK.
When you finish working with an object that you checked out, you must check it back in so other developers can use it, or you must clear the object's checked-out status.You cannot check in objects that you have not checked out.
If you do not want to use the checked-out version
Instead of checking an entry back in, you can choose not to use the checked-out version by clearing the checked-out status of the entry. See Clearing the checked-out status of objects.
Checking in multiple objects
If you select the Check In menu item for a workspace, PowerBuilder lists all the objects in the workspace that are available for check-in. If you select the Check In menu item for a PowerBuilder target that is currently checked out to you, and at least one of the objects in that target is also checked out to you, PowerBuilder displays a dialog box that prompts you to:
-
Select multiple files contained in the target
-
Check in the target file only
If you select the multiple file option, or if the target file is not currently checked out to you, the Check In dialog box displays the list of objects from that target that are available for you to check in. A check box next to each object in the list lets you choose which objects you want to check in. By default, check boxes are selected for all objects that you currently have checked out of source control.
The Deselect All button in the Check In dialog box lets you clear all the check boxes with a single click. When none of the objects in the list is selected, the button text becomes Select All, and you can click the button to select all the objects in the list.
You can also select multiple objects (without selecting a workspace or target) in the List view of the Library painter. The PowerBuilder SCC API does not let you check in an object that you have not checked out of source control. If you use multiple object selection to select an object that is not checked out to you, PowerBuilder does not include this object in the list view of the Check In dialog box.
To check in objects to source control
-
Right-click the object in the System Tree or in a Library painter view and select Check In from the pop-up menu
or
Select the object in a Library painter view and select Entry>Source Control>Check In from the Library painter menu.
The Check In dialog box displays the name of the object you selected. If you selected multiple objects or a workspace, the Check In dialog box displays the list of objects available for check-in. You can also display a list of available objects when you select a target file. A check mark next to an object in the list marks the object as assigned for check-in.
-
Make sure the check box is selected next to the object you want to check in and click OK.
Sometimes you need to clear (revert) the checked-out status of an object without checking it back into source control. This is usually the case if you modify the object but then decide not to use the changes you have made. When you undo a checkout on an object, PowerBuilder replaces your local copy with the latest version of the object on the source control server. For PowerScript and .NET targets, it compiles and regenerates the object in its target PBL.
Clearing the status of multiple objects
If you select the Undo Check Out menu item for a PowerBuilder target that is checked out to you, and at least one of the objects in that target is also checked out to you, PowerBuilder displays a dialog box that prompts you to:
-
Select multiple files contained in the target
-
Undo the checked-out status for the target file only
If you select the multiple file option, or if the target file is not currently checked out to you, the Undo Check Out dialog box displays the list of objects from that target that are locked by you in source control. A check box next to each object in the list lets you choose the objects for which you want to undo the checked-out status. By default, check boxes are selected for all objects that are currently checked out to you from source control.
You can also select multiple objects (without selecting a target) in the List view of the Library painter. The PowerBuilder SCC API does not let you undo the checked-out status of an object that you have not checked out of source control. If you use multiple object selection to select an object that is not checked out to you, PowerBuilder does not include this object in the list view of the Undo Check Out dialog box.
To clear the checked-out status of entries
-
Right-click the object in the System Tree or in a Library painter view and select Undo Check Out from the pop-up menu
or
Select the object in a Library painter view and select Entry>Source Control>Undo Check Out from the Library painter menu.
The Undo Check Out dialog box displays the name of the object you selected. If you selected multiple objects, the Undo Check Out dialog box displays the list of objects in the selection that are currently checked out to you. You can also display a list of objects that are checked out to you when you select a target file.
-
Make sure that the check box is selected next to the object whose checked-out status you want to clear, and click OK.
You can synchronize local copies of PowerBuilder objects with the latest versions of these objects in source control without checking them out from the source control system. The objects copied to your local computer are read-only. The newly copied PowerScript objects are then compiled into their target PBLs.
If there are exported PowerScript files in your local path that are marked read-only, and you did not select the Suppress Prompts To Overwrite Read-Only Files option, your source control system might prompt you before attempting to overwrite these files during synchronization. If you are synchronizing multiple objects at the same time, you can select:
-
Yes To All, to overwrite all files in your selection
-
No To All, to cancel the synchronization for all objects in the selection that have writable files in the local path
Synchronizing an object does not lock that object on the source control server. After you synchronize local objects to the latest version of these objects in source control, other developers can continue to perform source control operations on these objects.
If you want only to check whether the status of the objects has changed on the source control server, you can use the Refresh Status menu item from the Library painter Entry menu or System Tree pop-up menus. The Refresh Status command runs on a background thread. If you do not use the Refresh Status feature before getting the latest versions of workspace or target objects, then PowerBuilder has to obtain status and out-of-sync information from the SCC provider in real time during a GetLatestVersion call.
For more information, see Refreshing the status of objects.
To synchronize a local object with the latest source control version
-
Right-click the object in the System Tree or in a Library painter view and select Get Latest Version from the pop-up menu
or
Select the object in a Library painter view and select Entry>Source Control>Get Latest Version from the Library painter menu.
The Get Latest Version dialog box displays the name of the object you selected. If you selected multiple objects in the Library painter List view, the Get Latest Version dialog box lists all the objects in your selection. If you selected a workspace, the Get Latest Version dialog box lists all the objects referenced in the PBG files belonging to your workspace. You can also display a list of available objects (from the PBG files for a target) when you select the Get Latest Version menu item for a target file.
A check mark next to an object in the list assigns the object for synchronization. By default only objects that are currently out of sync are selected in this list. You can use the Select All button to select all the objects for synchronization. If all objects are selected, the button text becomes Deselect All. Its function also changes, allowing you to clear all the selections with a single click.
-
Make sure that the check box is selected next to the object for which you want to get the latest version, and click OK.
PowerBuilder uses the source control connection defined for a workspace to check periodically on the status of all objects in the workspace. You can set the status refresh rate for a workspace on the Source Control page of the Workspace Properties dialog box. You can also select the Perform Diff on Status Update option to detect any differences between objects in your local directories and objects on the source control server.
For more information about source control options you can set on your workspace, see Setting up a connection profile.
PowerBuilder stores status information in memory, but it does not automatically update the source control status of an object until a System Tree or Library painter node containing that object has been expanded and the time since the last status update for that object exceeds the status refresh rate.
Status information can still get out of sync if multiple users access the same source control project simultaneously and you do not refresh the view of your System Tree or Library painter. By using the Refresh Status menu item, you can force a status update for objects in your workspace without waiting for the refresh rate to expire, and without having to open and close tree view nodes containing these objects.
The Refresh Status feature runs in the background on a secondary thread. This allows you to continue working in PowerBuilder while the operation proceeds. When the Refresh Status command is executed, your SCC status cache is populated with fresh status values. This allows subsequent operations like a target-wide synchronization (through a GetLatestVersion call) to run much faster.
To refresh the status of objects
-
Right-click the object in the System Tree or in a Library painter view and select Refresh Status from the pop-up menu
or
Select the object in a Library painter view and select Entry>Source Control>Refresh Status from the Library painter menu.
If the object you selected is not a workspace, target, or PBL file, the object status is refreshed and any change is made visible by a change in the source control icon next to the object. If you selected an object in a Library painter view, the status of this object in the System Tree is also updated.
For information about the meaning of source control icons in PowerBuilder, see Viewing the status of source-controlled objects.
-
If the object you selected in step 1 is a workspace or target file, select a radio button to indicate whether you want to refresh the status of the selected file only or of multiple files in the workspace or target.
-
If the object you selected in step 1 is a PBL, or if you selected the multiple files option in step 2, make sure that the check box is selected next to the object or objects whose status you want to refresh, and click OK.
Status is refreshed for every object selected in the Refresh Status dialog box. Any change in status is made visible by a change in the source control icon next to the objects (in the selected workspace, target, or PBL) that are refreshed.
The PowerBuilder SCC API lets you compare an object in your local directory with a version of the object in the source control archive (or project). By default, the comparison is made with the latest version in the archive, although most source control systems let you compare your local object to any version in the archive. Using this feature, you can determine what changes have been made to an object since it was last checked into source control.
Setting up PBNative for object comparisons
PBNative does not have its own visual difference utility, but it does allow you to select one that you have already installed. You must use only a 32-bit visual difference utility for the object comparisons. You can select any or all of the following options when you set up the utility to work with a PBNative repository:
|
Option |
Select this if |
|---|---|
|
Enclose file names in double quotes |
Your visual difference utility does not handle spaces in file names. |
|
Refer to local PBL entry as argument #1 |
You do not want the visual difference utility to use the repository object as the first file in a file comparison. |
|
Generate short (8.3) file names |
Your visual difference utility does not handle long file names. |
|
Generate an extra space prior to file arguments |
Your visual difference utility requires an extra space between files that are listed as arguments when you open the utility from a command line. This option was added for backward compatibility only, as an extra space was automatically added by PowerBuilder 8. |
To set up PBNative for object comparisons
-
Right-click the Workspace object in the System Tree and click the Source Control tab in the Workspace Properties dialog box.
PBNative should be your selection for the source control system, and you must have a project and local root directory configured. If you are connected already to source control, you can skip the next step.
-
Click Connect.
The Connect button is disabled if you are already connected to source control.
-
Click Advanced.
The PBNative Options dialog box displays.
-
Type the path to a visual difference utility followed by the argument string required by your utility to perform a diff (comparison) on two objects.
Typically, you would add two %s parameter markers to indicate where PowerBuilder should perform automatic file name substitution. The following figure shows a setting used to call the Microsoft WinDiff utility:
-
(Optional) Select any or all of the check box options in the PBNative Command Options dialog box for your object comparisons.
-
Click OK twice.
You are now set to use your visual difference utility to compare objects on the local computer and the server.

Using Show Differences to compare objects
You can select Show Differences from a pop-up menu or from the Library painter menu bar. If the object you want to compare has not been added to the source control project defined for your workspace, the Show Differences menu item is not available.
To compare a local object with the latest source control version
-
Right-click the object in the System Tree or in a Library painter view and select Show Differences from the pop-up menu
or
Select the object in a Library painter view and select Entry>Source Control>Show Differences from the Library painter menu bar.
A dialog box from your source control system displays.
PBNative connections
Skip the next step if you are using a visual difference utility with PBNative. The difference utility displays the files directly or indicates that there are no differences between the files.
-
Select the source control comparison options you want and click OK.
Some source control systems support additional comparison functions. You may need to run the source control manager for these functions. See your source control system documentation for more information.
For some source control systems, the PowerBuilder SCC API lets you show the version control history of an object in source control. Using this feature, you can determine what changes have been made to an object since it was first checked into source control.
The Show History menu item is not visible if the object for which you want to display a version history has not been added to the source control project defined for your workspace. It is grayed out if your source control system does not support this functionality through the PowerBuilder SCC API.
To display the source control version history
-
Right-click the object in the System Tree or in a Library painter view and select Show History from the pop-up menu
or
Select the object in a Library painter view and select Entry>Source Control>Show History from the Library painter menu bar.
A dialog box from your source control system displays.
-
Select the source control options you want and click OK.
Some source control systems support additional tracing and reporting functions for objects in their archives. You may need to run the source control manager for these functions. See your source control system documentation for more information.
The PowerBuilder SCC API lets you remove objects from source control, although for some source control systems, you may have to use the source control manager to delete the archives for the objects you remove. You cannot remove an object that is currently checked out from source control.
You cannot delete a source-controlled object from a local PowerBuilder workspace before that object has been removed from source control. There is no requirement, however, that the source control archive be deleted before you delete the object from its PowerBuilder workspace.
To remove objects from source control
-
Select the object in a Library painter view and select Entry>Source Control>Remove From Source Control from the Library painter menu.
The Remove From Source Control dialog box displays the name of the object you selected.
If you selected multiple objects or a workspace, the Remove From Source Control dialog box displays the list of objects in your selection that are not currently checked out from source control. You can also display a list of available objects when you select the Remove From Source Control menu item for a target file. A check mark next to an object in the list marks the object as assigned for removal from source control.
-
Make sure that the check box is selected next to the object you want to remove, and click OK.
Settings for managing source control operations
In addition to the SccMaxArraySize described in Fine-tuning performance for batched source control requests, and SccMultiCheckout described in Multiple user checkout, there are other PB.INI parameters you can add that affect source control operations.
|
PB.INI parameter |
Permitted values |
Description |
|---|---|---|
|
SccCOImport |
full inc outofdate full outofdate inc outofdate |
During checkout the default behavior is to import and compile only the objects being checked out. You can make the compile more inclusive by adding this parameter to the initialization file and assigning either the "full" or "inc" value to it. You can use the "outofdate" value to avoid unnecessary import and compile operations. For a fuller description of the permitted values, see the following table. |
|
SccUCImport |
full inc outofdate full outofdate inc outofdate |
When you revert a checkout, the default behavior is to refresh and compile only those objects in the local project path that were originally checked out. You can make the compile more inclusive by adding this parameter and assigning either the "full" or "inc" value to it. You can use the "outofdate" value to avoid unnecessary import and compile operations. For the meaning of the permitted values, see the following table. |
|
SccGLImport |
full inc |
When you issue a GetLatestVersion call, the default behavior is to refresh and compile only the objects in the request. You can make the compile more inclusive by adding this parameter and assigning a permitted value to it. For the meaning of the permitted values, see the following table. |
|
SccRBImport |
full inc |
When you issue a checkout, get latest version, or undo checkout call, images of the requested objects are exported to a temporary directory. When refreshed objects fail to compile, a dialog box asks whether you want to continue with or cancel the operation for all objects that fail to compile. If you select Cancel, the older images for the objects that fail to compile are reimported from the temporary directory to the local project path. Whenever object images are rolled back in this manner, you can force an incremental or full compilation of the entire target by adding the SccRBImport parameter and assigning a permitted value to it. For the meaning of the permitted values, see the following table. |
|
SccMaxArraySize |
nn (positive integer) |
Allows you to override the 25-file limit on file names sent to the source control server in a batched request. For more information, see Fine-tuning performance for batched source control requests. |
|
SccCaseSensitive |
0 or 1 (1 is default for Telelogic Synergy, 0 for all other SCC providers) |
By default, PowerBuilder uses a case sensitivity setting that is compatible with the SCC provider you are using. You can override the default setting by adding this parameter and assigning a different value. A value of 1 means that object names checked into source control are case sensitive, and a value of 0 means that they are not case sensitive. |
|
SccMultiCheckout |
0 or 1 (1 is default for SCC providers that support multiuser checkouts, 0 for providers that do not support multiuser checkout) |
If your SCC provider permits multiple user checkouts, you can use this initialization parameter to ensure that an item checked out by a user is exclusively reserved for that user until the object is checked back in. For more information, see Multiple user checkout. |
|
SccCheckoutNoLock |
0 or 1 (1 is default for MKS Source Integrity, 0 for all other providers |
Based on known defaults for the SCC provider you are using, PowerBuilder determines whether locks are added in source control to objects that you check out. You can override the default setting for some SCC providers by adding this parameter and assigning a different value. If the SCC provider permits checkouts of objects without locking them, a value of 1 means that no locks are added for objects that you check out. A value of 0 makes sure that locks are added for these objects. |
Permitted values for Import parameters
The following table describes the effect of permitted values for the SccCOImport, SccUCImport, SccGLImport, and SccRBImport parameters in the PB.INI initialization file. You can also add an import parameter without assigning it a value. This has the same effect as the default behavior during checkout, undo checkout, get latest version, and rollback operations.
|
Permitted value |
Description |
|---|---|
|
full |
Forces a full build of the target after the requested source control operation is completed. For SccCOImport and SccUCImport, you can combine the "full" value with the "outofdate" value to reduce the number of objects imported from the local project path to the target PBLs before a full rebuild. You combine the values by separating them with a single space, as shown in the following example: SccUCImport= full outofdate. For SccRBImport, if rollback fails for any reason, the build operation is not performed. |
|
inc |
Examines the entire target for additional objects that are descendants of objects or have dependencies on the objects that are included in the initial source control request. The dependent objects are compiled and regenerated as part of an incremental build, along with the objects in the initial request. For SccCOImport and SccUCImport, you can combine the "inc" value with the "outofdate" value to reduce the number of objects imported from the local project path to the target PBLs before an incremental rebuild. You combine the values by separating them with a single space, as shown in the following example: SccUCImport= inc outofdate. For SccRBImport, if rollback fails for any reason, the build operation is not performed. |
|
outofdate |
Compares the exported object images to the source code in target PBLs after an initial checkout or undo checkout operation. If the code in the PBLs is identical to the object images, the object images are not imported. The source code for identical PBL objects is also not compiled unless you also assign "full" or "inc" to the SccCOImport or SccUCImport parameters. The "outofdate" value is not available for the SccGLImport and SccRBImport parameters. Typically GetLatestVersion calls are made for objects that are assumed to be out of sync, in which case the out-of-date comparison is not expected to be useful. Also, object images that have been rolled back should always be reimported and compiled to assure the integrity of the target PBLs. |
Settings for troubleshooting problems with source control
In addition to the initialization parameters that can help with managing source control operations, there are also parameters you can use to troubleshoot problems with source control. These parameters should not be used in normal operations. They should be used only for diagnosing a problem with source control. The following table describes these parameters.
|
PB.INI parameter |
Permitted values |
Description |
|---|---|---|
|
SccExtensions |
0 or 1 (1 is default) |
Add this parameter and set it to 0 to disable SccQueryInfoEx calls when your source control provider supports this extension to the SCC API. You should do this either to Measure performance differences between SccDiff and SccQueryInfoEx calls. Test for incompatibilities between PowerBuilder clients and SCC provider DLL implementations. For more information about SccQueryInfoEx calls, see Extension to the SCC API. |
|
SccLogLevel |
1 or 3 (1 is default) |
Add this parameter and set it to 3 to enable more detailed tracing of SCC requests and the responses from the SCC provider. Increased tracing detail requires more file input and output, so this setting should be used only for diagnosing problems. |
|
SccMultithread |
0 or 1 (1 is default) |
Add this parameter and set it to 0 to disable multithreading. Disabling multithreading can cause significant delays when first connecting to source control or when expanding a node in the PowerBuilder System Tree, so this setting should be used only to diagnose integration issues with a specific provider or to work around a known defect. |
|
SccDiffStrategy |
nn (positive integer) |
Depending on the capabilities of an SCC provider, different strategies are used for determining whether a PBL object is out of sync with object files in the SCC repository. By default, a comparison is made by version number if the SCCQueryInfoEx API extension is supported and the SccExtensions parameter is not set to 0. Otherwise, a provider-specific backup strategy is used for the object comparisons. You can override the default comparison strategy by adding the SccDiffStrategy parameter to the initialization file and assigning an appropriate value to it. For more information, see Comparison strategies. |
By default, PowerBuilder uses the SCCQueryInfoEx API extension command to compare objects in target PBLs with object files in a source control repository.
For more information on the SCCQueryInfoEx API extension command, see Extension to the SCC API.
A backup strategy is set for SCC providers that do not support the API extension. The default backup strategy for all SCC providers except ClearCase and Perforce is to issue an SccDiff command. For ClearCase, the backup strategy compares the PBL object with the local project path object file. For Perforce versions earlier than 2008, the strategy for comparing differences first examines the SCC_STATUS_OUTOFDATE bit returned by the SccQueryInfo command and then compares the PBL object with the local project page object file.
You can override the default comparison strategy by adding the SccDiffStrategy parameter to the initialization file and assigning a value to it from the following table. You can also add the values together to use multiple comparison strategies, as long as those strategies are supported by your SCC provider.
Perforce 2008 and later
The Perforce client behavior changed with the 2008 version. SccQueryInfo does not return information about added objects to a Perforce 2008 depot. Therefore, for this SCC client, it is best to perform full synchronizations from the Perforce management utility or by using the OrcaScript scc refresh target <full> command. You also need to add the SccDiffStrategy parameter to the initialization file and set its bit value to 08 to make sure that the source code in the target PBLs match the object files in the local project path.
|
Parameter value |
Object comparison strategy |
|---|---|
|
02 (default) |
Compares by version number (SCCQueryInfoEx) -- not supported by all vendors |
|
04 |
Examines the SCC_STATUS_OUTOFDATE bit from the SccQueryInfo command to determine which objects are out of sync |
|
08 |
Compares the source code in the target PBLs with object files in the local project path |
|
16 |
Uses the SccDiff command in quiet mode |
Objects in targets under source control must be managed differently than the same objects in targets that are not under source control.
You must check out a target file from source control before you can modify its properties. If objects in a source-controlled target are not themselves registered in source control, you can add them to or delete them from the local target without checking out the target. However, you must remove a source-controlled object from the source control system before you can delete the same object from the local copy of the target (whether or not the target itself is under source control).
Although you can add objects to a source-controlled target without checking out the target from source control, you cannot add existing libraries to the library list of a source-controlled target unless the target is checked out.
For information on removing an object from source control, see Removing objects from source control.
Although you can open objects in a PowerBuilder painter when they are checked in to source control, until you check them out again, any changes you make to those objects cannot be saved. By default, when you try to open an object under source control, PowerBuilder provides a warning message to let you know when the object is not checked out. You can avoid this type of warning message by clearing the "Suppress prompts to overwrite read-only files" check box on the Source Control tab of the Workspace Properties dialog box.
If you did not change the default, you can still select a check box on the first warning message that displays. After you select the "Do not display this message again" check box in a warning message box and click Yes, the check box on the Source Control tab is automatically cleared. This prevents warning messages from displaying the next time you open objects that are checked in to source control. Although warning messages do not display, you still cannot save any changes you make to these objects in a PowerBuilder painter.
You cannot copy a source-controlled object to a destination PBL in the same directory as the source PBL. Generally when you work with source control, objects with the same name should not exist in more than one PBL in the same directory.
Moving an object that is not under source control to a destination PBL having a source-controlled object with the same name is permitted only when the second object is checked out of source control.
You cannot move an object from a source PBL if the object is under source control, even when the object has been checked out. The right way to move an object under source control is described below.
PowerBuilder creates and uses PBG files to determine if any objects present on a source control server are missing from local PowerScript or .NET targets. Up-to-date PBG files insure that the latest objects in source control are available to all developers on a project, and that the objects are associated with a named PBL file.
Ideally, PBG files are not necessary. If the source control system exposes the latest additions of objects in a project through its SCC interface, PowerBuilder can obtain the list of all objects added to a project since the last status refresh. However, many source control systems do not support this, so PowerBuilder uses the PBG files to make sure it has an up-to-date list of objects under source control.
PBG files are registered and checked in to source control separately from all other objects in PowerBuilder. They are automatically updated to include new objects that are added to source control, but they can easily get out of sync when multiple users simultaneously register objects to (or delete objects from) the same source control project. For example, it is possible to add an object to source control successfully yet have the check-in of the PBG file fail because it is locked by another user.
You cannot see the PBG files in the System Tree or Library painter unless you set the root for these views to the file system. To edit PBG files manually, you should check them out of source control using the source control manager and open them in a text editor. (If you are using PBNative, you can edit PBG files directly in the server storage location, without checking them out of source control.)
You can manually add objects to the PBG file for a PowerBuilder library by including a new line for each object after the @begin Objects line. The following is an example of the contents of a PBG file for a PBL that is saved to a subdirectory (target1) of the workspace associated with the source control project:

Migrating from earlier versions of PowerBuilder
There are different strategies for migrating existing source control projects from earlier versions of PowerBuilder. To migrate a target from PowerBuilder 8 or later, you can check the target out from source control, then add the target to a workspace in the new version of PowerBuilder. When the Migrate Application dialog box prompts you to migrate the libraries in the application library list, click OK to begin the migration.
If you change the directory hierarchy for target libraries in the new version of PowerBuilder, you should use the Existing Application target wizard to create a new target instead of adding and migrating a PowerBuilder 8 or later target. If you keep the old target file (PBT) in the new target path, you must give the new target a different name or the wizard will not be able to create a new PBT.
For information on using the Existing Application target wizard, see Using the Existing Application target wizard.
When you open a PowerBuilder 8 or later workspace in the current version of PowerBuilder, a dialog box prompts you to migrate the workspace targets. If you select the No Prompting check box and click OK, the target libraries are migrated without additional prompting, and the Migrate Application dialog box never displays. You can then add the migrated target objects to source control from the new version of PowerBuilder.
For more information about migration, see Migrating targets.
Removing PowerBuilder 8
If you remove PowerBuilder 8 from a computer where you have already installed a later version of PowerBuilder, the setup program deletes the PBNative registry entry. Subsequently, if you want to use PBNative source control with PowerBuilder 2019, you must reregister PBNAT190.dll. Attempting to use PBNative before reregistering the DLL produces an error message that points out the problem and the solution. You can reregister the DLL by opening a DOS command box, changing to the %Appeon%\Shared\PowerBuilder directory, and entering the command REGSVR32 PBNAT190.dll.
Removing PowerBuilder 9 or later does not remove the DLL or the registry entry for PBNative source control.
Migrating from PowerBuilder 7 or earlier
Migrating an application from PowerBuilder 7 or earlier requires a different approach, since workspaces and targets were introduced with PowerBuilder 8. You need to create a new workspace and appropriate targets for any PowerBuilder 7 (or older) objects that you are migrating.
The strategies available to you or the project manager are:
To use the first strategy, you must keep a copy of the old version of PowerBuilder -- at least until you have finished migrating all your source-controlled PBLs.
Source control in early PowerBuilder versions
Because workspaces and targets were not available in PowerBuilder prior to version 8, you must use the Existing Application wizard to create targets for applications that you built with PowerBuilder 7 or earlier PowerBuilder versions. A source control project in PowerBuilder 7 (or earlier PowerBuilder versions) was associated with a single application.
Beginning with PowerBuilder 8, source control is associated with a workspace that can have multiple targets and applications.
If you keep a copy of your old version of PowerBuilder, you can check out your application object and all other objects from source control to a work PBL. By checking out the objects in the older version of PowerBuilder, you make sure that no one else makes changes to the objects before you migrate them to the current version of PowerBuilder.
Deciding on a directory hierarchy
You should decide on a directory hierarchy before you migrate. PowerBuilder 7 and earlier versions required you to keep all source-controlled files in a single directory. Beginning with PowerBuilder 8, you can create subdirectories to contain each PBL in your library list. Although this is not required, it is useful in that it keeps objects from different PBLs separated in source control subprojects.
You must also decide whether to add a new target to an existing PowerBuilder workspace or to a new workspace that you create specifically for the target. You can then use the Existing Application target wizard to create a new target from the local copies of your registered PBLs (making sure to select all the supporting PBLs for your application on the Set Library Search Path page of the wizard). When you run the wizard, PowerBuilder prompts you to migrate the PBLs you select.
After you have run the wizard and migrated all the source-controlled PBLs, you can define the source control connection profile for the workspace to point to the old source control project if you want to maintain it, or to a new source control project if you do not. You can then check in or add the migrated objects to source control and delete the work PBL containing the older versions of the objects. You do not need a separate work PBL in PowerBuilder 9 or later.
To migrate a source control project using the Existing Application wizard
-
From your old version of PowerBuilder, check out your objects to a work PBL.
-
Decide on a new file hierarchy for the libraries in your application library list.
You can keep all the libraries in the same directory if you want, but it can be advantageous to create separate subdirectories for each library in the list. If you plan to share libraries among different targets, you should structure the directories so that the common libraries are in the local root path of every target that uses them.
-
Create a new workspace in the new version of PowerBuilder, or open an existing workspace in the new version of PowerBuilder.
-
Create a new target using the Existing Application wizard.
-
In the wizard, point to the PBL with an Application object and add all the helper PBLs to the library search path.
PowerBuilder prompts you to migrate the PBLs.
-
Click Yes to migrate each library in the path.
-
Create a source connection profile for the workspace that points to the old source control project or to a new project.
-
Check in the migrated objects to source control if you are using the old source control project, or add the migrated objects to source control if you are using a new source control project.
-
Delete the work PBL whenever you want.
You can use your source control manager to check out all the old PowerBuilder objects to a named directory or folder. If you plan to use the same project to store your migrated objects, you must make sure that the manager locks the files you check out of the source control archive.
You can create a new target using the Application target wizard in a new or existing workspace. The Application wizard lets you select or name a new PBL file to associate with the target it creates. You can use the Target property sheet to list any additional PBLs you want to associate with the target.
You can then import the files that you checked out of source control, distributing them as needed to the libraries you associated with the new target. After importing the files, you can migrate the target by right-clicking it in the System Tree and selecting Migrate from the target pop-up menu. You should also do a full build of the target. After you have migrated and built the target, you can define the connection profile for the workspace to point to the old source control project if you want to maintain it, or to a new source control project if you do not.
