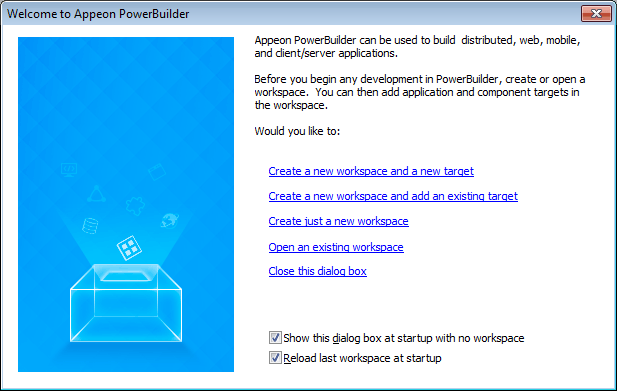
When you start PowerBuilder for the first time, the Welcome to PowerBuilder dialog box lets you create a new workspace with or without targets:
When PowerBuilder starts, it opens in a window that contains a menu bar and the PowerBar at the top and the System Tree and Clip window on the left. The remaining area will display the painters and editors you open when you start working with objects.
The System Tree provides an active resource of programming information you use while developing targets. It lets you not only get information, but also drag objects into painter views (such as the Script view or Layout view) for immediate use.
The System Tree displays by default when you start PowerBuilder for the first time. You can hide or display the System Tree using the System Tree button on the PowerBar or by selecting Window>System Tree.
Using the Workspace tab page
The System Tree has a single tab page that provides a view of the current workspace. The Workspace tab page displays the current workspace and all its targets. Most targets display the library list for the target and all the objects in each PBL. The Workspace tab page in the System Tree works like a tree view in the Library painter, but you can keep it open all the time to serve as the control center of the development environment.
You can set the root of the Workspace page to your computer's root directory, the current selection, or any directory or library, as well as to the current workspace.
Working with targets
To see the pop-up menu that lets you perform operations on a target such as search, build, and migrate, you must set the root of the System Tree to the current workspace.
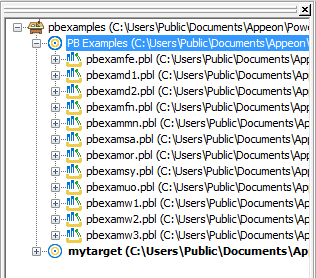
The following illustration shows a workspace with two targets.
Current target
The orders target is bold, indicating it is the current target, which means that it is the default target used in the New dialog box and for Run and Debug. The current target is set whenever you:
-
Invoke an action in the System Tree, Library painter, or main menu that affects a target or a child of a target, such as Build, Migrate, Run, or Debug. Some actions, such as Search and Migrate, display a dialog box. If you cancel the action by clicking the Cancel button in the dialog box, the current target is not changed.
-
Open an object painter.
-
Change the active object painter.
If you prefer to set the current target explicitly using the Set as Current Target pop-up menu item for the target in the System Tree or the File>Set Current Target menu item, clear the Automatically Set Current Target check box on the Workspaces tab page in the System Options dialog box. To open the System Options dialog box, select Tools>System Options from the main menu.
Actions in the System Tree
You can use the Workspace page as the hub of your PowerBuilder session. Pop-up menus let you build and deploy targets and open and edit any object. Double-clicking an event or function in the System Tree opens its script in the Script view. Events with scripts have a different icon and are listed before events without scripts.
The following table lists the actions you can take on each item that displays on the Workspace page. You can also set properties for each item, choose which object types display in the tree view, change the root of the Workspace page, and reset the root to the current workspace.
|
Item |
Menu action items |
|---|---|
|
Workspace |
New (opens New dialog box), Add Target, Open Workspace, Close, Incremental Build, Full Build, Deploy, Run, Debug, Show, Properties. |
|
Target |
New, Search, Set as Current Target, Remove Target, Library List, .NET Assemblies, Migrate, Incremental Build, Full Build, Deploy, Run, Debug, Show, Properties. .NET Assemblies only displays for .NET targets. |
|
PBL |
Search, Delete, Remove Library, Import, Import PB Extension, Optimize, Build Runtime Library, Print Directory, Show, Properties. |
|
PBD |
Search, Delete, Remove Library, Print Directory, Show, Properties |
|
PowerBuilder object |
Edit, Edit Source, Search, Inherit from, Run/Preview, Copy, Move, Delete, Regenerate, Export, Print, Properties. Edit Source is not available for project and proxy objects. Inherit from and Run/Preview are available only for some object types. Source control items are available only if source control information is associated with the target. |
|
Functions and events |
Edit, Properties. The Properties dialog box shows the prototype of the function or event and its "signature." The signature is a string that represents the argument types, return types, and passing style. You use this string when you write a PBNI extension that calls the function or event. For more information, see PowerBuilder Native Interface Programmers Guide and Reference. |
|
.NET assembly |
Show, Properties. .NET assemblies can be added to the System Tree by selecting them from the Properties dialog box for .NET targets. |
Like the System Tree, the PowerBar provides a main control point for building PowerBuilder applications and deploying the application to Web/Mobile. From the PowerBar1 you can create new objects and applications, open existing objects, and debug and run the current application; and from the PowerBar4 you can configure the application and servers, and deploy the application to Web/Mobile.
PowerBar4 (also called PowerServer Toolkit) is provided only in the Universal edition of PowerBuilder 2017 or later. For more information about PowerBar4 (PowerServer Toolkit), refer to the PowerServer Help.
While you are getting used to using PowerBuilder, you can display a label on each button in a toolbar to remind you of its purpose. To do so, right-click any toolbar button and select Show Text from the pop-up menu.
The following table lists the buttons from left to right on the PowerBar1.
|
PowerBar1 button |
What you can use it for |
|---|---|
|
New |
Create new objects. |
|
Inherit |
Create new windows, user objects, and menus by inheriting from an existing object. |
|
Open |
Open existing objects. |
|
Run/Preview |
Run windows or preview DataWindows. |
|
System Tree |
Work in the System Tree window, which can serve as the hub of your development session. For more information see The System Tree. |
|
Output Window |
Examine the output of a variety of operations (migration, builds, deployment, project execution, object saves, and searches). See The Output window. |
|
Next Error, Previous Error |
Navigate through the Output window. |
|
To-Do List |
Keep track of development tasks you need to do for the current application and use links to get you quickly to the place where you complete the tasks. |
|
Browser |
View information about system objects and objects in your application, such as their properties, events, functions, and global variables, and copy, export, or print the information. |
|
Clip Window |
Store objects or code you use frequently. You can drag or copy items to the Clip window to be saved and then drag or copy these items to the appropriate painter view when you want to use them. See The Clip window. |
|
Library |
Manage your libraries using the Library painter. |
|
DB Profile |
Define and use named sets of parameters to connect to a particular database. |
|
Database |
Maintain databases and database tables, control user access to databases, and manipulate data in databases using the Database painter. |
|
Edit |
Edit text files (such as source, resource, and initialization files) in the file editor. |
|
Incremental Build Workspace |
Update all the targets and objects in the workspace that have changed since the last build. |
|
Full Build Workspace |
Update all the targets and objects in the workspace. |
|
Deploy Workspace |
Deploy all the targets in the workspace. |
|
Skip, Stop |
Interrupt a build, deploy, or search operation. When a series of operations is in progress, such as a full deploy of the workspace, the Skip button lets you jump to the next operation. The Stop button cancels all operations. |
|
Debug |
Debug the current target. You can set breakpoints and watch expressions, step through your code, examine and change variables during execution, and view the call stack and objects in memory. |
|
Select & Debug |
Select a target and open the Debugger. |
|
Run |
Run the current target just as your users would run it. For standard PowerBuilder application targets, the application runs in the development environment. For .NET targets, you must deploy the target before you can run it for the first time. If you have made changes since you last deployed, you must redeploy to see those changes when you click the Run button. |
|
Select & Run |
Select a target and run it. |
|
Exit |
Close PowerBuilder. |
Customizing the PowerBar
You can customize the PowerBar. For example, you can choose whether to move the PowerBar around, add buttons for operations you perform frequently, and display text in the buttons.
For more information, see Using toolbars.
About PowerTips
In the PowerBar, when you leave the mouse pointer over a button for a second or two, PowerBuilder displays a brief description of the button, called a PowerTip.PowerTips display in PowerBuilder wherever there are toolbar buttons.
You can store code fragments you use frequently in the Clip window. You copy text to the Clip window to save it and then drag or copy this text to the appropriate Script view or editor when you want to use it.
Using the Clip window
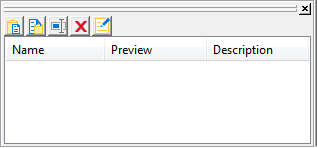
The Clip window displays a list of named clips, a preview of the information contained in the clip, and a description. It provides buttons to move Clip window contents to the clipboard, copy clipboard contents to the Clip window, rename a clip, delete a clip, and modify the clip's description. Clips you save in one workspace are available in all your workspaces; you might want to use a naming convention that reflects this.
For example, you might use standard error-checking code when you use the ConnectToServer function to connect to a server. To copy it to the clipboard, highlight the code in a Script view and select Copy from the pop-up menu. In the Clip window, click the Paste icon, and name the clip. The Clip Description dialog box opens so that you can enter a description. To change the description later, select the clip's name and click the Modify button.
You can drag the clip from the Clip window to any script in which you want to connect to a server. You can also use the Copy icon to copy the clip to the clipboard.
You can hide or display the Clip window using the Clip Window button on the PowerBar or by selecting Window>Clip.
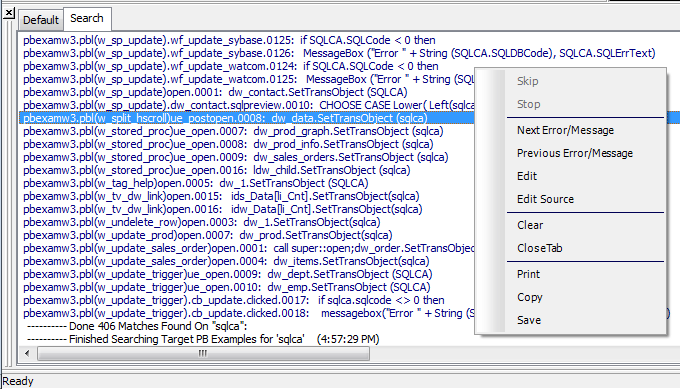
The output of a variety of operations (migration, builds, deployment, project execution, object saves, and searches) displays in the Output window.
When you start a new PowerBuilder session, the Output window has a single tab, Default. New tabs are added as you perform operations.
|
Tab |
Contents |
|---|---|
|
Default |
General information about the progress of full or incremental builds and project deployment |
|
Debug |
Debugger output, including the paths of assemblies loaded to support .NET debugging |
|
Errors |
Messages that indicate problems that prevent the build or deploy process from completing successfully |
|
Warnings |
Warning and informational messages |
|
Search |
Output from search operations |
|
Unsupported features |
For .NET targets, names and locations of features are not supported in the target type |
Using the Output window
You can hide or display the Output window with the Output button on the PowerBar or by selecting Window>Output.
You control operations in the window using the Skip, Stop, Next Error, and Previous Error buttons or menu options.
Tabs display in the order in which they are created and remain in the Output window for the rest of the PowerBuilder session. To clear the output from the tabs automatically when you start a new build, make sure that the Automatically Clear Output Window check box on the General page of the System Options dialog box is selected. You can also clear and close tabs manually from the pop-up menu.
When appropriate, lines in the Output window provide links that invoke the correct painter when you double-click on that line. The pop-up menu also provides the options Edit and Edit Source to open an object in a painter or the Source editor. You can copy the contents of the current tab to the Windows clipboard, save its contents to a text file, or print its contents to your default printer.


