When you build a menu that inherits its style, events, functions, structures, variables, and scripts from an existing menu, you save coding time. All you have to do is modify the descendant object to meet the requirements of the current situation.
To use inheritance to build a descendant menu:
-
Click the Inherit button on the PowerBar.
-
In the Inherit From Object dialog box, select Menus from the Object Type drop-down list, the library or libraries you want to look in, and the menu you want to use to create the descendant, and click OK.
Displaying menus from many libraries
To find a menu more easily, you can select more than one library in the Application Libraries list. Use Ctrl+click to toggle selected libraries and Shift+click to select a range.
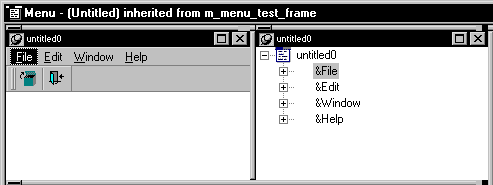
The selected menu displays in the WYSIWYG Menu view and the Tree Menu view in the Menu painter. The title in the painter's title bar indicates that the menu is a descendant.
-
Make the changes you want to the descendant menu as described in the next section.
-
Save the menu under a new name.
When you build and save a menu, PowerBuilder treats the menu as a unit that includes:
-
All menu items and their scripts
-
Any variables, functions, and structures declared for the menu
-
When you use inheritance to build a menu, everything in the ancestor menu is inherited in all of its descendants.
What you can do
You can do the following in a descendant menu:
-
Add menu items to the end of a menu
-
Insert menu items in a menu (with some restrictions)
For more information, see Where you can insert menu items in a descendant menu.
-
Modify existing menu items
For example, you can change the text displayed for a menu item or change its initial appearance, such as making it disabled or invisible.
-
Build scripts for menu items that do not have scripts in the ancestor menu
-
Extend or override inherited scripts
-
Declare functions, structures, and variables for the menu
What you cannot do
You cannot do the following in a descendant menu:
-
Change the order of inherited menu items
-
Delete an inherited menu item
-
Insert menu items between inherited menu items that do not have the ShiftToRight property set (see Modifying the ShiftToRight property)
-
Change the name of an inherited menu item
-
Change the type of an inherited menu item
Hiding a menu item
If you do not need a menu item in a descendant menu, you can hide it by clearing the visible property in the Properties view or by using the Hide function.
About menu item names in a descendant
PowerBuilder uses the following syntax to show names of inherited menu items:
AncestorMenuName::MenuItemName
For example, in a menu inherited from m_update_file, you see m_update_file::m_file for the m_file menu item, which is defined in m_update_file.
The inherited menu item name is also locked, so you cannot change it.
Understanding inheritance
The issues concerning inheritance with menus are similar to the issues concerning inheritance with windows and user objects. For information, see Understanding Inheritance.
Modifying the ShiftToRight property
When defining a descendant menu, you might want to insert menu items in the middle of the menu bar or in the middle of a drop-down or cascading menu. To do this, you set the ShiftToRight property in a menu item's Properties view on the General property page.
If the ancestor menu has no menu items with ShiftToRight set, you can add a new menu item to the end of the descendant menu. To add new menu items elsewhere in the menu, set the ShiftToRight property for the descendant menu items that will follow the new menu item.
The ShiftToRight property is used for menu items on the menu bar (where items need to shift right if a new item is inserted) and for menu items in a drop-down or cascading menu (where items might need to shift down if a new item is inserted). The property name is ShiftToRight, but it means shift down in drop-down or cascading menus.
Where you set the ShiftToRight property
You set the ShiftToRight property in an ancestor menu only if you know that you will always want a group of menu items to shift right (or down) when you inherit from the menu and add a new menu item. For example, if you have File, Edit, Window, and Help menus on the menu bar, set the ShiftToRight property for the Window and Help menu items if you are going to inherit from this menu, because Window and Help are usually the last items on a menu bar.
Where you can insert menu items in a descendant menu
In a descendant menu, a group of menu items can be one of four types. Each type has an insertion rule.
|
Type of group |
Insertion rule |
|---|---|
|
Inherited menu items without ShiftToRight set |
You cannot insert a new menu item before any of these menu items |
|
Inherited menu items with ShiftToRight set in ancestor |
You can insert before the first menu item in the group but not before the others |
|
New items without ShiftToRight set |
You can insert a new menu item before any of these menu items |
|
New items with ShiftToRight set |
You can insert a new menu item before any of these menu items |
The Example with no ShiftToRight in ancestor and the Example with ShiftToRight in ancestor demonstrate some of these rules.
How to insert menu items in a descendant menu
If you can insert a menu item in a descendant menu, the Insert Menu Item option on the Insert menu and the pop-up menu is enabled. The Insert Menu Item is enabled if ShiftToRight is set in the selected item that will follow the item you are inserting and all menu items following it.
To insert a menu item in a descendant, you use the same method you use to insert an item in a new menu, whether the menu item is on the menu bar or on a drop-down or cascading menu. For information about inserting menu items, see Working with menu items.
The following examples illustrate where you can insert menu items in a descendant menu and demonstrate the rules that govern where you can insert them.
Example with no ShiftToRight in ancestor
Suppose you have a menu with File, Edit, Window, and Help items on the menu bar. The menu is inherited from an ancestor frame menu with no items set as ShiftToRight in the ancestor.
Here is how you might add some new menu items. Since ShiftToRight is not set anywhere at first, you can add a menu item only to the end.
Select any item in the menu bar and select Insert>Menu Item At End.
Name the new menu item New1 and press Enter.
The New1 menu item is added to the right of the Help menu.

Now add a new Menu item before the New1 menu item. You can do this without setting ShiftToRight on New1, because New1 is a new menu item in the inherited menu.
Select Insert Menu Item from the pop-up menu for New1.
Name the new menu item New2 and press Enter.

Now add a new Menu item before the Help menu item. You cannot do this unless you set ShiftToRight on the Help menu item, the New2 Menu item, and the New1 menu item, because Help is an inherited menu item without ShiftToRight set in the ancestor menu. For Help to shift right, New2 and New1 must also be able to shift right.
Select the Help menu item and in the Properties view, select the ShiftToRight property, and then do the same for New1 and New2.
Order for setting ShiftToRight for the three menu items
You can set ShiftToRight in any order, but you see the items shifting only if you set ShiftToRight from left to right.
Now you can add a new menu item before the Help menu item.
Select the Help menu item, then select Insert New Item from the pop-up menu, name the new item New3, and then press Enter.

If you want to add a new Menu item before the New3 menu item, you can do it without setting ShiftToRight on New3, because New3 is a new menu item and ShiftToRight is set in all items that follow.
However, if you want to add a new menu item before the Window menu item, you cannot do this by working only in the descendant menu because the Window menu item is an ancestor menu item and ShiftToRight is not set in the ancestor. To be able to do this, you must set Window as ShiftToRight in the ancestor.
Example with ShiftToRight in ancestor
In this example, the inherited menu has the same four menu bar items, but ShiftToRight has been set in the Window and Help menu items in the ancestor menu. Suppose you want to insert a new menu item before the Help menu item and the Window menu item.
Select the Help menu item and display the pop-up menu.
The Insert Menu Item option is disabled because the Help item is not the first item in a group of ancestor menu items (Window and Help) with ShiftToRight set in the ancestor.
Select the Window menu item and display the pop-up menu.
The Insert Menu Item option is enabled because the Window item is the first item in a group of ancestor menu items with ShiftToRight set in the ancestor.
Select Insert Menu Item At End from the pop-up menu to insert a new menu item after Help, name it New1, and press Enter.
The New1 item's ShiftToRight property is set automatically.
Now the Window, Help, and New1 items are set ShiftToRight. You can insert a new item before Window and New1, but not before Help. This is because the Window and Help menu items are a group for which ShiftToRight is set in the ancestor.
You cannot insert a new item before the Edit menu item because Edit is in a group (File and Edit) that are inherited items with no ShiftToRight set in the ancestor.
Select the Edit menu item, select ShiftToRight in the Properties view, and then add a new menu item.

You could also have set the ShiftToRight property in the ancestor menu, but it is easier to work just in the descendant.
