- Installing .NET Framework 4.x
- Installing IIS 10 on Windows 10
- Installing IIS 8.0 on Windows 8
- Installing IIS 8.0 on Windows Server 2012
- Installing IIS 7.5 on Windows Server 2008 R2
- Installing IIS 7.5 on Windows 7
- Installing IIS 7.0 on Windows Server 2008
- Installing IIS 7.0 on Windows Vista
- Installing IIS 6.0 on Windows Server 2003
Before you install Appeon Server make sure
-
.NET Framework 4.x is successfully installed.
-
IIS 6.0, 7.0, 7.5, 8.0, or 10 is correctly installed with necessary components.
If you want to install Appeon File Server later, you will also need to install the components listed under IIS 6 Management Compatibility.
If you are using one of the latest versions of the Windows or Windows Server operating system, the .NET Framework might already be installed on your computer. Specifically, the .NET Framework 3.5.1 is included with Windows 7, the .NET Framework 4.5 is included with Windows 8/8.1 and Windows Server 2012. Appeon for PowerBuilder 2016 requires .NET Framework 4.x to be installed.
-
If you are using Windows 7 or earlier version, you need to manually install .NET Framework 4.x. You can download and install .NET Framework 4.x from http://www.microsoft.com/en-us/download/details.aspx?id=17851.
-
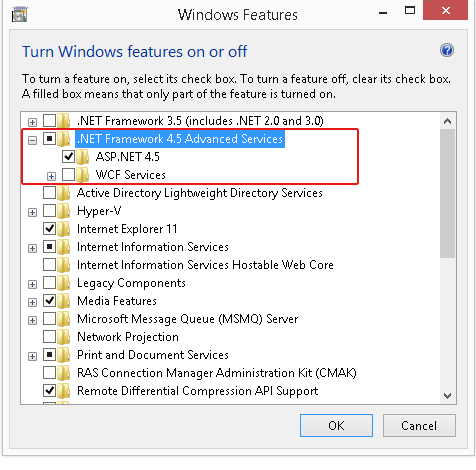
If you are using Windows 8 or 8.1, you need to enable the .NET Framework 4.5 through Control Panel.
-
In Control Panel, click Programs > Turn on or off Windows features.
-
In the Windows Features dialog box, select the .NET Framework 4.5 Advanced Services checkbox, and then expand the list and select the item ASP.NET 4.5.
-
Click OK to let Windows finish the installation and reboot the system.
-
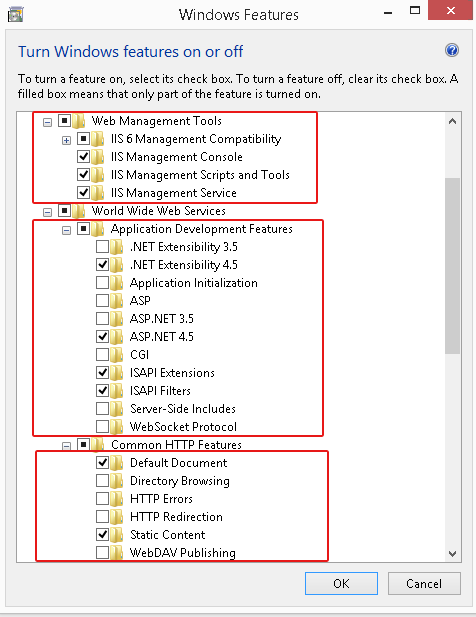
IIS 10 is included with Windows 10, but it is not installed on Windows 10 by default. You need to manually install it. Follow the instructions below and make sure that the following highlighted features are installed; these features are not selected to install by default, you will need to manually select them during the IIS installation.
-
In Control Panel, click Programs > Turn on or off Windows features.
-
In the Windows Features dialog box, select the check box of Internet Information Services, then expand the list and select the items listed under Application Development Features and under Common HTTP Features as shown in the figure below. Click OK. These features of IIS provide runtime support for Appeon Server.
Note: The aforementioned features are the necessary features for Appeon Server. If you want to better manage your IIS or to install Appeon File Server, you should select the items listed under IIS 6 Management Compatibility.
-
Click OK to let Windows finish the installation and reboot the system.
IIS 8.0 is included with Windows 8/8.1, but it is not installed on Windows 8/8.1 by default. You need to manually install it. Follow the instructions below and make sure that the following highlighted features are installed; these features are not selected to install by default, you will need to manually select them during the IIS installation.
-
In Control Panel, click Programs > Turn on or off Windows features.
-
In the Windows Features dialog box, select the check box of Internet Information Services, then expand the list and select the items listed under Application Development Features and under Common HTTP Features as shown in the figure below. Click OK. These features of IIS provide runtime support for Appeon Server.
Note: The aforementioned features are the necessary features for Appeon Server. If you want to better manage your IIS or to install Appeon File Server, you should select the items listed under IIS 6 Management Compatibility.
-
Click OK to let Windows finish the installation and reboot the system.
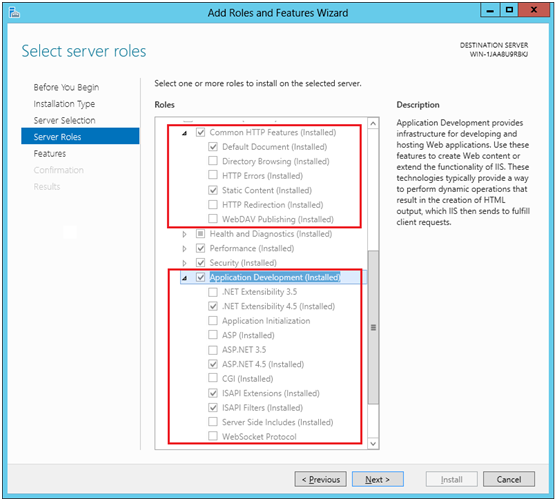
IIS 8.0 is included with Windows Server 2012, but it is not installed on Windows Server 2012 by default. You need to manually install it. Follow the instructions below and make sure that the following highlighted features are installed; these features are not selected to install by default, you will need to manually select them during the IIS installation.
-
In Control Panel, click Turn on or off Windows features to enter Add Roles and Features Wizard. Click Next until you enter the Server Roles page.
-
In the Server Roles page, select the check box of Web Server (IIS) -> Web Server, then expand the list and select the items under the Application Development Features and under Common HTTP Features (as shown in the red boxes in the figure below). Click OK. These features of IIS provide runtime support for Appeon Server.
-
Click OK to let Windows finish the installation and reboot the system.
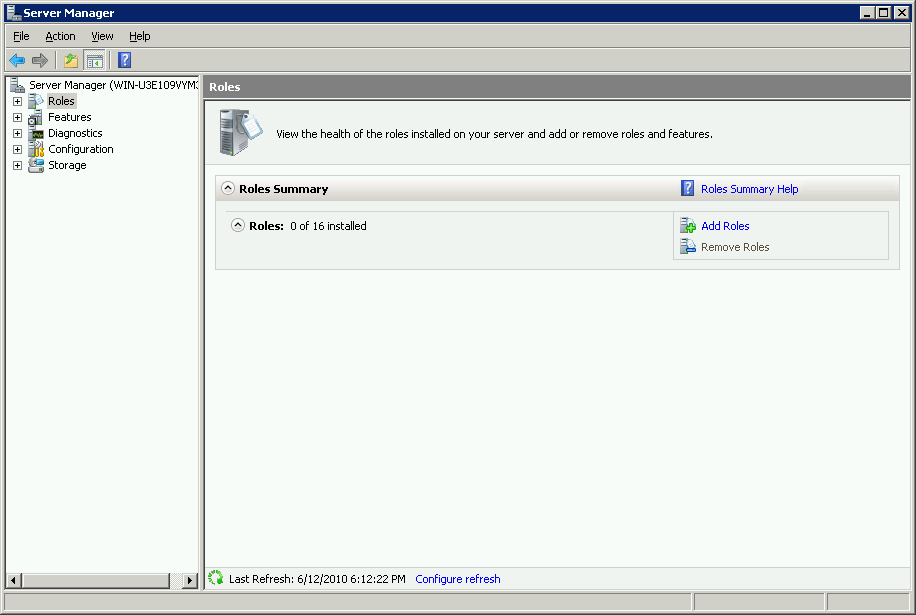
IIS 7.5 is included with Windows Server 2008 R2, but it is not installed on Windows Server 2008 R2 by default. You need to manually install it. Follow the instructions below and make sure that the following highlighted features are installed; these features are not selected to install by default, you will need to manually select them during the IIS installation.
-
Click Start, point to Administrative Tools and then click Server Manager. Click Roles under Server Manager, and the Roles Summary view is displayed.
-
In Roles Summary, click Add Roles, and follow the instructions of the Add Roles Wizard.
-
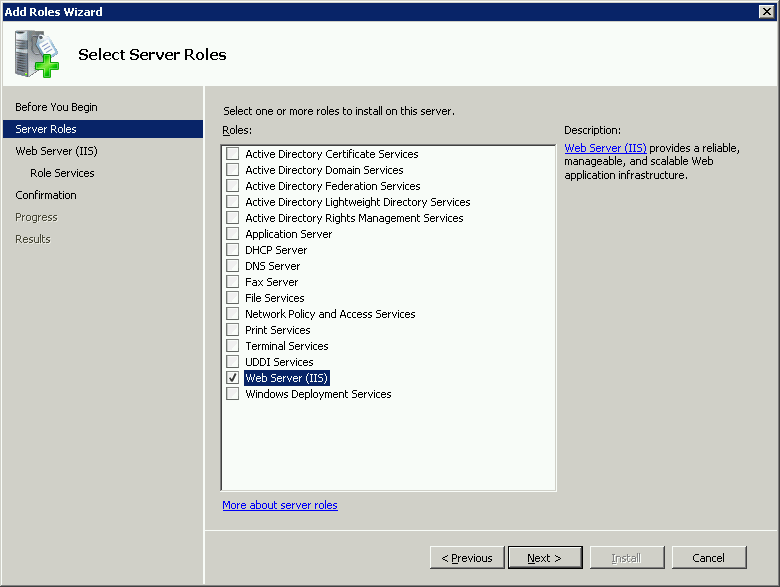
Select Web Server (IIS) in Select Server Roles, and click Next.
-
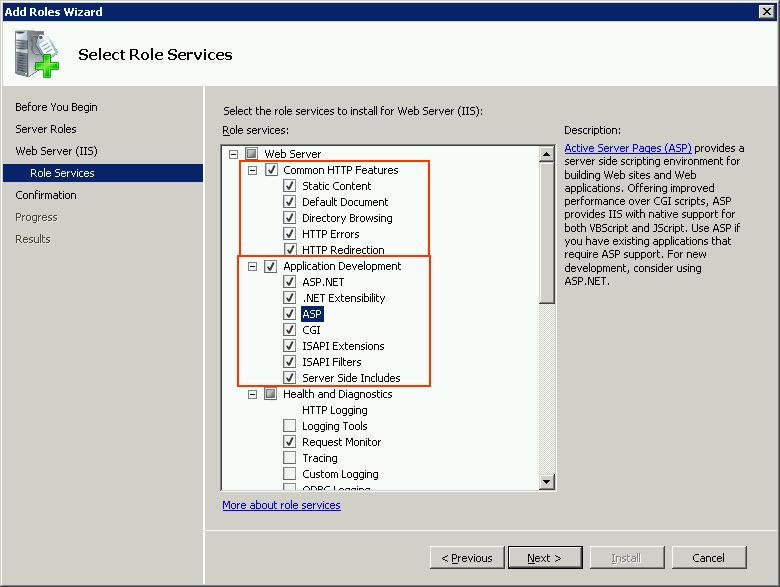
In the Select Role Services page, select the items listed under Common HTTP Features and Application Development (as shown in the red boxes in the figure below).
-
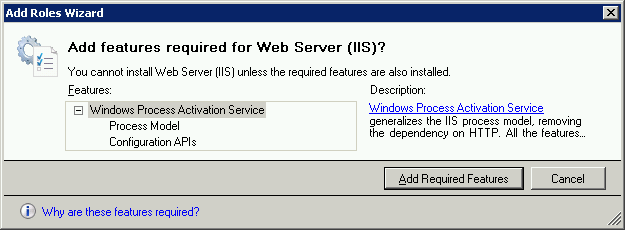
Since IIS depends on the Windows Process Activation Service (WAS) feature, the following informational dialog displays. Click Add Required Features to continue when the Add Roles Wizard notifies you on any required dependencies.
-
Go through the installation with the wizard and reboot the system.
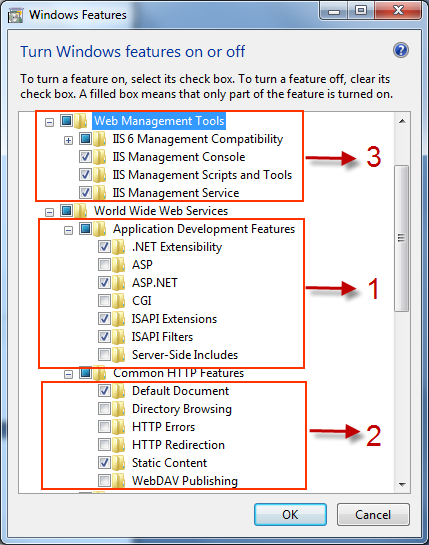
IIS 7.5 is included with Windows 7, but it is not installed on Windows 7 by default. You need to manually install it. Follow the instructions below and make sure that the following highlighted features are installed; these features are not selected to install by default, you will need to manually select them during the IIS installation.
-
Click Start > Control Panel > Programs > Turn on or off Windows features.
-
In the Windows Features dialog box, select the check box of Internet Information Services, then expand the list and select the items listed under Application Development Features and under Common HTTP Features (as shown in the red boxes marked with "1" and "2" in the figure below). Click OK. These features of IIS provide runtime support for Appeon Server.
Note: The features checked above are the necessary features for Appeon Server. If you want to better manage your IIS or to install Appeon File Server, you can select the items listed under IIS 6 Management Compatibility (as shown in the red box marked with "3" in the figure below).
-
Click OK to let Windows finish the installation and reboot the system.
IIS 7.0 is included with Windows Server 2008, but it is not installed on Windows Server 2008 by default. You need to manually install it. Follow the instructions below and make sure that the following highlighted features are installed; these features are not selected to install by default, you will need to manually select them during the IIS installation.
-
Click Start, point to Administrative Tools and then click Server Manager. Click Roles under Server Manager, and the Roles Summary view is displayed.
-
In Roles Summary, click Add Roles, and follow the instructions of the Add Roles Wizard.
-
Select Web Server (IIS) in Select Server Roles, and click Next.
-
In the Select Role Services page, select the items listed under Common HTTP Features and Application Development (as shown in the red boxes in the figure below).
-
Since IIS depends on the Windows Process Activation Service (WAS) feature, the following informational dialog displays. Click Add Required Features to continue when the Add Roles Wizard notifies you on any required dependencies.
-
Go through the installation with the wizard and reboot the system.
IIS 7.0 is included with Windows Vista, but it is not installed on Windows Vista by default. You need to manually install it. Follow the instructions below and make sure that the following highlighted features are installed; these features are not selected to install by default, you will need to manually select them during the IIS installation.
-
Click Start > Control Panel > Programs > Turn on or off Windows features.
-
In the Windows Features dialog box, select the check box of Internet Information Services, then expand the list and select the items listed under Application Development Features and under Common HTTP Features (as shown in the red boxes marked with "1" and "2" in the figure below). Click OK. These features of IIS provide runtime support for Appeon Server.
Note: The features checked above are the necessary features for Appeon Server. If you want to better manage your IIS or install Appeon File Server, you can select the items listed under IIS 6 Management Compatibility (as shown in the red box marked with "3" in the figure below).
-
Click OK to let Windows finish the installation and reboot the system.
IIS 6.0 is included with Windows Server 2003, but it is not installed on Windows Server 2003 by default. You need to manually install it. Following are the key steps to complete the IIS install.
-
Go to Control Panel | Add/Remove Programs.
-
Click Add/Remove Windows Components .
-
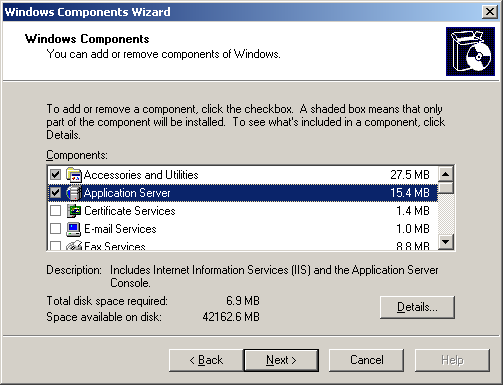
In the Components list box, click Application Server (as shown in the figure below), then click Next.
-
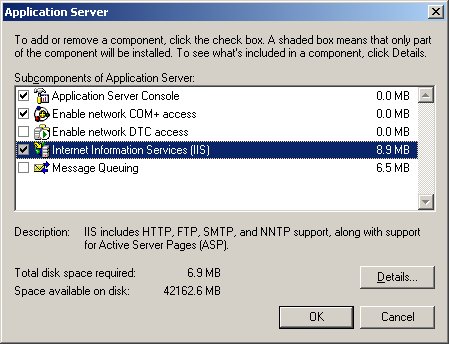
Select Internet Information Services (IIS) (as shown in the figure below).
-
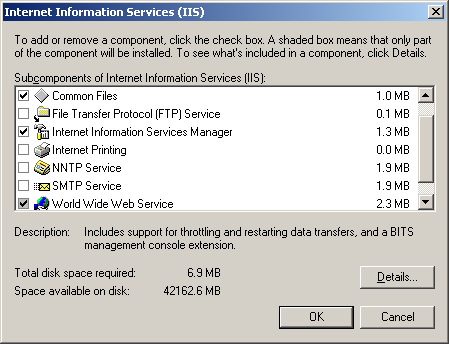
Click Details and select the following components:
-
Common Files
-
Internet Information Services Manager
-
World Wide Web Service
-
-
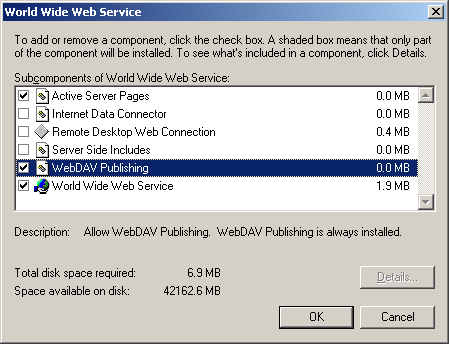
Select World Wide Web Service and click Details to select the following components (as shown in the following figure):
-
Active Server Pages
-
WebDAV Publishing
-
World Wide Web service
-
-
Click OK to install IIS 6.0 and reboot the system.
During the Appeon Server installation, the setup program will automatically configure the .NET IIS server so Appeon Server and IIS can work with each other. In very few cases, the automatic configuration may fail due to reasons such as environmental issues, user privileges, configuration changes etc., as a result Appeon Server is not working properly. When this happens, you can go through the configurations in the section called “Install Appeon Server to .NET IIS” in Appeon Troubleshooting Guide to fix the problem.
Step 1: Launch the Appeon for PowerBuilder 2016 Setup program and select to install Appeon Server for .NET (see Starting the installation). Wait until Appeon Server completes the preparation.
Step 2: Specify the IIS Web site where Appeon Server will be installed and click Next.
Appeon Server can be installed to an existing Web site or a new Web site. If you want to install Appeon Server to a new Web site, create one by selecting the Create a new Web Site option and inputting the Web site description, TCP port, and home directory. The Description, TCP Port, and Home Directory of the new Web site cannot be the same as the existing Web site.
Table 7. New IIS Web site
|
Setting |
Instructions |
|---|---|
|
Description |
Type a name to be used as the new Web site name. |
|
TCP Port |
Type a port number to be used as the new Web site port. |
|
Home Directory |
Click Browse to specify a root path of the new Web site. |

Step 3: Select whether to install the demo application and click Next.
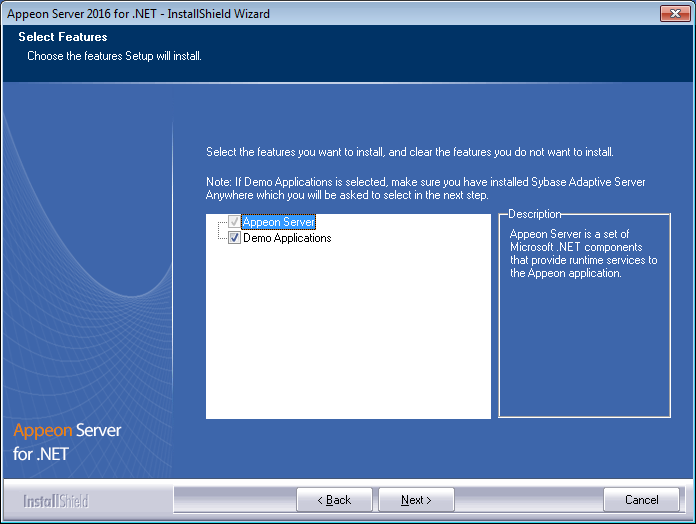
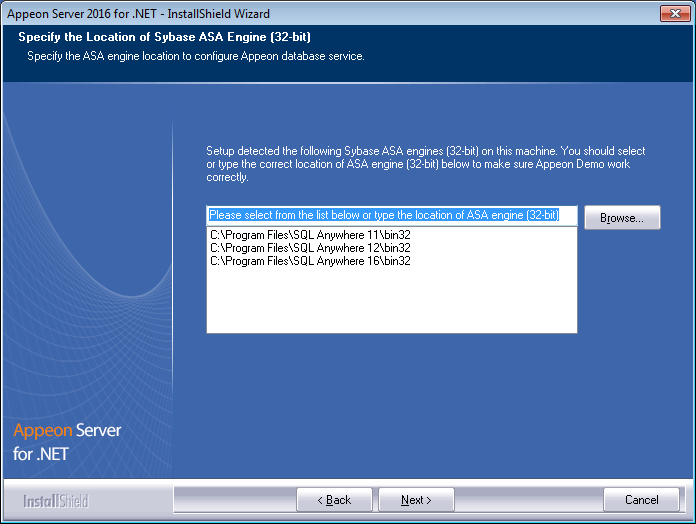
Step 4: If you selected to install the demo application, specify the path for the SAP ASA/SQL Anywhere engine and click Next. Appeon demo application requires ASA/SQL Anywhere to run.
Notes: Depending on the version of Appeon Server (32-bit or 64-bit), Setup lists all copies of ASA/SQL Anywhere engines of the corresponding version (32-bit or 64-bit) detected in your machine.
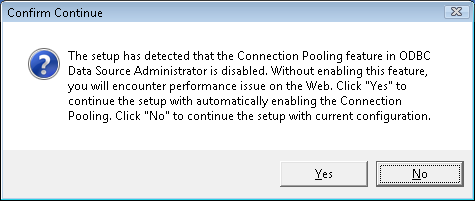
If you encounter the following message, Appeon recommends you click Yes to allow the setup program to enable the connection pooling in ODBC Data Source Administrator, this eliminates the likelihood of having any performance issues at runtime.
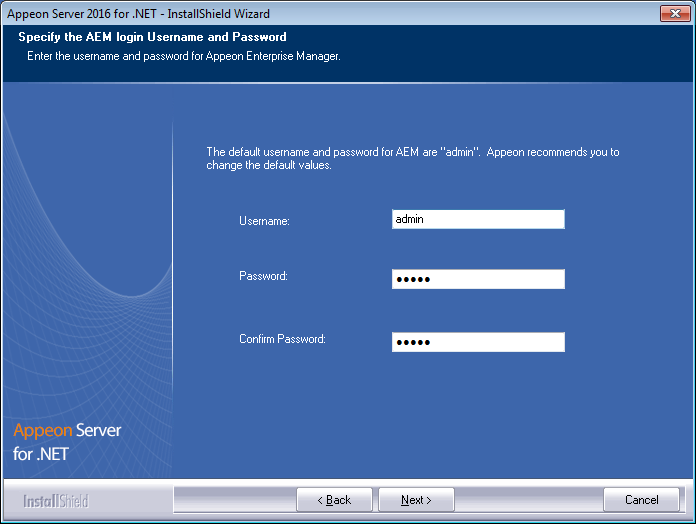
Step 5: Specify the AEM login user name and password.
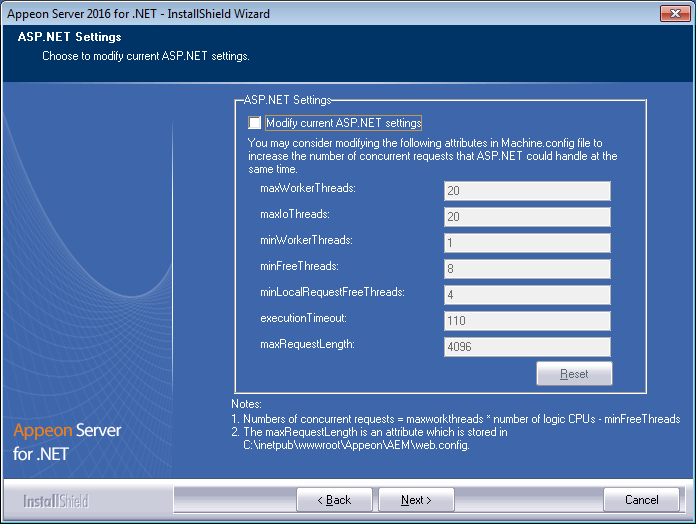
Step 6: Modify the settings for ASP.NET when necessary.
Select the Modify current ASP.NET settings checkbox and then modify the attribute values; or click Reset to restore the default values. These values are used to determine the maximum number of concurrent users that Appeon Server can support, therefore, setting proper values can help improve the Appeon Server performance. For detailed instructions, refer to the section called “Microsoft IIS server” in Appeon Performance Tuning Guide.
Step 7: Check the summary of settings. Click Back to change any unwanted settings or click Next to have Setup begin copying files.

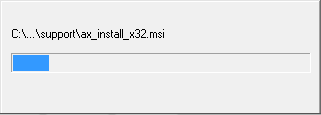
At the click of the Next button, the setup program begins copying files to your computer, as shown in the figure below.
Step 8: Wait until the installation is complete.
If you have selected to install Appeon Server as well as the other components (such as Appeon Developer, Appeon Help etc.), the setup program will install Appeon Server first, and then install the other components before it displays the setup complete screen (as shown below).
Step 9: Click Finish to complete the installation of Appeon Server.
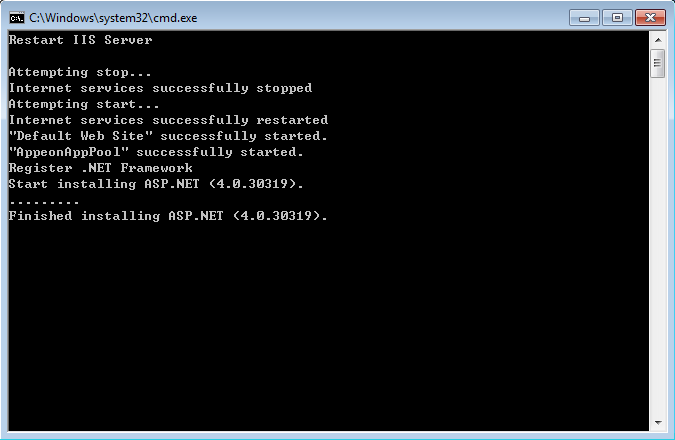
It is recommended that you keep Restart IIS Server and Register .NET Framework 4.0 selected when clicking Finish.
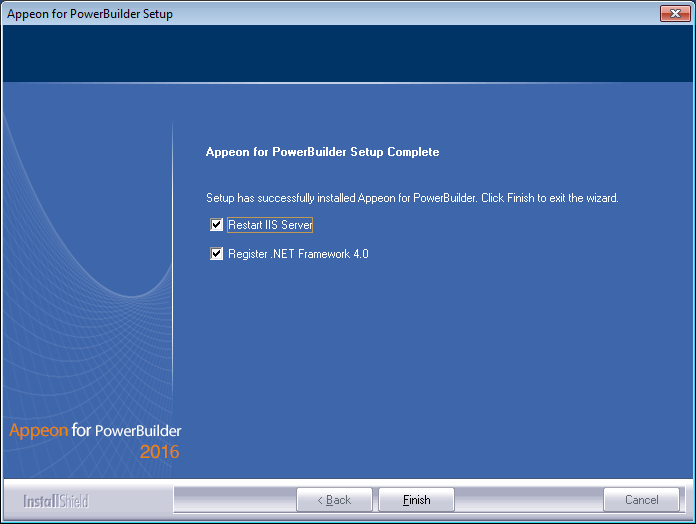
The setup program will restart the IIS server and then register .NET Framework, as shown in the following figure.
During the Appeon Server installation, the Appeon Enterprise Manager (AEM) (installed to %appeonserver%\AEM) and the Appeon Server Web Component (installed to %appeonserver%\weblibrary_ax) are automatically installed. %appeonserver% indicates the Appeon Server installation directory, for example, C:\Inetpub\wwwroot\appeon.
During the Appeon Server installation, you can select to install Appeon Server to an IIS Web site, but you may want to create the Appeon Server instances on the other IIS Web sites on that machine, so that the machine hardware resources can be better utilized, and the Appeon application on different Web sites can run more stably and independently, as the Appeon Server instances work independently from each other, and use different Application Pool and work process, like they are installed on different machines.
The following sections will talk about how to use the Appeon Server Instance Configuration Wizard to create the Appeon Server instance on IIS Web site(s) on the same machine.
Before creating the Appeon Server instance, you must have already installed Appeon Server to an IIS Web site which will be used later by the Appeon Server Instance Configuration Wizard as the template to create the instance.
To create an Appeon Server instance by the Appeon Server Instance Configuration Wizard, you can directly create an instance on the existing IIS Web site(s) or create a new IIS Web site and then create an instance on it. See the following sections for detailed instructions.
To create an Appeon Server instance on an existing IIS Web site, follow the steps below:
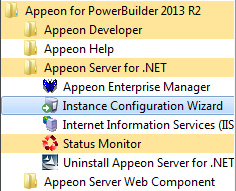
Step 1: Launch the Instance Configuration Wizard by running InstanceConfiguration.exe from %appeonserver%\Toolkit\instance configuration\.
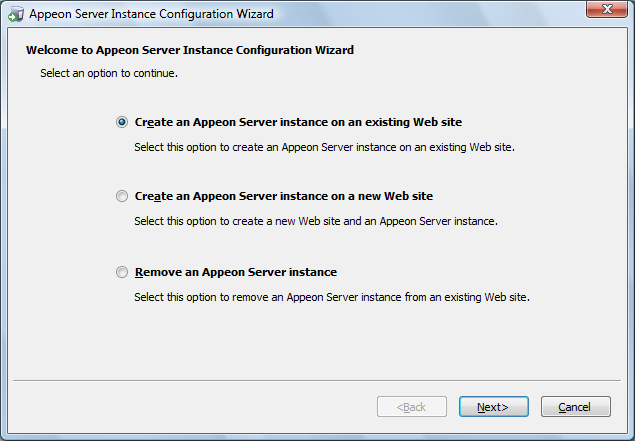
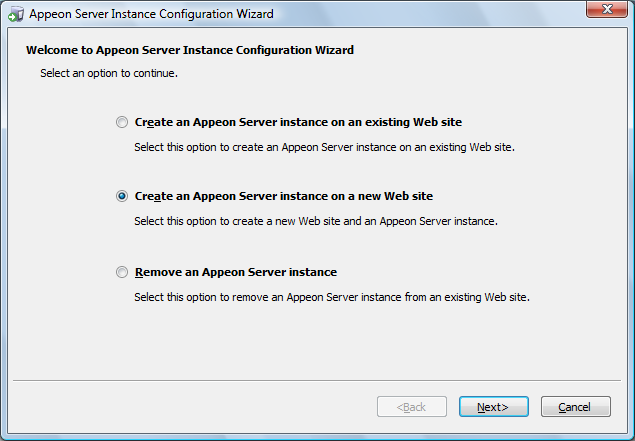
Step 2: In the Appeon Server Instance Configuration Wizard (referred as "Wizard" later in this section), select Create an Appeon Server instance on an existing Web site and click Next.
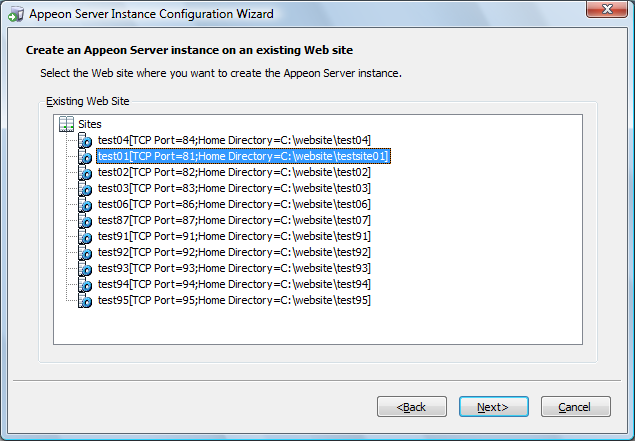
Step 3: From the Existing Web Site list, select a Web site where you want to create the Appeon Server instance and click Next.
The Wizard automatically detects and lists all existing Web sites where no Appeon Server instance is installed.
Note: More than one IIS Web site is allowed to share the same home directory; but if one of these Web sites already has an Appeon Server instance installed, then the other Web sites (that use the same home directory) cannot have the Appeon Server instance installed.
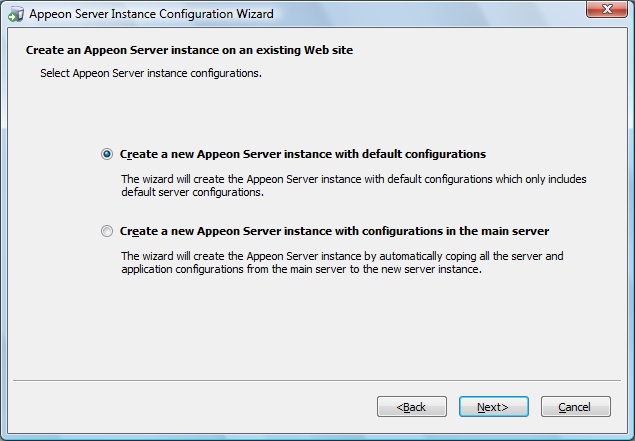
Step 4: Select to create the Appeon Server instance based on the default configurations or on the existing configurations and then click Next.
-
Create a new Appeon Server instance with default configurations indicates the Appeon Server instance to be created will have the default configurations of Appeon Server.
-
Create a new Appeon Server instance with configurations in the main server indicates the Appeon Server instance to be created will have all of the existing configurations, including the default configurations and the configurations made later, such as AEM configurations.
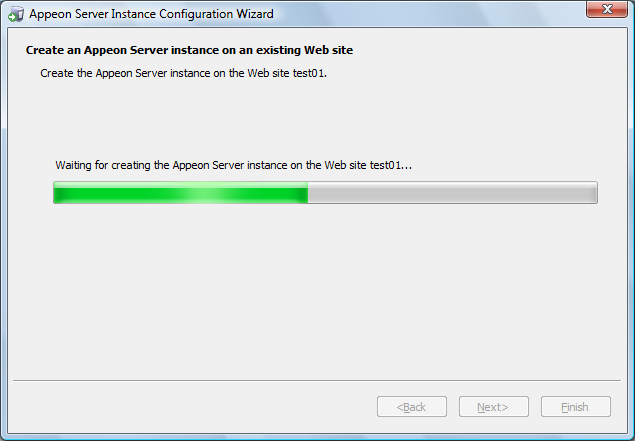
The Wizard is now creating a new Appeon Server instance on the selected Web site with the selected configurations.
If you are on Windows Vista and if you receive error messages such as "Failed to create the Appeon folder", please resolve the error by applying SP1 or above.
Step 5: Click Finish to exit the program.

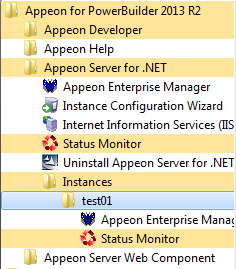
If the Appeon Server instance is created successfully, a shortcut for the new instance will be added to the Start menu, as shown in the following figure.
To create an Appeon Server instance on a new IIS Web site, follow the steps below:
Step 1: Run the Instance Configuration Wizard from Start | All Programs | Appeon for PowerBuilder 2016 | Appeon Server for .NET | Instance Configuration Wizard.
Step 2: In the Appeon Server Instance Configuration Wizard (referred as "Wizard" later in this section), select Create an Appeon Server instance on a new Web site and click Next.
Step 3: Specify the information needed for creating a new Web site and click Next to proceed.
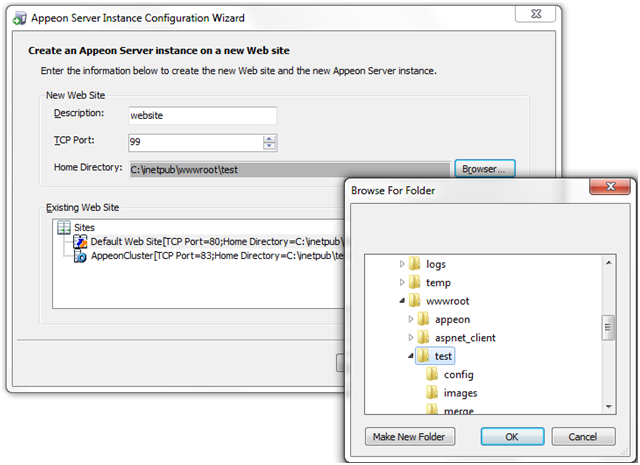
To create a new Web site, specify the Description, TCP Port, and Home Directory.
Table 8. New IIS Web site settings
|
Setting |
Instructions |
|---|---|
|
Description |
Type a name to be used as the new Web site name. |
|
TCP Port |
Type a port number to be used as the new Web site port. |
|
Home Directory |
Click Browse to specify a root path of the new Web site. |
Notes: The Description and TCP Port of the new Web site cannot be the same as the existing Web site, and the Home Directory cannot be the same as the existing Web site where an Appeon Server instance has already been installed. You can view the Description, TCP Port and Home Directory of the existing Web sites in the Existing Web Site group box.
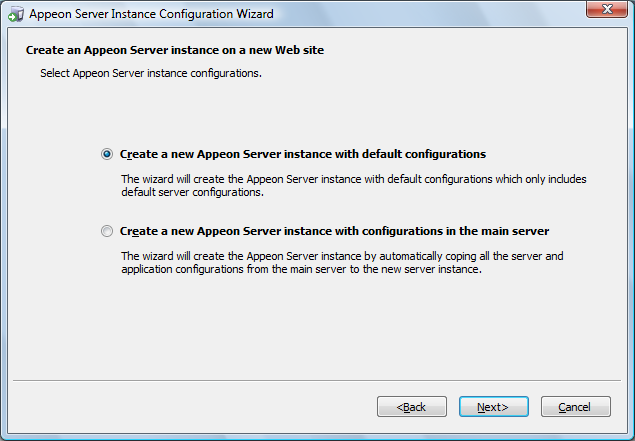
Step 4: Select to create the Appeon Server instance based on the default configurations or on the existing configurations and then click Next.
-
Create a new Appeon Server instance with default configurations indicates the Appeon Server instance to be created will have the default configurations of Appeon Server.
-
Create a new Appeon Server instance with configurations in the main server indicates the Appeon Server instance to be created will have all of the existing configurations, including the default configurations and the configurations made later, such as AEM configurations.
The Wizard will be creating a new Web site and then creating an Appeon Server instance on this new Web site.
Step 5: Click Finish.

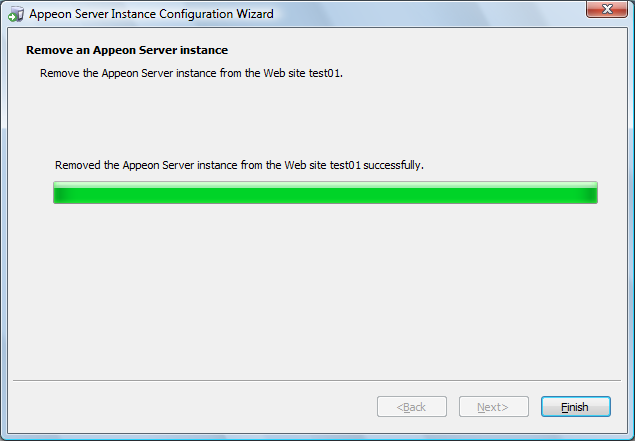
To remove an Appeon Server instance from the IIS Web site, follow the steps below:
Step 1: Run the Instance Configuration Wizard from Start | All Programs | Appeon for PowerBuilder 2016 | Appeon Server for .NET | Instance Configuration Wizard.
Step 2: In the Appeon Server Instance Configuration Wizard (referred as "Wizard" later in this section), select Remove an Appeon Server instance and click Next.

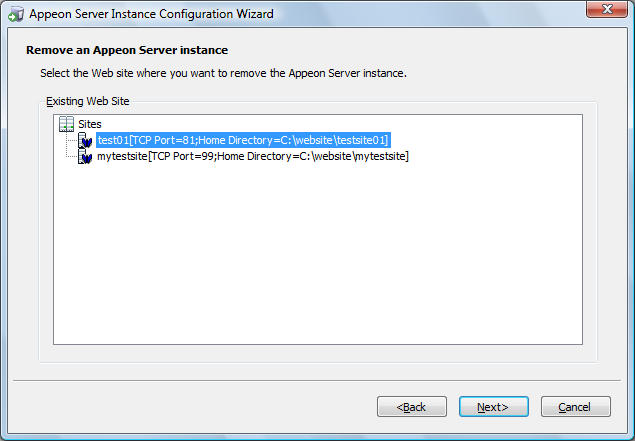
Step 3: Select the Web site where you want to remove the Appeon Server instance and click Next.
The Wizard automatically detects and lists all of the Web sites where an Appeon Server instance has been created.
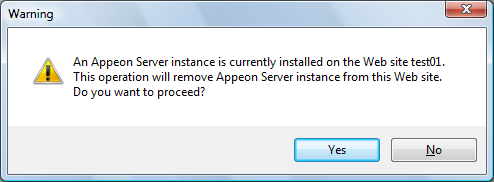
Step 4: In the popup Warning window, click Yes to confirm the deletion (or click No to cancel the deletion).
The Wizard will be removing the Appeon Server instance from the selected Web site.
Step 5: Click Finish to exit.