Instead of using the default launcher, you can create and upload your own launcher.
To create and customize the launcher:
-
In the PowerServer project painter, select the Deploy > Advanced tab. Click the Configuration button. The Cloud App Launcher Profiles window appears.
-
Click the New button to add a new launcher profile. (You can click the Delete icon after the profile to remove it.)
In the New Launcher Profile window, create the profile with the following settings:
-
The minor version of the launcher.
You can set the minor version to a value between 0 and 65535. You must increment the version number to be greater than the previously installed version; otherwise the launcher will NOT update. When the version number is greater than the previously installed version, the launcher will automatically upgrade to the new version.
-
The name for the new launcher profile.
-
The location to save the launcher profile on the local machine.
-
The version of the launcher (Standard or Public). If you are not sure which version to select, refer to the section Versions and admin rights for their differences.
-
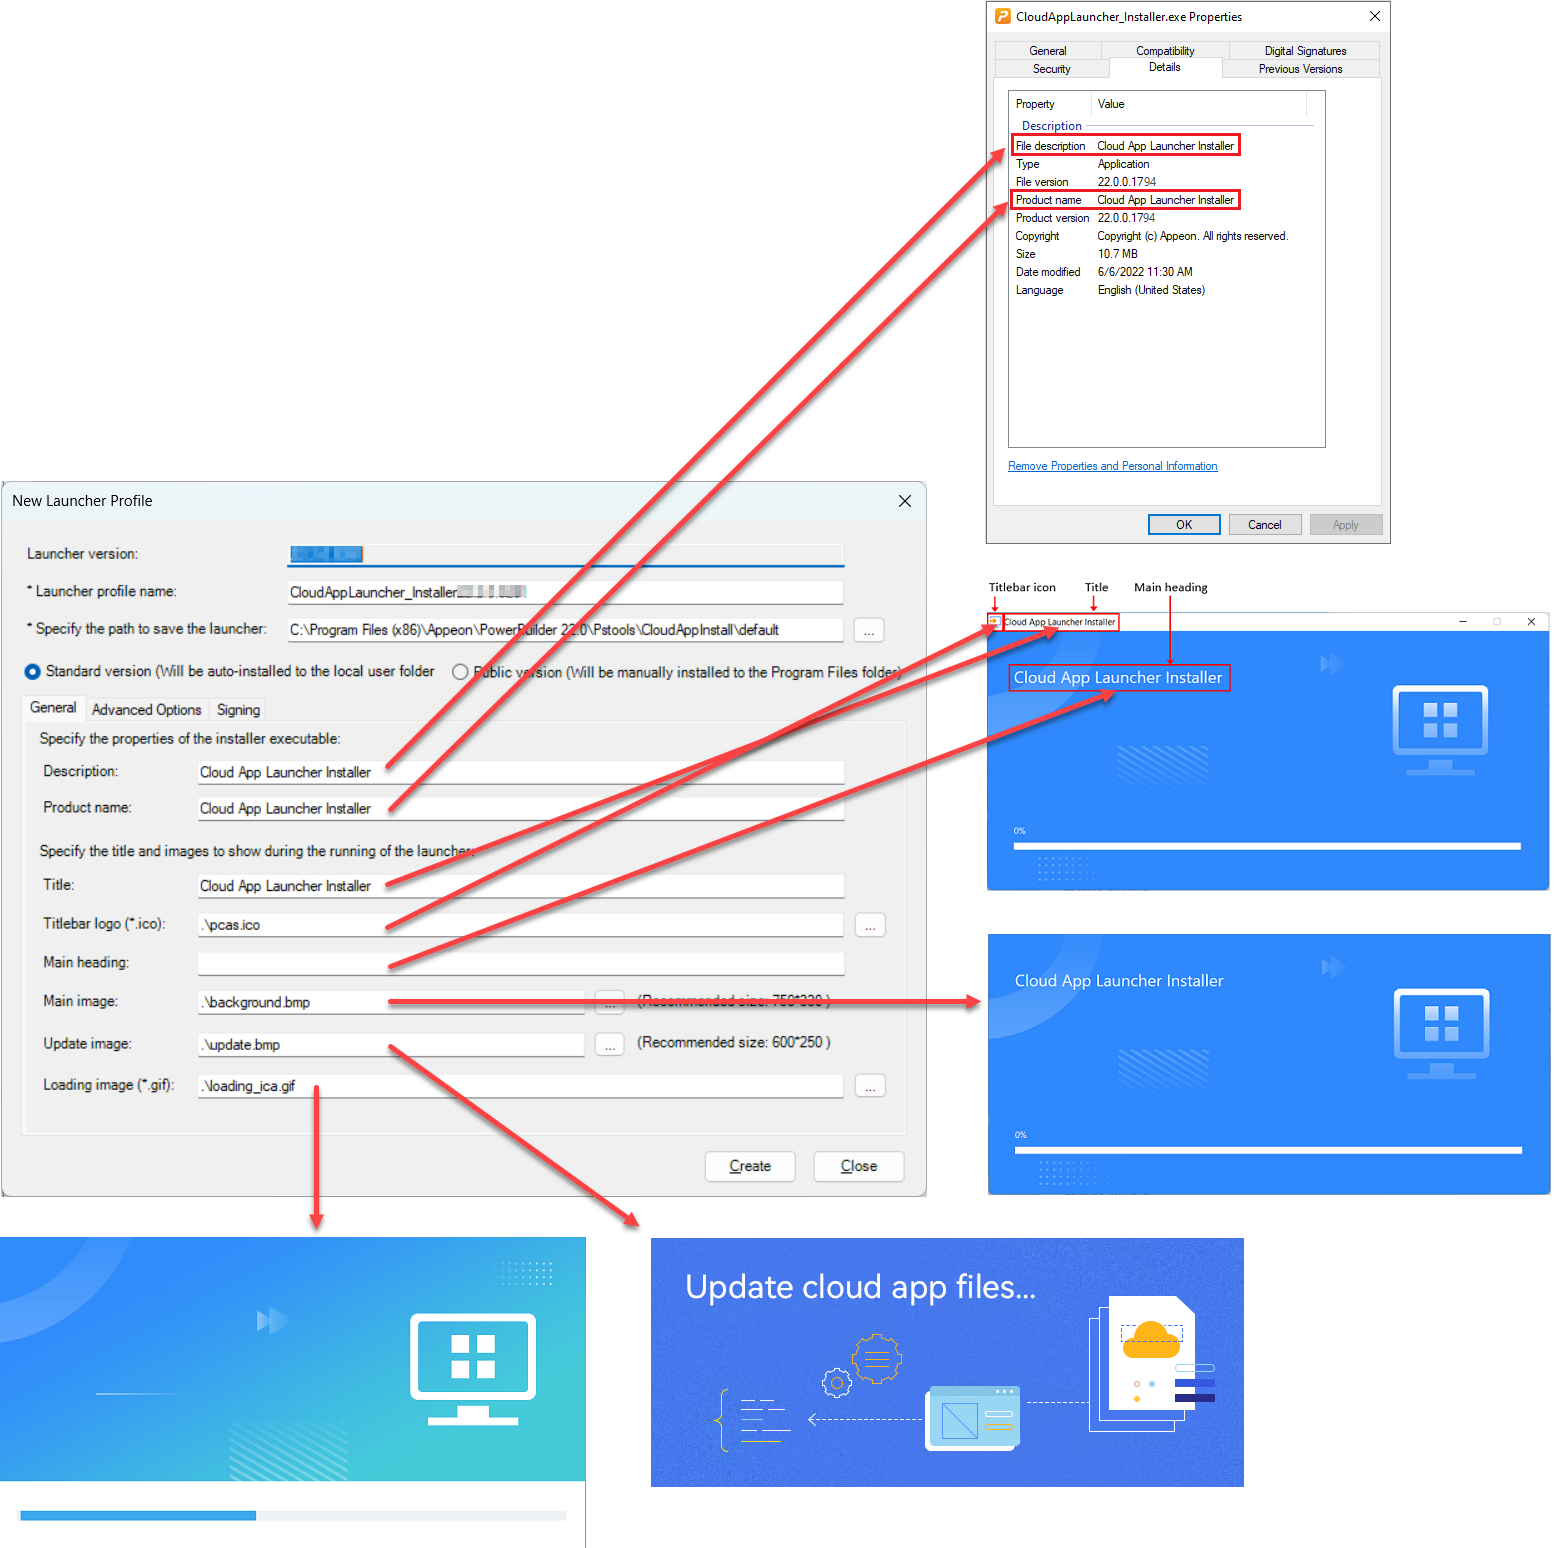
On the General tab:
-
The description and product name that will be shown in the Properties page of the launcher setup file.
-
The title, titlebar logo, main heading, main image, update image, and loading image that will be shown during the launcher installation or startup process.
The titlebar logo can be in the ICO format only.
The main image can be in the following formats: JPG, JPEG, PNG, and BMP.
The update image can be in the following formats: JPG, JPEG, PNG, and BMP.
The loading image can be in the GIF format only.
Make sure the path and file name are correct. You can specify an absolute path or relative path of the image. If it is a relative path, it is relative to the path of launcher template, for example, the full path of ".\pcas.ico" is "C:\Program Files (x86)\Appeon\PowerBuilder [version]\Pstools\CloudAppInstall\pcas.ico. The file name is not necessarily the same as the default, for example, you can specify "D:\custom\launcher.ico" as the titlebar logo.
The specified images will be packaged with the launcher. However, if the path or file name does not exist, then the default image will be packaged.
-
-
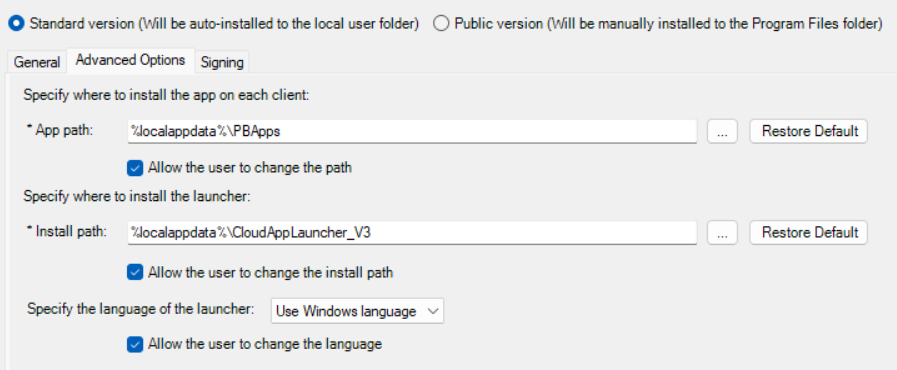
On the Advanced Options tab:
-
Specify a path in the App path field that will be used as the default installation path of the application on the client. If you want to allow the user to select where to install the application during the installation process, you can select "Allow the user to change the path".
-
Specify a path in the Install path field that will be used as the default installation path of the cloud app launcher on the client. If you want to allow the user to select where to install the cloud app launcher during the installation process, you can select "Allow the user to change the install path".
-
If "standard version" is selected, you can specify whether to allow the user to change the installation path of launcher. However, the standard version should not be installed to the same location as the public version.
-
If "public version" is selected, you should not allow the user to change the installation path of launcher.
If the end user has no sufficient rights to install to the default or specified path for the application or the cloud app launcher, they will be prompted to select an appropriate path before they can proceed with the installation process.
-
-
Specify the language of the cloud app launcher. The launcher (both installer and resources) will run in the chosen language.
Supported languages include English, Chinese, Danish, Dutch, French, German, Italian, Norwegian, Spanish, and Swedish.
Note
Each supported language is stored in a dedicated .lng file (e.g.,
english.lng,french.lng).They will be automatically packaged into the launcher installer.
When Custom is selected, the user-defined language will be used.
Note
You will need to prepare the user-defined language file in this way:
-
Name the user-defined language file as
custom.lngand place it in the runtime language folder, for example, C:\Program Files (x86)\Appeon\Common\PowerBuilder\Runtime 25.1.0.6180\lang.By default, a
custom.lngfile is already provided in this location and initially contains the same content asenglish.lng.Only one custom language file is allowed.
-
The file content format is
TextID,
                                                                               TextDescription
. Edit only the text descriptions.Note that you can only change the
custom.lngfile. Changes made to any other.lngfile (e.g.,english.lng,french.lng). will not take effect. -
Create a launcher profile and select Custom to include this custom language file.
When Use Windows Language is selected, the Windows Display Language configured for the end user on the client will be used.
Note
Some Windows display languages have multiple locales, for example, Chinese has Chinese (Simplified, China), Chinese (Simplified, Singapore), Chinese (Traditional, Hong Kong SAR), Chinese (Traditional, Macao SAR), and Chinese (Traditional, Taiwan), and all of them will be mapped to the supported language type -- Chinese; for another example, English has English (Australia), English (Belize), ..., and English (Zimbabwe), and all of them will be mapped to the supported language type -- English; and other languages are similar.
If the Windows display language is not one of the language types supported by PowerBuilder, English (for EN version) or Japanese (for JP version) will be used by default.
If you want to allow the user to change the language of the launcher (currently only runtime resources, no installer), you can select "Allow the user to change the language", so that the user will be offered with the language options during the launcher installation process.
-
-
-
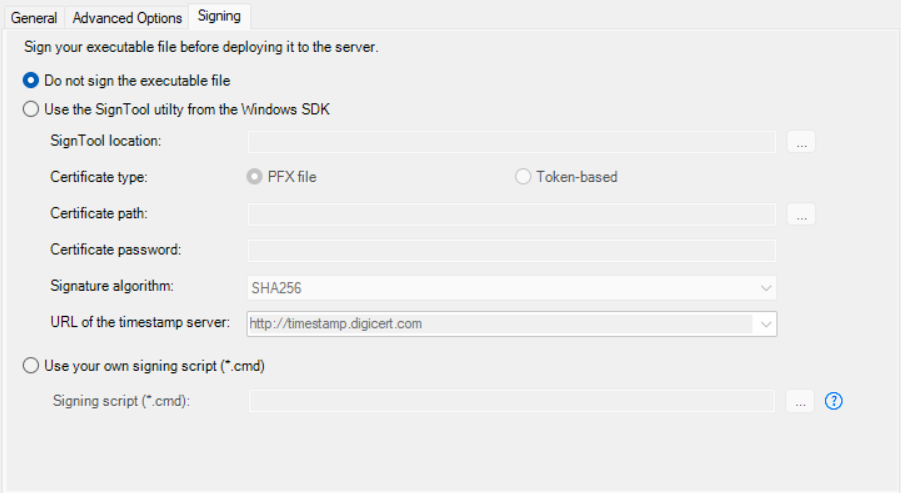
On the Signing tab, select whether to digitally sign the launcher executable file (CloudAppLauncher_Installer.exe).
For more information, refer to Signing.
After the executable file is generated and before it is uploaded to the server, PowerBuilder will sign the executable file using your own signing scripts or using the SignTool settings you specified.
Note
If you want to sign your customized Cloud App Launcher using the SignTool utility, ensure that the current Windows OS account that runs the PowerBuilder IDE has permission to access the specified URL of the timestamp server. Otherwise, the signing may fail.
-

To import or export the launcher profile:
-
In the Cloud App Launcher Profiles window, click the Import or Export button to import or export a launcher profile.
The launcher profile will be saved in the JSON file format.
To modify the launcher profile:
-
In the Cloud App Launcher Profiles window, select an existing profile on the left, and then modify its settings on the right.
-
Click Apply to save the settings.
-
Click Re-Create to generate the launcher again with the changed settings.
If you have made any change to the launcher settings, you must click Re-Create to create the launcher again before uploading it to the server.
