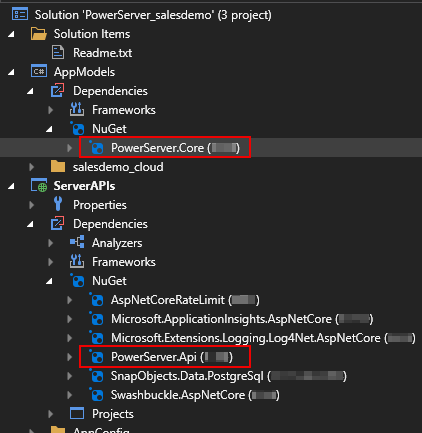
Due to changes made to the PowerServer project settings and the PowerServer Web APIs, the PowerServer C# solution created in version 2021 will have to be upgraded first before it can work with version 2022. You will either have to
-
Generate a brand new PowerServer C# solution (in Version 2022)
This new solution will be generated with the latest changes/templates. However, if you have made your own changes to the solution before, you will need to manually incorporate those changes to the new solution.
-
Or, use the existing PowerServer C# solution
This can keep your own changes in the solution. However, the solution will still use the settings/templates of Version 2021 even if you use Build & Deploy PowerServer Project in PowerBuilder IDE at Version 2022 to build the solution again; unless you manually change the following areas in the solution (to be in sync with the settings/templates of Version 2022):
-
Upgrade PowerServer.Core and PowerServer.Api to the latest compatible version 2.0.0. Or refer to this table for a list of NuGet packages compatible with the application deployed via PowerServer Toolkit from different builds.
If you don't manually upgrade PowerServer.Core and PowerServer.Api, you will encounter the error "Application Terminated. The version of PowerServer Nuget packages does not match that of PowerBuilder. " (view more) when running the installable cloud app.
-
Add the following scripts to the PowerServer C# solution > ServerAPIs project > Startup.cs:
using PowerServer.Core;
services.AddPowerServerDataProvider(this.GetType().Assembly);
app.UsePowerServerPathBase();
-
Add the following script to the PowerServer C# solution > ServerAPIs project > Server.json:
"PathBase": "/vpath1",
"PathBase" is used to specify the sub-folder of the Web site where PowerServer Web APIs is deployed, for example, "/vpath1".
Note
A value is required only if you have specified a sub-folder of the Web site in the Web API URL (for example, http://172.168.168.88:5000/vpath1).
You can set it to null if no sub-folder is used.
-
Add the following script to the PowerServer C# solution > ServerAPIs project > OpenAPI > OpenAPIExtensions.cs:
This will add the route prefix "PowerServer" to the PowerServer Swagger UI, so that Swagger UI can start successfully.
// Enables Swagger UI for visual debugging app.UseSwaggerUI(options => { options.SwaggerEndpoint("/swagger/v1/swagger.json", "ServerAPIs v1"); options.RoutePrefix = "PowerServer"; -
Add the following script to the PowerServer C# solution > ServerAPIs project > Logging > Logging.json or Logging.Development.json if you want to specify log level for logging providers such as Microsoft, Microsoft.Hosting.Lifetime, and System.Net.Http.HttpClient.PowerServer:
// Sets the default log output level of all the logging providers "LogLevel": { // Sets the default log output level "Default": "Information", // Sets the Microsoft log output level "Microsoft": "Information", // Sets the Microsoft.Hosting.Lifetime log output level "Microsoft.Hosting.Lifetime": "Information", // Sets the System.Net.Http.HttpClient.PowerServer log output level "System.Net.Http.HttpClient.PowerServer": "Warning" }, -
Add the following script to the PowerServer C# solution > ServerAPIs project > Server.json if you want to keep the version information:
    "VersionInfo": {
      "Version": "2022",
      "Revision": "R1",
      "Build": "1878"
    }
-
PowerBuilder installable cloud apps deployed in Version 2021 will have to be re-deployed in Version 2022 by following steps below:
-
Select Tools > System Options in the PowerBuilder IDE; make sure the correct runtime version is selected on the General tab. If you are not sure which version is correct, refer to Selecting a version of PowerBuilder Runtime.
-
Select the required database types and agree to the license terms of the database drivers that will be downloaded.
To do that, open the PowerServer project painter in the PowerBuilder IDE, select the Database page, select the database type from the Provider list box, and then select the check box of "I have read and agree to the license terms...".
-
Make sure the deployment mode is Full.
To do that, open the PowerServer project painter in the PowerBuilder IDE, select the Client App page, select Full in Project build options.
-
Deploy the application again using the Build & Deploy PowerServer Project option in the PowerBuilder IDE.
Or, export the JSON build file again and then re-deploy the application using PBAutoBuild. For how to export the build file and deploy with PBAutoBuild, see Build & deploy using commands.
-
Upload the Cloud App Launcher and Runtime files to the server. For detailed instructions, refer to Upload the cloud app launcher and the runtime files.


