Where you are
Run the Connection Object wizard
Modify the connection information
> Complete the login and logout scripts
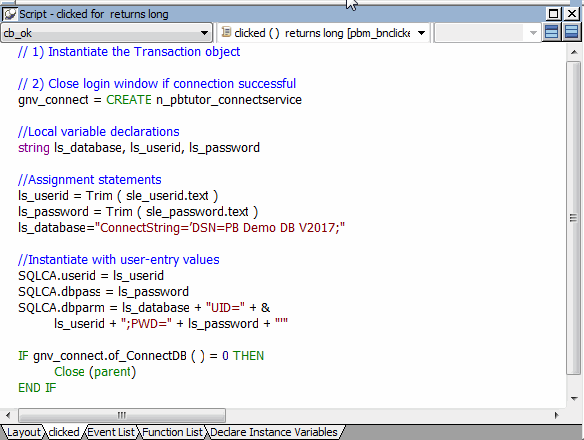
Earlier in this lesson, you called the connection service manager from the Clicked event for the login window OK button. Next you add code to the same Clicked event to instantiate the Transaction object with information entered by the user.
You also add code to the login window Cancel button Clicked event and to the application Closed event.
Minimizing typing errors in the Script view
If you right-click inside the scripting area, you open a pop-up menu that includes Paste Special commands. You can use these commands to paste statements, objects, functions or even the contents of text files into the event script. This reduces the risk of typing errors. You can also use AutoScript to complete code, as you will see in this lesson.
In this exercise you:
When you are coding scripts, AutoScript provides help by completing the statement you are typing or displaying a list of language elements that are appropriate to insert in the script at the cursor location.
-
Select Design>Options from the menu bar and click the AutoScript tab.
-
Make sure all the check boxes in the first three group boxes are selected.
-
Make sure the Activate Only After A Dot and Automatic Popup check boxes in the fourth group box are cleared, and click OK.
With these settings, AutoScript provides Help wherever it has enough information to determine what code to insert, but it does not pop up automatically when you pause. By selecting the Statement Templates check box (not selected by default), you can use AutoScript to enter structures for a multiple line PowerScript statement.
-
Select Tools>Keyboard Shortcuts from the menu bar.
Expand the Edit node in the tree.
-
Scroll down and select Activate AutoScript.
With your cursor in the Press Keys For Shortcut box, press Ctrl+Space.
-
Expand the Edit>Go To node in the Current Menu list and select Next Marker.
With your cursor in the shortcut box, press Ctrl+M.
Now whenever you want help completing code, you can press Ctrl+space to see a list of possible completions. If you paste a statement or function with comments, you can press Ctrl+M to move to the next comment.
-
Click OK.
As is often the case when you are developing production applications, you get some of the connection properties from an initialization file and some from user input.
For the tutorial application, you should not get the user ID and password from the tutorial INI file. Get them directly from the user in the login window and then pass the database information in a script.
-
Make sure you are looking at the Clicked event script for the cb_ok control.
This is the script in which you added the call to the Connection Service object.
-
Click before the IF-THEN statement.
Type the following lines:
//Local variable declarations
string ls_database, ls_userid, ls_password

//Assignment statements
ls_userid = Trim ( sle_userid.text )
ls_password = Trim ( sle_password.text )
ls_database="ConnectString='DSN=PB Demo DB V2019R2;"
With these lines you declare local variables and assign them values. Do not use blank spaces around the = signs in the ConnectString text. Do not worry about the lone single quotation mark. You will add a single quotation mark in the next step to complete the connection script.
Using AutoScript to help code the assignment statements
When you type the assignment statements, if you type the letters before the underscore in a variable name and then press Ctrl+space, AutoScript pops up a list of possible completions. Use the arrow keys to move to the correct completion and the Tab key to paste it into your script. If you type the underscore and the first letter after the underscore and then press Ctrl+space, AutoScript pastes the completion directly into your script, as long as there is a unique completion.
The Trim function removes leading and trailing spaces from the user ID and password values passed as arguments to the function from the SingleLineEdit boxes on the login window.
-
Click after the lines you just added (which follow the CREATE statement) but before the IF-THEN statement.
Type the following lines:
//Instantiate with user-entry values
SQLCA.userid = ls_userid
SQLCA.dbpass = ls_password
SQLCA.dbparm = ls_database + "UID=" + &
         ls_userid + ";PWD=" + ls_password + "'"
These lines instantiate SQLCA parameters with values from the SingleLineEdit text boxes.
The lines must be added to the script after the CREATE statement to keep them from being overwritten with blank values from the Constructor event of the connection service manager. They must be added before the IF-THEN statement or their values are not used by the Transaction object when it is called by the of_ConnectDB function of the connection service manager.

-
Click the Compile button in PainterBar2
or
Right-click inside the Script view and click Compile in the pop-up menu.
The script should compile without error. If you get an error message, make sure you have typed object and function names correctly.
Now you add code to the Cancel button to stop the application when this button is clicked.
-
Double-click the Cancel button in the Layout view
or
Select cb_cancel in the first drop-down list box of the Script view.
The script area for the Cancel button is blank.
-
Type this one-line script for the Clicked event:
HALT
This statement terminates the application immediately when the user clicks Cancel on the login window.
-
Click the Save button in the PainterBar
or
Select File>Save from the menu bar.
PowerBuilder compiles the script.
-
Click the Close button in the PainterBar
or
Select File>Close from the menu bar.
The Window painter closes.
Because the connection service manager was called by a global variable, it is still available to the application and does not need to be instantiated again (as it would if you had used a local variable).
Now you call the connection service manager disconnect function to close the database connection.
-
Double-click the pbtutor application icon in the System Tree.
The Application painter displays different views of the tutorial application object. The Script view is part of a stack in the default layout, but you might find it easier to detach it from the stack or open a second Script view.
-
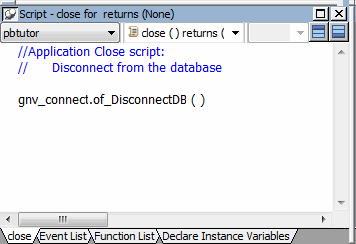
Select close ( ) returns (none) in the second drop-down list box of the Script view.
There is no code yet for the application Close event.
-
Type the following lines for the Close event comment:
Application Close script:
      Disconnect from the database
-
Select all or part of the lines you just added.
Click the Comment button.
-
Type the following line below the comment you typed (you can use AutoScript to complete the variable name and the function name):
gnv_connect.of_DisconnectDB ( )

Releasing memory by setting global variables to null
If this were not the application Close event and you no longer needed an instance of the global connection variable, you could release the memory it occupies by calling the SetNull function.
PowerBuilder also provides a DESTROY statement to destroy object instances. Do not use the DESTROY statement for local or global variables for nonvisual objects. PowerBuilder garbage collection removes any local variables that go out of scope.
-
Right-click anywhere in the script area of the Script view.
Click Compile in the pop-up menu.
PowerBuilder compiles the Close script. If you get an error message, look carefully at the lines you typed to make sure there is no mistyped variable or object name.
-
Click the Close button in PainterBar1.
A message box asks if you want to save your changes to the Application object in the application library file.
-
Click Yes.
This saves your changes and closes the Application painter.


