To complete your form style, enhance the window and menu to provide the processing you want. For example, you can:
-
Work with the central DataWindow control
-
Add controls to the window
-
Define actions (functions that appear as actions in your form style)
-
Modify the menu and its associated toolbar
-
Write scripts for the window, its controls, and menu items
-
Add other capabilities, such as drag and drop, to the window
The DataWindow controls with special names are the heart of a form. It is in these controls that users manipulate the data in the form.
You need to understand:
-
How the freeform DataWindow is sized in the form
-
How to retrieve data into the control in the form
How the freeform DataWindow is sized
All form styles you build contain a freeform DataWindow (as do all the built-in styles). Regardless of what size you specify for the freeform DataWindow control in the Window painter in PowerBuilder, the freeform DataWindow fills the entire form in the Form painter in InfoMaker. InfoMaker enlarges the freeform DataWindow so that users can place data (such as computed fields) anywhere in the form.
This means that a window background color that you specify in PowerBuilder is ignored in the form.
Retrieving rows into the central DataWindow control
When an InfoMaker user runs a form, InfoMaker automatically populates the SQLCA Transaction object with the correct values, so you do not have to do that in a script. To retrieve rows into the central DataWindow control, all you have to do is set the Transaction object for the control and then retrieve rows.
For example, to retrieve data into the control named dw_freeform, code:
dw_freeform.SetTransObject(SQLCA)
dw_freeform.Retrieve()
You would code this in the window's Open event to present the data to the user when the form opens.
For more information about Transaction objects, see Using Transaction Objects.
All windows serving as the basis for a form style have at least one DataWindow control. In addition, you can add any other controls that you can add to standard PowerBuilder windows, such as command buttons, user objects, text, edit boxes, pictures, and drawing objects.
Users of the form can move the controls you place in the window, but they cannot delete them.
Users can also add controls to the form in the Form painter. They make CommandButtons and PictureButtons work by associating actions with them. Actions are described next.
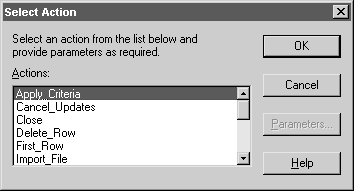
Often users want to add buttons (CommandButtons or PictureButtons) to a form created using a custom form style. When you create the form style, you specify what the added buttons can do by defining actions for the form style. When users place a button, they select the desired action from a list:
Actions are implemented as public window-level functions.
To define an action:
-
In the Script view in the Window painter, select Insert>Function from the menu bar.
-
Define the window-level function (for how, see Users Guide).
If you want the window function to be available to a form user as an action, be sure to define the function as public. Function arguments you define are used as parameters of the action. Each public window function you define is listed as an action in the Select Action dialog box in the Form painter.
Defining functions not available as actions
If you want to define and use window functions that are not available as actions in forms, define them as private.
You specify the menu and toolbar that display when users run a form by defining a menu in the Menu painter and associating it with the window that serves as the basis for your form style.
Each menu item in the menu you define displays when a form is run. In addition, InfoMaker adds Window and Help menus to allow users to manipulate windows and get online Help when running a form in the InfoMaker environment.
Providing online Help
You can define a Help item in the menu bar, then define menu items that display in the Help drop-down menu. The Help items do not display when users run a form within InfoMaker, but they do display when a form is run from an executable. For more information about InfoMaker executable files, see the InfoMaker Users Guide.
Item in a toolbar
As with MDI applications, you can specify that a menu item should display as an item in a toolbar when the form is run.
Scripting
You use the same scripting techniques for menus used in forms as you do for menus used in standard windows. Typically you communicate between a window and its menu by defining user events for the window, then triggering them from the menu using the menu object's ParentWindow property to refer to the form window; this technique is used in the built-in form styles.
For more information
For more information about using menus and user events, see Users Guide.
For more information about associating toolbars with menus, see Building an MDI Application
You write scripts for the window, its controls, and Menu objects the same way you write them for standard windows and menus. When working with DataWindow controls, remember that you do not have to set the properties of the SQLCA Transaction object -- InfoMaker does that automatically when users run a form.
You can define global user-defined functions and structures to support the scripts you code, but note that since InfoMaker does not have an application object, form styles cannot use global variables or global external function declarations.
You can make forms as sophisticated as you want. For example, you can implement drag and drop features, and mail-enable your form.
For complete information about the features you can build into a window, see the Working with Windows in Users Guide.
