You will use the same setup program (Setup.exe file) in the generated package for installing and uninstalling DLL/OCX files:
-
If the DLL/OCX files are not installed on the client, when you run the setup program, you will be guided to install the files. Refer to the section called “Installing DLL/OCX files” for detailed instructions.
-
If the DLL/OCX files are already installed on the client, when you run the setup program, you will be guided to reinstall or uninstall the files. If you select to reinstall the files, you will run through the same process as a new installation, as described in the section called “Installing DLL/OCX files”. If you select to uninstall the files, refer to the section called “Uninstalling DLL/OCX files” for detailed instruction.
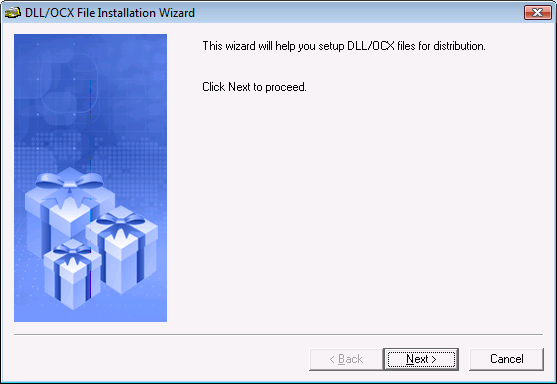
Step 1: On a client machine, run the Setup.exe file in the generated package.
The DLL/OCX File Installation Wizard starts, as shown in the following figure. Click Next to proceed.
Step 2: Specify the location where the DLL/OCX files will be installed. Click Next to start the installation process.
The default installation location is %SystemRoot%\system32\AppeonPlugin (%SystemRoot% indicates the folder where Windows is installed, typically C:\Windows); if you specify a custom location in AEM (see Appeon Server Configuration Guide for .NET or Appeon Server Configuration Guide for J2EE for details), then specify the same location here.

Step 3: Wait until the installation is complete.
During the installation process, the DLL/OCX files will first be copied to the specified location and then registered if they have been selected for auto-registration during the packaging process.
Step 4: When the installation is complete, select the Let wizard restart the system now option and click Finish to close the installation wizard and restart your machine.
To view the log information generated during the process, select the View Log box and click Finish. The log file will be automatically opened. You can also manually open the DLLOCX.log file in the generated package.

Step 1: On a client machine, run the Setup.exe file in the generated package.
The DLL/OCX File Installation Wizard starts, as shown in the following figure. Click Next to proceed.

Step 2: Select Uninstall and click Next to proceed.
If you select to reinstall the files, you will run through the same process as a new installation, as described in the section called “Installing DLL/OCX files”.

Step 3: Click Yes to confirm the uninstall.

Step 4: Wait until the uninstall is complete.
Step 5: When uninstall is complete, click OK to exit.

