Note: This is required only if you run the Web application in Internet Explorer. If you run the Web application in other Web browsers such as Firefox, Chrome, & Opera, you can skip this section.
Settings in Internet Explorer can affect the deployed Web application. Sometimes outdated files that are cached in the browser can interfere with how a Web application functions and can cause errors when they are re-deployed many times. Internet Explorer's settings may also block proxy connections or ActiveX control downloads when the Web application is opened. Therefore, you need to make sure you configure Internet Explorer's settings accordingly. Note that you may need to have the administrator rights to modify certain settings.
Sometimes cached files in Internet Explorer can cause problems when accessing the converted Web application after deployment. In order to avoid the risk of providing stale data, it is imperative that Internet Explorer has the cache options set to Automatically and that there is sufficient disk space on the Client to enable the Web files to be cached.
To set the cache options:
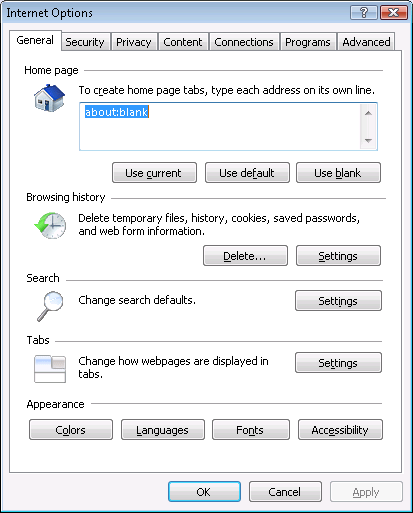
Step 1: Open Internet Explorer and select Tools > Internet Options, as shown in the following figure.
Step 2: Click the Settings button in the Temporary Internet Files group box.
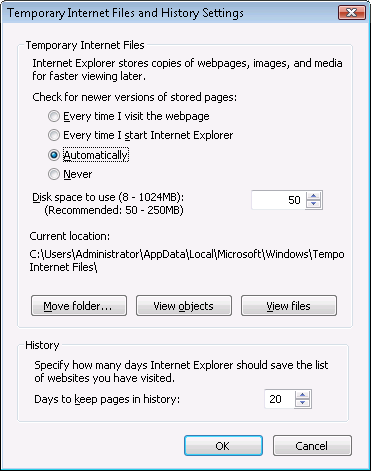
Step 3: Select the Automatically radio button to check for newer versions of stored pages, as shown in the figure below.
Step 4: Verify that the Disk space to use scroll box is set to at least 200 MB. Click OK in the Settings window.
During development, the Temporary Internet Files folder should be set to automatically empty each time Internet Explorer is closed. This will force Internet Explorer to re-download the entire application every time it is opened, to ensure the latest version of the application is present, and to prevent interference from outdated cached files.
Here are the necessary steps required to configure Internet Explorer to flush its temporary files each time the browser is closed:
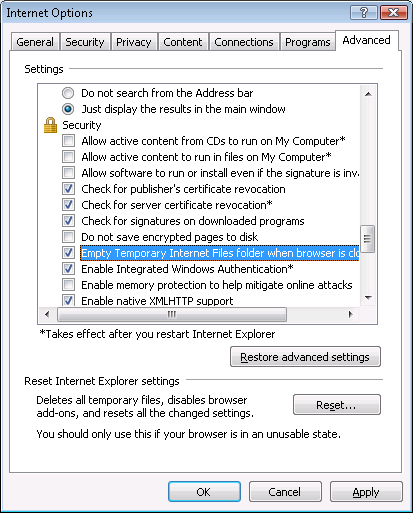
Step 1: Click the Advanced tab in the Internet Options window, as shown in the following figure.
Step 2: Check the Empty Temporary Internet files folder when browser is closed check box under the Security section, as shown in the following figure.
Step 3: Click Apply in the Advanced tab and then OK in the Internet Options window to allow the settings to take effect.
Allowing the temporary Internet files folder to be emptied each time the browser is closed, is recommended only during the development stage. Once your Web application is ready for production deployment, and frequent changes are not being made to the application, this setting can be disabled once again (unchecked). This setting should be reset once development is complete so the Web application can be cached in each Client PC for better Client-side performance. Using this set of guidelines, caching files should be enabled when they are needed for performance improvement, and disabled during the development and debugging stages.
If the Client visits the Web application through a proxy server, you need to select the Use HTTP 1.1 through proxy connections option under the HTTP 1.1 settings section, as shown in the following figure.
The following steps detail the configuration needed in Internet Explorer:
Step 1: Click the Advanced tab in the Internet Options window, as shown in the following figure.
Step 2: Check the Use HTTP 1.1 through proxy connections check box under the HTTP 1.1 settings section, as shown in the following figure.
Step 3: Click Apply in the Advanced tab and then OK in the Internet Options window to allow the settings to take effect.
If the Web application calls OLE objects, DLL files, or runs executable programs on the Client, then when the Web application is run for the first time on the Client the user will need to download an ActiveX control (for executing functions that involve client-side integration) and the Appeon Xcelerator plug-in (for improving the runtime performance of Web applications) from the Web Server. To ensure that Internet Explorer will not block the download, configure Internet Explorer's settings, using the following steps:
Step 1: Open Internet Explorer and navigate to Tools > Internet Options > Security.
Step 2: Verify that you selected an appropriate Web content zone. Appeon recommends you select the Trusted sites zone and add the Web application URL to the Trusted sites.
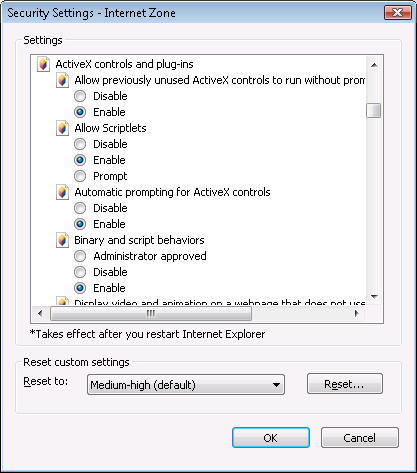
Step 3: Click the Custom Level button in the Security tab. The Security Settings page is displayed, as shown in the following figure.
Step 4: Check the Enable or the Prompt (recommended) radio button for the following options:
-
Download signed ActiveX controls and plug-ins
-
Initialize and script ActiveX controls not marked as safe
-
Run ActiveX controls and plug-ins
-
Script ActiveX controls marked safe for scripting
-
File download
-
Active scripting
If Enable is selected, the ActiveX control will download automatically without prompting. If Prompt is selected, your approval will be required before downloading takes place.


