The Project painter for client/server applications allows you to streamline the generation of executable files and dynamic libraries. When you build a project object, you specify the following components of your application:
-
Executable file name
-
Which of the libraries you want to distribute as dynamic libraries
-
Which PowerBuilder resource files (if any) should be used to build the executable file and the dynamic libraries
-
Which build options you want to use in your project
-
Which code generation options you want to use
-
Version information for your application
If you do not use the Template Application Target wizard to create a new application project, you need to define the project using a Project wizard or by setting project properties in the Project painter. After you have created a project, you might need to update it later because your library list has changed or you want to change your compilation options.
To define or modify a client/server application project
-
Select the Application project icon on the Project Object tab in the New dialog box to create a new application project, or select File>Open to open an existing application project.
The Project painter displays.
-
Specify or modify options as needed.
For how to specify the options in the Project painter for client/server applications, refer to the information below.
When you have finished defining the project object, save the object by selecting File>Save from the menu bar.
PowerBuilder saves the project as an independent object in the specified library. Like other objects, projects are displayed in the System Tree and the Library painter.

The following table describes the option in the General page of the Application project.
|
Option |
What you specify |
|---|---|
|
Executable file name |
Specify a name for the executable. The name must have the extension EXE. If you do not want the executable saved to your current directory, click the Browse (...) button next to the box to navigate to a different directory. |
|
After build, copy the generated PBD or DLL files to the EXE output path |
Select this if you want PowerBuilder to automatically copy all generated PBD or DLL files to the same directory as the executable after build. This ensures the EXE and its dependencies are located together, making it easier to test and deploy the application. |
|
Resource file name |
(Optional) Specify a PowerBuilder resource file (PBR) for your executable if you dynamically reference resources (such as bitmaps and icons) in your scripts and you want the resources included in the executable file instead of having to distribute the resources separately. You can type the name of a resource file in the box or click the button next to the box to browse your directories for the resource file you want to include. For more about PBRs, see Distributing resources. |
|
Prompt for overwrite |
Select this if you want PowerBuilder to prompt you before overwriting files. PowerBuilder overwrites any files it creates when building your application. |
|
Windows classic style |
Select this to add a manifest file to the application that specifies the appearance of the controls as an application resource. By default, this option is not selected, which means the Windows flat style is used and the 3D effect of some controls will be removed to have a "flat" look, for example, the 3D lowered border of Column and Computed Field in the DataWindow object, the background color of Button, the BackColor and TextColor of tooltip, and the TabBackColor of tab header will not take effect. If you still want the 3D effect, you should select the "Windows classic style" option when deploying the application. NoteIf you have applied a theme to the application, you should not check the "Enable Windows Classic Style in the IDE" option in the System Options or the "Windows classic style" option in the project painter and the PB.INI file (if any) should not contain such setting, otherwise, the application UI will be rendered in the Windows classic style instead of the selected theme. |
|
Rebuild |
Specify either Full or Incremental to indicate whether you want PowerBuilder to regenerate all objects in the application libraries before it creates the executable and dynamic libraries. If you choose Incremental, PowerBuilder regenerates only objects that have changed, and objects that reference any objects that have changed, since the last time you built your application. As a precaution, regenerate all objects before rebuilding your project. |
|
Platform |
Select if the executable can run on 32-bit or 64-bit machines. |
|
Pcode or Machine Code |
Select whether to generate compiled code as Pcode or machine code. For more information about machine code and Pcode, see the section called “Compiler basics” in Application Techniques. Pcode is selected by default in the PowerBuilder solution, because Machine code is unsupported in the PowerBuilder solution. Selecting Machine Code enables the other code generation options in the Project painter. They cannot be set in the wizard. |
|
Trace Information |
Select this if you want to create a trace file when you run your compiled code executable. You can use the trace file to troubleshoot or profile your application. For more information on obtaining trace information, see Tracing execution. |
|
Error Context Information |
Select this if you want PowerBuilder to display context information (such as object, event, and script line number) for runtime errors. |
|
Optimization |
Select an optimization level. You can build your application with no optimizations, or you can optimize for speed or space. |
|
Enable DEBUG symbol |
Select to enable any code that you placed in DEBUG conditional code blocks. For more information, see Using the DEBUG preprocessor symbol. |
|
Compilation command-line parameters |
Directly copy the runtime parameters which are automatically displayed here according to the options selected, and execute them with PBAutoBuild. For more information, see PBAutoBuild. |
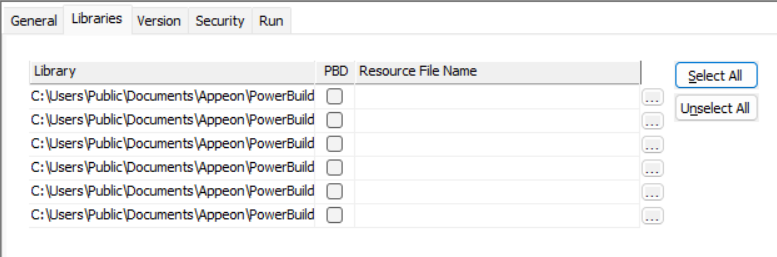
Libraries page
The label for the PBD or DLL check box depends on whether you are building a Pcode or machine code executable. Select the check box to define a library as a dynamic library to be distributed with your application.
If you are generating Pcode, you create PBD files. If you are generating machine code, you create DLL files. For more about dynamic libraries, see Using dynamic libraries.
Specify a resource file for a dynamic library if it uses resources (such as bitmaps and icons) and you want the resources included in the dynamic library instead of having to distribute the resources separately. The file name cannot be specified in the wizard.
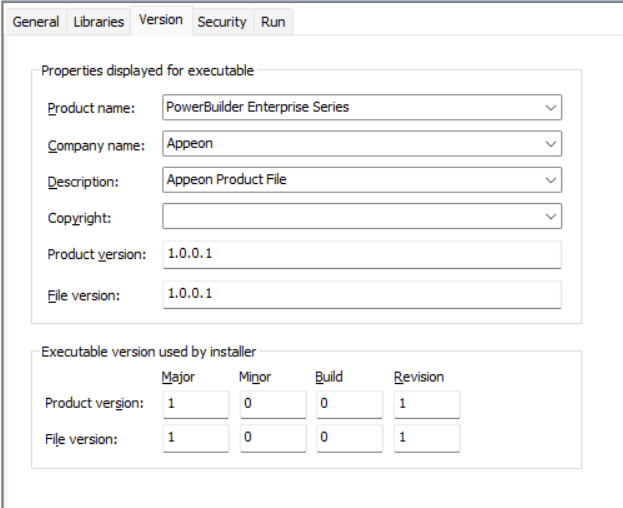
Version page
Specify your own values for the Product Name, Company Name, Description, Copyright, Product Version, and File Version fields associated with the executable file and with machine-code DLLs. These values become part of the Version resource associated with the executable file, and most of them display on the Version tab page of the Properties dialog box for the file in Windows Explorer. The Product version and File version string fields can have any format.
The Product version and File version numeric fields in the "Executable version used by installer" group box are used by Microsoft Installer to determine whether a file needs to be updated when a product is installed.
The Product Version final value will automatically include the runtime version to help users easily identify which runtime version is used by the executable file, for example, if you input "1.0.2" to the Product Version field, the Product Version displayed in the executable file properties will look like this "1.0.0.2 (Runtime: 25.0.0.1234)".
The four numbers can be used to represent the major version, minor version, point release, and build number of your product. They must all be present. If your file versioning system does not use all these components, you can replace the unused numbers with zeros. The maximum value for any of the numbers is 65535.
Security page
The following table describes the option in the Security page of the Application project.
|
Option |
What you specify |
|---|---|
|
Signing |
Select whether to digitally sign the application executable file (appname.exe). To use the "Use the SignTool utility from the Windows SDK" option:
To use the "Use your own signing script" option, you should place the signing scripts in a .cmd file and then select the file under the "Use your own signing script" option. You can take advantage of this option and dynamic parameters to make your script reusable. For more information, refer to the section called “Digitally signing the executable application” in Application Techniques. |
|
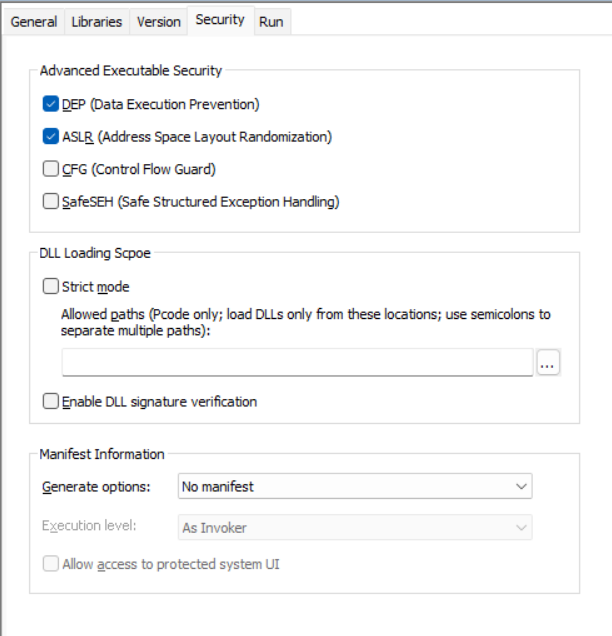
Advanced Executable Security |
Select the desired security flags for the application executable file (appname.exe). These flags allow PowerBuilder applications to leverage modern Windows executable security features. These options are not available for machine-code executables.
|
|
DLL Loading Scope |
Select the Strict mode option and then input the path of the DLLs to limit the DLL search scope to the defined paths, preventing unauthorized or unexpected DLLs from being loaded. If runtime DLLs and third-party DLLs are located in different folders, you should input multiple paths (separated with semicolons). Select the Enable DLL signature verification option, so that the application will verify the digital signature of DLLs at startup. Note: only Appeon-signed DLLs will be verified by PowerBuilder. For more information, refer to the section called “DLL secure loading (using Strict Mode)” in Application Techniques. |
|
Manifest Information |
Generate a manifest file (either external or embedded) and set the execution level of the application. To meet the certification requirements of the Windows logo program the application executable must have an embedded manifest that defines the execution level and specifies whether access to the user interface of another window is required. For further information, see Attaching or embedding manifest files. |
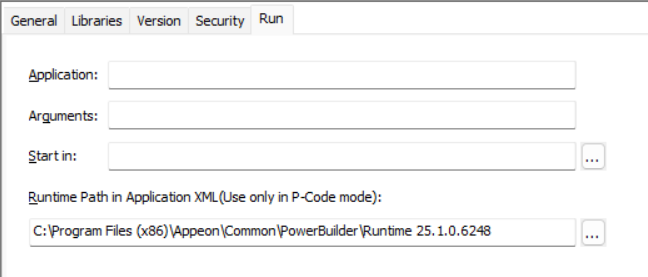
Run page
Application -- Displays the name and location of the executable file and is not editable. You can change these properties on the General page.
Arguments -- Specify command-line arguments for the application.
Start in -- Specify the application's working directory.
Runtime Path in Application XML -- Specify the relative or absolute path of the runtime files that will be displayed as the default value in the application XML file. You can only input one path here and the path should point to the location of the runtime files. Runtime files here refer to the files that are installed by the PowerBuilder Runtime component and required by the application at runtime. For more information, refer to the section called “Specifying runtime version for application executable” in Application Techniques.
The machine code generation process puts temporary files in a temporary directory, such as the TEMP directory. You can specify a different location in the [PB] section of your PowerBuilder initialization file with the CODEGENTEMP variable. You might want to do this if you have limited space on your local system.
For example:
CODEGENTEMP=e:\pbtempdir
