About this chapter
This chapter provides information about creating reports that have other reports nested in them.
About reports and DataWindow objects
A report is the same as a nonupdatable DataWindow object.
This chapter shows the process of nesting reports using the Report painter in InfoMaker, but you can do the same things in the DataWindow painter with the same results.
A nested report is a report within another report.
There are two ways to create reports containing nested reports:
-
Create a composite report using the Composite presentation style
-
Place a nested report in another report
About creating a composite report
You can choose the Composite presentation style to create a new report that consists entirely of one or more nested reports. This type of report is called a composite report. A composite report is a container for other reports.
You can use composite reports to print more than one report on a page.
Composite report
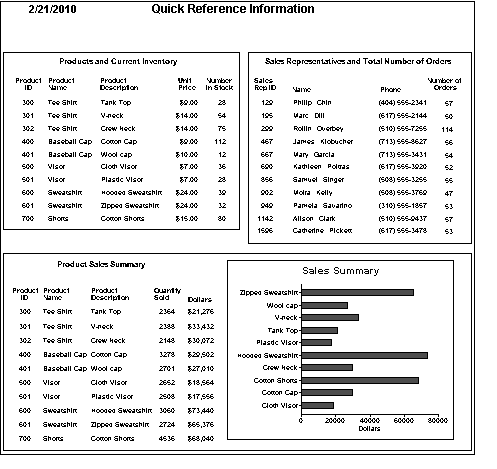
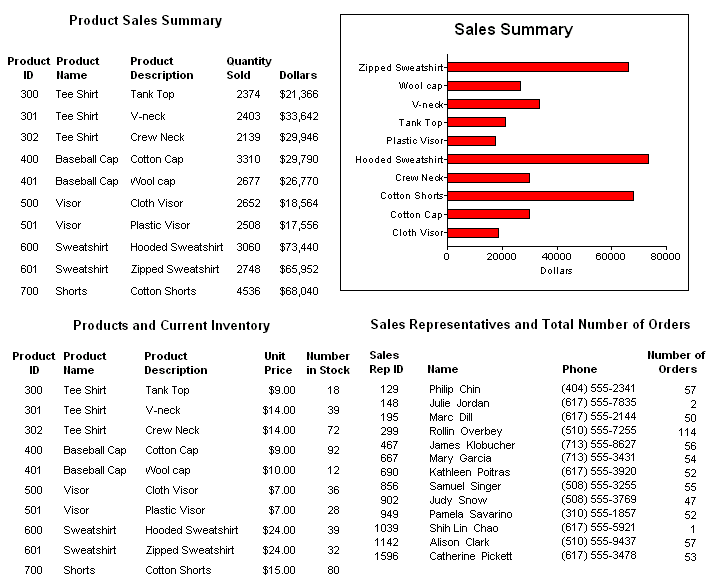
For example, the following composite report consists of three tabular reports. One of the tabular reports includes a graph:
Composite report in the Design view
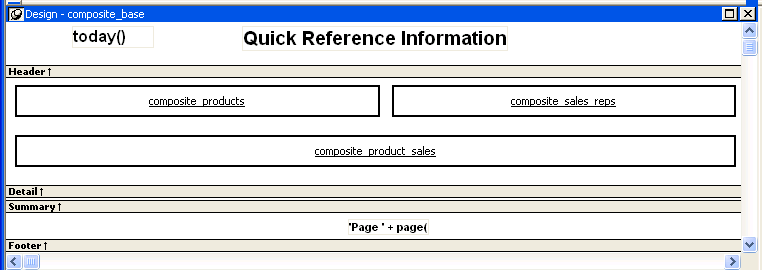
In the Design view, you see three boxes that represent the individual tabular reports that are included in the composite report. The only additional controls in this example are a title, date, and page number:
About placing a nested report within another report
You can place one or more reports within another report. The report you place is called the nested report. You can place a nested report in any type of report except crosstab. Most of the time you will place nested reports in freeform or tabular reports.
Often, the information in the nested report depends on information in the report in which it is placed (the base report). The nested report and the base report are related to each other by some common data. The base report and the nested report have a master/detail relationship.
Freeform report with a related nested report
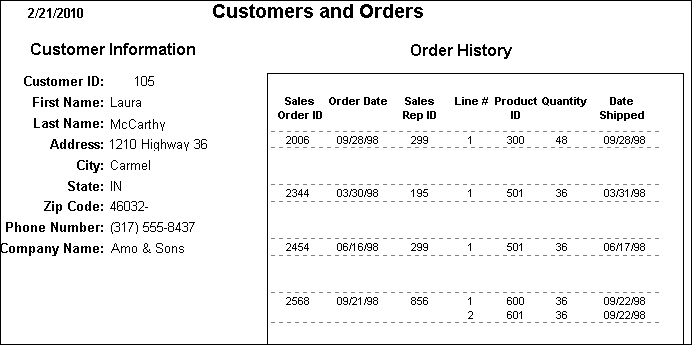
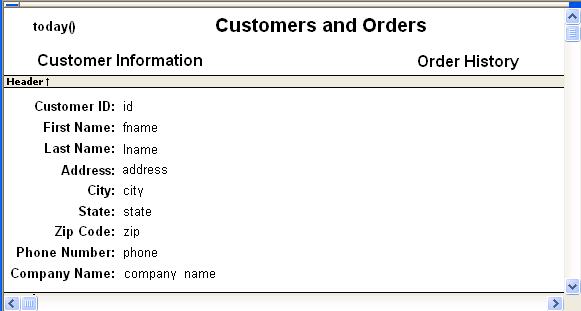
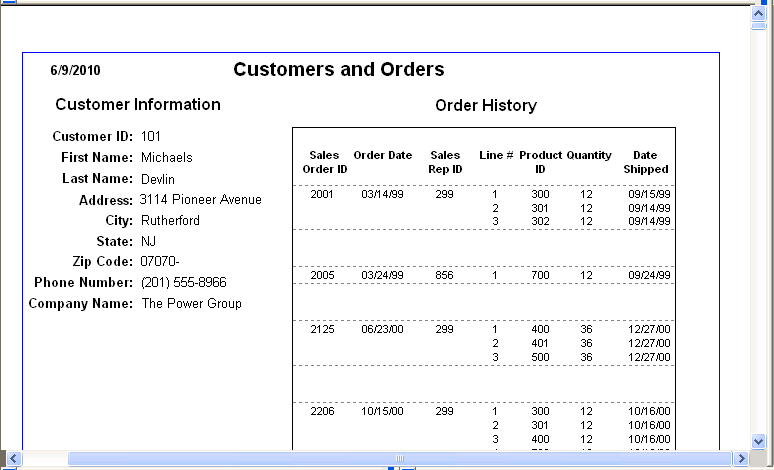
For example, the following freeform report lists all information about a customer and then includes a related nested report (which happens to be a tabular report). The related nested report lists every order that the customer has ever placed. The base report supplies the customer ID to the nested report, which requires a customer ID as a retrieval argument. This is an example of a master/detail relationship—one customer has many orders:
What you see in the Design view
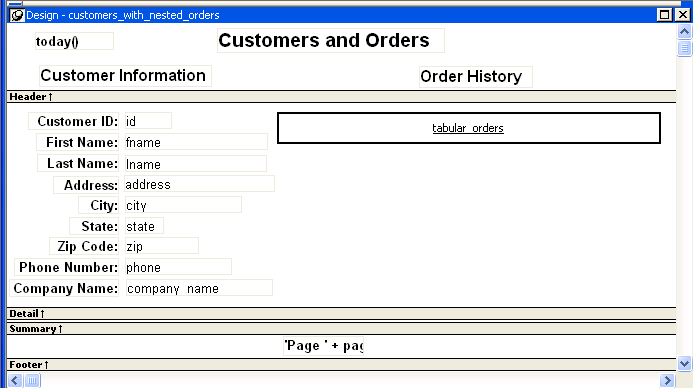
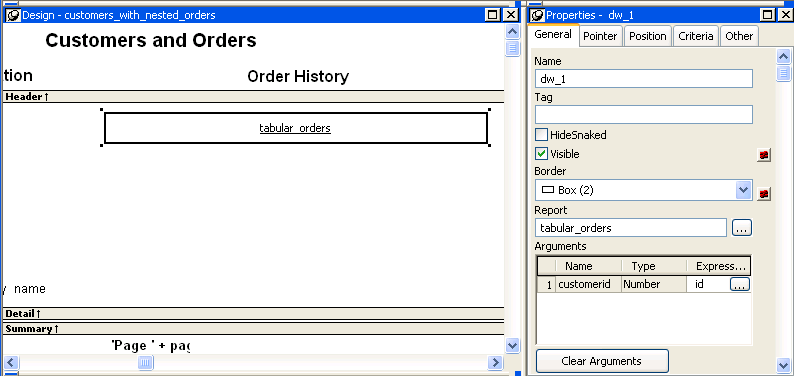
In the Design view, you see everything in the base report plus a box that represents the related nested report:
The difference between nested and composite reports
There are two important differences between nesting using the Composite style and nesting a report within a base report.
Data sources. The composite report does not have a data source—it is just a container for nested reports. In contrast, a base report with a nested report in it has a data source. The nested report has its own data source.
Related nesting. The composite report cannot be used to relate reports to each other in the database sense. One report cannot feed a value to another report, which is what happens in a master/detail report. If you want to relate reports to each other so that you can create a master/detail report, you need to place a nested report within a base report.
How retrieval works
When you preview (run) a composite report, PowerBuilder retrieves all the rows for one nested report, and then for another nested report, and so on until all retrieval is complete.Your computer must have a default printer specified, because composite reports are actually displayed in print preview mode.
When you preview (run) a report with another related report nested in it, PowerBuilder retrieves all the rows in the base report first. Then PowerBuilder retrieves the data for all nested reports related to the first row. Next, PowerBuilder retrieves data for nested reports related to the second row, and so on, until all retrieval is complete for all rows in the base report.
For information about efficiency and retrieval, see Supplying retrieval arguments to relate a nested report to its base report.
Limitations on nesting reports
For the most part you can nest the various types of report styles. However, limitations apply to two of them.
Crosstabs. You cannot place a crosstab with retrieval arguments within another report as a related nested report. However, you can include a crosstab in a Composite report.
RichText reports. You cannot nest a RichText report in any way. You cannot place a RichText report in another report, and you cannot include a RichText report in a Composite report.
To create a report using the Composite presentation style:
-
Select File>New from the menu bar.
The New Report dialog box displays.
-
Choose the DataWindow tab page and the Composite presentation style, and click OK.
The wizard displays all reports (DataWindow objects) that are in the current target's library search path.
-
Click the reports you want to include in the composite report and then click Next.
The wizard lists your choices.
-
Click Finish.
PowerBuilder places boxes for the selected reports in the Design view. In this example, you see three reports:
-
Select File>Save from the menu bar and assign a name to the composite report.
-
Look at the Preview view of the report:
Notice that you are in print preview (which is read-only).
Working with composite reports
Many of the options available for working with reports, such as Rows>Filter, Rows>Import, and Rows>Sort, are disabled for a composite report. If you want to use any of these options, you need to access the nested report(s), where these options are available.
-
Continue to enhance the composite report (for example, add a date and title).
When you place a nested report in another report, the two reports can be independent of each other, or they can be related in the database sense by sharing some common data such as a customer number or a department number. If the reports are related, you need to do some extra things to both the base report and the related nested report.
Usually, when you place a report within a report rather than create a composite report, you want to relate the reports. Those instructions are first.
Typically, a related nested report provides the details for a master report. For example, a master report might provide information about customers. A related nested report placed in the master report could provide information about all the orders that belong to each customer.
To place a related nested report in another report
-
Create the nested report (DataWindow object) that you plan to place in the base report.
-
Define a retrieval argument for the nested report.
For example, suppose the nested report lists orders and you want to list orders for a particular customer. To define a retrieval argument, you would:
-
Select Design>Data Source to go to the SQL Select painter.
-
Select Design>Retrieval Arguments from the menu bar in the SQL Select painter.
-
Define a retrieval argument in the Specify Retrieval Arguments dialog box. In the example, customerID is the name assigned to the retrieval argument.
-
Specify the retrieval argument in a WHERE clause for the SELECT statement.
The WHERE clause in this example tells the DBMS to retrieve rows where the value in the column cust_id equals the value of the argument :customerid:
At this point, when you run the report to retrieve data, you are prompted to enter a value for :customerid. Later in these steps, you will specify that the base report supply the values for :customerid instead of prompting for values.
-
-
Open or create the report you want to have as the base report.
In the example, the base report is one that lists customers and has a place for the order history of each customer:
-
Select Insert>Control>Report from the menu bar.
-
In the Design view, click where you want to place the report.
-
The Select Report dialog box displays, listing defined reports (DataWindow objects) in the current target's library search path.
-
Select the report you want, and click OK.
A box representing the report displays in the Design view.
-
With the report still selected, select the General page of the Properties view.
The Arguments box lists arguments defined for the nested report and provides a way for you to specify how information from the base report will be used to supply the values of arguments to the nested report.
-
Supply the base report column or the expression that will supply the argument's value. To do this, click the button in the Expression column.
The Modify Expression dialog box displays. In this dialog box, you can easily select one of the columns or develop an expression. In the example, the column named id from the base report will supply the value for the argument :customerid in the nested report.
-
Select File>Save from the menu bar and assign a name to the report.
In the Preview view, you can see what your report looks like:
When you place an unrelated nested report in a base report, the entire nested report appears with each row of the base report.
To place an unrelated nested report in another report
-
Create or open the report you want as the base report.
-
Select Insert>Control>Report from the menu bar.
-
In the Design view, click where you want to place the report.
The Select Report dialog box displays, listing defined reports (DataWindow objects) in the current target's library search path.
-
Select the report you want to nest in the base report, and click OK.
A box representing the nested report displays in the Design view.
-
Select File>Save from the menu bar and if the base report is newly created, assign a name to it.
- Adjusting nested report width and height
- Changing a nested report from one report to another
- Modifying the definition of a nested report
- Adding another nested report to a composite report
- Supplying retrieval arguments to relate a nested report to its base report
- Specifying criteria to relate a nested report to its base report
- Using options for nested reports
When you use nested reports either in composite reports or in other base reports, several enhancements and options are available. An easy way to see what you can do is to select the nested report and look at the Properties view for it.
Many of the options in the Properties view are described in Enhancing DataWindow Objects For example, using borders on nested reports is like using borders on any control.
This section describes activities that apply only to nested reports or that have special meaning for nested reports. It covers:
When you preview a report with nested reports, the width of the nested report may be unacceptable. This can happen, for example, if you change the design of the nested report or if you use newspaper columns in a nested report.The width of the nested report is not adjusted to fit its contents at runtime; if the report is too narrow, some columns may be truncated. For example, if the size of the nested report is set to 6 inches wide in the parent report, columns in the nested report that exceed that width are not displayed in the parent report.
To adjust report width
-
In the Design view, position the pointer near a vertical edge of the nested report and press the left mouse button.
-
Drag the edge to widen the nested report.
-
Check the new width in the Preview view.
When you Print preview a DataWindow that contains a nested N-Up report with newspaper columns across the page, you might find that blank pages display (and print) when the nested report in the detail band fills the page. This is because any white space at the bottom of the band is printed to a second page. You can usually solve this problem by dragging up the detail band to eliminate the white space between the nested report and the band, or even to overlap the bottom of the representation of the nested report.
You can change the nested report that is used. For example, you may work on several versions of a nested report and need to update the version of the nested report that the composite or base report uses.
To change the nested report to a different report
-
Select the nested report in the Design view.
-
In the Properties view, General property page, click the button next to the Report box.
-
Select the report you want to use, and click OK.
The name of the report that displays in the box in the Design view changes to the new one.
You can modify the definition of the nested report. You can do this directly from the composite report or base report that contains the nested report.
To modify the definition of a nested report from the composite report or base report
-
Position the pointer on the nested report whose definition you want to modify, and display the pop-up menu.
-
Select Modify Report from the pop-up menu.
The nested report opens and displays in the painter. Both the composite or base report and the nested report are open.
-
Modify the report.
-
Select File>Close from the menu bar.
You are prompted to save your changes.
-
Click OK.
You return to the composite report or to the base report that includes the nested report.
After you have created a composite report, you might want to add another report. The following procedure describes how. For information on adding a nested report to a report that is not a composite report, see Placing a related nested report in another report or Placing an unrelated nested report in another report.
To add another nested report to a composite report
-
Open the composite report.
-
Select Insert>Control>Report from the menu bar.
-
Click in the Design view where you want to place the report.
The Select Report dialog box displays, listing defined reports (DataWindow objects) in the current target's library search path.
-
Select the report you want and click OK.
A box representing the report displays in the Design view.
The most efficient way to relate a nested report to its base report is to use retrieval arguments. If your nested report has arguments defined, you use the procedure described in this section to supply the retrieval argument value from the base report to the nested report. (The procedure described is part of the whole process covered in Placing a related nested report in another report.)
Why retrieval arguments are efficient
Some DBMSs have the ability to bind input variables in the WHERE clause of the SELECT statement. When you use retrieval arguments, a DBMS with this capability sets up placeholders in the WHERE clause and compiles the SELECT statement once. PowerBuilder retains this compiled form of the SELECT statement for use in subsequent retrieval requests.
Requirements for reusing the compiled SELECT statement
To enable PowerBuilder to retain and reuse the compiled SELECT statement:
-
The database interface must support binding of input variables.
-
You must enable binding support by setting the DisableBind database parameter to 0, which is the default.
-
You must enable caching in the database profile. Set the SQLCache database parameter to the number of levels of nesting plus 5.
For more information, see the description of the SQLCache and DisableBind database parameters in the section called “SQLCache” in Connection Reference and the section called “DisableBind” in Connection Reference.
Nested reports in composite reports
If the base report is a composite report, you need to define retrieval arguments for the composite report before you can supply them to the nested report.
In the Properties view for the composite report, select the General page. Then define the retrieval arguments that the nested report needs, taking care to specify the correct type.
To supply a retrieval argument value from the base report to the nested report
-
Make sure that the nested report has been set up to take one or more retrieval arguments.
-
Select the nested report and then select the General page of the Properties view.
The Arguments box lists arguments defined for the nested report and provides a way for you to specify how information from the base report will supply the value of the argument to the nested report.
-
Supply the base report column or the expression that will supply the argument's value. To do this, click the button in the Expression column.
The Modify Expression dialog box displays. In this dialog box, you can easily select one of the columns or develop an expression. In the example, the column named id from the base report will supply the value for the argument :customerid in the nested report.
When you run the report now, you are not prompted for retrieval argument values for the nested report. The base report supplies the retrieval argument values automatically.
If you do not have arguments defined for the nested report and if database efficiency is not an issue, you can place a nested report in another report and specify criteria to pass values to the related nested report.
How the DBMS processes SQL if you use the specify criteria technique
If you use the specify criteria technique, the DBMS repeatedly recompiles the SELECT statement and then executes it. The recompilation is necessary for each possible variation of the WHERE clause.
To specify criteria to relate a nested report to its base report
-
Select the nested report and then select the Criteria page in the Properties view.
The Criteria property page provides a way for you to specify how information from the base report will supply the retrieval criteria to the nested report.
-
Click the button next to the criteria box.
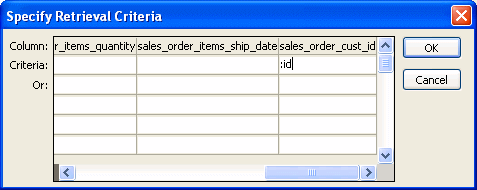
The Specify Retrieval Criteria dialog box displays.
-
Enter the retrieval criteria and click OK.
The rules for specifying criteria are the same as for specifying criteria in the Quick Select data source. Multiple criteria in one line are ANDed together. Criteria entered on separate lines are ORed together.
In this example, the customer ID (the id column) is the retrieval criterion being supplied to the nested report.
Notice that the id column is preceded by a colon (:), which is required:
When you run the report now, PowerBuilder retrieves rows in the nested report based on the criteria you have specified. In the example, the customer ID column in the base report determines which rows from the sales_order table are included for each customer.
Using the Autosize Height option
Autosize Height should be on for all nested reports except graphs. This option ensures that the height of the nested report can change to accommodate the rows that are returned.
This option is on by default for all nested reports except graphs. Usually there is no reason to change it. If you do want to force a nested report to have a fixed height, you can turn this option off.
Note that all bands in the DataWindow also have an Autosize Height option. The option is off by default and must be on for the Autosize Height option for the nested report to work properly.
To change the Autosize Height option for a nested report
-
In the Design view, select the nested report.
-
In the Properties view, select the Position properties page.
-
Select/clear the Autosize Height check box.
Handling large rows
To avoid multiple blank pages or other anomalies in printed reports, never create a DataWindow object with a data row greater than the size of the target page. To handle large text-string columns, break the large string into a series of small strings. The smaller strings are used to populate individual data rows within a nested report instead of using a single text column with an autosized height.
Using the Slide options
PowerBuilder determines the appropriate Slide options when positioning the nested report(s) and assigns default values. Usually, you should not change the default values:
-
The Slide Left option is on by default for grid and crosstab style reports and off by default for all others. Having Slide Left on for grid and crosstab ensures that these reports break horizontally on whole columns and not in the middle of a column.
-
The Slide Up All Above and Directly Above options ensure that the nested report uses just as much vertical space as it needs. One of these options is on by default for all nested reports.
For more information, see Sliding controls to remove blank space in a DataWindow object.
Using the New Page option (composite only)
The New Page option forces a new page for a nested report used in a composite report. By default, this option is off.
To specify that a nested report in a composite report should begin on a new page
-
In the Design view, select the nested report.
-
In the Properties view, select the General properties page.
-
Select the New Page check box.
Using the Trail Footer option (composite only)
The Trail Footer option controls the placement of the footer for the last page of a nested report in a composite report. By default, this option is on. The footer appears directly under the contents of the nested report and not at the bottom of the page.
To specify that the footer should appear at the bottom of the page
-
In the Design view, select the nested report.
-
In the Properties view, select the General properties page.
-
Clear the Trail Footer check box.
The footer appears at the bottom of the page on all pages of the nested report, including the last page. Note that if another nested report begins on the same page, the footer from the earlier report might be misleading or confusing.


