- About libraries
- Opening the Library painter
- About the Library painter
- Working with libraries
- Searching targets, libraries, and objects
- Optimizing libraries
- Regenerating library entries
- Rebuilding workspaces and targets
- Upgrading targets
- Exporting and importing entries
- Creating runtime libraries
- Creating reports on library contents
About this chapter
PowerBuilder stores all the PowerScript objects you create in libraries. This chapter describes how to work with your libraries.
Whenever you save an object, such as a window or menu, in a painter, PowerBuilder stores the object in a library (a PBL file). Similarly, whenever you open an object in a painter, PowerBuilder retrieves the object from the library.
Assigning libraries
Application and .NET targets can use as many libraries as you want. Libraries can be on your own computer or on a server. When you create a target, you specify which libraries it uses. You can also change the library search path for a target at any time during development.
For information about specifying the library search path, see Specifying the target's library search path.
How the information is saved
Every object is saved in two parts in a library:
-
Source form
This is a syntactic representation of the object, including the script code.
-
Object form
This is a binary representation of the object, similar to an object file in the C and C++ languages. PowerBuilder compiles an object automatically every time you save it.
It is hard to predict the needs of a particular application, so the organization of a target's libraries generally evolves over the development cycle. PowerBuilder lets you reorganize your libraries easily at any time.
About library size
For small applications, you might use only one library, but for larger applications, you should split the application into different libraries.
There are no limits to how large libraries can be, but for performance and convenience, you should follow these guidelines:
-
Number of objects
It is a good idea not to have more than 50 or 60 objects saved in a library. This is strictly for your convenience; the number of objects does not affect performance. If you have many objects in a library, list boxes that list library objects become unmanageable and the System Tree and Library painter become more difficult to use.
-
Balance
Managing a large number of libraries with only a few objects makes the library search path too long and can slow performance by forcing PowerBuilder to look through many libraries to find an object. Try to maintain a balance between the size and number of libraries.
You can organize your libraries any way you want. For example, you might put all objects of one type in their own library, or divide your target into subsystems and place each subsystem in its own library.
Sharing objects with others
PowerBuilder provides basic source control using the PBNative check in/check out utility. PBNative allows you to lock the current version of PowerBuilder objects and prevents others from checking out these objects and modifying them while you are working on them.
The project administrator must design a directory hierarchy for the project's workspace. The administrator might create a separate subdirectory for each target in the workspace, or for each PBL in the workspace. After the administrator sets up the project and registers every object in the workspace, individual developers copy a template workspace to their own computers, open the workspace, and connect to source control.
PowerBuilder also provides a direct connection to external SCC-compliant source control systems.
For more about using PBNative and other source control systems, see Using a source control system with PowerBuilder.
To open the Library painter:
-
Click the Library button in the PowerBar or select Tools>Library Painter.
What you can do in the Library painter
In the Library painter, you can:
-
Create a new library
-
Create new objects in targets in your current workspace
-
Copy, move, and delete objects in any library
-
Open objects in libraries that are on a library list in the current Workspace to edit them in the appropriate painters
-
Upgrade, rebuild, and regenerate libraries in the current Workspace
-
Control modifications to library objects by using check-out and check-in or use version control systems
-
Create a runtime library that includes objects in the current library and related resource objects
-
Open the containing folder of the selected workspace, target, or library
What you cannot do in the Library painter
You cannot upgrade or open objects in PowerBuilder libraries that are not on the library list. You also cannot rename a library.
Views in the Library painter
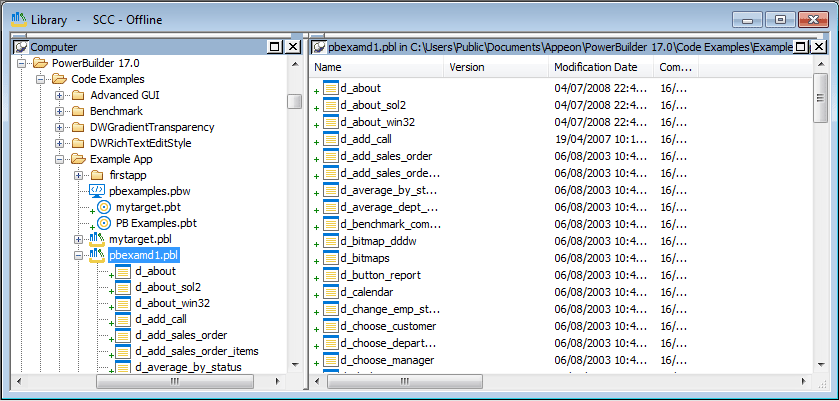
The Library painter has two views, the Tree view and the List view, that can display all the files in your file system, not just PowerBuilder objects. You use the painter primarily for displaying and working with workspaces, targets, library files (PBLs), and the objects they contain.
The Tree and List views are available from the View menu. By default, the Library painter displays one Tree view (on the left) and one List view (on the right). When the Library painter opens, both the Tree view and the List view display all the drives on your computer, including mapped network drives.
Using the System Tree
The Workspace tab page in the System Tree works like a Tree view in the Library painter. You can perform most tasks in either the System Tree or the Library painter Tree view, using the pop-up menu in the System Tree and the pop-up menu, PainterBar, or menu bar in the Library painter. When you have the System Tree and a Library painter open at the same time, remember that the PainterBar and menu bar apply only to the Library painter.
Each time you click the Library painter button on the PowerBar, PowerBuilder opens a new instance of the Library painter. One advantage of using the System Tree is that there is only one instance of it that you can display or hide by clicking the System Tree button on the PowerBar.
About the Tree view
The Tree view in the Library painter displays the drives and folders on the computer and the workspaces, targets, libraries, objects, and files they contain. You can expand drives, folders, and libraries to display their contents.
About the List view
The List view in the Library painter displays the contents of a selected drive, folder, or library and has columns with headers that provide extra information. For libraries, the comment column displays any comment associated with the library. For objects in libraries, the columns display the object name, modification date, size, and any comment associated with the object. You can resize columns by moving the splitter bar between columns, and you can sort a column's contents by clicking the column header.
About sorting the Name column
When you click the Name column header repeatedly to sort, the sort happens in four ways: by object type and then name, in both ascending and descending order, and by object name, in both ascending and descending order. You might not easily observe the four ways of sorting if all objects of the same type have names that begin with the same character or set of characters.
Displaying items in the Tree view and the List view
Most of the time, you select a library in the Tree view and display the objects in that library in the List view, but at any time, you can set a new root or move back and forward in the history of your actions in the List view and the Tree view to display libraries or other items. For more information, see Setting the root and Moving back, forward, and up one level.
Using custom layouts
You might find that having more than one Tree view or List view makes your work easier. Using the View menu, you can display as many Tree views and List views as you need.
The following screen shows the Library painter with one Tree view and three List views.
You can filter the objects in each of the List views so that one List view shows menus, another windows, and another user objects. For information about filtering objects in a view, see Filtering the display of objects.
To get this layout in the Library painter, use the View menu to display two more List views and then manipulate the views to fit this layout. For information about opening and closing views, manipulating views, returning to the default view layout, or saving your favorite layouts, see Using views in painters.
View synchronization
Tree and List views are synchronized with each other. When you are using more than one Tree view or List view, changes you make in one type of view are reflected in the last view you touched of the other type. For example, when an item is selected in a Tree view, the contents of that item display in the List view that you last touched. When you display new contents in a List view by double-clicking an item, that item is selected in the Tree view you last touched (if it can be done without resetting the root).
Each List view in the previous screen displays the contents of a different library because three libraries were dragged from the Tree view and dropped in different List views. For information about drag and drop, see Displaying libraries and objects.
- Displaying libraries and objects
- Using the pop-up menu
- Controlling columns that display in the List view
- Selecting objects
- Filtering the display of objects
- Creating and deleting libraries
- Filtering the display of libraries and folders
- Working in the current library
- Opening and previewing objects
- Copying, moving, and deleting objects
- Setting the root
- Moving back, forward, and up one level
- Modifying comments
The Library painter is designed for working with PowerBuilder libraries.
What you see in the views
In the Tree view, you can expand items and see the folders, libraries, or objects they contain. The List view displays the contents of a selection in the Tree view.
To expand or collapse an item in the Tree view
-
Double-click the item.
If the item contains libraries or objects, they display in the List view.
To display the contents of an item in the List view
-
Select the item in the Tree view or double-click the item in the List view.
Using drag and drop to expand items
You can drag and drop items to expand them and see the contents.
If you drag an item from a Tree view or List view to a List view, the List view sets the item as the root and displays its contents.
If you drag an item from a Tree view or List view to a Tree view, the Tree view expands to display the dragged item.
For example, you can drag a library from the Tree view and drop it in the List view to quickly display the objects the library contains in the List view. If you are using one Tree view and multiple List views, you can drag a specific library from the Tree view to each List view so each List view contains the contents of a specific library.
For information about using drag and drop to copy or move items, see Copying, moving, and deleting objects.
Like other painters, the Library painter has a pop-up menu that provides options that apply to the selected item in the Tree view or the List view. For example, from a library's pop-up menu, you can delete, optimize, or search the library, print the directory, specify the objects that display in the library, and import objects into it.
The actions available from an object's pop-up menu depend on the object type. For PowerBuilder objects that you can work with in painters, you can edit the object in a painter or in the Source editor, copy, move, or delete the object, export it to a text file, search it, regenerate it, or send it to a printer. You can also preview and inherit from some objects. For most of these actions, the object must be in a library in your current workspace.
Actions available from the pop-up menus are also available on the Entry menu on the menu bar.
You can control whether to display the last modification date, compilation date, size, SCC version number, and comments (if a comment was created when an object or library was created) in the List view.
The version number column in the Library painter list view remains blank if the source control system for your workspace does not support the PowerBuilder extension to the SCC API. If your source control system supports this extension and if you are connected to source control, you can override the SCC version number of a PowerScript object in the local copy directory through the property sheet for that object.
For more information about listing the SCC version number and overriding it through the PowerBuilder interface, see Extension to the SCC API.
In the List view, you can select one or more libraries or objects to act on.
You can change what objects display in expanded libraries.
Settings are remembered
PowerBuilder records your preferences in the Library section of the PowerBuilder initialization file so that the next time you open the Library painter, the same information is displayed.
Specifying which objects display in all libraries
In the Tree and List views, the Library painter displays all objects in libraries that you expand, as well as targets, workspaces, folders, and files. You can specify that the Library painter display only specific kinds of objects and/or objects whose names match a specific pattern. For example, you can limit the display to only DataWindow objects, or limit the display to windows that begin with w_emp.
To restrict which objects are displayed
-
Select Design>Options from the menu bar and select the Include tab.
-
Specify the display criteria:
-
To limit the display to entries that contain specific text in their names, enter the text in the Name box. You can use the wildcard characters question mark (?) and asterisk (*) in the string. The ? represents one character; an * represents any string of characters. The default is all entries of the selected types.
-
To limit the display to specific entry types, clear the check boxes for the entry types that you do not want to display. The default is all entries.
-
-
Click OK.
The Options dialog box closes.
In the Tree view, expand libraries or select a library to display the objects that meet the criteria.
Overriding the choices you made for a specific view
In either the Tree view or the List view, you can override your choice of objects that display in all libraries by selecting a library, displaying the library's pop-up menu, and then clearing or selecting items on the list of objects.
A library is created automatically when you create a new target, but you can create as many libraries as you need for your project in the Library painter.
To create a library
-
Click the Create button or select Entry>Library>Create from the menu bar.
The Create Library dialog box displays showing the current directory and listing the libraries it contains.
-
Enter the name of the library you are creating and specify the directory in which you want to store it.
The file is given the extension .PBL.
-
Click Save.
The library properties dialog box displays.
-
Enter any comments you want to associate with the library.
Adding comments to describe the purpose of a library is important if you are working on a large project with other developers.
-
Click OK.
PowerBuilder creates the library.
To delete a library
-
In either the Tree view or the List view, select the library you want to delete.
-
Select Entry>Delete from the menu bar or select Delete from the pop-up menu.
Restriction
You cannot delete a library that is in the current target's library search path.
The Delete Library dialog box displays showing the library you selected.
-
Click Yes to delete the library.
The library and all its entries are deleted from the file system.
Creating and deleting libraries at runtime
You can use the LibraryCreate and LibraryDelete functions in scripts to create and delete libraries. For information about these functions, see the PowerScript Reference.
In either the Tree view or the List view, you can control what displays when you expand a drive or folder. An expanded drive or folder can display folders, workspaces, targets, files, and libraries.
In PowerBuilder, the current library is the library that contains the object most recently opened or edited. That library becomes the default for Open and Inherit. If you click the Open or Inherit button in the PowerBar, the current library is the one selected in the Libraries list.
You can display the current library in the Library painter.
To display objects in the current library
-
Click in the Tree view or the List view.
-
Click the Display Most Recent Object button on the PainterBar or select Most Recent Object from the View menu.
The library that contains the object you opened or edited last displays in the view you selected with the object highlighted.
You can open and preview objects in the current workspace.
Opening PowerBuilder objects
PowerBuilder objects, such as windows and menus, are opened only if they are in a PBL in the current workspace.
To open an object
-
In either the Tree view or the List view, double-click the object, or select Edit from the object's pop-up menu.
PowerBuilder takes you to the painter for that object and opens the object. You can work on the object and save it as you work. When you close it, you return to the Library painter.
Opening other objects
The Library painter allows you to open most of the different file types it displays. When you double-click on an object, PowerBuilder attempts to open it using the following algorithm:
-
PowerBuilder determines if the object can be opened in the File editor. For example, files with the extensions .txt, .ini, and .sr* open in the File editor.
-
PowerBuilder determines if the object can be opened in a painter or HTML editor.
-
PowerBuilder checks to see if the object is associated with a program in the HKEY_CLASSES_ROOT section of the Windows registry and, if so, launches the application.
Previewing PowerBuilder objects
You can run windows and preview DataWindow objects from the Library painter.
As the needs of your target change, you can rearrange the objects in libraries. You can copy and move objects between libraries or delete objects that you no longer need.
To copy objects using drag and drop
-
In the Tree view or the List view, select the objects you want to copy.
-
Drag the objects to a library in either view. If the contents of a library are displaying in the List view, you can drop it there.
PowerBuilder copies the objects. If an object with the same name already exists, PowerBuilder prompts you and if you allow it, replaces it with the copied object.
To move objects using drag and drop
-
In the Tree view or the List view, select the objects you want to move.
-
Press and hold Shift and drag the objects to a library in either view. If the contents of a library are displaying in the List view, you can drop it there.
PowerBuilder moves the objects and deletes them from the source library. If an object with the same name already exists, PowerBuilder prompts you and if you allow it, replaces it with the moved object.
To copy or move objects using a button or menu item
-
Select the objects you want to copy or move to another library.
-
Do one of the following:
-
Click the Copy button or the Move button.
-
Select Copy or Move from the pop-up menu.
-
Select Entry>Library Item>Copy or Entry>Library Item>Move from the menu bar.
The Select Library dialog box displays.
-
-
Select the library to which you want to copy or move the objects and click OK.
To delete objects
-
Select the objects you want to delete.
-
Do one of the following:
-
Click the Delete button.
-
Select Delete from the pop-up menu.
-
Select Entry>Delete from the menu bar.
You are asked to confirm the first deletion.
Being asked for confirmation
By default, PowerBuilder asks you to confirm each deletion. If you do not want to have to confirm deletions, select Design>Options to open the Options dialog box for the Library painter and clear the Confirm on Delete check box in the General tab page.
PowerBuilder records this preference as the DeletePrompt variable in the Library section of the PowerBuilder initialization file.
-
-
Click Yes to delete the entry or Yes To All to delete all entries. Click No to skip the current entry and go on to the next selected entry.
In either the Tree view or the List view, you can set the root location of the view.
To set the root of the current view
-
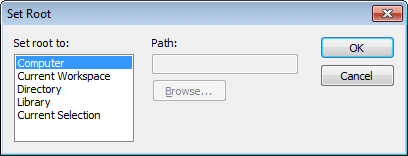
In either view, select View>Set Root from the menu bar or select Set Root from the pop-up menu to display the Set Root dialog box.
-
If you want the root to be a directory or library, type the path or browse to the path.
Setting the root to the current workspace
In the System Tree, the default root is the current workspace. If you prefer to work in the Library painter, you may find it convenient to set the root to the current workspace. Using the current workspace as your root is particularly helpful if you are using many libraries in various locations, because they are all displayed in the same tree.
You can also set a new root by moving back to where you were before, moving forward to where you just were, or for the List view, moving up a level.
You can use comments to document your objects and libraries. For example, you might use comments to describe how a window is used, specify the differences between descendant objects, or identify a PowerBuilder library.
You can associate comments with an object or library when you first save it in a painter and add or modify comments in the System Tree or Library painter. If you want to modify comments for a set of objects, you can do so quickly in the List view.
To modify comments for multiple objects
-
In the List view, select the objects you want.
-
Select Entry>Properties from the menu bar or select Properties from the pop-up menu.
PowerBuilder displays the Properties dialog box. The information that displays is for one of the objects you selected. You can change existing comments, or, if there are no comments, you can enter new descriptive text.
-
Click OK when you have finished editing comments for this object.
If you do not want to change the comments for an object, click OK. The next object displays.
-
Enter comments and click OK for each object until you have finished.
If you want to stop working on comments before you finish with the objects you selected, click Cancel. The comments you have entered until the most recent OK are retained and display in the List view.
Global search of targets
You can search a target to locate where a specified text string is used. For example, you could search for:
-
All scripts that use the SetTransObject function
-
All windows that contain the CommandButton cb_exit (all controls contained in a window are listed in the window definition's source form in the library so they can be searched for as text)
-
All DataWindow objects accessing the Employee table in the database
Working with targets
To see the pop-up menu that lets you perform operations on a target, such as search, build, and upgrade, you must set the root of the System Tree or the view in the Library painter to the current workspace.
Searching selected libraries and objects
You can also select a library or one or more PowerBuilder objects to search. The following procedure applies whatever the scope of your search is.
To search a target, library, or object for a text string:
-
Select the target, library, or objects you want to search.
You can select multiple objects in the List view using Shift+click and Ctrl+click.
-
Select Search from the pop-up menu or the PainterBar.
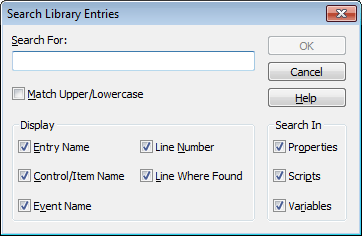
The Search Library Entries dialog box displays.
-
Enter the string you want to locate (the search string) in the Search For box.
The string can be all or part of a word or phrase used in a property, script, or variable. You cannot use wildcards in the search string.
-
In the Display group box, select the information you want to display in the results of the search.
-
In the Search In group box, select the parts of the object that you want PowerBuilder to inspect: properties, scripts, and/or variables.
-
Click OK.
PowerBuilder searches the libraries for matching entries. When the search is complete, PowerBuilder displays the matching entries in the Output window.
For example, the following screen displays the results of a search for the string garbagecollect:
From the Output window, you can:
-
Jump to the painter in which an entry was created
To do this, double-click the entry or select it and then select Edit from the pop-up menu.
-
Print the contents of the window
-
Copy the search results to a text file
You should optimize your libraries regularly. Optimizing removes gaps in libraries and defragments the storage of objects, thus improving performance.
Optimizing affects only layout on disk; it does not affect the contents of the objects. Objects are not recompiled when you optimize a library.
Once a week
For the best performance, you should optimize libraries you are actively working on about once a week.
To optimize a library:
-
In either Tree view or List view, choose the library you want to optimize.
-
Select Entry>Library>Optimize from the menu bar or select Optimize from the library's pop-up menu.
PowerBuilder reorganizes the library structure to optimize object and data storage and index locations. Note that PowerBuilder does not change the modification date for the library entries. PowerBuilder saves the unoptimized version as a backup file in the same directory.
The optimized file is created with the default permissions for the drive where it is stored. On some systems new files are not shareable by default. If you see "save of object failed" or "link error messages after optimizing," check the permissions assigned to the PBL.
If you do not want a backup file
If you do not want to save a backup copy of the library, clear the Save Optimized Backups check box in the Library painter's Design>Options dialog box. If you clear this option, the new setting will remain in effect until you change it.
Occasionally you may need to update library entries by regenerating, rebuilding, or upgrading them. For example:
-
When you modify an ancestor object, you can regenerate descendants so they pick up the revisions to their ancestor.
-
When you make extensive changes to a target, you can rebuild entire libraries so objects are regenerated sequentially based on interdependence.
-
When you upgrade to a new version of PowerBuilder, you need to upgrade your targets.
-
When you regenerate an entry, PowerBuilder recompiles the source form stored in the library and replaces the existing compiled form with the recompiled form. You can regenerate entries in the Library painter or by selecting regenerate from the object's pop-up menu in the System Tree.
You can also regenerate and rebuild from a command line. For more information, see Appendix B, The OrcaScript Language.
To regenerate library entries in the Library painter:
-
Select the entries you want to regenerate.
-
Click the Regenerate button or select Entry>Library Item>Regenerate from the menu bar.
PowerBuilder uses the source to regenerate the library entry and replaces the current compiled object with the regenerated object. The compilation date and size are updated.
Regenerating descendants
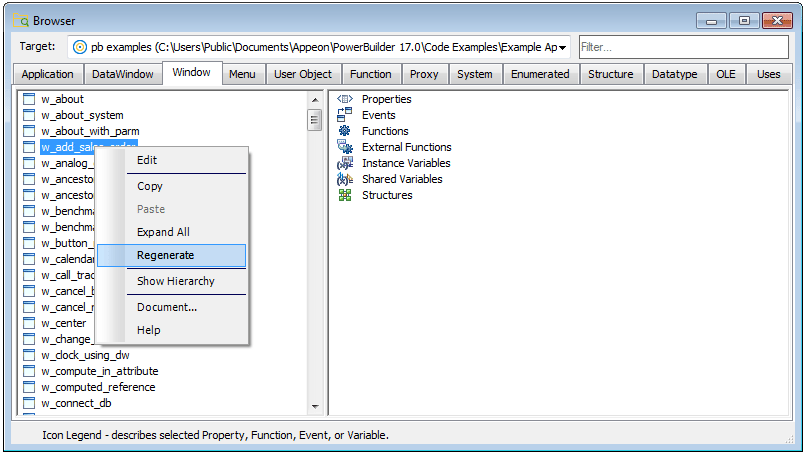
You can use the Browser to easily regenerate all descendants of a changed ancestor object.
To regenerate descendants:
-
Click the Browser button in the PowerBar.
The Browser displays.
-
Select the tab for the object type you want to regenerate.
For example, if you want to regenerate all descendants of window w_frame, click the Window tab.
-
Select the ancestor object and choose Show Hierarchy from its pop-up menu.
The Regenerate item displays on the pop-up menu.
-
Click the Regenerate item.
PowerBuilder regenerates all descendants of the selected ancestor.
For more about the Browser, see Browsing the class hierarchy.
Regenerate limitations
If you regenerate a group of objects, PowerBuilder will regenerate them in the order in which they appear in the library, which might cause an error if an object is generated before its ancestor. For this reason, you should use a full or incremental build to update more than one object at a time.
When you make modifications to a target and need to update one or more libraries, you should use a rebuild option to update all the library objects in the correct sequence.
Working with targets
To see the pop-up menu that lets you perform operations on a target such as search, build, and upgrade, you must set the root of the System Tree or the view in the Library painter to the current workspace.
There are two methods to use when you rebuild a workspace or target:
-
Incremental rebuild
Updates all the objects and libraries that reference objects that have been changed since the last time you built the workspace or target
-
Full rebuild
Updates all the objects and libraries in your workspace or target
When you upgrade to a new version of PowerBuilder, your existing targets need to be upgraded to the new version. Typically, when you open a workspace that contains targets that need to be upgraded, or add a target that needs to be upgraded to your workspace, PowerBuilder prompts you to upgrade the targets. However, there are some situations when you need to upgrade a target manually. For example, if you add a library that has not been upgraded to a target's library list, you will not be able to open objects in that library until the target has been upgraded.
You cannot upgraded a target that is not in your current workspace and you must set the root of the System Tree or the view in the Library painter to the current workspace.
Before you upgrade
There are some steps you should take before you upgrade a target:
-
Use the Migration Assistant to check for obsolete syntax or the use of reserved words in your code
-
Check the release notes for migration issues
-
Make backup copies of the target and libraries
-
Make sure that the libraries you will upgrade are writable
Always back up your PBLs before upgrading
Make sure you make a copy of your PBLs before upgrading. After migration, you cannot open them in an earlier version of PowerBuilder.
The Migration Assistant is available on the Tool page of the New dialog box. For help using the Migration Assistant, click the Help (?) button in the upper-right corner of the window and click the field you need help with, or click the field and press F1. If the Migration Assistant finds obsolete code, you can fix it in an earlier version of PowerBuilder to avoid errors when you upgrade to the current version.
PowerBuilder libraries and migration
PowerBuilder libraries (PBLs) contain a header, source code for the objects in the PBL, and binary code. There are two differences between PowerBuilder 10 and later PBLs and PBLs developed in earlier versions of PowerBuilder:
-
The source code in PowerBuilder 10 and later PBLs is encoded in Unicode (UTF-16LE, where LE stands for little endian) instead of DBCS (versions 7, 8, and 9) or ANSI (version 6 and earlier).
-
The format of the header lets PowerBuilder determine whether it uses Unicode encoding. The header format for PowerBuilder 10 is the same as that used for PUL files in PowerBuilder 6.5 and for PKL files in PocketBuilder. These files do not need to be converted to Unicode when they are upgraded to PowerBuilder 10 or later.
When PBLs are upgraded
Before opening a PBL, PowerBuilder checks its header to determine whether or not it uses Unicode encoding. PBLs are not converted to Unicode unless you specifically request that they be upgraded.
You cannot expand the icon for a PBL from PowerBuilder 9 or earlier in the Library painter. To examine its contents, you must upgrade it to PowerBuilder 10 or later.
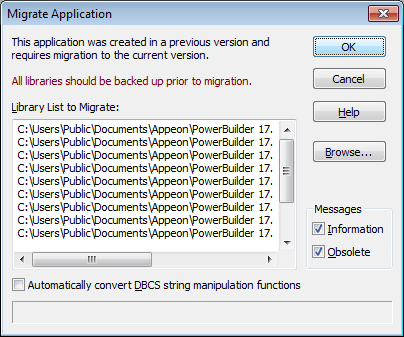
When you attempt to open a workspace that contains targets from a previous release in PowerBuilder, the Targets to be Migrated dialog box displays. You can upgrade targets from this dialog box, or clear the No Prompting check box to open the Migrate Application dialog box.
PowerBuilder dynamic libraries
If you plan to reference a PowerBuilder dynamic library (PBD) that was encoded in ANSI formatting (for example, if it was created in PowerBuilder 9 or earlier), you must regenerate the PBD to use Unicode formatting. Dynamic libraries that you create in PowerBuilder 10 or later use Unicode formatting exclusively.
For information on creating PBDs, see Creating runtime libraries.
The Migrate Application dialog box
The Migrate Application dialog box lists each PBL that will be upgraded and lets you choose the type of messages that display during the migration process.
If you click OK, each PBL is first upgraded to the new version of PowerBuilder. If necessary, PowerBuilder converts source code from DBCS to Unicode. PowerBuilder performs a full build and saves the source code back to the same PBL files. Changes to scripts display in informational messages in the Output window and are written to a log file for each PBL so that you can examine the changes later. Recommended changes are also written to the log file.
Migration from DBCS versions
The migration process automatically converts multibyte strings in DBCS applications to unicode strings. You do not need to select the Automatically Convert DBCS String Manipulation Functions check box for this conversion. If the migration encounters an invalid multibyte string, it sets the invalid string to a question mark and reports the error status. You can modify question marks in the Unicode output string after the migration.
The following two lines from a log file indicate that the FromAnsi function is obsolete and was replaced with the String function, and that an encoding parameter should be added to an existing instance of the String function:
2006/01/27 08:20:11   test.pbl(w_main).cb_1.clicked.4: Information C0205: Function 'FromAnsi' is replaced with function 'String'.
2006/01/27 08:20:11   test.pbl(w_main).cb_2.clicked.4: Information C0206: Append extra argument 'EncodingAnsi!' to function 'String' for backward compatibility.
The log file has the same name as the PBL with the string _mig appended and the extension .log and is created in the same directory as the PBL. If no changes are made, PowerBuilder creates an empty log file. If the PBL is upgraded more than once, output is appended to the existing file.
PowerBuilder makes the following changes:
-
The FromUnicode function is replaced with the String function and the second argument EncodingUTF16LE! is added
-
The ToUnicode function is replaced with the Blob function and the second argument EncodingUTF16LE! is added
-
The FromAnsi function is replaced with the String function and the second argument EncodingAnsi! is added
-
The ToAnsi function is replaced with the Blob function and the second argument EncodingAnsi! is added
-
An Alias For clause with the following format is appended to declarations of external functions that take strings, chars, or structures as arguments or return any of these datatypes:
ALIAS FOR "functionname;ansi"
If the declaration already has an Alias For clause, only the string ;ansi is appended.
DBCS users only
If you select the Automatically Convert DBCS String Manipulation Functions check box, PowerBuilder automatically makes appropriate conversions to scripts in PowerBuilder 9 applications. For example, if you used the LenW function, it is converted to Len, and if you used the Len function, it is converted to LenA. The changes are written to the Output window and the log file. This box should be selected only in DBCS environments.
Adding PBLs to a PowerBuilder target
When you add PBLs from a previous release to a PowerBuilder target's library list, the PBLs display in the System Tree. The PBLs are not upgraded when you add them to the library list. Their contents do not display because they have not yet been converted. To display their contents, you must upgrade the target.
You can upgrade a target from the Workspace tab of the System Tree by selecting Migrate from the pop-up menu for the target. You can also upgrade targets in the Library painter if they are in your current workspace.
You can export object definitions to text files. The text files contain all the information that defines the objects. The files are virtually identical syntactically to the source forms that are stored in libraries for all objects.
You may want to export object definitions in the following situations:
-
You want to store the objects as text files.
-
You want to move objects to another computer as text files.
Later you can import the files back into PowerBuilder for storage in a library.
Caution
The primary use of the Export feature is exporting source code, modifying the source. You can use the Source editor to modify the source code of an object directly, but modifying source in an ASCII text file is not recommended for most users. See Using the Source editor.
To export entries to text files:
-
Select the Library entries you want to export.
You can select multiple entries in the List view.
-
Do one of the following:
-
Select Export from the pop-up menu.
-
Click the Export button on the PainterBar.
-
Select Entry>Library Item>Export from the menu bar.
The Export Library Entry dialog box displays, showing the name of the first entry selected for export in the File Name box and the name of the current directory. The current directory is the target's directory or the last directory you selected for saving exported entries or saving a file using the file editor.
PowerBuilder appends the file extension .srx, where x represents the object type.
-
-
Specify the file name and directory for the export file. Do not change the file extension from the one that PowerBuilder appended.
-
Select the encoding for the exported file.
The HEXASCII export format is used for source-controlled files. Unicode strings are represented by hexadecimal/ASCII strings in the exported file, which has the letters HA at the beginning of the header to identify it as a file that might contain such strings. You cannot import HEXASCII files into a previous version of PowerBuilder.
-
Click OK.
PowerBuilder converts the entry to text, stores it with the specified name, then displays the next entry you selected for export.
If a file already exists with the same name, PowerBuilder displays a message asking whether you want to replace the file. If you say no, you can change the name of the file and then export it, skip the file, or cancel the export of the current file and any selected files that have not been exported.
-
Repeat steps 3 through 5 until you have processed all the selected entries.
If the Library painter is set to display files, you can see the saved files and double-click them to open them in the File editor.
To import text files to library entries:
-
In the System Tree or Library painter, select the library into which you want to import an object.
-
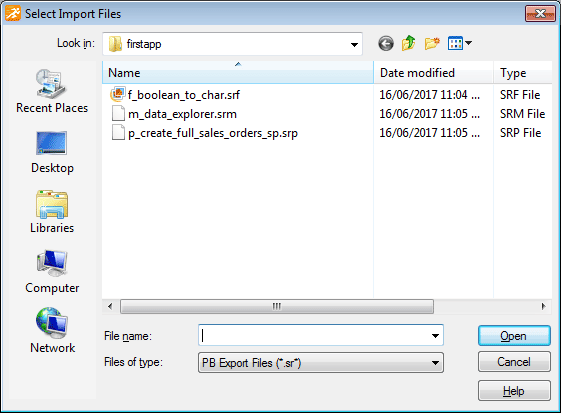
Select Import from the pop-up menu, or, in the Library painter only, click the Import button on the PainterBar.
The Select Import Files dialog box displays, showing the current directory and a list of files with the extension .sr* in that directory. The current directory is the target's directory or the last directory you selected for saving exported entries or saving a file using the file editor.
-
Select the files you want to import. Use Shift+click or Ctrl+click to select multiple files.
-
Click Open.
PowerBuilder converts the specified text files to PowerBuilder format, regenerates (recompiles) the objects, stores the entries in the specified library, and updates the entries' timestamps.
If a library entry with the same name already exists, PowerBuilder replaces it with the imported entry.
Caution
When you import an entry with the same name as an existing entry, the old entry is deleted before the import takes place. If an import fails, the old object will already be deleted.
If you want your deployed target to use dynamic runtime libraries, you can create them in the Library painter.
For information about using runtime libraries, see Creating Executables and Components. That chapter also describes the Project painter, which you can use to create dynamic runtime libraries automatically.
To create a runtime library:
-
Select the library you want to use to build a runtime library.
-
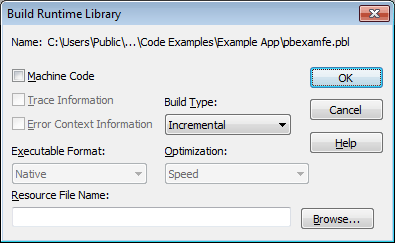
Select Entry>Library>Build Runtime Library from the menu bar, or select Build Runtime Library from the library's pop-up menu.
The Build Runtime Library dialog box displays, listing the name of the selected library.
If any of the objects in the source library use resources, specify a PowerBuilder resource file in the Resource File Name box (see Including additional resources).
-
Select other options as appropriate.
Most options are available only if you select Machine Code, which creates a DLL file. The default is Pcode, which creates a PBD file. For more information about build options, see Executable application project options.
-
Click OK.
PowerBuilder closes the dialog box and creates a runtime library with the same name as the selected library and the extension .dll or .pbd.
There is no difference between 32-bit platform and the 64-bit platform if you build the runtime library in Pcode. The same PBD file works for both 32-bit and 64-bit PowerBuilder applications.
When building a runtime library, PowerBuilder does not inspect the objects; it simply removes the source form of the objects. Therefore, if any of the objects in the library use resources (pictures, icons, and pointers)—either specified in a painter or assigned dynamically in a script—and you do not want to provide these resources separately, you must list the resources in a PowerBuilder resource file (PBR file). Doing so enables PowerBuilder to include the resources in the runtime library when it builds it.
For more on resource files, see Using PowerBuilder resource files.
After you have defined the resource file, specify it in the Resource File Name box to include the named resources in the runtime library.
You can generate three types of reports from the Library painter:
-
The search results report
-
Library entry reports
-
The library directory report
The search results report contains the matching-entries information that PowerBuilder displays after it completes a search, described in Searching targets, libraries, and objects. The other two types of reports are described in this section.
Library entry reports provide information about selected entries in the current target. You can use these reports to get printed documentation about the objects you have created in your target.
To create library entry reports
-
Select the library entries you want information about in the List view.
-
Select Entry>Library Item>Print from the menu bar, or select Print from the pop-up menu.
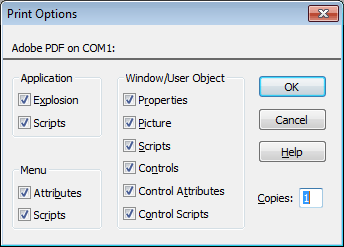
The Print Options dialog box displays.
-
If you have selected the Application object or one or more menus, windows, or user objects to report on, select the information you want printed for each of these object types.
For example, if you want all properties for selected windows to appear in the report, make sure the Properties box is checked in the Window/User Object group box.
The settings are saved
PowerBuilder records these settings in the Library section of the PowerBuilder initialization file.
-
Click OK.
PowerBuilder generates the selected reports and sends them to the printer specified in Printer Setup in the File menu.
The library directory report lists all entries in a selected library in your workspace, showing the following information for all objects in the library, ordered by object type:
-
Name of object
-
Modification date and time
-
Size (of compiled object)
-
Comments
To create the library directory report
-
Select the library that you want the report for.
The library must be in your current workspace.
-
Select Entry>Library>Print Directory from the menu bar, or select Print Directory from the pop-up menu.
PowerBuilder sends the library directory report to the printer specified under File>Printer Setup in the menu bar.


