About this chapter
This chapter introduces user events, describes how to define them, and discusses how to use them in an application.
Windows, user objects, controls, menus, and Application objects each have a predefined set of events. In most cases, the predefined events are all you need, but there are times when you want to declare your own user event. You can use predefined event IDs to trigger a user event, or you can trigger it exclusively from within your application scripts.
Features that you might want to add to your application by creating user events include keystroke processing, providing multiple ways to perform a task, and communication between a user object and a window.
Keystroke processing
Suppose that you want to modify the way keystrokes are processed in your application. For example, in a DataWindow control, you want the user to be able to press the Down Arrow and Up Arrow keys to scroll among radio buttons in a DataWindow column. Normally, pressing these keys moves the focus to the next or preceding row.
To do this, you define user events corresponding to Windows events that PowerBuilder does not define.
Multiple methods
Suppose that you want to provide several ways to accomplish a certain task within a window. For example, you want the user to be able to update the database by either clicking a button or selecting a menu item. In addition, you want to provide the option of updating the database when the user closes the window.
To do this, you define a user event to update the database.
Communication between user object and window
Suppose that you have placed a custom visual user object in a window and need to communicate between the user object and the window. For information, see Communicating between a window and a user object.
An event ID connects events related to user actions or system activity to a system message. PowerBuilder defines (or maps) events to commonly used event IDs, and when it receives a system message, it uses the mapped event ID to trigger an event.
User-defined events do not have to be mapped to an event ID. See Defining user events.
The PowerBuilder naming convention for user event IDs is similar to the convention Windows uses to name messages. All PowerBuilder event IDs begin with pbm_.
Event IDs associated with Windows messages
Several Windows messages and notifications map to PowerBuilder event IDs.
For Windows messages that begin with wm_, the PowerBuilder event ID typically has the same name with pbm_ substituted for wm_. For messages from controls, the PowerBuilder event ID typically has the same name but begins with pbm_ and has the Windows prefix for the control added to the message name. For example:
-
wm_keydown maps to pbm_keydown
-
bm_getcheck (a button control message) maps to pbm_bmgetcheck
-
bn_clicked (a button control notification message) maps to pbm_bnclicked
To see a list of event IDs to which you can map a user-defined event, select Insert>Event and display the Event ID drop-down list in the Prototype window that displays.
Windows messages that are not mapped to a PowerBuilder event ID map to the pbm_other event ID. The PowerBuilder Message object is populated with information about system events that are not mapped to PowerBuilder event IDs. For more information about the Message object, see the section called “Message object” in Objects and Controls or the section called “The Message object” in Application Techniques.
For more information about Windows messages and notifications, see the information about Windows controls and Windows management in the section on user interface design and development in the Microsoft MSDN Library at http://msdn.microsoft.com/library/default.aspx.
Event IDs associated with PowerBuilder events
PowerBuilder has its own events, each of which has an event ID. For example, the PowerBuilder event DragDrop has the event ID pbm_dragdrop. The event name and event ID of the predefined PowerBuilder events are protected; they cannot be modified. The event IDs for predefined events are shown in the Event List view:

Custom event IDs
The list of event IDs that displays in the Event ID drop-down list in the Prototype window includes custom event IDs. Custom user events can be mapped from Windows wm_user message numbers to pbm_customxx event IDs.
Obsolete technique
This technique is not recommended and is considered to be obsolete. The ability to use this technique has been retained for backward compatibility. If you do not want to map a user event to a named pbm_ code, use an unmapped user event as described in Unmapped user events.
These event IDs were intended for use with DataWindow controls, windows, and user objects other than standard visual user objects, which behave like the built-in controls they inherit from. They were not intended for use with standard controls.
Defining custom user events for standard controls can cause unexpected behavior because all standard controls respond to standard events in the range 0 to 1023. Most controls also define their own range of custom events beyond 1023, corresponding to wm_user messages, and some controls have custom events that overlap with the PowerBuilder custom events. The pbm_custom01 event ID maps to wm_user+0, pbm_custom02 maps to wm_user+1, and so on, through pbm_custom75, which maps to wm_user+74.
In PowerBuilder, you can define both mapped and unmapped user events for windows, user objects, controls, menus, and the Application object.
When you add a new event, a Prototype window displays above the script area in the Script view. Most of the fields in the Prototype window are the same as when you define a user-defined function. They are in the same order as the event's signature: access level, return type, and name; then for each parameter, how it is passed, its datatype, and its name; and finally, the THROWS clause. For information about filling in these fields, see Defining user-defined functions.
The access level for events is always public.
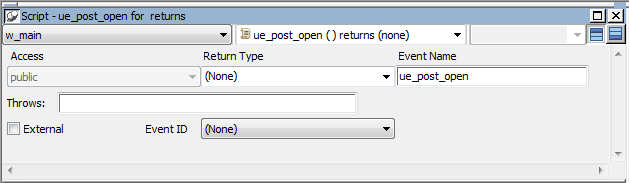
The Prototype window for user events has an additional field that you use if you want to map the user event to an event ID.
External check box
When you select the External check box, PowerBuilder sets the IsExternalEvent property of the ScriptDefinition object associated with the event to "true". This has no effect on your application in this release. The feature may be used in a future release.
Mapped user events
When a system message occurs, PowerBuilder triggers any user event that has been mapped to the message and passes the appropriate values to the event script as arguments. When you define a user event and map it to an event ID, you must use the return value and arguments that are associated with the event ID.
Unmapped user events are associated with a PowerBuilder activity and do not have an event ID. When you define an unmapped user event, you specify the arguments and return datatype; only your application scripts can trigger the user event. For example, if you create an event called ue_update that updates a database, you might trigger or post the event in the Clicked event of an Update command button.
To define a mapped user event:
-
Open the object for which you want to define a user event.
If you want to define a user event for a control on a window or visual user object, double-click the control to select it.
-
Select Insert>Event from the menu bar, or, in the Event List view, select Add from the pop-up menu.
The Prototype window opens in the Script view. If you display the Script view's title bar, you see (Untitled) because you have not named the event yet. If there is no open Script view, a new view opens.
-
Name the event and tab to the next field.
Event names can have up to 40 characters. For valid characters, see the section called “Identifier names” in PowerScript Reference.
To recognize user events easily, consider prefacing the name with an easily recognizable prefix such as ue_.
When you tab to the next field, the user event is added to the Event List view. It is saved as part of the object whenever you save the object.
-
Select an ID from the drop-down list at the bottom of the Prototype window.
To define an unmapped user event:
-
Open the object for which you want to define a user event.
If you want to define a user event for a control on a window or visual user object, double-click the control to select it.
-
Select Insert>Event from the menu bar, or, in the Event List view, select Add from the pop-up menu.
The Prototype window opens in the Script view. If you display the Script view's title bar, you see (Untitled) because you have not named the event yet. If there is no open Script view, a new view opens.
-
Select a return type and tab to the next field.
Defining return types for events is similar to defining them for functions. See Defining a return type.
When you can specify return type and arguments
If you map the user event to an event ID, you cannot change its return type or specify arguments.
-
Name the event and tab to the next field.
Event names can have up to 40 characters. For valid characters, see the the section called “Identifier names” in PowerScript Reference.
To recognize user events easily, consider prefacing the name with an easily recognizable prefix such as ue_.
When you tab to the next field, the user event is added to the Event List view. It is saved as part of the object whenever you save the object.
If the event will take arguments, define arguments for the event.
Defining arguments for events is similar to defining them for functions. See Defining arguments and Changing the arguments.
-
Optionally enter the name of exceptions that can be thrown by the event.
After you define a user event, you must write the script that PowerBuilder will execute when that user event is triggered. If it is an unmapped user event, you also write the code that will trigger the user event.
User events display in alphabetical order in the Event List view and the event list box in the Script view, along with the predefined events. As with predefined events, the script tells PowerBuilder what processing to perform when the user event occurs.
If the user event is not mapped to a Windows message (that is, if there is no event ID associated with it), you must trigger the event in a script. You can trigger the user event in an object using the EVENT syntax. For information about calling events, see the section called “About events” in PowerScript Reference.
This section includes two examples that use a mapped user event and one example that uses an unmapped user event. For more user event examples, see Communicating between a window and a user object.
Example 1: mapped user event for a control
Situation. You have several SingleLineEdit controls in a window and want the Enter key to behave like the Tab key (if users press Enter, you want them to tab to the next SingleLineEdit).
Solution. Define a user event for each SingleLineEdit. Give the event any name you want, such as ue_CheckKey. Map the event to the event ID pbm_keydown. Write a script for the user event that tests for the key that was pressed. If Enter was pressed, set the focus to the SingleLineEdit that you want the user to go to.
For example, in the script for the user event for sle_1, you could code:
// Script for user event ue_CheckKey
// which is mapped to pbm_keydown.
IF KeyDown(KeyEnter!) THEN   // Go to sle_2 if
   sle_2.SetFocus( )         // Enter pressed.
END IF
Similarly, in the script for the user event for sle_2, you could code:
// Script for user event ue_CheckKey,
// which is mapped to pbm_keydown.
IF KeyDown(KeyEnter!) THEN  // Go to sle_3 if
   sle_3.SetFocus( )        // Enter pressed.
END IF
Example 2: mapped user event for an edit style
Situation. You have a DataWindow control with a column that uses the RadioButton edit style and you want to allow users to scroll through the RadioButtons when they press Down Arrow or Up Arrow (normally, pressing Down Arrow or Up Arrow scrolls to the next or preceding row).
Solution. Declare a user event for the DataWindow control that maps to the event ID pbm_dwnkey and write a script like the following for it. dwn stands for DataWindow notification.
// Script is in a user event for a DataWindow control.
// It is mapped to pbm_dwnkey. If user is in column
// number 6, which uses the RadioButton edit style, and
// presses DownArrow, the cursor moves to the next item
// in the RadioButton list, instead of going to the next
// row in the DataWindow, which is the default behavior.
// Pressing UpArrow moves to preceding RadioButton.
//
// Note that the CHOOSE CASE below tests for data
// values, not display values, for the RadioButtons.

int colnum = 6                     // Column number
long rownum
rownum = dw_2.GetRow( ) // Current row

IF KeyDown(KeydownArrow!) AND &
   This.GetColumn( ) = colnum THEN
   CHOOSE CASE dw_2.GetItemString(rownum, colnum)
      case "P"             // First value in RB
         This.SetItem(rownum, colnum,"L")  // Next
      case "L"             // Second value in RB
         This.SetItem(rownum, colnum,"A")  // Next
      case "A"             // Last value in RB
         This.SetItem(rownum, colnum,"P")  // First
   END CHOOSE
   This.SetActionCode(1)   // Ignore key press
END IF

// The following code does same thing for UpArrow.
IF KeyDown(KeyupArrow!) AND &
   This.GetColumn( ) = colnum THEN

   CHOOSE CASE dw_2.GetItemString(rownum, colnum)
      case "P"            // First value in RB
         This.SetItem(rownum, colnum,"A")   // Last
      case "L"            // Another value in RB
         This.SetItem(rownum, colnum,"P")
      case "A"            // Last value in RB
         This.SetItem(rownum, colnum,"L")
   END CHOOSE
   This.SetActionCode(1)
END IF
Example 3: unmapped user event for menu options
Situation. Suppose you use the same menu in all your windows, but you want to enable or disable some menu items, in this case database update items, depending on which window the user is in.
Solution. In the window that will be the ancestor of all the sheet windows that do not have database update capability, define an unmapped user event called ue_ct_menu_enable. The event takes a boolean argument, ab_state, to set or clear the enabled property on various menus. This is the script for the ue_ct_menu_enable user event in the ancestor window:
// Enable / Disable Menu Options
            im_CurrMenu.m_maint.m_add.enabled = Not ab_state
            im_CurrMenu.m_maint.m_delete.enabled = Not ab_state
            im_CurrMenu.m_maint.m_undelete.enabled = Not ab_state
            im_CurrMenu.m_maint.m_update.enabled = Not ab_state
            im_CurrMenu.m_maint.m_close.enabled = ab_state
Then, in the script for the Activate event in the ancestor window, call the user event and pass the value "true" for the boolean variable ab_state.
this.EVENT ue_ct_menu_enable ( TRUE )
Write a similar script for the Deactivate event with the value "false" for ab_state.
You can use this window as the ancestor of any sheet window in your application that does not have database update capability. When the window is active, the Add, Delete, Undelete, and Update menu items are grayed out. When it is not active, the Close item is grayed out.
For windows that have database update capability, you can create a second ancestor window that inherits from the ancestor window in which you defined ue_ct_menu_enable. In the second ancestor window, you can override the ue_ct_menu_enable event script so that the appropriate menu options are enabled.
