- Configuring a deployment server
- Uploading the app launcher and runtime files
- Creating a PowerClient project
- Defining a PowerClient project
- Building and deploying a PowerClient project
- Building and deploying the PowerClient project with commands
- Running the PowerClient project
- Debugging the PowerClient project
- Packaging the PowerClient project
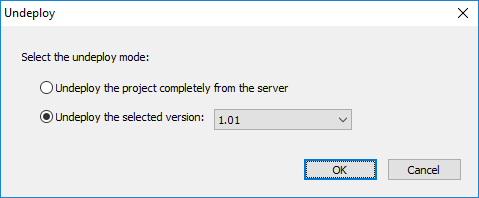
- Undeploying the PowerClient project
- Uninstalling the PowerClient project
- Changing external files using commands
- Supporting cookie validation
- Rolling back to an earlier version of app
- Tutorial 1: Deploying your first PowerClient project
- Tutorial 2: Building your PowerClient project with commands
The applications deployed with PowerClient will be installed and updated through a Web server. Therefore, you will need to configure a Web server for deployment.
To configure a deployment server:
-
Set up a Web server according to the documents provided by the vendor.
Any type of Web server (such as IIS, Apache, Nginx etc.) is supported. You can set up FTP on the server, so that you can remotely deploy the app to the server. For how to configure FTP on a server running against IIS, refer to Configure an FTP server. For how to configure SSL on a server running against IIS, refer to Configure an SSL-based FTP server.
-
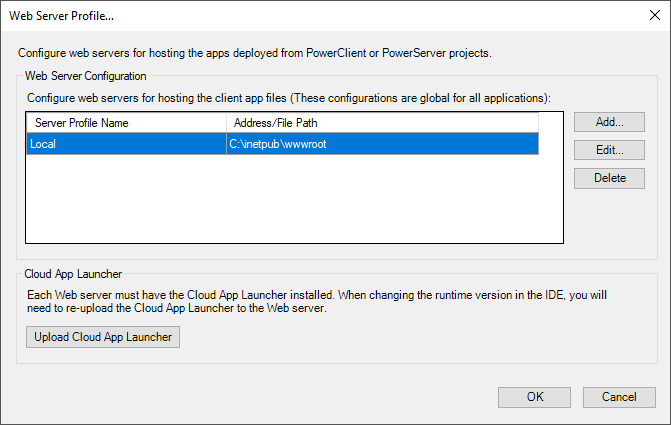
Select Tools>Web Server Profile from the menu bar to open the Web Server Profile window.
-
In the Web Server Profile window, click Add to configure a local or remote Web server where the application will be deployed.
-
To configure a local Web server, select the Local Server button and specify the Web root of the Web server (for example %systemdrive%\inetpub\wwwroot for IIS) or a subdirectory under the Web root. Click Test File Path to make sure the specified path is valid for deployment.
Note
If you intend to deploy to a local Web server, make sure you run PowerBuilder as administrator or have the read and write permissions to the specified directory (read and write permissions are required when transferring files to the Web server).
-
To configure a remote Web server, select the Remote Server button. You will need to specify the profile name and the following FTP settings: host name, port number, user name, password, and encryption settings. Click Test FTP Connection to make sure the specified settings are correct for deployment. The FTP user must have the read and write permissions in order to transfer files to the FTP server successfully.
The server configuration will be used by all PowerClient projects; therefore if you have changed the server settings, you will need to upload the app launcher if no launcher has been uploaded to that server or directory.
Note
If you intend to deploy to the Web server through a proxy server, make sure the proxy server and the FTP server have the same encoding, otherwise, the multi-byte characters in the file/folder name will become unrecognizable after deployed to the server.
Note
As PowerBuilder is designed to be case-insensitive, therefore, in a case-sensitive system like Linux, some app files (such as images) may not be found or loaded. To avoid any issue caused by the case of file name, make sure to configure the Linux server to ignore case-sensitive.
-
The app launcher and the runtime files must be uploaded to the Web server, and then installed to the client when the application is run for the first time. Apps deployed to the same server and directory will use the same app launcher and the same runtime files. There will be only one app launcher in the specified server and directory, although there can be multiple versions of runtime files. The app launcher will be overwritten without notice by the one uploaded later to the same server and directory.
To upload the app launcher and runtime files:
-
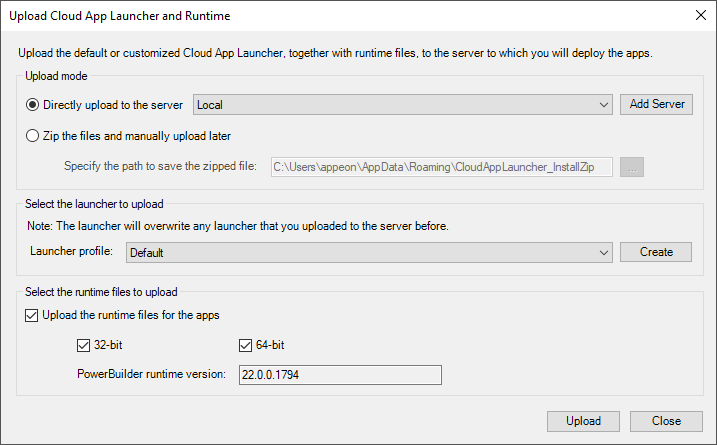
Select Tools>Upload Cloud App Launcher from the menu bar. The Upload Cloud App Launcher and Runtime window appears.
-
In the Upload Cloud App Launcher and Runtime window, select whether to directly upload the app launcher and runtime files to the server or only create a zip package and manually upload it to the server later.
-
To directly upload the app launcher and runtime files to the server, select a local server or a remote server where the app launcher and the runtime files will be uploaded.
-
To create a zip package which will be manually uploaded later, specify where the zip package will be created.
IMPORTANT: the app launcher and runtime files must be uploaded to the same server and web root where the application will be deployed. If you have not configured the server yet, follow instructions in Configuring a deployment server to configure the server first.
-
-
Select or create an app launcher to upload.
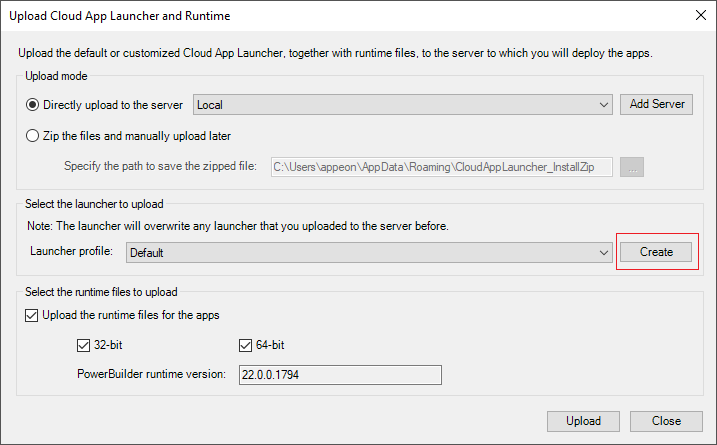
You can select the default app launcher from the Launcher profile list or create your own launcher by clicking the Create button. To customize the launcher settings, see the next section Customize cloud app launcher for details.
-
Select the runtime files (32-bit and/or 64-bit) to upload.
The version of runtime files is determined by the runtime version selected in the IDE > System Options dialog. Multiple versions of runtime files can co-exist on the same server and directory.
The Cloud App Launcher is a launcher program that must be first installed to the user’s machine. It facilitates the initial installation and subsequent updates of your PowerBuilder applications over HTTP/HTTPS.
Why cloud app launcher is needed
The cloud app launcher works as a "helper" application that installs, starts, and updates the installable cloud app over HTTP/HTTPS, besides that the cloud app launcher can be opened by the Web browser, therefore it enables the installable cloud app to be started through a Web browser (the Web browser launches the cloud app launcher; and then the cloud app launcher launches the installable cloud app).
How cloud app launcher is installed/uninstalled
The installable cloud launcher is available in two versions: the standard version and the public version.
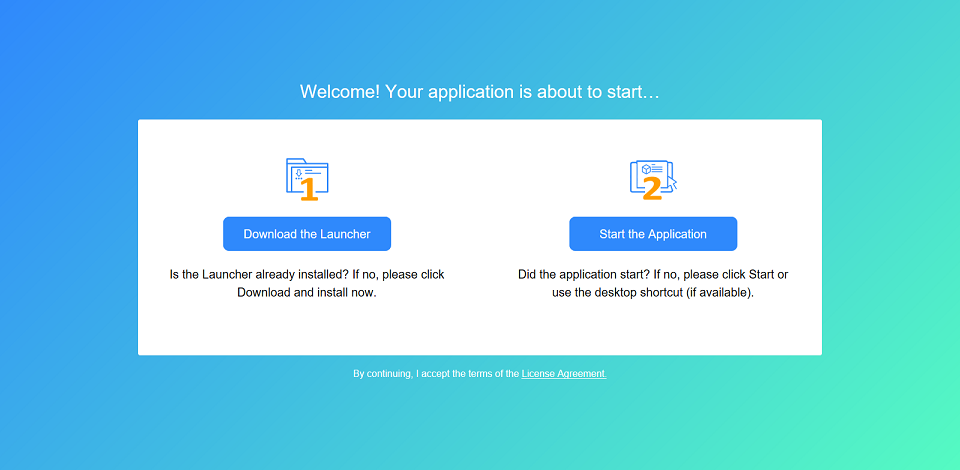
The standard version of the cloud app launcher will be automatically downloaded when the user runs the application for the first time by accessing the application URL in the Web browser. If download does not start automatically, the user will need to click the Download the Launcher button to download the setup file. After that, the user will need to run the setup file to install the cloud app launcher.
The public version of the cloud app launcher is provided separately so that the administrator can get the setup file of the public version and install it to the client. The administrator must have the administrator rights to install the public version so that it can be used by all users on that client machine. The setup file can be obtained from the Web server after it was uploaded, for example, C:\inetpub\wwwroot\CloudAppPublisher\CloudAppInstall 22.0\CloudAppLauncherPublic_Installer.exe (or CloudAppLauncherPublic_Installer.msi).
The administrator can directly run the setup file to install or run the following command to silently install the cloud app launcher.
For EXE file:
CloudAppLauncherPublic_Installer.exe /s /AppInstallPath=""c:\appeon_dir\App1"" /CalInstallPath=""%localappdata%\cal_v22""
CloudAppLauncher_Installer.exe /s /AppInstallPath=""c:\appeon_dir\App1"" /CalInstallPath=""%localappdata%\cal_v22""
For MSI file:
CloudAppLauncherPublic_Installer.msi /qn APPINSTALLPATH=""c:\appeon_dir\App1"" CALINSTALLPATH=""%localappdata%\cal_v22""
CloudAppLauncher_Installer.msi /qn APPINSTALLPATH=""c:\appeon_dir\App1"" CALINSTALLPATH=""%localappdata%\cal_v22""
-
/s or /qn - starts the silent installation mode.
-
/AppInstallPath or APPINSTALLPATH -- (optional) specifies the installation path for the application.
-
/CalInstallPath or CALINSTALLPATH -- (optional) specifies the installation path for the cloud app launcher.
The administrator can directly run the SilentUninstall.bat file under the installation path to silently uninstall the cloud app launcher.
Note
If the MSI file for the installation is used, you will need to make sure the installation path for the application and the cloud app launcher can be accessed and executed by the end user, otherwise, the application or the cloud app launcher may fail to run. The end user will not be prompted for the permission issue (this is a limitation with MSI file).
If the EXE file for the installation is used, the end user will be prompted to select a different path if s/he has no sufficient rights to install to the specified path for the application or the cloud app launcher; they cannot proceed with the installation process until they select an appropriate path.
|
Standard version |
Public version |
|
|---|---|---|
|
Whether uploaded to the server |
Yes |
Yes |
|
How to download and install |
The setup file is automatically downloaded from the Web server when the user enters the application URL in the browser; and then installed when the user runs the setup file. |
The administrator gets the setup file from the Web server and then installs it to the client machine. |
|
Where to install |
The launcher (as well as the app files and runtime files) will be installed to the local user folder. |
The launcher will be installed to the %programfiles% folder and the app files and runtime files will be installed to the local user folder. |
|
How to run |
The launcher will be installed and run by each user. The launcher starts when the user starts an application, and will stay active all the time (unless manually ended). |
The launcher must be installed by the administrator, and then shared by all users. The launcher will start at the computer start-up, and will stay active all the time (unless manually ended). |
|
Precedence |
If the public version is installed, the user will always use the public version (even if the user has installed the standard version under his own account). |
|
|
How to upgrade |
Will automatically upgrade. |
Will rely on the administrator to upgrade. If the administrator does not promptly upgrade it to the latest version, when the user runs the application, s/he will be prompted to contact the administrator to upgrade the launcher. |
|
How to uninstall |
Uninstalled by each user. |
Uninstalled by the administrator. |
Are administrator rights required
The standard version of cloud app launcher requires no administrator rights to install and use.
The public version of cloud app launcher requires administrator rights to install. And after that, it can be used by all users without administrator rights.
How multiple versions coexist
The launcher for version 2022 has been re-factored, so the 2022 launcher will not work for 2019 R3/2021 apps, and vice versa. Therefore: (1) The 2022 launcher can co-exist with 2019 R3/2021 launcher at the Web server and also at the client side; (2) The 2022 launcher will work for 2022 apps only.
As to the launchers of version 2019 R3 and 2021, these two launchers will not coexist on the Web server and the client; only one of them will exist (either 2019 R3 or 2021). And the application deployed in 2019 R3 or 2021 can work with either of them. View here for more information.
Instead of uploading the default app launcher, you can create your own launcher and upload it.
To create and customize the launcher:
-
Select Tools>Upload Cloud App Launcher from the menu bar. The Upload Cloud App Launcher and Runtime window appears.
-
Click the Create button to create a new launcher and specify the settings.
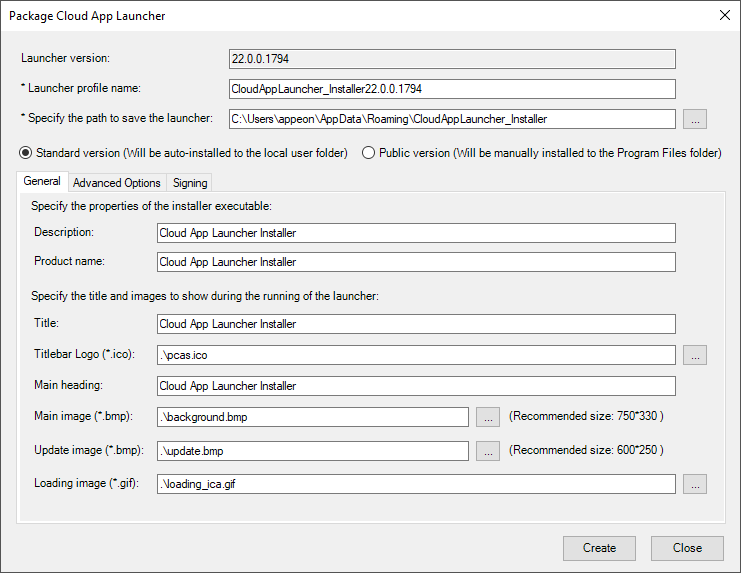
You can specify the following launcher settings:
-
Specify a profile name for your new launcher.
-
Specify where to save the launcher profile on the local machine.
-
Select the version of the launcher: standard version or public version. If you are not sure which version to select, refer to the previous section About cloud app launcher for their differences.
-
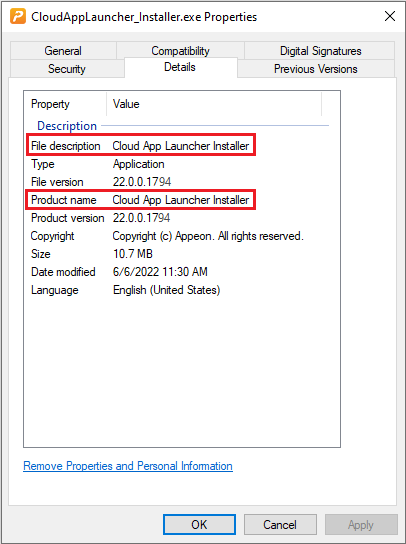
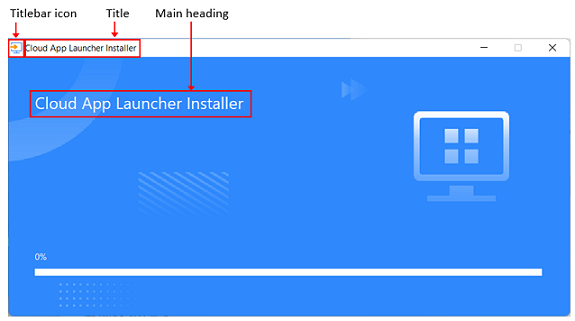
On the General tab, specify the following settings:
-
On the Advanced Options tab, specify where to install the application on the client. The path in the App path field will be used as the default installation path. If you want to allow the user to select where to install the application during the installation process, you can select "Allow the user to change the path".
-
On the Advanced Options tab, specify where to install the cloud app launcher on the client. The path in the Install path field will be used as the default installation path. If you want to allow the user to select where to install the cloud app launcher during the installation process, you can select "Allow the user to change the install path".
-
If "standard version" is selected, you can specify whether to allow the user to change the installation path of launcher, but the standard version should not be installed to the same location where the public version is installed.
-
If "public version" is selected, you should not allow the user to change the installation path of launcher.
If the end user has no sufficient rights to install to the default or specified path for the application or the cloud app launcher, they will be prompted to select an appropriate path before they can proceed with the installation process.
-
-
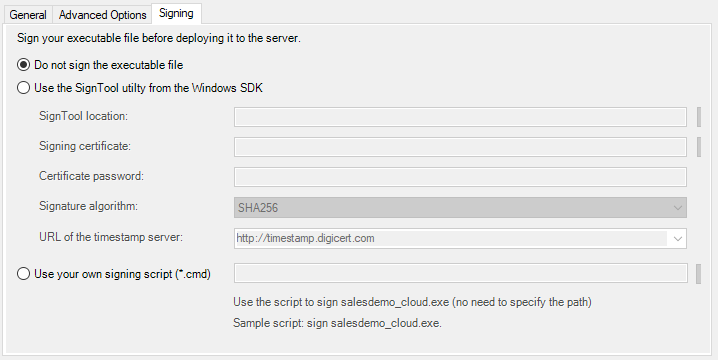
On the Signing tab, select whether to digitally sign the launcher executable file (CloudAppLauncher_Installer.exe).
If you want to digitally sign the launcher executable file, you can specify the settings required for signing under the "Use the SignTool utility from the Windows SDK" option, for example, SignTool location, signing certificate, certificate password, signature algorithm, and URL of the time stamp server. And make sure Microsoft’s SignTool has been installed on the current machine.
Or you can place the signing scripts in a file (with file extension as .cmd) and then select the file for the "Use your own signing script" option. For example, to sign the executable file (CloudAppLauncher_Installer.exe) using Microsoft’s SignTool, you may create a cmd file that includes the following scripts:
signtool.exe sign /f mycert.pfx /p password /d "My app launcher" /du http://www.mytest.com /fd sha256 /tr "http://timestamp.digicert.com" /td sha256 CloudAppLauncher_Installer.exe
After the executable file is generated and before it is uploaded to the server, PowerBuilder will sign the executable file using your own signing scripts or using the SignTool settings you specified.
-
Tip
You will not be able to edit the launcher profile; you can only create new ones.
To remove a launcher profile, go to the path where the launcher is saved (by default, C:\Users\appeon\AppData\Roaming\CloudAppLauncher_Installer\), go into the folder which corresponds to the launcher version and then delete the sub-folder that is named after the profile.
You can create a PowerClient project by selecting the PowerClient project type.
To create a PowerClient project:
-
Select File>New or click the New button in the PowerBar to open the New dialog box.
-
Select the Project tab.
-
Select the target in which you want to create the project from the Target drop-down list.
-
Select the PowerClient project type and click OK.
The Project painter for PowerClient opens so that you can specify the various properties of your application.
-
When you have finished defining the project object, save the object by selecting File>Save from the menu bar. PowerBuilder saves the project as an independent object in the specified library. Like other objects, projects are displayed in the System Tree and the Library painter.
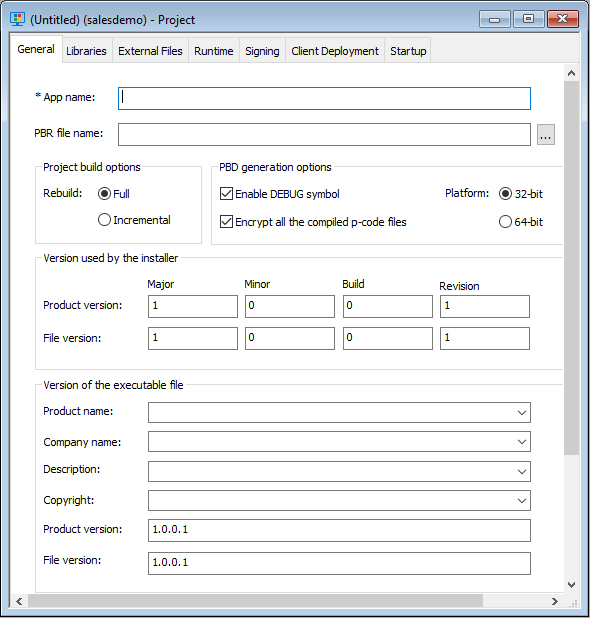
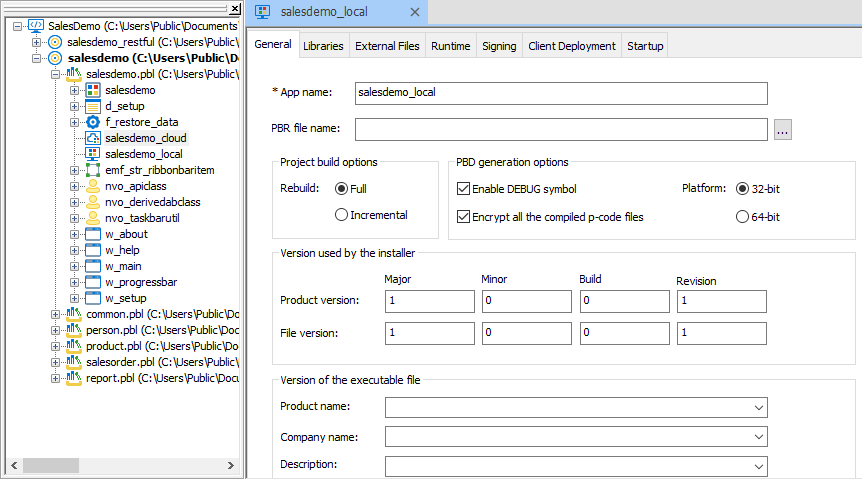
Once you have created a PowerClient project, you can open it from the System Tree and modify the properties if necessary. The Project painter for the PowerClient project looks like this.
Note
If you want to view an example of the PowerClient project, you can open the demo app, for example, from Windows Start | Appeon PowerBuilder [version] | Example Sales App, and view the PowerClient project included in the demo.
The following table describes each of the options you can specify in the Project painter for PowerClient.
|
Page or Option |
What you specify |
|
|---|---|---|
|
App Name |
Specify a name for the application. The application name is mainly used in the following places:
If you need to define and modify the App Name, it is recommended to consider comprehensively. |
|
|
PBR file name |
(Optional) Specify a PowerBuilder resource file (PBR) for your application if you dynamically reference resources (such as bitmaps and icons) in your scripts and you want the resources included in the application instead of having to distribute the resources separately. You can type the name of a PBR file in the box or click the button next to the box to browse your directories for the PBR file you want to include. The PBR file as well as the resources it references must reside in the application directory or subdirectory; and only relative paths of the PBR file and the resources will be accepted. For more about PBRs, see the section called “Distributing resources”. |
|
|
Rebuild |
Specify either Full or Incremental to indicate whether you want PowerClient to regenerate and redeploy all object files to the Web server. If you choose Incremental, PowerClient regenerates and redeploys only objects that have changed, and objects that reference any objects that have changed, since the last time you built the application. As a precaution, regenerate all objects before rebuilding your project. |
|
|
Enable DEBUG symbol |
Select to enable any code that you placed in DEBUG conditional code blocks. For more information, see the section called “Using the DEBUG preprocessor symbol”. |
|
|
Encrypt all the compiled p-code files |
Select whether to encrypt the object files when compiled from the PowerBuilder dynamic libraries. |
|
|
Platform |
Select if the application can run on 32-bit or 64-bit machines. |
|
|
Version used by the installer |
Specify the product version and file version (in numeric values) that will be used by Microsoft Installer to determine whether a file needs to be updated. The four numbers can be used to represent the major version, minor version, point release, and build number of your product. They must all be present. If your file versioning system does not use all these components, you can replace the unused numbers with zeros. The maximum value for any of the numbers is 65535. |
|
|
Version of the executable file |
Specify your own values for the Product name, Company name, Description, Copyright, Product version, and File version fields associated with the application file and with machine-code DLLs. These values become part of the Version resource associated with the application file, and most of them display on the Version tab page of the Properties dialog box for the file in Windows Explorer. The Product and File version string fields can have any format. |
|
|
Manifest Information |
Select whether to generate a manifest file (either external or embedded) and to set the execution level of the application. For further information, see the section called “Attaching or embedding manifest files”. |
|
|
Windows classic style |
Select this to add a manifest file to the application that specifies the appearance of the controls as an application resource. By default, this option is not selected, which means the Windows flat style is used and the 3D effect of some controls will be removed to have a "flat" look, for example, the 3D lowered border of Column and Computed Field in the DataWindow object, the background color of Button, the BackColor and TextColor of tooltip, and the TabBackColor of tab header will not take effect. If you still want the 3D effect, you should select the "Windows classic style" option when deploying the application. NoteIf you have applied a theme to the application, you should not check the "Enable Windows Classic Style in the IDE" option in the System Options or the "Windows classic style" option in the project painter and the PB.INI file (if any) should not contain such setting, otherwise, the application UI will be rendered in the Windows classic style instead of the selected theme. |
|
|
Specify a PBR file for a dynamic library if it uses resources (such as bitmaps and icons) and you want the resources included in the dynamic library instead of having to distribute the resources separately. You can type the name of a PBR file in the box or click the button next to the box to browse your directories for the PBR file you want to include. The PBR file as well as the resources it references must reside in the application directory or subdirectory; and only relative paths of the PBR file and the resources will be accepted. |
||
|
Specify the custom user external files and/or the resource files that are referenced in the PowerScript. Make sure all these files are placed in the same folder or sub-folder of the application target (.pbt) file. Files preloaded as compressed packages and Files preloaded in uncompressed format The custom user external files will be downloaded from the server before the application starts. It is recommended that you deploy the files which stay unchanged most of the time (such as UI theme files) as one compressed package, so that it can be transferred faster; and deploy the files which may be modified frequently (such as INI files) as individual files, or deploy them as a separate package.
The custom user external files may include the following:
Images/videos dynamically loaded The resource files (such as images, videos etc.) are downloaded from the server at the moment when they are used by the application. You can select Images/videos dynamically loaded and then click Add Folder or Add Files to add the folder or files under it. NoteThe read-only files added under Files preloaded in uncompressed format or Images/videos dynamically loaded will lose its read-only attribute after transferred to the server via FTP. This seems to be a common issue with FTP transfer. DLL & OCX Registration If the DLL/OCX files need to be registered and can be registered by Regsvr32 or Regasm without requiring the administrator rights, you can click DLL & OCX Registration to select the DLL/OCX files so that they can be registered by Regsvr32 or Regasm automatically before the application starts; if the DLL/OCX files need to be registered but cannot be registered by Regsvr32 or Regasm or they need to be registered using administrator rights, you can specify the registration commands in Preload Event in the Startup page > Advanced tab. INI Configuration When the application is updated, the INI file can be updated with the specified strategy. Click the INI Configuration button and then select one or more INI file and configure the strategy for them at one time; or select and configure for the INI file one by one.
NoteThe external files cannot contain any file that has the same name as the application, or the PBD or p-code file to be generated, otherwise duplicate name error occurs. For example, [appname].exe, [appname].xml, [appname].manifest file etc. cannot be added to External Files. For another example, test.pbl will be deployed as test.pbd, therefore, test.pbd cannot be added to External Files. |
||
|
Select the runtime files according to the features used in the application. The files will be downloaded from the server to the client, for the application to run. The deployment tool does not actually deploy the files, instead it notifies the application to download such files (corresponding to the runtime version displayed) from the server directly, therefore, you will need to make sure the corresponding version of PowerBuilder Runtime is uploaded to the server when you upload the Cloud App Launcher to the server (view detailed instructions). When the project is opened, if the runtime version configured in the System Options dialog (Tools > System Options) is different from the runtime version last saved with the project, they both will be displayed (as shown below); and then when the project is saved, the runtime version in the System Options dialog (the second text box) will be saved with the project.  |
||
|
Select whether to digitally sign the application executable file (appname.exe). If you want to digitally sign the application executable file, you can specify the settings required for signing under the "Use the SignTool utility from the Windows SDK" option, for example, SignTool location, signing certificate, certificate password, signature algorithm, and URL of the time stamp server. And make sure Microsoft’s SignTool has been installed on the current machine. Or you can place the signing scripts in a file (with file extension as .cmd) and then select the file for the "Use your own signing script" option. For example, to sign the application executable file (appname.exe) using Microsoft’s SignTool, you may create a cmd file that includes the following scripts: signtool.exe sign /f mycert.pfx /p password /d "My application" /du http://www.mytest.com /fd sha256 /tr "http://timestamp.digicert.com" /td sha256 mytest.exe After the executable file is generated and before it is deployed to the server, PowerBuilder will sign the executable file using your own signing scripts or using the SignTool settings you specified. Make sure the PowerBuilder user has the appropriate rights to access the time stamp server and sign files. |
||
|
"Use this server" group |
Select to deploy the client app to a local server or a remote server. If you have not configured the server yet, click the Server Configuration button and follow instructions in Configuring a deployment server to configure the server. Click the Upload Cloud App Launcher button to upload the app launcher and runtime files to the same server or directory where app files will be deployed. For detailed instructions, refer to Uploading the app launcher and runtime files. |
|
|
"Create a package" group |
Select this option if you want to package the client app as an executable installer or a zipped file, and then install the client-side to the Web servers. For more about packaging a client app, refer to Packaging the PowerClient project. |
|
|
Cloud App Launcher and Runtime files |
Select the Cloud App Launcher and runtime files to go with the client app. |
|
|
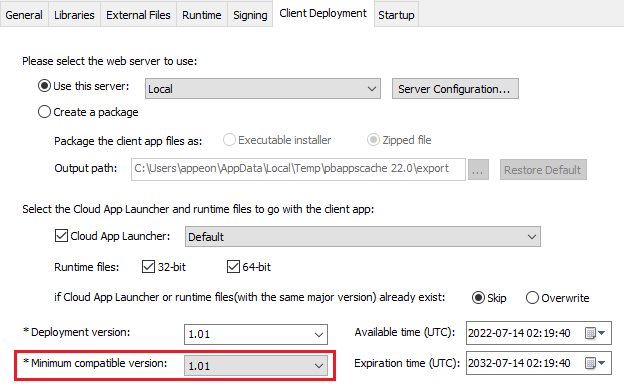
Deployment version |
The deployment version number is used by the server to determine whether to perform an install or update for the application. It is recommended to increment the deployment version number every time when the application is updated and re-deployed. |
|
|
Minimum compatible version |
Specify the lowest compatible version for the application. If the current version installed is older than it, a forced update will be performed, or the application will stop running. |
|
|
Available time and Expiration time |
Schedule the time for the deployment version to be accessible or inaccessible to end users. However, if the available time or expiration time is reached and the app is still open, the app will not get updated, until the app is closed or the session times out. Therefore, it is recommended that the session timeout feature should be enabled (for apps deployed via PowerServer) or implemented manually (for apps deployed via PowerClient). |
|
|
Running app from IDE |
Specify the URL of the application that can be launched from the PowerBuilder IDE (when you select the Run PowerClient Project button in the toolbar or from right-clicking the PowerClient project in the System Tree). You can specify the host name, port number, and connection type (HTTP or HTTPS). |
|
|
Validate the application integrity before the app runs |
Specify whether to validate the hash of every object file before they are loaded, so that files changed illegally will not be run. |
|
|
"App shortcut" group |
You can specify whether to create shortcuts for:
You can also customize the app shortcut name and the shortcut icon.
|
|
|
Startup page > Advanced tab |
Update strategy |
Specify the update strategy for the application.
|
|
Download options |
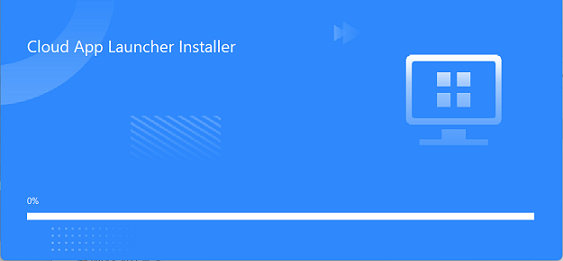
Specify when to download the application files -- before the application starts or at the moment when they are called by the application at runtime. If you select "Download the app files as necessary", the following files will be downloaded before the app runs: 1) the PowerBuilder Runtime files, 2) the application executable, and 3) the files you selected to be preloaded in External Files; the other files will be downloaded at the moment they are called by the app. If you select "Download all the app files at app startup", the runtime files, app executable, the application files, and external files are all downloaded at the startup, except for the image files that are set to be dynamically loaded in the External Files settings. Show the loading animation before the app runs -- Specify whether to show an animation (as shown below) when the application prepares for startup. The animation will disappear when the application's first window displays. This option should not be selected if the application starts with no user interface; otherwise the animation will not disappear. You can deploy your own animation to replace the default animation (as shown above). To deploy your own animation,
|
|
|
Preload Event |
(Optional) Specify the commands that will be executed immediately after files are downloaded and before the application starts. For example, you can specify commands to register DLL/OCX files that cannot be registered by Regsrv32 or Regasm or require administrator rights to register; or any other commands that need to be executed with administrator rights. If the commands need to be executed with the administrator rights, you should select the Run as administrator option. You can specify how often the commands should be executed: for only one time when the application is launched for the first time or when the application is updated, or every time when the application runs. The commands can be any Windows commands or user-defined commands. For example, suppose there is a DLL file from the application that needs to be registered on the client, you can enter the following commands: cd /d "C:\Windows\Microsoft.NET\Framework\v4.0.30319" regasm "%AppData%\Appeon\PBCloud\demo.appeon.com_app1\EncryptDecryptClass.dll" /tlb:testappeon.tlb /codebase /nologo Note that as the commands are executed silently, any commands that will pause the execution and wait for user input will cause the application to wait endlessly. |
|
|
Commandline arguments |
Specify the command line arguments for the application. The arguments will be directly passed to the application when the application is run. And the arguments will be automatically saved and updated to the app startup icon on the desktop and the app shortcut menu in Windows start. The arguments specified here cannot be modified at runtime. If you want to modify the argument at runtime, you can specify the argument at the end of the application URL (for example, http://localhost/salesdemo/?arg=1&arg2=2. Note that the arguments appended to the application URL cannot contain special characters such as "?", "#", as they have special meanings in HTML URL; if you want to use these characters in the argument name or value, you can specify them in the Commandline arguments as static arguments on this same page, so that they can be passed to the application directly instead of being sent as part of the URL. You can also pass arguments to the EXE directly. If there are multiple arguments, please include them in quotation marks or separate them with a delimiter (instead of a space), for example, C:\Users\<username>\AppData\Roaming\PBApps\Applications\localhost_<appname>\<appname>.exe "parm1 parm2 parm3" C:\Users\<username>\AppData\Roaming\PBApps\Applications\localhost_<appname>\<appname>.exe parm1/parm2/parm3 If you call the CommandParm function to get the command line arguments, the command line arguments will be automatically saved (in pbapp.ini) and used by the other PowerClient-deployed applications. If you don't want the command line arguments to be saved and used by the other apps, you can follow instructions in this article to clear the values. |
|
Tip
Advanced usage of External Files and Preload Event
The combination of External Files and Preload Event can streamline the process of deploying a setup package to the server, installing the package and registering the file on the client machine. In the External Files page, you add the folders and/or files that make up of the setup package, and in the Preload Event field, you add commands to run the setup file and register any component if necessary.
Take Microsoft OLE DB Driver for SQL Server (MSOLEDBSQL) as an example. Suppose the MSOLEDBSQL setup package includes the following folders and files: msoledbsql folder, sqlncli folder, CheckDBDriver.bat file, and Install.bat file.
Step 1: Copy the msoledbsql folder, sqlncli folder, CheckDBDriver.bat file, and Install.bat file to the same folder as the application target file.
Step 2: In the External Files page, select Files (Download at startup) in the list, and then click Add Folder to add the folders: msoledbsql and sqlncli and click Add Files to add the files: CheckDBDriver.bat and Install.bat.
The selected folders and files will be first deployed to the server and then downloaded to the application directory on the client machine.
Step 3: In the Startup page > Advanced tab, add the following command in the Preload Event field: .\CheckDBDriver.bat.
The command will be executed automatically when the application is first installed or upgraded. The CheckDBDriver.bat file checks whether MSOLEDBSQL is installed on the client machine. If MSOLEDBSQL is not installed, then Install.bat is automatically run to install MSOLEDBSQL. Administrator rights are required to run the Install.bat file, so the end user will be prompted for that if Install.bat is run.
To build and deploy a PowerClient project:
-
Before building and deploying the application, make sure to close any anti-virus tool on the development machine.
-
Click the Build & Deploy PowerClient Project button in the toolbar, or right-click the PowerClient project in the System Tree and then select Build & Deploy PowerClient Project to compile and deploy the application to the server. Or select Deploy PowerClient Project if you have already built the application before.
The application executable file (as well as an XML file with the same name and the object files) is generated under %PBAPPSCACHEDIR%\[appname] (%PBAPPSCACHEDIR% points to %TEMP%\pbappscache\temp\) on the development machine, then digitally signed, and deployed to the server.
Note
After the application is deployed to the server, do not manually change the application folder name on the server, otherwise the application uninstall program will fail to run.
Instead of building and deploying the PowerClient project from the PowerBuilder IDE, you can also build and deploy the project using the PBAutoBuild220.exe tool.
PBAutoBuild220.exe is a standalone tool that can compile and deploy PowerClient projects using DOS commands on Windows. It can automate the entire build and deploy process without requiring PowerBuilder IDE installed or any PowerBuilder license running; it is free for use! But it requires PowerBuilder Runtime to run, so it must be installed to a machine where PowerBuilder Runtime will also be installed. To install PBAutoBuild220.exe, run the PowerBuilder Installer and select PowerBuilder Utilities in the Programs tab.
For step-by-step guidance, refer to Tutorial 2: Building your PowerClient project with commands. The PBAutoBuild220 command can also integrate with Jenkins to automate the build and deployment process for PowerClient projects. Refer to the Jenkins user documentations for how to use Jenkins.
To build and deploy the PowerClient project with commands:
-
Export the configurations of the PowerClient project to the JSON file.
-
Click the Export PowerClient Build File button (
 ) in the toolbar if the PowerClient
project painter opens, or right click the PowerClient project
object (or target or workspace) and then select Export Build File.
-
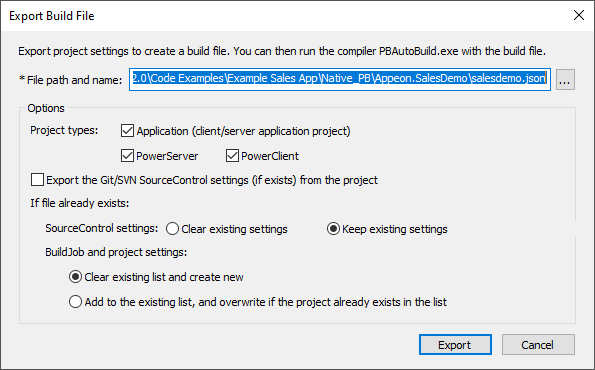
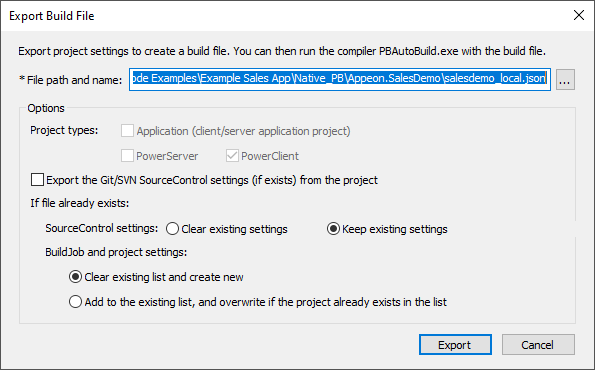
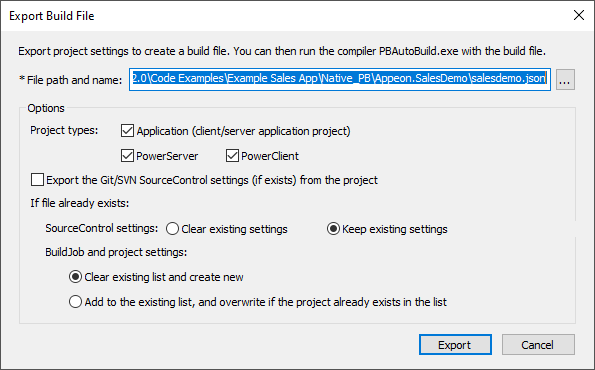
In the Export Build File dialog box, specify where to save the exported file and how to overwrite the settings if the file already exists. Click Export.
If you right click the workspace and then select Export Build File, you can select one or more targets to export the build file for, and then select one or more project types to export if there are more than one type of project objects in the selected target(s). If you select more than one project type, the corresponding project objects will be exported to the build file > "Projects" > [project object name]. If the selected targets contain project objects with the same name, only the object listed last will be added to the build file.
Select "Export the Git/SVN SourceControl settings (if exists) from the project" if you want to export the Git/SVN source control settings (such as login username, password, source code path etc.) to the build file. The password will be encrypted automatically.
Specify how to overwrite the source code settings if the build file already contains such settings. Existing settings will be kept by default. If you want to export the current settings, such as login username, password (encrypted), source code path etc. to the build file, you should select "Clear existing settings". If you have selected "Clear existing settings", while have not selected "Export the Git/SVN SourceControl settings (if exists) from the project", then existing settings will be removed and no settings will be stored.
Specify how to overwrite the build job settings and project settings if the build file already contains such settings. Such settings will be cleared by default.
-
Click Export.
The exported JSON file includes every single setting that is required for compiling, packaging and deploying the PowerServer project. It also contains a "BuildPlan" block which provides additional configurations. For more, see About the build file.
-
-
Execute the PBAutoBuild220.exe file and the JSON file in a command line to automatically build and deploy the project. For example,
PBAutoBuild220 /f c:\salesdemo_local.json /l Log_PCBuild.log /le Log_PCError.log
The PBAutoBuild220.exe file supports the following parameters:
-
/f -- specify the configuration file. The configuration file (in JSON format) can be directly exported from the PowerBuilder IDE, as described in step 1.
PBAutoBuild220 /f c:\salesdemo_local.json
-
/l -- write the logging information to a file.
-
/le -- write the error information to a file. For example,
PBAutoBuild220 /f c:\salesdemo_local.json /l Log_PCBuild.log /le Log_PCError.log
The relative path specified in the parameter is relative to the path of the configuration file. In the above example, the log files will be generated under the same path as the configuration file.
-
/p -- specify the password for logging into SVN or Git. This will generate an encrypted value based on the password. If the password contains the double quotation mark ("), use the escape character \" to replace ".
PBAutoBuild220 /p 123456
-
/v -- specify the product version (property displayed for executable).
/fv -- specify the file version (property displayed for executable).
/vn -- specify the product version (executable version used by installer).
/fvn -- specify the file version (executable version used by installer).
You can specify for multiple projects at the same time, in this format: "[projectname1]:1.0.0.1;[projectname2]:1.2.3.4". Projects are separated with semicolons (";"). For example,
PBAutoBuild220 /f c:\test.json /v "project1:1.0.0.1;project2:1.2.3.4" /vn "project1:1.0.0.1;project2:1.2.3.4" /fv "project1:1.0.0.1;project2:1.2.3.4" /fvn "project1:1.0.0.1;project2:1.2.3.4"
If no project name is specified, the version number will be used by all projects. For example,
PBAutoBuild220 /f c:\test.json /v "1.0.0.1"
The version numbers specified by parameters take precedence over those specified in the build file.
-
/h or /? -- display the help information. For example,
PBAutoBuild220 /h
-
-
Check if PBAutoBuild220 command is successful via
errorlevel. For more information, refer to Verifying if PBAutoBuild is successful.
Note
The handling of PB.INI is the same in PBAutoBuild and OrcaScript:
If the application relies on a property in PB.INI to run, for example, [RichText] PageSizeAsControlSize=1, the user needs to copy the PB.INI file to the directory where the application executable resides.
If the compilation of PBAutoBuild or OrcaScript relies on a property in PB.INI, for example, [PB] DashInIdentifiers=0, the user needs to copy the PB.INI file to the directory where PBAutoBuild220.exe or pbc220.exe resides.
To run the PowerClient project:
Note: IE and Edge Legacy (EdgeHTML-based) browsers should not be used to run the app deployed with PowerClient, as Microsoft will end support for IE and Edge Legacy soon. You can use one of the following supported browsers: Chrome, Firefox, and the new Edge browser (Chromium-based).
-
(For developers) Run the application by right-clicking the PowerClient project in the System Tree and then select Run PowerClient Project.
Or click the Run PowerClient Project button in the toolbar. The Run PowerClient Project button will be available in the toolbar when the Project painter for PowerClient is opened; if more than one Project painter for PowerClient is opened, then the settings in the currently active painter will be used to run the application.
-
(For developers and end users) Run the application in a Web browser for the first time.
The user can input the application URL http://IPAddress/AppName in a Web browser to access the application. The IP address should point to the Web server where the app files are deployed.
After the cloud app launcher and the application are successfully installed through the Web browser for the first time, users can directly double click the application icon on the desktop or the application shortcut on the Windows Start menu to run the application (the shortcut icon and menu are created by default unless the developer has changed the default settings in the Project painter for PowerClient).
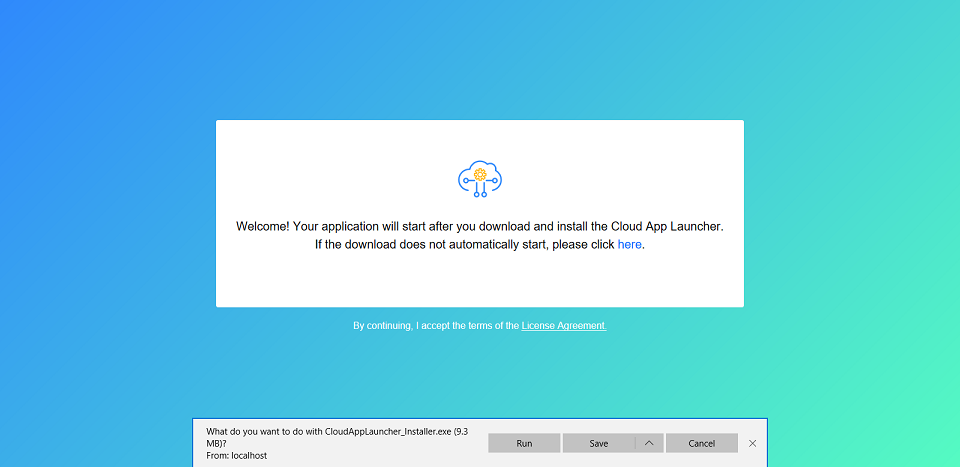
When the application starts, the following app entry displays. If download does not start automatically, click to download and install the cloud app launcher.
Occasionally, the user may be asked by the Web browser whether to run the app launcher. This is a browser behavior. Select Allow. Then the following app entry page displays. If the download does not start automatically, click Download the Launcher to download and install the cloud app launcher first, and then click Start the Application to download, install, and start the application.
If you want to customize the license agreement and the visual displays (such as color, icon, text etc.) in the above app entry page, you can make changes to the files under the %AppeonInstallPath%\PowerBuilder [version]\HTML folder, and then deploy the application again. The changes will apply to all deployed applications. Or you can directly make changes to the files under the application folder on the server, if you want to change that particular application only.
-
license.html is the template for license agreement.
-
auto.html, autoconnect.html, autodownload.html, autoinit.html, and index.html are templates for applications started in the default mode.
-
manual.html, manualconnect.html, manualdownload.html, and index.html are templates for applications started in certain browsers.
Note
The virus-detection software McAfee WebAdvisor may block the CloudAppLauncher.exe file during the installation process. You can try adding the domain as a trusted site. To add the domain as a trusted site in McAfee WebAdvisor:
1. Right click the WebAdvisor add-on and select Options.
2. Under Manage your trusted sites, add the domain and click the + symbol.
3. Close and re-open the browser and run the installation again.
Note
If there is no response or progress when running the application, the CloudAppLauncher.exe file might be blocked by the Windows SmartScreen. You can try to turn off Windows SmartScreen in Control Panel > System and Security > Security and Maintenance > Change SmartScreen settings.
Note
Every time when the application launches, it needs to connect with the Web server to check updates, therefore, please make sure Web server is running and can be connected all the time.
The project must be deployed and run successfully before it can be debugged with PowerClient Debugger, because:
-
The application executable (to be more exactly, the PBD files) will be debugged by the PowerClient Debugger, therefore, if you have changed the application scripts, make sure to deploy the application again immediately, so that the scripts in the PBD files exactly match with the scripts in the painter.
-
When you insert breakpoints in the scripts in the painter, the breakpoints will be mapped to the corresponding scripts in the PBD files.
-
Whether to debug the project as 32-bit or 64-bit should be configured in the platform setting in the PowerClient project painter > General tab before the project is deployed.
-
It is recommended that you run the application before starting PowerClient Debugger, so that the cloud app launcher can be downloaded and installed. If the cloud app launcher is not installed, PowerClient Debugger will open the browser for you to install the cloud app launcher first.
To start the PowerClient Debugger, click the Debug Project button (![]() ) in the PowerClient Toolbar.
) in the PowerClient Toolbar.
The PowerClient Debugger has the same toolset as the PowerBuilder Debugger. You can insert breakpoints, step in/over/out the scripts, add/remove watch, and use quickwatch, exactly in the same way as PowerBuilder Debugger. For detailed instructions, refer to Debugging an application in PowerBuilder User Guide.
To package the PowerClient project:
-
Click the PowerClient project in the System Tree and then select the Client Deployment page.
-
Click the "Create a package" button and specify the location where the package will be generated.
-
Specify to generate the package as an executable installer or a compressed zip file.
If you select Zipped file, an appname_Installer.zip file is generated in the specified path. You can copy the zip file to the server and then decompress it to the Web root.
If you select Executable installer file, an appname_Installer.exe file is generated in the specified path. You can copy the executable file to the server and then run it to install the application to the Web root.
Note
Do not manually change the name of the installed or de-compressed application folder on the server, otherwise the application uninstall program will fail to run.
To undeploy the PowerClient project from the server:
-
Right-click the PowerClient project in the System Tree and then select Undeploy PowerClient Project from the popup menu.
-
Select whether to remove the entire project (all deployed versions) or only the selected deployment version from the server.
To uninstall the PowerClient project from the client machine:
-
Uninstall the application by selecting the Uninstall shortcut menu from the Windows Start | [appname].
The Uninstall menu and the [appname] menu are available only when the developer selected to create the start menu shortcut in the Startup page > Basic tab of the Project painter for PowerClient. If the Uninstall menu is not available, you can run the Uninstall.exe file in the application folder, for example, %AppData%\PBApps\Applications\localhost_app1\Uninstall.exe (%AppData%\PBApps is configurable when uploading the Cloud App Launcher and runtime files).
Note: If the application folder name (which is named after [appname]) on the server has been changed manually, the application uninstall program will fail to run.
The uninstall program will automatically remove the following:
-
The application shortcuts on the desktop and the Windows start menu.
-
The application folder under %AppData%\PBApps\Applications, for example, %AppData%\PBApps\Applications\localhost_app1.
The application folder contains all of the application files and any external files (such as UI theme files, DLLs/OCXs, images/videos, INIs etc.) that are deployed with PowerClient. This folder will be automatically deleted during the uninstall process.
However, the uninstall program will NOT automatically remove the following:
-
The registration information of DLL/OCX files in the Windows registry.
If you have selected to register the DLL/OCX files (using Regsvr32 by default), you will need to remove the registry information manually. Follow instructions in step 4 below.
-
The runtime files under %AppData%\PBApps\Applications\Runtime.
The PowerBuilder Runtime files are used by all deployed apps on the client machine. You can manually delete the runtime files if they are no longer used.
-
The download folder under %AppData%\PBApps, for example, %AppData%\PBApps\Download.
This folder stores the download statistics of the app and runtime files. It can be manually deleted.
-
-
Uninstall the cloud app launcher by uninstalling Cloud App Launcher from Control Panel\Programs\Programs and Features.
If the public version of the cloud app launcher is installed, it can only be uninstalled by the administrator.
-
Uninstall the cloud app service by uninstalling Cloud App Launcher Service from Control Panel\Programs\Programs and Features.
-
Remove the registry information of DLL/OCX files.
The registry information of DLL/OCX files (or any other files that are installed and registered by your own) will not be automatically removed during the application uninstall process.
To clean up the registry information of the DLL/OCX files, you can write scripts (a sample shown below) and place them in a file named ManualUninstall.cmd, place the ManualUninstall.cmd file under the same directory as the application target (.pbt) file, add ManualUninstall.cmd under Files preloaded as compressed packages or Files preloaded in uncompressed format in the External Files page, and then deploy the application.
The scripts in ManualUninstall.cmd will be automatically run when the application uninstall program is run. (If the file requires administrator rights to unregister, you should run the application uninstall program with administrator rights.)
You can also add scripts in ManualUninstall.cmd to clean up any other files that are installed and registered by your own.
The following is a sample script for unregistering DLL/OCX files that are registered by Regsvr32:
set Driver=%~d0
set HOMEDIR=%~dp0
%Driver%
cd %HOMEDIR%
regsvr32 /u .\dllname
regasm   /unregister .\AssemblyName
When the application is deployed (from the PowerBuilder IDE) or installed (from the packaged executable installer or zipped file) to the Web server, the app files are generated with hash codes, to prevent files changed illegally from running. Therefore, you cannot directly change the deployed files on the Web server, instead you will have to make changes in the project painter and then deploy the application again, or modify the files using the CustomizeDeploy.dll tool.
The CustomizeDeploy.dll tool allows you to modify the external files in the Web server. The "external files" refers to the packages, folders, and files (such as INI files, DLL/OCX etc.) that are deployed from the External Files tab of the PowerClient project painter.
You can find the CustomizeDeploy.dll tool under the "1.01" sub-folder of the application folder after the application is deployed or installed to the Web server (either from the PowerBuilder IDE or from the packaged executable installer or zipped file).
The CustomizeDeploy.dll tool supports the following syntax:
dotnet CustomizeDeploy.dll -src=<source file> -dest=<destination file>
The "src" argument should point to the new file that you want to use to replace the old file.
The "dest" argument should point to the old file that you want to replace with the new file.
When external files are deployed to the server, they are appended with the file extension ".zip", but they are not compressed files (the only exception is package). For example, if apisetup.ini is selected in the External Files tab, it will be deployed as apisetup.ini.zip to the server, however, apisetup.ini.zip is not a compressed file and it can be directly opened in a text editor just like apisetup.ini.
And to replace the file, you should prepare the source file without .zip extension.
For example,
dotnet CustomizeDeploy.dll -src=/new/apisetup.ini -dest=apisetup.ini.zip
Or
dotnet CustomizeDeploy.dll -src=/new/new.ini -dest=apisetup.ini.zip
The only exception is the package which is indeed compressed as the zip format (with file extension ".zip.zip") during deployment. Therefore, you should prepare the source file for the package in the compressed zip format.
For example,
dotnet CustomizeDeploy.dll -src=/new/theme.zip -dest=theme.zip.zip
Or
dotnet CustomizeDeploy.dll -src=/new/aaa.zip -dest=theme.zip.zip
The tool will replace the package as a whole (and refresh the hash code of the package) and it will not validate the individual files included in the package. Therefore you need to make sure the files included in the package are correct and complete.
Important
Prerequisites
To execute the CustomizeDeploy.dll file using the dotnet command, you will need to install the ASP.NET Core Runtime 3.1 or later in the server.
To run CustomizeDeploy.dll in Windows Web server:
-
Install the ASP.NET Core Runtime 3.1 or later.
-
Open the command prompt. (You'd better run the command prompt using an administrator by right-clicking it and then selecting "Run as administrator").
-
Navigate to the Web server root folder > [application] folder > "1.01" (for example, C:\inetpub\wwwroot\sales\1.01).
-
Execute the CustomizeDeploy.dll file using the dotnet command.
To run CustomizeDeploy.dll in Linux Web server:
-
Install the ASP.NET Core Runtime 3.1 or later.
dnf install aspnetcore-runtime-5.0
-
Go to the Web server root folder > [application] folder > "1.01" (for example, /var/www/html/sales/1.01, or /usr/share/nginx/html/sales/1.01).
-
Right click the blank area within the folder and then select Open in Terminal.
-
Execute the CustomizeDeploy.dll file using the dotnet command. Notice that the command and file name are all case-sensitive in the Linux OS.
You can now set a cookie to the cloud app launcher and the application; and the cookie will be automatically carried in the HTTP request header of every client request.
Once a cookie is set to the cloud app launcher and the application, the cookie can be validated against the validation scripts or the SSO server etc. And based on the validation results, the launcher and/or the application can be determined whether to allow to download the requested files.
Notice that
-
Currently you can only set the name and value for a cookie, and cannot set the other cookie attributes (including Domain, Expires, Path etc.); and you must set the cookie in the key-value pairs, for example, "key1=value1; key2=value2".
-
The cookie must be passed into the launcher and the application by the index.html file, therefore, you will have to start the application from the index.html (by accessing the app URL in the Web browser); you cannot start the application from the app shortcut on the desktop or start menu.
-
Make sure the cookie will stay valid if you select "Download the app files as necessary" because files will be downloaded only when requested. Set an appropriate expiration period for the cookie.
To set a cookie to the cloud app launcher and the application,
You can modify the JavaScript file (launcher.js) on the Web server to set a cookie to the cloud app launcher.
launcher.js is located in the application folder > "js" sub-folder on the Web server, for example, C:\inetpub\wwwroot\salesdemo_local\js\launcher.js.
For example, the following JavaScript will set the cookie by obtaining the cookie from document.cookie. However, if the cookie is set to HttpOnly, it cannot be accessed from document.cookie by JavaScript.
function getCookie(){
 var strCookie = "";
 strCookie = document.cookie;
 return strCookie;
}

function getCmdline(Url){
 var strCookie = getCookie();
 var strUrl = Url;
 if(strCookie.length > 0)
 {
  strUrl += " -cookie ";
  strUrl += strCookie;
 }
 return strUrl;
}
For example, the following JavaScript will set the cookie by obtaining the cookie from the application URL, for example, http://localhost/test?name=admin;pw=123.
function getCookie(){
 var strCookie = "";
 strCookie = window.parent.parent.location.search.split("?")[1];
 return strCookie;
}

function getCmdline(Url){
 var strCookie = getCookie();
 var strUrl = Url;
 if(strCookie.length > 0)
 {
  strUrl += " -cookie ";
  strUrl += strCookie;
 }
 return strUrl;
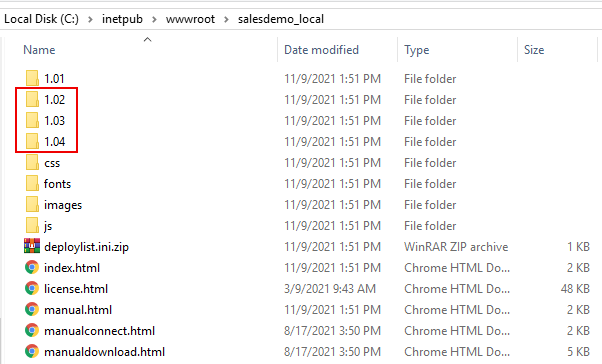
}Suppose you have deployed four versions: 1.01, 1.02, 1.03, & 1.04, and now want to roll back to 1.02.
Step 1: Go to the Web server Web root and make a backup of the versions that you are going to roll back to or undeploy in the subsequent steps.
In this example, back up 1.02, 1.03, & 1.04 folders.
Step 2: Go to the Client Deployment tab of the PowerClient project painter and make sure Minimum compatible version is equal to or earlier than the version that you want to roll back to.
In this example, 1.02 or 1.01 must be selected.
Step 3: If you have made changes to Minimum compatible version, then click the
Deploy PowerClient Project button
( ) in the toolbar.
This will refresh the minimum compatible version on the server (and deploy files to the current Deployment version; the current deployment version should be 1.04 in this example).
Step 4: Undeploy any version that is newer than the version you want to roll back to, because the latest available version will be downloaded by default.
In this example, you will have to undeploy 1.03 & 1.04, otherwise the client side will not download 1.02 but download 1.03 or 1.04.
For how to undeploy from the server, see Undeploying the PowerClient project.
Step 5: Uninstall the current version from the client machine.
Although you can deploy multiple versions on the server, there will be only one version (the latest available version) installed on the client machine.
For how to uninstall from the client machine, see Uninstalling the PowerClient project.
Step 6: Run the application.
The latest available version (in this example 1.02) will be downloaded and installed from the server.
By completing this tutorial, you will have a basic understanding of the key tasks for creating and deploying a PowerClient project. You will use the Example Sales Demo to complete this tutorial.
Step 1: Open the Example Sales Demo from Windows Start | Appeon PowerBuilder [version] | Example Sales App.
Step 2: In the PowerBuilder System Tree, expand the salesdemo target | salesdemo.pbl, double click the salesdemo_local object to open the PowerClient project in the painter.
Step 3: View the settings in each tab of the project painter; keep the default values, but pay special attentions to the following:
-
the app name in the General tab
-
the selected folders and files in the External Files tab
-
the selected runtime modules in the Runtime tab
Step 4: Select the Client Deployment tab in the project painter.
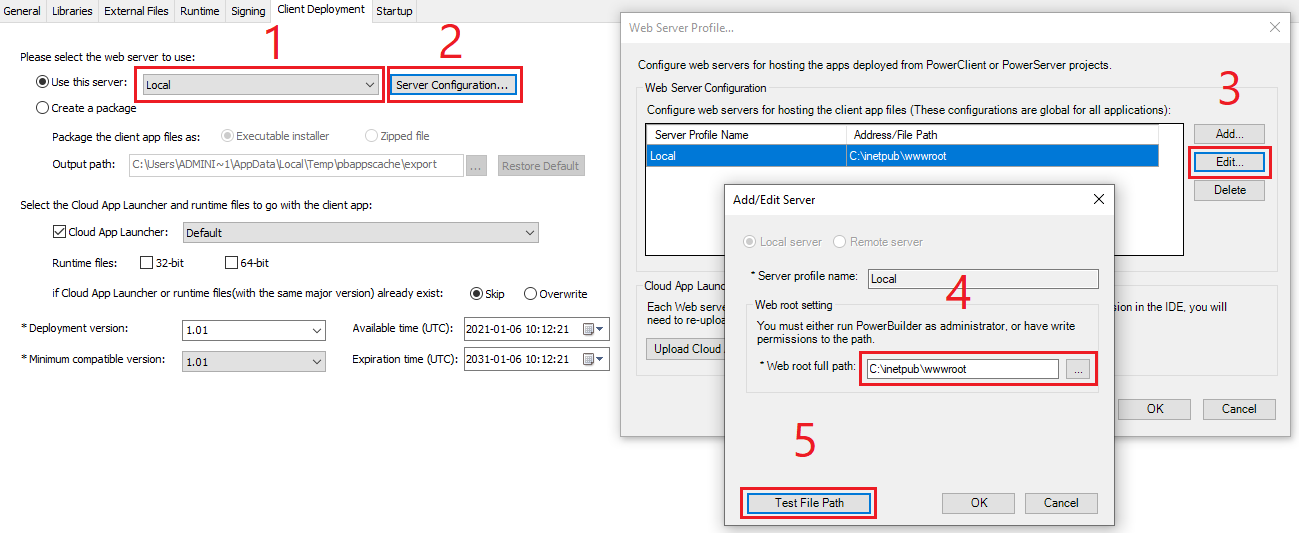
Step 5: Make sure Local server is selected, and then click the Server Configuration button.
In the Web Server Profile window that appears, click the Edit button to check the local server configuration.
And in the Add/Edit Server window that appears, make sure the Web root full path is set to C:\inetpub\wwwroot.
Click Test File Path to ensure the path is valid.
Step 6: Click the Upload Cloud App Launcher button in the Web Server Profile window.
In the Upload Cloud App Launcher and Runtime window, make sure the following are selected: Local, Default, Upload the runtime files for the apps, 32-bit, and 64-bit.
Click Upload and make sure the upload is successful.
Step 7: Save the project (by clicking the Save button in the toolbar).
Step 8: Build and deploy the project (by clicking the Build & Deploy PowerClient Project button in the toolbar). Or right click the salesdemo_local object and then select Build & Deploy PowerClient Project.
Make sure the project is built and deployed successfully.
Step 9: Run the project (by clicking the Run PowerClient Project button in the toolbar). Or directly access http://localhost/salesdemo_local in the Web browser.
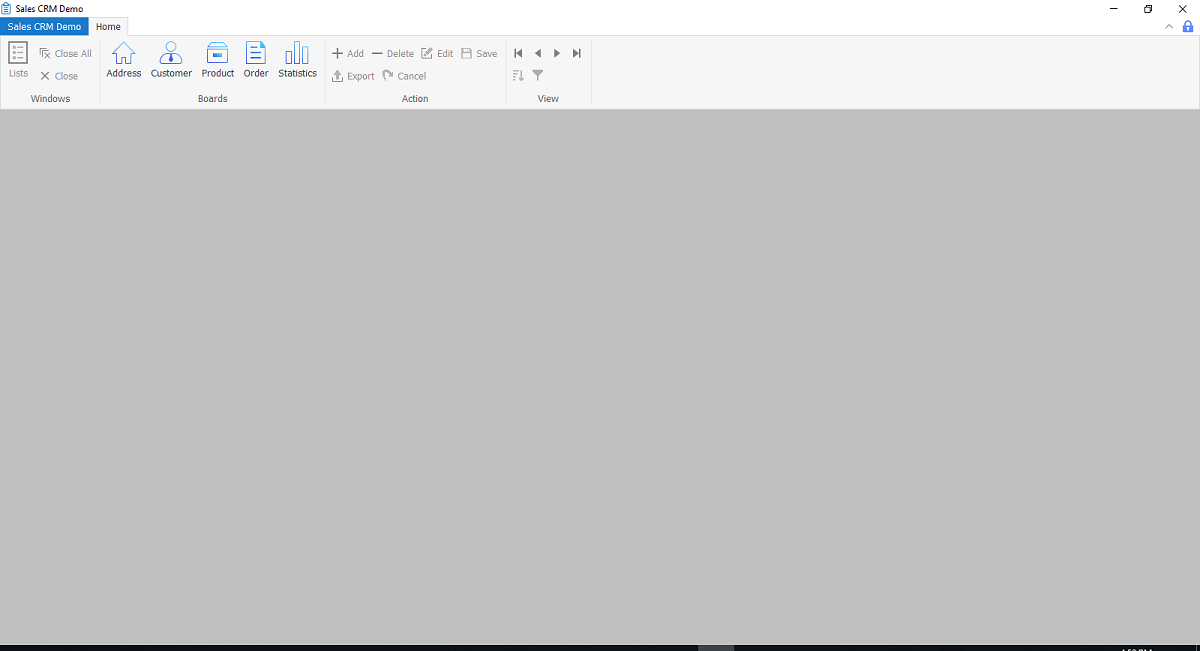
In the app entry page that appears, click Download the Launcher to download and install the launcher. After the launcher is installed, the application should automatically start, if not, click Start the Application in the entry page to start the application.
Besides building and deploying your PowerClient project in the PowerBuilder IDE, you can also build and deploy your PowerClient project using the command line tool (PBAutoBuild220.exe).
For convenience, you can directly export the configuration of an existing PowerClient project from the PowerBuilder IDE to a JSON build file. Therefore, you will need to prepare a proper environment first.
Step 1: Install the following software to set up the PowerBuilder development environment.
-
Windows 11, 10 or 8.1
-
PowerBuilder IDE 2022
-
PowerBuilder Runtime 2022
Step 2: Follow Tutorial 1 to
-
create a PowerClient project for the Example Sales Demo;
-
build and deploy the PowerClient project (using the Build & Deploy PowerClient Project option in the PowerBuilder IDE) successfully; and
-
run the app successfully.
Now let's export the PowerClient project settings of the Example Sales Demo to a JSON file.
You can export the current project or all projects from the workspace (or target).
To export the current project:
-
Open the workspace for the Example Sales App in the PowerBuilder IDE, and then double-click the PowerClient project object to open the PowerClient project painter.
-
When the PowerClient project painter is opened, click the Export PowerClient Build File button (
 ) in the toolbar.
-
In the Export Build File dialog box, specify the settings, write down the path and filename to be exported, and then click Export.
For more information about the settings, refer to Building and deploying the PowerClient project with commands.
The current project will be exported to the build file.
To export all of the projects from the workspace (or target):
-
Open the workspace for the Example Sales App in the PowerBuilder IDE, and then right click the workspace (or target) in the System Tree and select Export Build File.
-
In the Export Build File dialog box, select which target(s) to be exported.
If the workspace contains multiple targets, then by default all targets will be exported to the same build file.
-
Select which project type(s) to be exported.
By default, all project types under the workspace (or target) will be exported to the build file.
-
Specify the settings, write down the path and filename to be exported, and then click Export.
The exported build file contains all the settings required for building and deploying the PBL files of the Example Sales App and some additional settings:
|
Build file content |
Description |
|---|---|
    "MetaInfo": {
        "IDEVersion": "220",
        "RuntimeVersion": "22.0.0.1311"
}, |
This section contains the version number of the PowerBuilder IDE and PowerBuilder Runtime currently in use. |
    "BuildPlan": {
        "SourceControl": {
            "PreCommand": "",
            "ClearSrcBeforeDownload": false,
            "SVN": [
                ...
            ],
            "Git": [
                ...
            ],
            "VSS": [
                ...
            ],
            "Merging": [
                ...
            ],
            "PostCommand": ""
        },
        "BuildJob": {
            "PreCommand": "",
            "Projects": [
                ...
       ],
            "PostCommand": ""
        }
}, |
This section contains settings for source control and build jobs.
Both the "SourceControl" and "BuildJob" blocks contain a "PreCommand" setting and a "PostCommand" setting which allow you to specify commands that can be executed before and/or after that particular block is executed. See Executing additional commands for more examples. The commands in "PreCommand" and "PostCommand" can be executed in synchronous (default) or asynchronous mode, and the command window can be visible or invisible (default). For example, "PostCommand": "postcmd.bat /show /async" |
    "Projects": {
        "project1": {
            ...
        },
        "project2": {
            ...
        },
        "project3": {
            ...
        },
        ...
} |
This section lists the project(s) that has been exported. Every single setting that can be found in the project painter can also be found here. You can modify the settings here when necessary. |
Settings in the build file are independent from each other; they run in sequence but do not rely on others or execution results, for example, if there is already source code in ws_objects, then you only need to set the Merging setting, and leave Git, SVN, and VSS empty as there is no need to download source code; or if there are PBLs in your Git server, then you only need to set the Git setting (to download PBLs) and leave the Merging setting empty. If you do not want a setting to run, just leave that setting with no values; or add "\\" in front of the setting name, for example, "\\Git" or "\\SourceControl", to skip the setting.
It is recommended that you make a copy of the exported build file and place it to the same location or a location near your PowerBuilder application target, so that you could manage the file path (especially the relative file path) easily.
Note: the relative path specified in the build file is relative to the build file.
You can configure the exported build file to download source code from SVN, Git, or VSS before the build process starts.
Step 1: Make a copy of the exported build file and place it to a location near your PowerBuilder application target, so that you could manage the file path easily, for example, when you use relative paths in the build file, the relative path will be relative to the build file.
Step 2: Open the build file in a text editor, locate the "BuildPlan" section and then configure the corresponding part.
If the computer connects to Internet through a proxy server, make sure to configure the proxy server settings in the "Proxy" part.
The following example shows how to download source code from Git:
    "BuildPlan": {
        "SourceControl": {
            "PreCommand": "",
            "ClearSrcBeforeDownload": false,
            "SVN": [
                {"SrcPath": "","User": "","Password": "","DestPath": "","Proxy": {"Ip": "","Port": 0,"Username": "","Password": ""}}
            ],
            "Git": [
                {"SrcPath": "https://github.com/Appeon/PowerBuilder-AutoBuild-Sales-SourceCode", "User": "tester@appeon.com", "Password": "YGRrYjc6OzU=", "DestPath": ".\\Build", "Branch": "", "Proxy": {"Ip": "","Port": 0,"Username": "","Password": ""}}
            ],
You can also download source code from multiple targets at one time:
           "Git": [
                {"SrcPath": "https://github.com/Appeon/PowerBuilder-AutoBuild-Sales-SourceCode", "User": "tester@appeon.com", "Password": "YGRrYjc6OzU=", "DestPath": ".\\Build_Sales", "Branch": "", "Proxy": {"Ip": "","Port": 0,"Username": "","Password": ""}},
                {"SrcPath": "https://github.com/Appeon/PowerBuilder-AutoBuild-Examples-SourceCode", "User": "tester@appeon.com", "Password": "YGRrYjc6OzU=", "DestPath": ".\\Build_Examples", "Branch": "", "Proxy": {"Ip": "","Port": 0,"Username": "","Password": ""}}
            ],
The following example shows how to download source code from Team Foundation Server (TFS) or Azure DevOps Server:
IMPORTANT: To download source code from Team Foundation Server (TFS) or Azure DevOps Server, you must configure the "Git" section, and input your Personal Access Token (PAT) as the user name and password for connection.
    "BuildPlan": {
        "SourceControl": {
            "PreCommand": "",
            "ClearSrcBeforeDownload": false,
            "SVN": [
                {"SrcPath": "","User": "","Password": "","DestPath": "","Proxy": {"Ip": "","Port": 0,"Username": "","Password": ""}}
            ],
            "Git": [
                {"SrcPath": "https://402977329@dev.azure.com/402977329/kittytest/_git/kittytest","User": "402977329@qq.com","Password": "ZHFgcXVsZndtY2hicHJkZHxuMXlicXxufjF7OzVzOzB8ejpmcjthZz15eWB5aW0/bDV+eQ==","DestPath": "C:\\TFStest\\bug1853_1","Branch": "master","Proxy": {"Ip": "","Port": 0,"Username": "","Password": ""}}
            ],
The following example shows how to download source code from VSS:
    "BuildPlan": {
        "SourceControl": {
            "PreCommand": "",
            "ClearSrcBeforeDownload": false,
            "SVN": [
                {"SrcPath": "","User": "","Password": "","DestPath": "","Proxy": {"Ip": "","Port": 0,"Username": "","Password": ""}}
            ],
           "Git": [
                {"SrcPath": "","User": "","Password": "","DestPath": "","Branch": "","Proxy": {"Ip": "","Port": 0,"Username": "","Password": ""}}
            ],
            "VSS": [
                {"SrcPath": "\\\\192.168.0.100\\Project_VSS\\\"$/Salesdemo/native_pb/appeon.salesdemo\", YYOAAAAA","User": "tester","Password": "","DestPath": ".\\Build"}
            ],
Notes:
1) Connecting to Git or SVN through a proxy server is supported; but connecting to VSS through a proxy server is not supported yet.
2) The password for VSS is not supported. The VSS login window will be displayed for you to input the password before downloading the source code. The password for SVN or Git must be an encrypted value which is generated from the original password by executing "PBAutoBuild220.exe /p", as shown below.
3) Getting an SVN/VSS branch is completely unsupported. Getting a Git branch can be supported by using the "Branch" setting.
Step 3: If the source code downloaded from SVN, Git, or VSS is not the PBL file but objects in ws_objects, then you will need to merge the objects to the PBL file. Locate the "Merging" section in the exported build file and then configure as below:
Setting "RefreshPbl" to true if you want to refresh the PBL files by deleting and then generating the PBL files again.
            "Merging": [
                {"Target": ".\\Build\\salesdemo.pbt", "LocalProjectPath": ".\\Build", "RefreshPbl": false}
            ],
You can also merge source code for multiple targets at one time:
            "Merging": [
                {"Target": ".\\Build_Sales\\salesdemo.pbt", "LocalProjectPath": ".\\Build_sales", "RefreshPbl": true},
                {"Target": ".\\Build_Examples\\examples.pbt", "LocalProjectPath": ".\\Build_Examples", "RefreshPbl": true}
            ],
Merging will not only merge the source code but also upgrade the source code to the current version. However, it will not check or upgrade the PBD files used in the library list (you will need to replace the PBD files with the corresponding version).
At the same time, make sure to double check the target location is set correctly in the "Projects" section, for example,
        "BuildJob": {
            "PreCommand": "",
            "Projects": [
                {"Target": ".\\Build_Sales\\salesdemo.pbt", "Name": "salesdemo_local"}
                {"Target": ".\\Build_Examples\\examples.pbt", "Name": "examplesdemo_local"}
            ],
            "PostCommand1": ""
        }
When the PBAutoBuild220.exe command is executed later, it will first download the source code from the Git server and then merge the source code.
The entire build & deploy process is made up of several steps, and additional commands can be executed before and/or after some particular steps such as the "SourceControl" and "BuildJob" steps.
For example, to add commands to remove a folder before downloading the source code:
Step 1: Create a bat file which contains the following command, and save the bat file as Command_DeleteFolder.bat.
RMDIR /s /q "D:\PB2022\SalesDemo\Build"
Step 2: In the exported build file, locate the "BuildPlan" section and then the "PreCommand" sub-section; and add the file path and name of Command_DeleteFolder.bat.
    "BuildPlan": {
        "SourceControl": {
            "PreCommand": "Command_DeleteFolder.bat",
            "ClearSrcBeforeDownload": false,
            "SVN": [
               ...
            ],
When the PBAutoBuild220.exe command is executed later, it will execute the commands in Command_DeleteFolder.bat before it downloads the source code.
Besides the "PreCommand" sub-section, there is also a "PostCommand" sub-section for the "SourceControl" and "BuildJob" steps, which allows you to execute commands after that particular step.
Note
The dotnet commands can also be integrated with Jenkins. See Task 2 for more details.
Step 1: To build and deploy the PowerClient project using the command line tool (instead of within PowerBuilder IDE), install the following software.
-
Windows 11, 10 or 8.1, or Windows Server 2022, 2019, 2016, or 2012 R2
-
PowerBuilder Utilities 2022
The command line tool (PBAutoBuild220.exe) is included in PowerBuilder Utilities.
-
PowerBuilder Runtime 2022
The PBAutoBuild220.exe tool can automate the entire build and deploy process outside PowerBuilder (without needing any PowerBuilder license).
Step 1: Copy the exported JSON build file to the current machine and double check the file paths in the build file are appropriate to the current environment.
Step 2: Copy the application source code (including PBT, PBL, PBR, images, INI etc.) to the current machine, or configure the build file to download source code from the source control server.
Step 3: In the command line window, execute the PBAutoBuild220.exe file and the build file. For example,
PBAutoBuild220.exe /f "D:\PB2022\SalesDemo\salesdemo_local.json" /l Log_PCBuild.log /le Log_PCError.log
The PBAutoBuild220.exe file can be running with several parameters. For a complete list, refer to Building and deploying the PowerClient project with commands.
Step 4: Carefully check the information in the command line window to make sure the build and deploy process is successful.
The build file and commands used in this tutorial can be downloaded from https://github.com/Appeon/PowerBuilder-AutoBuild-Sales-Example. After you download these files to D:\PB2022\SalesDemo\, you can follow instructions in the readme file.
After executing the PBAutoBuild220.exe file and the build file,
you can check if the execution is successful via the Windows
command errorlevel:
-
errorlevel = 0 indicates the process was successful.
-
errorlevel = 1 indicates the process encountered an error.
For example, you can write scripts like below to check the execution result:
Echo off
PBAutoBuild220.exe /f "D:\PB2022\SalesDemo\salesdemo_local.json" /l Log_PCBuild.log /le Log_PCError.log
If %ERRORLEVEL% == 0 (
    echo Run PBAutoBuild successfully.
) Else (
   echo Failed to run PBAutoBuild, Errorlevel is %ERRORLEVEL%.
)The PBAutoBuild220 command can integrate with Jenkins to automate the build and deployment process for PowerClient projects. Refer to the Jenkins user documentations for how to use Jenkins.
Following gives a few examples on how to integrate the PBAutoBuild220 command with Jenkins.
For example, to execute the PBAutoBuild220 command and the exported build file.
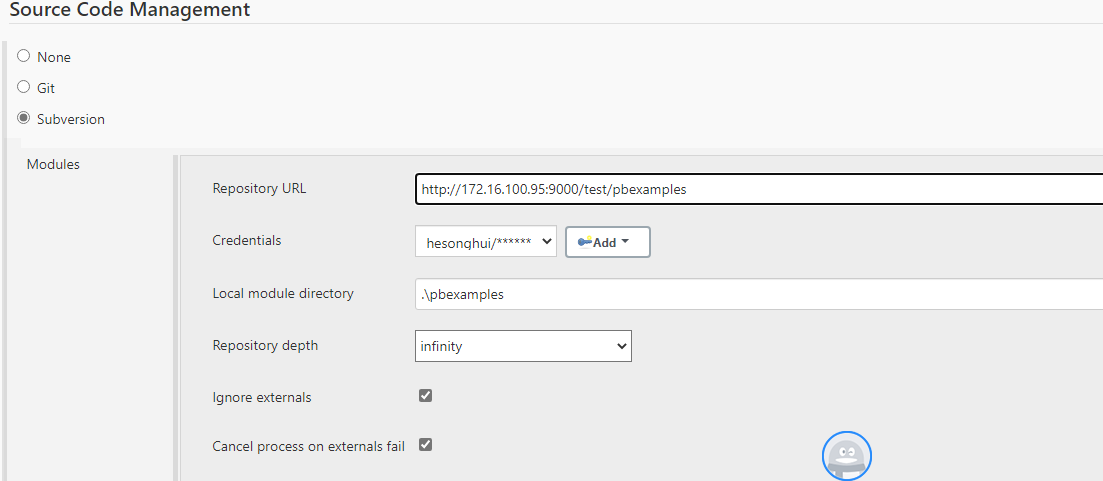
For example, to download source code from SVN, Git, or VSS, and then execute the PBAutoBuild220 command and the exported build file. (Double check that the PBT location is the same one in all required areas.)


