About this chapter
The row data in a DataWindow can be exported and imported in the Extensible Markup Language (XML). This chapter describes how to create and use templates that control the export and import of data in XML format.
Like Hypertext Markup Language (HTML), Extensible Markup Language (XML) is a subset of Standardized General Markup Language (SGML) and has been designed specifically for use on the Web. XML is defined in the W3C Recommendation published by the World Wide Web Consortium. The latest version of this document is available at http://www.w3.org/TR/REC-xml.
XML is more complete and disciplined than HTML, and it is also a framework for creating markup languages—it allows you to define your own application-oriented markup tags.
XML provides a set of rules for structuring data. Like HTML, XML uses tags and attributes, but the tags are used to delimit pieces of data, allowing the application that receives the data to interpret the meaning of each tag. These properties make XML particularly suitable for data interchange across applications, platforms, enterprises, and the Web. The data can be structured in a hierarchy that includes nesting.
An XML document is made up of declarations, elements, comments, character references, and processing instructions, indicated in the document by explicit markup.
The simple XML document that follows contains an XML declaration followed by the start tag of the root element, <d_dept_list>, nested row and column elements, and finally the end tag of the root element. The root element is the starting point for the XML processor.
<?xml version="1.0">
<d_dept_list>
<d_dept_list_row>
<dept_id>100</dept_id>
<dept_name>R &D</dept_name>
<dept_head_id>501</dept_head_id>
</d_dept_list_row>
..
</d_dept_list>This section contains a brief overview of XML rules and syntax. For more detailed information, see the W3C XML page at http://www.w3.org/XML/, the XML Cover Pages at http://xml.coverpages.org/xml.html, or one of the many books about XML.
An XML document must be valid, well-formed, or both.
Valid documents
To define a set of tags for use in a particular application, XML uses a separate document named a document type definition (DTD). A DTD states what tags are allowed in an XML document and defines rules for how those tags can be used in relation to each other. It defines the elements that are allowed in the language, the attributes each element can have, and the type of information each element can hold. Documents can be verified against a DTD to ensure that they follow all the rules of the language. A document that satisfies a DTD is said to be valid.
If a document uses a DTD, the DTD must immediately follow the declaration.
XML Schema provides an alternative mechanism for describing and validating XML data. It provides a richer set of datatypes than a DTD, as well as support for namespaces, including the ability to use prefixes in instance documents and accept unknown elements and attributes from known or unknown namespaces. For more information, see the W3C XML Schema page at http://www.w3.org/XML/Schema.
Well-formed documents
The second way to specify XML syntax is to assume that a document is using its language properly. XML provides a set of generic syntax rules that must be satisfied, and as long as a document satisfies these rules, it is said to be well-formed. All valid documents must be well-formed.
Processing well-formed documents is faster than processing valid documents because the parser does not have to verify against the DTD or XML schema. When valid documents are transmitted, the DTD or XML schema must also be transmitted if the receiver does not already possess it. Well-formed documents can be sent without other information.
XML documents should conform to a DTD or XML schema if they are going to be used by more than one application. If they are not valid, there is no way to guarantee that various applications will be able to understand each other.
There are a few more restrictions on XML than on HTML; they make parsing of XML simpler.
Tags cannot be omitted
Unlike HTML, XML does not allow you to omit tags. This guarantees that parsers know where elements end.
The following example is acceptable HTML, but not XML:
<table>
   <tr>
     <td>Dog</td>
     <td>Cat
     <td>Mouse
</table>
To change this into well-formed XML, you need to add all the missing end tags:
<table>
   <tr>
     <td>Dog</td>
     <td>Cat</td>
     <td>Mouse</td>
   </tr>
</table>
Representing empty elements
Empty elements cannot be represented in XML in the same way they are in HTML. An empty element is one that is not used to mark up data, so in HTML, there is no end tag. There are two ways to handle empty elements:
-
Place a dummy tag immediately after the start tag. For example:
<img href="picture.jpg"></img>
-
Use a slash character at the end of the initial tag:
<img href="picture.jpg"/>
This tells a parser that the element consists only of one tag.
XML is case sensitive
XML is case sensitive, which allows it to be used with non-Latin alphabets. You must ensure that letter case matches in start and end tags: <MyTag> and </Mytag> belong to two different elements.
White space
White space within tags in XML is unchanged by parsers.
All elements must be nested
All XML elements must be properly nested. All child elements must be closed before their parent elements close.
There are two major types of application programming interfaces (APIs) that can be used to parse XML:
-
Tree-based APIs map the XML document to a tree structure. The major tree-based API is the Document Object Model (DOM) maintained by W3C. A DOM parser is particularly useful if you are working with a deeply-nested document that must be traversed multiple times.
For more information about the DOM parser, see the W3C Document Object Model page at http://www.w3c.org/DOM.
PowerBuilder provides the PowerBuilder Document Object Model (PBDOM) extension to enable you to manipulate complex XML documents. For more information about PBDOM, see the section called “Using PowerBuilder XML Services” in Application Techniques and PowerBuilder Document Object Model in PowerBuilder Extension Reference.
-
Event-based APIs use callbacks to report events, such as the start and end of elements, to the calling application, and the application handles those events. These APIs provide faster, lower-level access to the XML and are most efficient when extracting data from an XML document in a single traversal.
For more information about the best-known event-driven parser, SAX (Simple API for XML), see the SAX page at http://sax.sourceforge.net/.
Xerces parser
PowerBuilder includes software developed by the Apache Software Foundation (http://www.apache.org/). The XML services for DataWindow objects are built on the Apache Xerces-C++ parser, which conforms to both DOM and SAX specifications and is portable across Windows and UNIX platforms. For more information about SAX, see the Xerces C++ Parser page at http://xerces.apache.org/xerces-c/index.html.
PowerBuilder supports both the export and import of XML in DataStore and DataWindow objects using XML template objects. You construct XML templates for export and import graphically in the Export/Import Template view for XML. Each template you create is encapsulated in the DataWindow object. A template enables you to specify the XML logical structure of how the row data iterates inside the root element of the XML document.
The possible uses of this feature include the following:
-
You can code events in data entry or data reporting applications to export selected data values, or the entire contents of a DataWindow object, to a structured XML document. The structure of the XML document can be customized for use by other internal or external applications, processes, or systems.
-
You can add a method to a custom class user object that uses DataStore objects for server-side database processing or middle-tier management of a client-side DataWindow object. The method would export data to XML, which could then be processed by a different component or subsystem, such as an Enterprise JavaBeans component or a Web service.
XML services
In addition to the support for XML in the DataWindow painter, PowerBuilder also provides the PowerBuilder Document Object Model (PBDOM). For more information, see the section called “Using PowerBuilder XML Services” in Application Techniques.
Export templates
An XML export template lets you customize the XML that is generated.
You can specify optional XML and document type declarations that precede the root element in the exported XML, as well as the logical structure and nesting level of iterative DataWindow row data inside the root element. The children of the root element can contain elements, character references, and processing instructions as well as the row data, using explicit markup. For more information, see Header and Detail sections.
If the exported XML is used by different applications or processes, you can define a separate export template for each use.
Import templates
You need to create an import template if you want to import data that does not match the DataWindow column definition or is associated with a schema, or if you want to import attribute values.
Only the mapping of column names to element and attribute names is used for import. All other information in the template is ignored.
Validating XML
XML export and import do not validate the data after export or before import. You can use the XMLParseFile and XMLParseString functions to validate an XML file or string against a DTD or XML schema before proceeding with additional processing.
If no DTD or schema is included or referenced, XMLParseFile and XMLParseString check whether the content is well-formed XML.
You define and edit templates for export and import in the Export/Import Template view for XML in the DataWindow painter. The view uses a tree view to represent the template.
When you create a new DataWindow object, PowerBuilder displays a default template in the Export/Import Template view. You can edit only one template at a time in the view, but you can create multiple templates and save them with the DataWindow object. Each template is uniquely associated with the DataWindow object open in the painter.
The default template has one element for each column in the DataWindow object.
Creating, opening, and saving templates
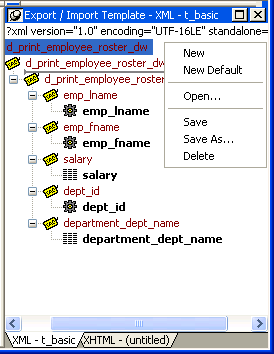
From the pop-up menu for the Export/Import Template view (with nothing selected), you can create new templates with or without default contents, open an existing template, save the current template, or delete the current template. You can only open and edit templates that are associated with the current DataWindow object.
Representing tree view items
Each item in the template displays as a single tree view item with an image and font color that denotes its type. The end tags of elements and the markup delimiters used in an XML document do not display.
The following table shows the icons used in the Export/Import Template view.
|
Icon |
Description |
|---|---|
|
|
XML declaration or document type declaration |
|
|
Root or child element |
|
|
Group header element |
|
|
DataWindow column reference |
|
|
Static text control reference |
|
|
Computed field or DataWindow expression reference |
|
|
Literal text |
|
|
Comment |
|
|
Processing instruction |
|
|
CDATA section |
|
|
Nested report |
To create a template, select the New menu item or the New Default menu item from the pop-up menu in the Export/Import Template view.
Creating new base templates
The New menu item creates a template that is empty except for the XML declaration, the root element, and the first element of the row data section, referred to as the Detail Start element. The name of the root element is the same as the name of the DataWindow object, and the default name for the Detail Start element is the name of the root element with _row appended.
For example, if the DataWindow object is named d_name, the default template has this structure:
<?xml version="1.0"?>
          <d_name>
            <d_name_row>
            </d_name_row>
          </d_name>
Creating new default templates
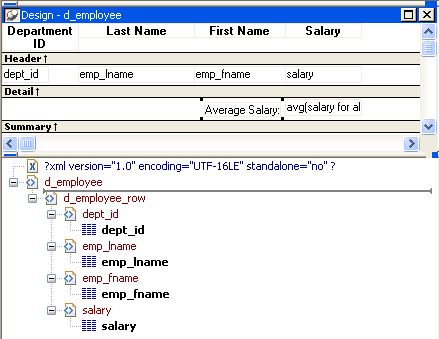
The New Default menu item creates a template with the same contents as the New menu item, as well as a flat structure of child elements of the Detail Start element. A child element is created for each DataWindow column name, in the order in which the columns appear in the SELECT statement, with the exception of blob and computed columns. The default tag for the element is the column's name.
If the names of the column and the control are the same, the content of the child element displays with a control reference icon. If there is no control name that matches the column name, the content of the child element displays using the DataWindow expression icon. For example, consider a DataWindow object in which the dept_id column is used as a retrieval argument and does not display:
The SQL syntax is:
SELECT "employee"."dept_id",
         "employee"."emp_lname",
         "employee"."emp_fname",
         "employee"."salary"
   FROM "employee"
   WHERE employee.dept_id = :deptnum
ORDER BY "employee"."emp_lname" ASC
In the default template, dept_id uses the DataWindow expression icon. All the other columns used the column control reference icon.
To save a new template, select Save from the pop-up menu in the Export/Import Template view, and give the template a name and optionally a comment that identifies its use.
The template is stored inside the DataWindow object in the PBL.
After saving a template with a DataWindow object, you can see its definition in the Source editor for the DataWindow object. For example, this is part of the source for a DataWindow that has two templates. The templates have required elements only:
export.xml(usetemplate="t_address"
          template=(comment="Employee Phone Book"
           name="t_phone"  xml="<d_emplist><d_emplist_row
           __pbband=~"detail~"</d_emplist>")
           template=(comment="Employee Address Book"
           name="t_address" xml="<d_emplist><d_emplist_row
__pbband=~"detail~"</d_emplist>"))An XML template has a Header section and a Detail section, separated graphically by a line across the tree view.
The items in the Header section are generated only once when the DataWindow is exported to XML, unless the DataWindow is a group DataWindow. For group DataWindow objects, you can choose to generate the contents of the header section iteratively for each group. For more information, see Generating group headers.
The Detail section contains the row data, and is generated iteratively for each row in the DataWindow object.
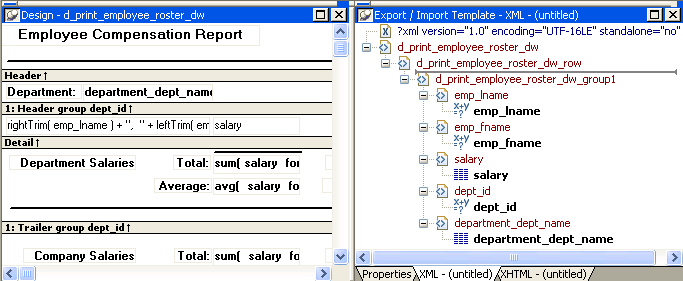
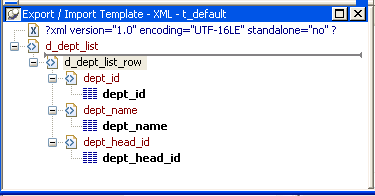
A line across the Export/Import Template view separates the Header section from the Detail section. The first element after this line, d_dept_list_row in the previous screenshot, is called the Detail Start element.
There can be only one Detail Start element, and it must be inside the document's root element. By default, the first child of the root element is the Detail Start element. It usually wraps a whole row, separating columns across rows. When the DataWindow is exported to XML, this element and all children and/or siblings after it are generated iteratively for each row. Any elements in the root element above the separator line are generated only once, unless the DataWindow is a group DataWindow and the Iterate Group Headers check box has been selected.
The Detail Start element can be a nested (or multiply-nested) child of an element from the Header section, permitting a nested detail. This might be useful for DataStores being packaged for submission to external processes, such as B2B, that require company and/or document information, date, or other master data preceding the detail.
Moving the separator
You can change the location of the separator line by selecting the element that you want as the Detail Start element and selecting Starts Detail from its pop-up menu. The separator line is redrawn above the new Detail Start element. When you export the data, the Detail Start element and the children and siblings after it are generated iteratively for each row.
If no Detail Start element is specified (that is, if the Starts Detail option has been deselected), the template has only a Header section. When you export the data, only one iteration of row data is generated.
The Header section can contain the items listed in the following table. Only the root element is required:
|
Item |
Details |
|---|---|
|
XML declaration |
This must be the first item in the tree view if it exists. See XML declaration. |
|
Document type declaration |
If there is an XML declaration, the document type declaration must appear after the XML declaration and any optional processing instructions and comments, and before the root element. Otherwise, this must be the first item in the tree view. See Document type declaration. |
|
Comments |
See Comments. |
|
Processing instructions |
|
|
Root element (start tag) |
See Root element. |
|
Group header elements |
|
|
Child elements |
Child elements in the Header section cannot be iterative except in the case of group DataWindows. |
Detail section in root element
The root element displays in the Header section, but the entire content of the Detail section is contained in the root element.
The Detail section, which holds the row data, can contain the items listed in The following table.
|
Item |
Details |
|---|---|
|
Detail Start element |
|
|
Child or sibling elements to the Detail Start element |
To add a sibling to the Detail Start element, add a child to its parent (the root element by default). |
|
Control references |
These references are in text format and can include references to column, text, computed field, and report controls. See Controls. Nested report controls can only be referenced as child elements. See Composite and nested reports. |
|
DataWindow expressions |
|
|
Literal text |
Literal text does not correspond to a control in the DataWindow object. |
|
Comments |
See Comments. |
|
Processing instructions |
|
|
CDATA sections |
See CDATA sections. |
|
Attributes |
You can assign attributes to all element types. See Attributes. |
Using templates for data import
If you use a template created for data export, DataWindow expressions, text, comments, and processing instructions are ignored when data is imported. If you are creating a template specifically for import, do not add any of these items. You need only map column names to element and attribute names.
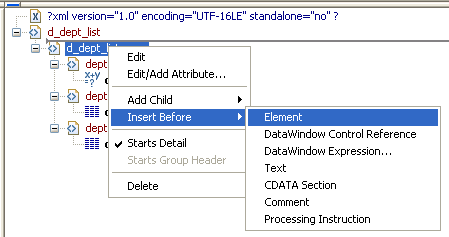
Every item in the Export/Import Template view has a pop-up menu from which you can perform actions appropriate to that item, such as editing or deleting the item, adding or editing attributes, adding child elements or other items, and inserting elements, processing instructions, CDATA sections, and so forth, before the current item.
If an element has no attributes, you can edit its tag in the Export/Import Template view by selecting it and left-clicking the tag or pressing F2. Literal text nodes can be edited in the same way. You can delete items (and their children) by pressing the Delete key.
The examples in this section show the delimiters used in the XML document. When you edit the template in dialog boxes opened from the Export/Import Template view for XML, you do not need to type these delimiters in text boxes.
The rest of this section describes some of the items in the template. For more information, see the XML specification at http://www.w3.org/TR/REC-xml.
The XML declaration specifies the version of XML being used. You may need to change this value for a future version of XML. It can also contain an encoding declaration and a standalone document declaration. From the pop-up menu, you can edit the declaration, and, if the document is well-formed, delete it. If you have deleted the XML declaration, you can insert one from the Insert Before item on the pop-up menu for the next item in the template.
Encoding declaration
The encoding declaration specifies the character-set encoding used in the document, such as UTF-16 or ISO-10646-UCS-4.
If there is no encoding declaration, the value defaults to UTF-16LE encoding in ASCII environments. In DBCS environments, the default is the default system encoding on the computer where the XML document is generated. This ensures that the document displays correctly as a plain text file. However, since the DBCS data is serialized to Unicode, XML documents that use UTF-16LE, UTF-16 Big Endian, or UTF-16 Little Endian can all be parsed or generated correctly on DBCS systems.
Several other encodings are available, including ASCII, UCS4 Big Endian, UCS4 Little Endian, EBCDIC code pages IBM037 and IBM1140, ISO Latin-1, and Latin 1 Windows (code page 1252). You can select these values from a drop-down list box in the XML Declaration dialog box.
Standalone document declaration
The standalone document declaration specifies whether the document contains no external markup that needs to be processed and can therefore stand alone (Yes), or that there are, or might be, external markup declarations in the document (No). The value in the default template is No, and if there is no standalone document declaration, the value is assumed to be No.
This is an XML declaration that specifies XML version 1.0, UTF-16LE encoding, and that the document can stand alone:
<?xml version="1.0" encoding="UTF-16LE" standalone="yes"?>
The document type declaration contains or points to markup declarations that provide a grammar for a class of documents. This grammar is known as a document type definition, or DTD. The document type declaration defines constraints on the sequence and nesting of tags, attribute values, names and formats of external references, and so forth. You can edit the document type declaration to change its name, but the name must always be the same as the name of the root element. Changing the name in either the document type declaration or the root element automatically changes the name in the other.
Adding DTDs
You can add an identifier pointing to an external DTD subset, and you can add an internal DTD subset. If you supply both external and internal subsets, entity and attribute-list declarations in the internal subset take precedence over those in the external subset.
Public identifiers
An external identifier can include a public identifier that an XML processor can use to generate an alternative URI. If an alternative URI cannot be generated, the URI provided in the system identifier is used. External identifiers without a public identifier are preceded by the keyword SYSTEM. External identifiers with a public identifier are preceded by the keyword PUBLIC.
Exporting metadata
If you specify a system or public identifier and/or an internal subset in the Document Type Declaration dialog box, a DTD cannot be generated when the data is exported to XML. A MetaDataType of XMLDTD! is ignored. For more information about the properties that control the export of metadata, see Exporting metadata.
These are examples of valid document type declarations.
An external system identifier:
<!DOCTYPE d_dept_listing SYSTEM "d_dept_listing.dtd">
An external system identifier with a public identifier:
<!DOCTYPE d_test PUBLIC "-//MyOrg//DTD Test//EN"
          "http://www.mysite.org/mypath/mytest.dtd">
An external system identifier with an internal DTD. The internal DTD is enclosed in square brackets:
<!DOCTYPE d_orders
          SYSTEM "http://www.acme.com/dtds/basic.dtd"[
          <!ELEMENT Order (Date, CustID, OrderID, Items*)>
          <!ELEMENT Date (#PCDATA)>
          <!ELEMENT CustID (#PCDATA)>
          <!ELEMENT OrderID (#PCDATA)>
          <!ELEMENT Items (ItemID, Quantity)>
          <!ELEMENT ItemID (#PCDATA)>
          <!ELEMENT Quantity (#PCDATA)>
]>You can change the name of the root element, add attributes and children, and insert comments, instructions, and, if they do not already exist, XML and/or document type declarations before it.
Changing the name of the root element changes the name of its start and end tags. You can change the name using the Edit menu item, or in the Element Attributes dialog box. Changing the name of the document type declaration, if it exists, also changes the name of the root element, and vice versa. The root element name is always the same as the document type declaration name.
You can add the following kinds of children to the root element:
-
Elements
-
Text
-
Control references
-
DataWindow expressions (including column references)
-
CDATA sections
-
Comments
-
Processing instructions
Adding a DataWindow control reference opens a dialog box containing a list of the columns, computed fields, report controls, and text controls in the document.
Control references can also be added to empty attribute values or element contents using drag-and-drop from the Control List view. Column references can also be added using drag-and-drop from the Column Specifications view.
Drag-and-drop cannot replace
You cannot drag-and-drop an item on top of another item to replace it. For example, if you want to replace one control reference with another control reference, or with a DataWindow expression, you first need to delete the control reference you want to replace.
Adding a DataWindow expression opens the Modify Expression dialog box. This enables you to create references to columns from the data source of the DataWindow object. One use of this feature is to return a fragment of XML to embed, providing another level of dynamic XML generation.
Using Date and DateTime with strings
If you use a control reference or a DataWindow expression that does not include a string to represent Date and DateTime columns in a template, the XML output conforms to ISO 8601 date and time formats. For example, consider a date that displays as 12/27/2016 in the DataWindow object, using the display format mm/dd/yyyy. If the export template does not use an expression that includes a string, the date is exported to XML as 2016-12-27.
However, if the export template uses an expression that combines a column with a Date or DateTime datatype with a string, the entire expression is exported as a string and the regional settings in the Windows registry are used to format the date and time.
Using the previous example, if the short date format in the registry is MM/dd/yy, and the DataWindow expression is: "Start Date is " + start_date, the XML output is Start Date is 12/27/16.
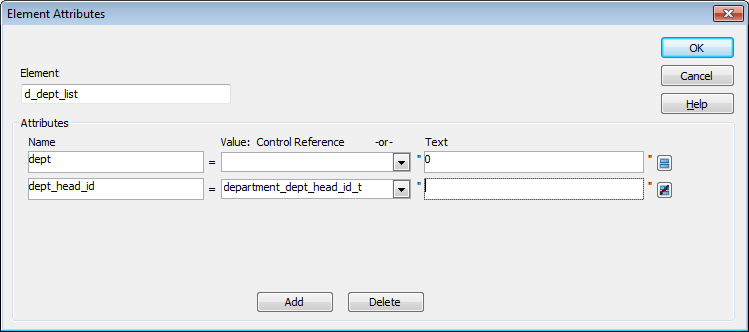
Controls or expressions can also be referenced for element attribute values. Select Edit/Add Attribute from the pop-up menu for elements to edit an existing attribute or add a new one.
For each attribute specified, you can select a control reference from the drop-down list or enter a literal text value. A literal text value takes precedence over a control reference. You can also use the expression button to the right of the Text box to enter an expression.
The expression button and entry operates similarly to DataWindow object properties in the Properties view. The button shows an equals sign if an expression has been entered, and a not-equals sign if not. A control reference or text value specified in addition to the expression is treated as a default value. In the template, this combination is stored with the control reference or text value, followed by a tab, preceding the expression. For example:
attribute_name=~"text_val~~tdw_expression~"
Report controls can be referenced in the Detail section of export templates as children of an element.
Nested reports supported for XML export only
Import does not support nested reports. If you attempt to import data in any format, including XML, CSV, DBF, and TXT, that contains a nested report, the nested report is not imported and the import may fail with errors.
Composite reports
For composite reports that use the Composite presentation style, the default template has elements that reference each of its nested reports.
If a composite DataWindow contains two reports that have columns with identical names, you must use the procedure that follows if you want to generate an XML document with a DTD or schema. If you do not follow the procedure, you will receive a parsing error such as "Element ‘identical_column_name' has already been declared."
-
Create a template in the first report and select this template in the Use Template list on the Data Export property page.
-
Create a template in the second report.
If any element name is used in the template in the first report, change it to another name in the template in the second report.
-
Select the template for the second report in the Use Template list.
-
Generate the XML document.
These steps are necessary because you cannot use a given element name more than once in a valid DTD or schema.
Nested reports
For report controls added to the detail band of a base report that is related to the inserted report with retrieval arguments or criteria, the report control is available to the export template in two ways:
-
Select an element in the template or add a new element, then select Add Child>DataWindow Control Reference. Any report controls inserted in the detail band are available for selection in the dialog box that displays.
-
Drag a report control from the Control List view and drop it on an existing empty element.
When you export XML using a template that has a reference to a report control, the export template assigned to the nested report with the Use Template property is used, if it exists, to expand the XML for the nested report. If no template is specified for the nested report, the default template is used.
The relationship between the nested report and the base report, for example a Master/Detail relationship, is reflected in the exported XML.
You can export the name of a column in a CDATA section using the syntax <![CDATA[columnname]]>. You can export the value of a column using the syntax <![CDATA[~t columnname]]>. The ~t is used to introduce a DataWindow expression, in the same way that it is used in the Modify method. You can also use an expression such as ~t columnname*columnname to export a computed value to the XML.
You can import a value into a column using the syntax <![CDATA[ columnname]]>. Note that this syntax in a template has different results for import and export: it imports the column value but exports the column name.
You cannot import an XML file that has a ~t expression in a CDATA section.
Everything else inside a CDATA section is ignored by the parser. If text contains characters such as less than or greater than signs (< or >) or ampersands (&) that are significant to the parser, it should be defined as a CDATA section. A CDATA section starts with <![CDATA[ and ends with ]]>. CDATA sections cannot be nested, and there can be no white space characters inside the ]]> delimiter—for example, you cannot put a space between the two square brackets.
Example
<![CDATA[ do not parse me]]>
This syntax in an export template exports the value of the column emp_salary:
<![CDATA[~t emp_salary]]>
This syntax in an import template imports the value of the column emp_salary:
<![CDATA[emp_salary]]>
Comments can appear anywhere in a document outside other markup. They can also appear within the document type declaration in specific locations defined by the XML specification.
Comments begin with <!-- and end with -->. You cannot use the string -- (a double hyphen) in a comment, and parameter entity references are not recognized in comments.
Example
<!-- this is a comment -->
Processing instructions (PIs) enable you to provide information to the application that uses the processed XML. Processing instructions are enclosed in <? and ?> delimiters and must have a name, called the target, followed by optional data that is processed by the application that uses the XML. Each application that uses the XML must process the targets that it recognizes and ignore any other targets.
The XML declaration at the beginning of an XML document is an example of a processing instruction. You cannot use the string xml as the name of any other processing instruction target.
Example
In this example, usething is the name of the target, and thing=this.thing is the data to be processed by the receiving application:
<?usething thing=this.thing?>
You can export the data in a DataWindow or DataStore object to XML using any of the techniques used for exporting to other formats such as PSR or HTML:
-
Using the SaveAs method:
ds1.SaveAs("C:\TEMP\Temp.xml", Xml!, true) -
Using PowerScript dot notation or the Describe method:
ls_xmlstring = dw1.Object.DataWindow.Data.XML
ls_xmlstring = dw1.Describe(DataWindow.Data.XML)
-
Using the Save Rows As menu item in the DataWindow painter.
With the Preview view open, select File>Save Rows As, select XML from the Files of Type drop-down list, provide a file name, and click Save. You can use this in the development environment to preview the XML that will be generated at runtime.
When you export data, PowerBuilder uses an export template to specify the content of the generated XML.
Default export format
If you have not created or assigned an export template, PowerBuilder uses a default export format. This is the same format used when you create a new default export template. See Creating templates.
OLE DataWindow objects cannot be exported using a template. You must use the default format.
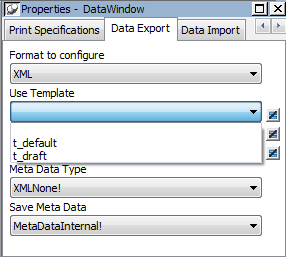
The Data Export page in the Properties view lets you set properties for exporting data to XML.
In addition to the properties that you can set on this page, PowerBuilder provides two properties that you can use to let the user of an application select an export template at runtime. See Selecting templates at runtime.
The names of all templates that you create and save for the current DataWindow object display in the Use Template drop-down list.
The template you select from the list is used to conform the XMLgenerated by any of the methods for saving as XML to the specifications defined in the named template. Selecting a template from the list box sets the DataWindow object's Export.XML.UseTemplate property. You can also modify the value of the UseTemplate property dynamically in a script. For example, an XML publishing engine would change templates dynamically to create different presentations of the same data.
When you open a DataWindow, the Export/Import Template view displays the template specified in the DataWindow's Use Template property. (If the view is not visible in the current layout, select View>Export/Import Template>XML from the menu bar.) If the property has not been set, the first saved template displays or, if there are no saved templates, the default structured template displays as a basis for editing.
Template used when saving
When the DataWindow is saved as XML, PowerBuilder uses the template specified in the Use Template property. If the property has not been set, PowerBuilder uses the default template.
When you are working on a template, you might want to see the result of your changes. The template specified in the Use Template property might not be the template currently displayed in the Export/Import Template view, so you should check the value of the Use Template property to be sure you get the results you expect.
To save to XML using the current template
-
Right-click in the Export/Import template view and select Save or Save As from the pop-up menu to save the current template.
-
On the Data Export page in the properties view, select the current template from the Use Template drop-down list.
-
Select File>Save Rows As, select XML from the Files of Type drop-down list, enter a file name, and click Save.
To generate the contents of the header section iteratively for each group in a group DataWindow, check the Iterate Header for Groups check box, or set the Export.XML.HeadGroups DataWindow property. This property is on by default.
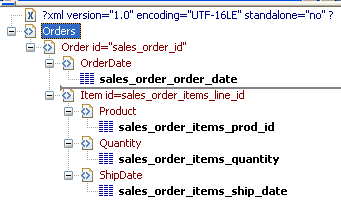
For example, consider a group DataWindow object that includes the columns sales_order_id and sales_order_order_date. The following screenshot shows the template for this DataWindow object:
The root element in the Header section of the template, Orders, has a child element, Order. Order has an id attribute whose value is a control reference to the column sales_order_id. Order also has a child element, OrderDate, that contains a column reference to the sales_order_order_date column. These elements make up the header section that will be iterated for each group.
The Detail Start element, Item, has an id attribute whose value is a control reference to the column sales_order_items_line_id. It also has three child elements that contain column references to the line items for product ID, quantity, and ship date.
When the DataWindow is exported with the Export.XML.HeadGroups property on, the order ID and date iterate for each group. The following XML output shows the first three iterations of the group header:
<?xml version="1.0" encoding="UTF-16LE" standalone="no"?>
<Orders>
   <Order id="2001">
      <OrderDate>2002-03-14</OrderDate>
         <Item id="1">
            <Product>300</Product>
            <Quantity>12</Quantity>
            <ShipDate>2005-09-15</ShipDate>
         </Item>
         <Item id="2">
            <Product>301</Product>
            <Quantity>12</Quantity>
            <ShipDate>2005-09-14</ShipDate>
         </Item>
         <Item id="3">
            <Product>302</Product>
            <Quantity>12</Quantity>
            <ShipDate>2005-09-14</ShipDate>
         </Item>
   </Order>
   <Order id="2002">
      <OrderDate>2002-03-18</OrderDate>
         <Item id="2">
            <Product>401</Product>
            <Qty>24</Qty>
            <ShipDate>2002-09-18</ShipDate>
         </Item>
         <Item id="1">
            <Product>400</Product>
            <Qty>24</Qty>
            <ShipDate>2002-09-18</ShipDate>
         </Item>
   </Order>
   <Order id="2003">
      <OrderDate>2002-03-21</OrderDate>
         <Item id="3">
            <Product>400</Product>
            <Qty>12</Qty>
            <ShipDate>2002-09-23</ShipDate>
         </Item>
         ...
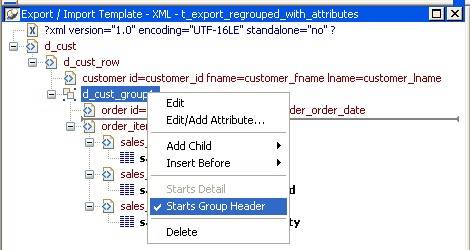
For DataWindow objects with more than one group, when you generate a new default template, each group after the first is identified with a special icon and a check on the pop-up menu next to the Starts Group Header item.
When the Iterate Header for Groups check box is selected, each XML fragment in the header section between a Group Header element and the next Group Header element or Detail Start element is iterated.
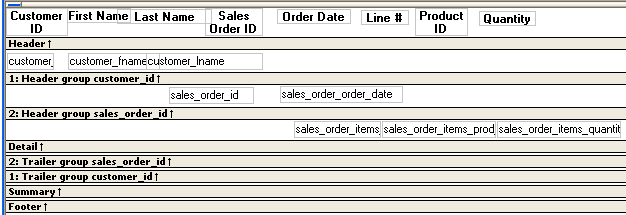
In the template shown in the previous illustration, sales are grouped by customer ID, then by order ID. The customer group header has attributes for the customer's ID and first and last names. The order group header has attributes for the order ID and date. The following illustration shows the DataWindow in the Design view:
The following XML output shows the first iteration of the customer group header and the first and second iterations of the order group header:
<?xml version="1.0" encoding="UTF-16LE" standalone="no"?>
<d_customer>
   <customer id="101" fname="Michaels" lname="Devlin">
      <order id="2001" date="1996-03-14">
            <order_item>
            <sales_order_items_line_id>1</sales_order_items_line_id>
            <sales_order_items_prod_id>300</sales_order_items_prod_id>
            <sales_order_items_quantity>12</sales_order_items_quantity>
         </order_item>
         <order_item>
            <sales_order_items_line_id>2</sales_order_items_line_id>
            <sales_order_items_prod_id>301</sales_order_items_prod_id>
            <sales_order_items_quantity>12</sales_order_items_quantity>
         </order_item>
         <order_item>
            <sales_order_items_line_id>3</sales_order_items_line_id>
            <sales_order_items_prod_id>302</sales_order_items_prod_id>
            <sales_order_items_quantity>12</sales_order_items_quantity>
         </order_item>
      </order>
      <order id="2005" date="1996-03-24">
         <order_item>
            <sales_order_items_line_id>1</sales_order_items_line_id>
            <sales_order_items_prod_id>700</sales_order_items_prod_id>
            <sales_order_items_quantity>12</sales_order_items_quantity>
         </order_item>
      </order>
By default, the XML is exported without formatting. If you want to view or verify the exported XML in a text editor, check the Include Whitespace check box or set the Export.XML.IncludeWhitespace property in a script. Turning this property on causes the export process to insert tabs, carriage returns, and linefeed characters into the XML so that it is easier to read. Most of the examples in this chapter were exported with this property turned on.
Do not import formatted XML
You should not try to import XML formatted with white space characters, because the white space between data element tags is considered to be part of the element.
You can specify that metadata in the form of a DTD or schema should be exported when you save the DataWindow object. You can choose to save the metadata with the XML or in a separate file.
If you export metadata as a schema, you can associate it with a namespace. See Associating a namespace with an exported schema.
To specify how metadata should be saved, select a value from the Meta Data Type drop-down list or set the Export.XML.MetaDataType property. The possible values are:
-
XMLNone!—No metadata is generated
-
XMLSchema!—An XML schema is generated
-
XMLDTD!—A DTD is generated
If the data item for a column is null or an empty string, an empty element is created. If you select XMLSchema!, child elements with null data items are created with the content "xsi:nil='true'".
The metadata is saved into the exported XML itself or into an associated file, depending on the setting in the SaveMeta Data drop-down list or the Export.XML.SaveMetaData property. The possible values are:
-
MetaDataInternal!—The metadata is saved into the generated XML document or string. To save metadata using the .Data.XML expression syntax, you must use this value.
-
MetaDataExternal!—The metadata is saved as an external file with the same name as the XML document but with the extension .xsd (for a schema) or .dtd (for a DTD). A reference to the name of the metadata file is included in the output XML document.
Example: internal metadata
For example, if you select XMLDTD! and MetaDataInternal!, the header and first row of the exported XML would look like this for a simple grid DataWindow for the contact table in the PB Demo DB. The Include Whitespace property has also been selected and the file name is dtdinternal.xml:
<?xml version="1.0" encoding="UTF-16LE" standalone="yes"?>
<!DOCTYPE dtdinternal [<!ELEMENT dtdinternal (dtdinternal_row*)>
<!ELEMENT dtdinternal_row (id, last_name, first_name, title, street, city, state, zip, phone, fax)>
<!ELEMENT id (#PCDATA)>
<!ELEMENT last_name (#PCDATA)>
<!ELEMENT first_name (#PCDATA)>
<!ELEMENT title (#PCDATA)>
<!ELEMENT street (#PCDATA)>
<!ELEMENT city (#PCDATA)>
<!ELEMENT state (#PCDATA)>
<!ELEMENT zip (#PCDATA)>
<!ELEMENT phone (#PCDATA)>
<!ELEMENT fax (#PCDATA)>
]>
<dtdinternal>
   <dtdinternal_row>
      <id>1</id>
      <last_name>Hildebrand</last_name>
      <first_name>Jane</first_name>
      <title>ma</title>
      <street>1280 Washington St.</street>
      <city>Emeryville</city>
      <state>MI</state>
      <zip>94608</zip>
      <phone>5105551309</phone>
      <fax>5105554209</fax>
   </dtdinternal_row>
Example: external metadata
If you select MetaDataExternal! instead, the generated XML in dtdexternal.xml looks like this:
<?xml version="1.0" encoding="UTF-16LE"?>
<!DOCTYPE dtdexternal SYSTEM "dtdexternal.dtd">
<dtdexternal>
   <dtdexternal_row>
      <id>1</id>
      <last_name>Hildebrand</last_name>
      <first_name>Jane</first_name>
      <title>ma</title>
      <street>1280 Washington St.</street>
      <city>Emeryville</city>
      <state>MI</state>
      <zip>94608</zip>
      <phone>5105551309</phone>
      <fax>5105554209</fax>
   </dtdexternal_row>
The DTD is in dtdexternal.dtd:
<?xml version="1.0" encoding="UTF-16LE"?><!ELEMENT dtdexternal (dtdexternal_row*)>
<!ELEMENT dtdexternal_row (id, last_name, first_name, title, street, city, state, zip, phone, fax)>
<!ELEMENT id (#PCDATA)>
<!ELEMENT last_name (#PCDATA)>
<!ELEMENT first_name (#PCDATA)>
<!ELEMENT title (#PCDATA)>
<!ELEMENT street (#PCDATA)>
<!ELEMENT city (#PCDATA)>
<!ELEMENT state (#PCDATA)>
<!ELEMENT zip (#PCDATA)>
<!ELEMENT phone (#PCDATA)>
<!ELEMENT fax (#PCDATA)>
MetaDataExternal! not supported for dot notation
The metadata cannot be saved in an external file if you use dot notation to generate the XML.
Associating a namespace with an exported schema
If you export metadata in the form of a schema, you can associate a namespace with the schema. To do so, right-click the root element in the Export/Import template view and select Schema Options from the pop-up menu. In the dialog box, specify the namespace prefix and URI.
When the Meta Data Type property is XMLSchema! and the Save Meta Data property is MetaDataInternal!, so that the XML schema is generated inline, you can specify a name for the root element. If the root element name is specified, it appears in the generated XML.
In the following example, the root element name is Contacts, the namespace prefix is po, and the URI is http://www.example.com/PO1.
The example shows the header and the first row of the generated XML:
<?xml version="1.0" encoding="UTF-16LE" standalone="no"?>
<Contacts>
  <xs:schema xmlns:po="http://www.example.com/PO1"
      xmlns:xs="http://www.w3.org/2001/XMLSchema"
      targetNamespace="http://www.example.com/PO1"
      elementFormDefault="qualified"
      attributeFormDefault="unqualified">
    <xs:element name="d_contact_list">
      <xs:complexType>
        <xs:sequence>
          <xs:element ref="d_contact_list_row"
              maxOccurs="unbounded" minOccurs="0"/>
        </xs:sequence>
      </xs:complexType>
    </xs:element>
    <xs:element name="d_contact_list_row">
      <xs:complexType>
        <xs:sequence>
          <xs:element ref="id"/>
          <xs:element ref="last_name"/>
          <xs:element ref="first_name"/>
          <xs:element ref="city"/>
          <xs:element ref="state"/>
        </xs:sequence>
      </xs:complexType>
    </xs:element>
    <xs:element name="id" type="xs:int"/>
    <xs:element name="last_name" type="xs:string"/>
    <xs:element name="first_name" type="xs:string"/>
    <xs:element name="city" type="xs:string"/>
    <xs:element name="state" type="xs:string"/>
  </xs:schema>
  <po:d_contact_list xmlns:po=
        "http://www.example.com/PO1" xmlns:xsi=
        "http://www.w3.org/2001/XMLSchema-instance">
    <po:d_contact_list_row>
      <po:id>1</po:id>
      <po:last_name>Hildebrand</po:last_name>
      <po:first_name>Jane</po:first_name>
      <po:city>Emeryville</po:city>
      <po:state>MI</po:state>
    </po:d_contact_list_row>
By default, the generated XML is not associated with a namespace.
Two DataWindow properties, Export.XML.TemplateCount and Export.XML.Template[ ].Name, enable you to provide a list of templates from which the user of the application can select at runtime.
The TemplateCount property gets the number of templates associated with a DataWindow object. You can use this number as the upper limit in a FOR loop that populates a drop-down list with the template names. The FOR loop uses the Template[ ].Name property.
string ls_template_count, ls_template_name
long i

ls_template_count=dw_1.Describe
  ("DataWindow.Export.XML.TemplateCount")

for i=1 to Long(ls_template_count)
  ls_template_name=
    dw_1.Object.DataWindow.Export.XML.Template[i].Name
  ddlb_1.AddItem(ls_template_name)
next
Before generating the XML, set the export template using the text in the drop-down list box.
dw_1.Object.DataWindow.Export.XML.UseTemplate = ddlb_1.text
You can select XML as a file type in the dialog box that displays when you select Rows>Import in the DataWindow painter. (The Preview view must be open to enable the Rows>Import menu item.)
You can also import data from an XML document or string using the ImportFile, ImportString, or ImportClipboard methods. These methods have an optional first parameter that enables you to specify the type of data to be imported.
Data can be imported with or without a template. To import data without a template, the data must correspond to the DataWindow column definition. The text content of the XML elements must match the column order, column type, and validation requirements of the DataWindow columns.
Composite, OLE, and Graph DataWindow objects
Composite, OLE, and Graph DataWindow objects cannot be imported using a template. You must use the default format. Graph controls must also be imported using the default format.
If the XML document or string from which you want to import data does not correspond to the DataWindow column definition, or if you want to import attribute values, you must use a template.
If a schema is associated with the XML to be imported, you must create a template that reflects the schema.
For complex, nested XML with row data in an iterative structure, you may need to design a structure that uses several linked DataWindow definitions to import the data. Each DataWindow must define the structure of a block of iterative data with respect to the root element. Importing the data into the DataWindow objects would require multiple import passes using different import templates.
For data that does not conform to an iterative row data structure or has additional complexities, you can use the PBDOM parser to handle the data on a node-by-node basis. For more information, see the section called “Using PowerBuilder XML Services” in Application Techniques and PowerBuilder Document Object Model in PowerBuilder Extension Reference.
Defining import templates
The XML import template can be defined in the Export/Import Template view for XML. If you are defining a template for use only as an import template, do not include DataWindow expressions, text, comments, and processing instructions. These items are ignored when data is imported.
Only mappings from DataWindow columns to XML elements and attributes that follow the Starts Detail marker in the template are used for import. Element and attribute contents in the header section are also ignored. If the Starts Detail marker does not exist, all element and attribute to column mappings within the template are used for import. For more information about the Starts Detail marker, see The Detail Start element.
Matching template structure to XML
An XML import template must map the XML element and attribute names in the XML document to DataWindow column names, and it must reflect the nesting of elements and attributes in the XML.
The order of elements and attributes with column reference content in the template does not have to match the order of columns within the DataWindow, because import values are located by name match and nesting depth within the XML. However, the order of elements and attributes in the template must match the order in which elements and attributes occur in the XML. Each element or attribute that has column reference content in the template must occur in each row in the XML document or string. The required elements and attributes in the XML can be empty.
If an element or attribute does not occur in the XML document, the DataWindow import column remains empty.
The data for the DataWindow is held in the columns of the data table. Some data columns, such as those used for computed fields, may not have an associated control. To import data into a column that has no control reference, add a child DataWindow expression that contains the column name.
Remove tab characters
When you select a column name in the DataWindow expression dialog box, tab characters are added before and after the name. You should remove these characters before saving the expression.
Importing data with group headers
For XML import using a template, element and attribute contents in the header section are ignored. However, if the Starts Detail marker does not exist, all element and attribute to column mappings within the template are used for import. This has the following implications for DataWindow objects with group headers:
-
If data is imported to a Group DataWindow using a template that has a Starts Detail marker, the group header data is not imported because import starts importing from the Starts Detail location.
-
If the Group DataWindow has one group and the import template has no Starts Detail marker, all the data is imported successfully.
Nested groups cannot be imported
If the Group DataWindow has nested groups, the data cannot be imported successfully even if the Starts Detail marker in the import template is turned off.
DataWindow columns cannot be referenced twice for import. A second column reference to a DataWindow column within an XML import template is ignored.
An XML element or attribute name whose content references a DataWindow column for import must be unique within the level of nesting. It cannot occur twice in the template at the same nesting level.
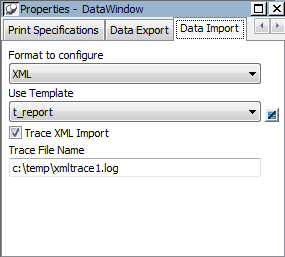
Setting the import template
The names of all templates for the current DataWindow object display in the Use Template drop-down list on the Data Import page in the Properties view.
Using export templates for import
If you have already defined an export template for a DataWindow object, you can use it as an import template, but only the mapping of column names to element attribute names is used for import. All other information in the template is ignored.
The template you select in the list box is used to conform the XML imported to the specifications defined in the named template. Selecting a template from the list sets the DataWindow object's Import.XML.UseTemplate property. You can also modify the value of the Import.XML.UseTemplate property dynamically in a script.
The Data Import page also contains a property that enables you to create a trace log of the import. See Tracing import.
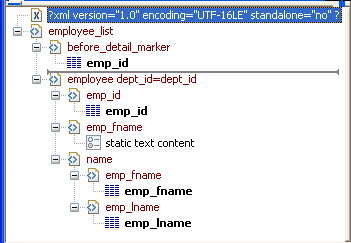
This example uses a DataWindow object that includes the columns emp_id, emp_fname, emp_lname, and dept_id. The template used in this example includes only these columns. Any other columns in the DataWindow remain empty when you import using this template.
To illustrate how template import works, create a new template that has one element in the header section, called before_detail_marker. This element contains a column reference to the emp_id column.
The Detail Start element, employee, has an attribute, dept_id, whose value is a control reference to the column dept_id. It also has three children:
-
The emp_id element contains a column reference to the emp_id column.
-
The emp_fname element contains static text.
-
The name element has two children, emp_fname and emp_lname, that contain column references to those columns.
The template exports and imports the dept_id DataWindow column using the attribute of the employee element. It exports and imports the emp_id, emp_fname, and emp_lname columns using the column references in the elements. The following shows the beginning of the XML exported using this template:
<?xml version="1.0" encoding="UTF-16LE" standalone="no"?>

<employee_list>
  <before_detail_marker>102</before_detail_marker>
  <employee dept_id="100">
     <emp_id>102</emp_id>
     <emp_fname>static text content</emp_fname>
     <name>
       <emp_fname>Fran</emp_fname>
       <emp_lname>Whitney</emp_lname>
     </name>
  </employee>
  <employee dept_id="100">
     <emp_id>105</emp_id>
     <emp_fname>static text content</emp_fname>
     <name>
       <emp_fname>Matthew</emp_fname>
       <emp_lname>Cobb</emp_lname>
     </name>
  </employee>
  ...
The exported XML can be reimported into the DataWindow columns dept_id, emp_id, emp_fname, and emp_lname. Before importing, you must set the import template on the Data Import page in the Properties view or in a script using the DataWindow object's Import.XML.UseTemplate property.
The following items are exported, but ignored on import:
-
The before_detail_marker element is ignored because it is in the header section.
-
The first occurrence of the element tag name emp_fname is ignored because it does not contain a mapping to a DataWindow column name.
If you change the nesting of the emp_fname and emp_lname elements inside the name element, the import fails because the order of the elements and the nesting in the XML and the template must match.
When there is no import template assigned to a DataWindow object with the UseTemplate property, PowerBuilder attempts to import the data using the default mechanism described in this section.
Elements that contain text
The text between the start and end tags for each element can be imported if the XML document data corresponds to the DataWindow column definition. For example, this is the case if the XML was exported from PowerBuilder using the default XML export template.
The text content of the XML elements must match the column order, column type, and validation requirements of the DataWindow columns. (The same restriction applies when you import data from a text file with the ImportFile method).
All element text contents are imported in order of occurrence. Any possible nesting is disregarded. The import process ignores tag names of the elements, attributes, and any other content of the XML document.
Empty elements
Empty elements (elements that have no content between the start and end tags) are imported as empty values into the DataWindow column. If the element text contains only white space, carriage returns, and new line or tab characters, the element is treated as an empty element.
Any attributes of empty elements are ignored.
Elements with non-text content
If the element has no text content, but does contain comments, processing instructions, or any other content, it is not regarded as an empty element and is skipped for import.
The three XML documents that follow all show the same result when you select Rows>Import in the DataWindow painter of if ImportFile is called with or without default arguments for start and end column, start and end row, and DataWindow start column.
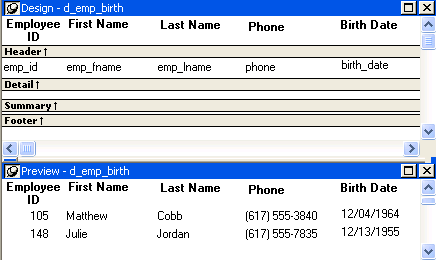
The DataWindow object has five columns: emp_id, emp_fname, emp_lname, phone, and birth_date.
Example 1
This example contains two rows, each with five elements that match the column order, type, and validation requirements for the DataWindow object.
<?xml version="1.0"?>
<d_emp_birth_listing>
   <d_emp_birth_row>
      <element_1>105</element_1>
      <element_2>Matthew</element_2>
      <element_3>Cobb</element_3>
      <element_4>6175553840</element_4>
      <element_5>04/12/1960</element_5>
   </d_emp_birth_row>
   <d_emp_birth_row>
      <element_1>148</element_1>
      <element_2>Julie</element_2>
      <element_3>Jordan</element_3>
      <element_4>6175557835</element_4>
      <element_5>11/12/1951</element_5>
   </d_emp_birth_row>
</d_emp_birth_listing>
Example 2
In this example, the elements are not contained in rows, but they still match the DataWindow object.
<?xml version="1.0"?>
<root_element>
   <element_1>105</element_1>
   <element_2>Matthew</element_2>
   <element_3>Cobb</element_3>
   <element_4>6175553840</element_4>
   <element_5>04/12/1960</element_5>
   <element_6>148</element_6>
   <element_7>Julie</element_7>
   <element_8>Jordan</element_8>
   <element_9>6175557835</element_9>
   <element_10>11/12/1951</element_10>
</root_element>
Example 3
The comments and processing instructions in this example are not imported. The nesting of the <first> and <last> elements within the <Name> element is ignored.
<?xml version="1.0"?>
<root_element>
<!-- some comment -->
<row_element><?process me="no"?>105<name Title="Mr">
<first>Matthew</first>
<last>Cobb</last>
</name>
<!-- another comment -->
<phone>6175553840</phone>
<birthdate>04/12/1960</birthdate>
</row_element>
<row_element>148<name Title="Ms">
<first>Julie</first>
<last>Jordan</last>
</name>
<phone>6175557835</phone>
<birthdate>11/12/1951</birthdate>
</row_element>
</root_element>
Result
All three XML documents produce this result:
|
emp_id |
emp_fname |
emp_lname |
phone |
birth_date |
|---|---|---|---|---|
|
105 |
Matthew |
Cobb |
6175553840 |
04/12/1960 |
|
148 |
Julie |
Jordan |
6175557835 |
11/12/1951 |
Example 4
This example uses the same DataWindow object, but there are two empty elements in the XML document. The first has no content, and the second has an attribute but no content. Both are imported as empty elements.
<?xml version="1.0"?>
<root_element>
<!-- some comment -->
<row_element>
<?process me="no"?>105<name Title="Mr">
<first>Matthew</first>
<!-- another comment -->
<last>Cobb</last>
</name>
<empty></empty>
<birthdate>04/12/1960</birthdate>
</row_element>
<row_element>148<name Title="Ms">
<empty attribute1 = "blue"></empty>
<last>Jordan</last>
</name>
<phone>6175557835</phone>
<birthdate>11/12/1951</birthdate>
</row_element>
</root_element>
Result
The XML document produces this result:
|
emp_id |
emp_fname |
emp_lname |
phone |
birth_date |
|---|---|---|---|---|
|
105 |
Matthew |
Cobb |
04/12/1960 |
|
|
148 |
Jordan |
6175557835 |
11/12/1951 |
When you import data from XML with or without a template, you can create a trace log to verify that the import process worked correctly. The trace log shows whether a template was used and if so which template, and it shows which elements and rows were imported.
To create a trace log, select the Trace XML Import check box on in the Data Import page in the Properties view and specify the name and location of the log file in the Trace File Name box. If you do not specify a name for the trace file, PowerBuilder generates a trace file with the name pbxmtrc.log in the current directory.
You can also use the Import.XML.Trace and Import.XML.TraceFile DataWindow object properties.
If you use ImportClipboard or ImportStringan import method to import the data, you must specify XML! as the importtype argument. For example:
ImportString(XML!, ls_xmlstring)
If you omit the importtype argument, the trace file is not created. You do not need to specify the importtype argument if you use ImportFile.
Example: default import
The following trace log shows a default import of the department table in the PB Demo database:
/*--------------------------------------------------*/
/*                09/10/2005 18:26                 */
/*--------------------------------------------------*/
CREATING SAX PARSER.
NO XML IMPORT TEMPLATE SET - STARTING XML DEFAULT IMPORT.
DATAWINDOW ROWSIZE USED FOR IMPORT: 3

ELEMENT: dept_id: 100
ELEMENT: dept_name: R & D
ELEMENT: dept_head_id: 501
--- ROW
ELEMENT: dept_id: 200
ELEMENT: dept_name: Sales
ELEMENT: dept_head_id: 902
--- ROW
ELEMENT: dept_id: 300
ELEMENT: dept_name: Finance
ELEMENT: dept_head_id: 1293
--- ROW
ELEMENT: dept_id: 400
ELEMENT: dept_name: Marketing
ELEMENT: dept_head_id: 1576
--- ROW
ELEMENT: dept_id: 500
ELEMENT: dept_name: Shipping
ELEMENT: dept_head_id: 703
--- ROW
Example: template import
The following trace log shows a template import of the department table. The template used is named t_1. Notice that the DataWindow column dept_id is referenced twice, as both an attribute and a column. The second occurrence is ignored for the template import, as described in Restrictions. The Detail Start element has an implicit attribute named __pbband which is also ignored.
/*---------------------------------------------------*/
/*                 09/10/2005 18:25                 */
/*---------------------------------------------------*/
CREATING SAX PARSER.
USING XML IMPORT TEMPLATE: t_1

XML NAMES MAPPING TO DATAWINDOW IMPORT COLUMNS:
ATTRIBUTE: /d_dept/d_dept_row NAME: '__pbband'
>>> RESERVED TEMPLATE NAME - ITEM WILL BE IGNORED
ATTRIBUTE: /d_dept/d_dept_row/dept_id_xml_name NAME: 'dept_id'
DATAWINDOW COLUMN: 1, NAME: 'dept_id'
ELEMENT: /d_dept/d_dept_row/dept_id_xml_name
>>> DUPLICATE DATAWINDOW COLUMN REFERENCE: 1, NAME: 'dept_id' - ITEM WILL BE IGNORED
ELEMENT: /d_dept/d_dept_row/dept_head_id
DATAWINDOW COLUMN: 3, NAME: 'dept_head_id'
ELEMENT: /d_dept/d_dept_row/dept_name
DATAWINDOW COLUMN: 2, NAME: 'dept_name'

ATTRIBUTE: /d_dept/d_dept_row/dept_id_xml_name NAME: 'dept_id': 100
ELEMENT: /d_dept/d_dept_row/dept_head_id: 501
ELEMENT: /d_dept/d_dept_row/dept_name: R & D
--- ROW
ATTRIBUTE: /d_dept/d_dept_row/dept_id_xml_name NAME: 'dept_id': 200
ELEMENT: /d_dept/d_dept_row/dept_head_id: 902
ELEMENT: /d_dept/d_dept_row/dept_name: Sales
--- ROW
ATTRIBUTE: /d_dept/d_dept_row/dept_id_xml_name NAME: 'dept_id': 300
ELEMENT: /d_dept/d_dept_row/dept_head_id: 1293
ELEMENT: /d_dept/d_dept_row/dept_name: Finance
--- ROW
ATTRIBUTE: /d_dept/d_dept_row/dept_id_xml_name NAME: 'dept_id': 400
ELEMENT: /d_dept/d_dept_row/dept_head_id: 1576
ELEMENT: /d_dept/d_dept_row/dept_name: Marketing
--- ROW
ATTRIBUTE: /d_dept/d_dept_row/dept_id_xml_name NAME: 'dept_id': 500
ELEMENT: /d_dept/d_dept_row/dept_head_id: 703
ELEMENT: /d_dept/d_dept_row/dept_name: Shipping
--- ROW


