About this chapter
Before you put a DataWindow object into production, you can enhance it to make it easier to use and interpret data. You do that in the DataWindow painter. This chapter describes basic enhancements you can make to a DataWindow object.
Related topics
Other ways to enhance DataWindow objects are covered in later chapters:
|
Chapter |
Explains how to |
|---|---|
|
Add controls to a DataWindow object and reorganize, position, and rotate them |
|
|
Specify display formats, edit styles, and validation rules for column data |
|
|
Limit which rows are displayed, the order in which they are displayed, and whether they are divided into groups |
|
|
Highlight data by using conditional expressions to modify the properties of controls in DataWindow objects |
|
|
Place reports inside DataWindow objects |
|
|
Use graphs to visually present information retrieved in a DataWindow object |
|
|
Use crosstabs to present analyses of data retrieved in a DataWindow object |
|
|
Use TreeViews to group data and display it hierarchically in a way that allows you to expand and collapse it |
|
|
Control update capabilities |
- Understanding the DataWindow painter Design view
- Using the DataWindow painter toolbars
- Using the Properties view in the DataWindow painter
- Selecting controls in the DataWindow painter
- Resizing bands in the DataWindow painter Design view
- Using zoom in the DataWindow painter
- Undoing changes in the DataWindow painter
The DataWindow painter provides views related to the DataWindow object you are working on. Interacting with these views is how you work in the DataWindow painter.
The following picture shows a DataWindow object in the DataWindow painter with the default layout.
Design view
The Design view at the top left shows a representation of the DataWindow object and its controls. You use this view to design the layout and appearance of the DataWindow object. Changes you make are immediately shown in the Preview view and the Properties view.
Preview view
The Preview view in the middle on the left shows the DataWindow object with data as it will appear at runtime. If the Print Preview toggle (File>Print Preview) is selected, you see the DataWindow object as it would appear when printed with an optional blue outline that shows where the page margins are located.
Export/Import Template view for XML
The Export/Import Template view for XML at the bottom left shows a default template for exporting and importing data in XML format. You can define custom templates for import and export. The templates are saved with the DataWindow object. For more information, see Exporting and Importing XML Data.
Export Template view for XHTML
The Export Template view for XHTML (not shown; see XHTML tab at the bottom left) shows a default template for exporting data in XHTML format. You can define custom XHTML export templates for customizing XML Web DataWindow generation. The templates are saved with the DataWindow object.
Properties view
The Properties view at the top right displays the properties for the currently selected control(s) in the DataWindow object, for the currently selected band in the DataWindow object, or for the DataWindow object itself. You can view and change the values of properties in this view.
Control List view
The Control List in the stacked pane at the bottom right view lists all controls in the DataWindow object. Selecting controls in this view selects them in the Design view and the Properties view. You can also sort controls by Control Name, Type, or Tag.
Data view
The Data view in the stacked pane at the bottom right displays the data that can be used to populate a DataWindow object and allows manipulation of that data.
Column Specifications view
The Column Specifications view in the stacked pane at the bottom right shows a list of the columns in the data source. For the columns, you can add, modify, and delete initial values, validation expressions, and validation messages. You can also specify that you want a column to be included in a prompt for retrieval criteria during data retrieval. To add a column to the DataWindow object, you can drag and drop the column from the Column Specifications view to the Design view. For external or stored procedure data sources, you can add, delete, and edit columns (column name, type, and length).
For most presentation styles, the DataWindow painter Design view is divided into areas called bands. Each band corresponds to a section of the displayed DataWindow object.
DataWindow objects with these presentation styles are divided into four bands: header, detail, summary, and footer. Each band is identified by a bar containing the name of the band above the bar and an Arrow pointing to the band.
These bands can contain any information you want, including text, drawing controls, graphs, and computed fields containing aggregate totals.
The following picture shows the Design view for a tabular DataWindow object.

|
Band |
Used to display |
|---|---|
|
Header |
Information at the top of every screen or page, such as the name of the report or current date |
|
Detail |
Data from the database or other data source |
|
Summary |
Summary information that displays after all the data, such as totals and counts |
|
Footer |
Information displayed at the bottom of every page or screen, such as page number and page count |
The header band contains heading information that is displayed at the top of every screen or page. The presentation style determines the contents of the header band:
-
If the presentation style is Tabular, Grid, or N-Up, the headings defined for the columns in the Database painter display in the header band and the columns display on a single line across the detail band
-
If the presentation style is Freeform, the header band is empty and labels display in the detail band next to each column
You can specify additional heading information (such as a date) in the header band and you can include pictures, graphic controls, and color to enhance the appearance of the band.
Displaying the current date
To include the current date in the header, you place a computed field that uses the Today DataWindow expression function in the header band. For information, see Adding computed fields to a DataWindow object.
The detail band displays the retrieved data. It is also where the user enters new data and updates existing data. The number of rows of data that display in the DataWindow object at one time is determined by the following expression:
(Height of the DataWindow object– Height of headers and footers) / Height of the detail band
The presentation style determines the contents of the detail band:
If the presentation style is Tabular, Grid, N-Up, or Label, the detail band displays column names, representing the columns
If the presentation style is Freeform, the labels defined for the columns in the Database painter display in the detail band with boxes for the data to the right
How PowerBuilder names the columns in the Design view
If the DataWindow object uses one table, the names of the columns in the Design view are the same as the names in the table.
If the DataWindow object uses more than one table, the names of the columns in the Design view are tablename_columnname. PowerBuilder prefaces the name of the column with the table name to prevent ambiguity, since different tables can have columns with the same name.
When you design the detail band of a DataWindow object, you can specify display and validation information for each column of the DataWindow object and add other controls, such as text, pictures, graphs, and drawing controls.
You use the summary and footer bands of the DataWindow object the same way you use summary pages and page footers in a printed report:
-
The contents of the summary band display at the end, after all the detail rows; this band often summarizes information in the DataWindow object
-
The contents of the footer band display at the bottom of each screen or page of the DataWindow object; this band often displays the page number and name of the report
The DataWindow painter contains three customizable PainterBars and a StyleBar.
For more information about using toolbars, see Using toolbars.
PainterBars
The PainterBars include buttons for standard operations (such as Save, Print, and Undo on PainterBar1), for common formatting operations (such as Currency, Percent, and Tab Order on PainterBar2), and for database operations (such as Retrieve and Insert Row on PainterBar3).
They also include six drop-down toolbars, which are indicated by a small black triangle on the right part of a button. The following table lists the drop-down toolbars that are available.The Controls toolbar is on PainterBar1. The other drop-down toolbars are on PainterBar2.
|
Toolbar |
Used to |
|---|---|
|
Background Color |
Specify the background color of one or more selected controls. |
|
Borders |
Specify borders for one or more selected controls. |
|
Controls |
Specify controls to add to a DataWindow object. |
|
Foreground Color |
Specify the foreground color of one or more selected controls. In a text control, the foreground color specifies the color of the text. |
|
Layout |
Specify the alignment, sizing, and spacing of selected controls. |
|
Slide |
Specify sliding for controls. |
StyleBar
The StyleBar includes buttons for applying properties (such as bold) to selected text elements.
Each part of the DataWindow object (such as text, columns, computed fields, bands, graphs, even the DataWindow object itself) has a set of properties appropriate to the part. The properties display in the Properties view.
You can use the Properties view to modify the parts of the DataWindow object.
To use the Properties view to modify the parts of the DataWindow object
-
Position the mouse over the part you want to modify.
-
Display the part's pop-up menu and select Properties.
If it is not already displayed, the Properties view displays. The view displays the properties of the currently selected control(s), the band, or the DataWindow object itself. The contents of the Properties view change as different controls are selected (made current).
For example, the Properties view for a column has tabbed property pages of information that you access by clicking the appropriate tab. If you want to choose an edit style for the column, you click the Edit tab. This brings the Edit page to the front of the Properties view.
The DataWindow painter provides several ways to select controls to act on. You can select multiple controls and act on all the selected controls as a unit. For example, you can move all of them or change the fonts used to display text for all of them.
Lasso selection
Use lasso selection when possible because it is fast and easy. Lasso selection is another name for the method described below for selecting neighboring multiple controls.
To select one control in a DataWindow object in the Design view
-
Click it.
The control displays with handles on it. Previously selected controls are no longer selected.
To select neighboring multiple controls in a DataWindow object in the Design view (lasso selection)
-
Press and hold the left mouse button at one corner of the neighboring controls.
-
Drag the mouse over the controls you want to select.
A bounding box (the lasso) displays.
-
Release the mouse button.
All the controls in the bounding box are selected.
To select non-neighboring multiple controls in a DataWindow object in the Design view
-
Click the first control.
-
Press and hold the Ctrl key and click additional controls.
All the controls you click are selected.
To select controls by type in the DataWindow object
-
Do one of the following:
-
Select Edit>Select>Select All to select all controls
-
Select Edit>Select>Select Text to select all text
-
Select Edit>Select>Select Columns to select all columns
-
To select controls by position in the DataWindow object
-
Do one of the following:
-
Select Edit>Select>Select Above to select all controls above the currently selected control
-
Select Edit>Select>Select Below to select all controls below it
-
Select Edit>Select>Select Left to select all controls to the left of it
-
Select Edit>Select>Select Right to select all controls to the right of it
-
To select controls in a DataWindow object in the Control List view
-
Select View>Control List from the menu bar.
-
Click a control in the list.
-
Press and hold the Ctrl key and click additional controls if desired.
Displaying information about the selected control
The name, x and y coordinates, width, and height of the selected control are displayed in the MicroHelp bar. If multiple controls are selected, Group Selected displays in the Name area and the coordinates and size do not display.
You can change the size of any band in the DataWindow object.
You can zoom the display in and out in four views in the DataWindow painter: the Design view, Preview view, Data view, and Column Specifications view. For example, if you are working with a large DataWindow object, you can zoom out the Design view so you can see all of it on your screen, or you can zoom in on a group of controls to better see their details.
To zoom the display in the DataWindow painter
-
Select the view you want to zoom (click in the view).
You can zoom the Design view, Preview view, Data view, and Column Specifications view.
-
Select Design>Zoom from the menu bar.
-
Select a built-in zoom percentage, or set a custom zoom percentage by typing an integer in the Custom box.
You use the Preview view of a DataWindow object to view it as it will appear with data and test the processing that takes place in it.
To display the Preview view of a DataWindow object open in the DataWindow painter:
-
If the Preview view is not already displayed, select View > Preview from the menu bar.
In the Preview view, the bars that indicate the bands do not display, and, if you selected Retrieve on Preview in the DataWindow wizard, PowerBuilder retrieves all the rows from the database. You are prompted to supply arguments if you defined retrieval arguments.
In external DataWindow objects
If the DataWindow object uses the External data source, no data is retrieved. You can import data, as described in Importing data into a DataWindow object.
In DataWindow objects that have stored data
If the DataWindow object has stored data in it, no data is retrieved from the database.
As the rows are being retrieved, the Retrieve button in the toolbarPainterBar changes to a Cancel button. You can click the Cancel button to stop the retrieval.
-
Test your DataWindow object.
For example, modify some data, update the database, re-retrieve rows, and so on, as described below.
Where PowerBuilder gets data
PowerBuilder follows this order of precedence to supply the data in your DataWindow object:
-
If you have saved data in the DataWindow object, PowerBuilder uses the saved rows from the DataWindow object and does not retrieve data from the database.
-
PowerBuilder uses the data in the cache, if there is any.
-
If there is no data in the cache yet, PowerBuilder retrieves data from the database automatically, with one exception. If the Retrieve on Preview option is off, you have to request retrieval explicitly, as described next.
Previewing without retrieving data
If you do not want PowerBuilder to retrieve data from the database automatically when the Preview view opens, you can clear the Retrieve on Preview option. The Preview view shows the DataWindow object without retrieving data.
To be able to preview without retrieving data automatically
-
Select Design>Options from the menu bar.
The DataWindow Options dialog box displays.
-
Clear the Retrieve on Preview check box on the General page.
When this check box is cleared, your request to preview the DataWindow object does not result in automatic data retrieval from the database.
Retrieve on Preview check box is available in the DataWindow wizards
During the initial creation of a DataWindow object, you can set the Retrieve on Preview option.
PowerBuilder uses data caching
When PowerBuilder first retrieves data, it stores the data internally. When it refreshes the Preview view, PowerBuilder displays the stored data instead of retrieving rows from the database again. This can save you a lot of time, since data retrieval can be time consuming.
How using data from the cache affects you
Because PowerBuilder accesses the cache and does not automatically retrieve data every time you preview, you might not have what you want when you preview. The data you see in preview and the data in the database can be out of sync.
For example, if you are working with live data that changes frequently or with statistics based on changing data and you spend time designing the DataWindow object, the data you are looking at may no longer match the database. In this case, retrieve again just before printing.
Explicitly retrieving data
You can explicitly request retrieval at any time.
To retrieve rows from the database
-
Do one of the following:
-
Click the Retrieve button in the PainterBar.
-
Select Rows>Retrieve from the menu bar.
-
Select Retrieve from the Preview view's pop-up menu.
-
Supplying argument values or criteria
If the DataWindow object has retrieval arguments or is set up to prompt for criteria, you are prompted to supply values for the arguments or to specify criteria.
PowerBuilder retrieves the rows. As PowerBuilder retrieves, the Retrieve button changes to a Cancel button. You can click the Cancel button to stop the retrieval at any time.
Sharing data with the Data view
The Data view displays data that can be used to populate a DataWindow object. When the ShareData pop-up menu item in the Data view is checked, changes you make in the Data view are reflected in the Preview view and vice versa.
Other options that affect retrieval
These other options can affect retrieval:
-
Retrieve Rows As Needed
Lets you specify that only the rows needed to display the current portion of the DataWindow object should be retrieved. When you scroll downward, additional rows are retrieved. This can speed up reporting in certain situations.
-
Retrieve Rows to Disk
Lets you specify that PowerBuilder should save retrieved data on your hard disk in a temporary file rather than keep the data in memory. When you preview the DataWindow object, PowerBuilder swaps rows of data from the temporary file into memory as needed.
For information, see Saving retrieved rows to disk.
You can add, modify, or delete rows in the Preview view. When you have finished manipulating the data, you can apply the changes to the database.
Changing input language
You (and your users) can add or modify data in a DataWindow object in multiple input languages. If you use multiple input languages, you can display a Language bar on your desktop to change the current input language. In a DataWindow object, the input language in effect the first time a column gets focus becomes the default input language for that column. If you subsequently change the input language when that column has focus, the new input language becomes the default for that column. This behavior does not apply to columns that have the RightToLeft property set.
If looking at data from a view or from more than one table
By default, you cannot update data in a DataWindow object that contains a view or more than one table. For more about updating DataWindow objects, see Controlling Updates in DataWindow objects.
To modify existing data
-
Tab to the field and enter a new value.
The Preview view uses validation rules, display formats, and edit styles that you have defined for the columns, either in the Database painter or in this particular DataWindow object.
To save the changes to the database, you must apply them, as described next.
To add a row
-
Click the Insert Row button.
PowerBuilder creates a blank row.
-
Enter data for a row.
To save the changes to the database, you must apply them, as described below.
Adding a row in an application
Clicking the Insert Row button in the Preview view is equivalent to calling the InsertRow method and then the ScrollToRow method at runtime.
Selecting Insert Row is equivalent to calling the insertRow method and then the scrollToRow method at runtime.
To delete a row
-
Click the Delete Row button.
PowerBuilder removes the row from the display.
To save the changes to the database, you must apply them, as described below.
Deleting a row in an application
Clicking the Delete Row button in the Preview view is equivalent to calling the DeleteRow method at runtime.
Selecting Delete Row is equivalent to calling the deleteRow method at runtime.
To apply changes to the database
-
Click the Update Database button.
PowerBuilder updates the table with all the changes you have made.
Applying changes in an application
Clicking the Update Database button in the Preview view is equivalent to calling the Update method at runtime.
Selecting Save is equivalent to calling the Update method at runtime.
You can display information about the data you have retrieved.
To display the row information
-
Select Rows>Described from the menu bar.
The Describe Rows dialog box displays, showing the number of:
-
Rows that have been deleted in the painter but not yet deleted from the database
-
Rows displayed in the Preview view
-
Rows that have been filtered
-
Rows that have been modified in the painter but not yet modified in the database
All row counts are zero until you retrieve the data from the database or add a new row. The count changes when you modify the displayed data or test filter criteria.
-
You can import and display data from an external source and save the imported data in the database.
To import data into a DataWindow object
-
Select Rows>Import from the menu bar.
-
Specify the file from which you want to import the data.
The types of files that you can import into the painter display in the List Files of Type drop-down list.
-
Click Open.
PowerBuilder reads the data from the file into the DataWindow painter. You can then click the Update Database button in the PainterBar to add the new rows to the database.
Data from file must match DataWindow definition
When importing data from a file, the datatypes of the data must match, column for column, all the columns in the DataWindow definition (the columns specified in the SELECT statement), not just the columns that are displayed in the DataWindow object.
For information about importing XML data, see Exporting and Importing XML Data.
You can print the data displayed in the Preview view. Before printing, you can preview the output on the screen.Your computer must have a default printer specified, otherwise properties handled by the printer driver, such as page orientation, are ignored.
To preview printed output before printing
-
Be sure the Preview view is selected (current) and then select File>Print Preview from the menu bar.
-
Print Preview displays the DataWindow object as it will print.
Using the IntelliMouse pointing device
Using the IntelliMouse pointing device, users can scroll a DataWindow object by rotating the wheel. Users can also zoom a DataWindow object larger or smaller by holding down the Ctrl key while rotating the wheel.
Controlling the display of rulers
You can choose whether to display rulers around page borders.
To control the display of rulers in Print Preview
-
Select/deselect File>Print Preview Rulers from the menu bar.
Changing margins
You can dynamically change margins while previewing a DataWindow object.
To change the margins in Print Preview
-
Drag the margin boundaries on the rulers.
The following picture shows the left and top margin boundaries. There are also boundaries for the right and bottom margins. The picture shows the outline of the margin. If you do not want to see the outline, clear the Print Preview Shows Outline check box on the Print Specifications page in the Properties view.
Changing margins at runtime
Using the Modify method, you can display a DataWindow object in print preview at runtime. While in print preview, users can also change margins by dragging boundaries. A user event in the DataWindow control (pbm_dwnprintmarginchange) is triggered when print margins are changed. Changing margins can affect the page count, so if you use the Describe method to display the page count in your application (for example, in MicroHelp), you must code a script for the user event to recalculate the page count.
Zooming the page
You can reduce or enlarge the amount of the page that displays in the Print Preview view. This does not affect the printed output.
To zoom the page on the display screen
-
Select File>Print Preview Zoom from the menu bar.
-
Select the magnification you want and click OK.
The display of the page zooms in or out as appropriate. The size of the contents of the page changes proportionately as you zoom. This type of zooming affects your display but does not affect printing.
Zooming the contents
In addition to zooming the display on the screen, you can also zoom the contents, affecting the amount of material that prints on a page.
To zoom the contents of a DataWindow object with respect to the printed page
-
Select Design>Zoom from the menu bar.
-
Select the magnification you want and click OK.
The contents of the page zooms in or out as appropriate. If you enlarge the contents so they no longer fit, PowerBuilder creates additional pages as needed.
You can print a DataWindow object while the Preview view is displayed. You can print all pages, a range of pages, only the current page, or only odd or even pages. You can also specify whether you want multiple copies, collated copies, and printing to a file.
Avoiding large rows
To avoid multiple blank pages and other anomalies in printed reports, no row in the DataWindow object should be larger than the size of the target page. The page boundary is often reached in long text columns with AutoSizeHeight on. It can also be reached when detail rows are combined with page and group headers and trailers, or when they contain multiple nested DataWindow objects or a column that has been resized to be larger than the page.
When a row contains large multiline edit columns, it can be broken into a series of rows, each containing one text line. These text lines become the source for a nested DataWindow object. The nested DataWindow object determines how many of its rows fit in the remaining page space.
Page break before last row
The summary band in a report is always printed on the same page as the last row of data. This means that you sometimes find a page break before the last row of data even if there is sufficient space to print the row. If you want the last row to print on the same page as the preceding rows, the summary band must be made small enough to fit on the page as well.
To print a DataWindow object
-
Select File>PrintReport from the menu bar to display the Print dialog box.
-
Specify the number of copies to print.
-
Specify the pages: select All or Current Page, or type page numbers and/or page ranges in the Pages box.
-
Specify all pages, even pages, or odd pages in the Print drop-down list.
If you want to print to a file rather than to the printer, select the Print to File check box.
If you want to change the collating option, clear or select the Collate Copies check box and click OK.
If you specified print to file, the Print to File dialog box displays.
-
Enter a file name and click OK.
The extension PRN indicates that the file is prepared for the printer. Change the drive, the directory, or both, if you want.
If you are viewing a grid-style DataWindow object in the Preview view, you can make the following changes. Whatever you do in the Preview view is reflected in the Design view:
-
Resize columns
-
Reorder columns
-
Split the display into two horizontal scrolling regions
You can use this feature to keep one or more columns stationary on the screen while scrolling through other columns.
-
Copy data to the clipboard
These features are also available to your users
Users of your application can also manipulate columns in these ways in a grid DataWindow object at runtime.
To resize a column in a grid DataWindow object
-
Position the mouse pointer at a column boundary in the header.
The pointer changes to a two-headed arrow.
-
Press and hold the left mouse button and drag the mouse to move the boundary.
-
Release the mouse button when the column is the correct width.
To reorder columns in a grid DataWindow object
-
Press and hold the left mouse button on a column heading.
PowerBuilder selects the column and displays a line representing the column border.
-
Drag the mouse left or right to move the column.
-
Release the mouse button.
To use split horizontal scrolling in a grid DataWindow object
-
To divide the grid into two regions that can scroll independently of each other, position the mouse pointer at the left end of the horizontal scroll bar.
The pointer changes to a two-headed arrow.
-
Press and hold the left mouse button and drag the mouse to the right to create a new horizontal scrolling border.
-
Release the mouse button.
You now have two independent scrolling regions in the grid DataWindow object.

To copy data to the clipboard from a grid DataWindow object
-
Select the cells whose data you want to copy to the clipboard:
-
To select an entire column, click its header.
-
To select neighboring columns, press and hold Shift, then click the headers.
-
To select non-neighboring columns, press and hold Ctrl, then click the headers.
-
To select cells, press the left mouse button on the bottom border of a cell and drag the mouse.
Selected cells are highlighted.
-
-
Select Edit>Copy from the menu bar.
The contents of the selected cells are copied to the clipboard. If you copied the contents of more than one column, the data is separated by tabs.
While previewing, you can save the data retrieved in an external file. Note that the data and headers (if specified) are saved. Information in the footer or summary bands is not saved unless you are saving as PDF or as a PSR file.
To save the data in a DataWindow object in an external file:
-
Select File>Save Rows As from the menu bar.
The Save As dialog box displays.
-
Choose a format for the file from the Save As Type drop-down list.
If you want the column headers saved in the file, select a file format that includes headers (such as Excel With Headers). When you select a with headers format, the names of the database columns (not the column labels) are also saved in the file.
When you choose a format, PowerBuilder supplies the appropriate file extension.
For TEXT, CSV, SQL, HTML, and DIF formats, select an encoding for the file.
You can select ANSI/DBCS, Unicode LE (Little-Endian), Unicode BE (Big-Endian), or UTF8.
-
Name the file and click Save.
PowerBuilder saves all displayed rows in the file; all columns in the displayed rows are saved. Filtered rows are not saved.
The rest of this section provides more information about saving data in PDF, HTML, and PSR formats.
For more information about saving data as XML, see Exporting and Importing XML Data.
PowerBuilder provides three ways to save a DataWindow object or DataStore in Portable Document Format (PDF).
Using PDFlib
Starting from PowerBuilder 2017, an alternative method is provided to directly print data to PDF without needing to install any third-party tool or driver or make any configuration. This method relies on a light-weight software called PDFlib which is automatically installed with PowerBuilder at no cost. And the DLL file for PDFlib (PBPDF.dll) is automatically packaged into the PowerBuilder application executable as well without requiring the developer to make any configuration or selection during the building process.
Starting from PowerBuilder 2019 R3, for new DataWindows, this method is automatically selected as the default PDF method (instead of the Distill! method with Ghostscript); but for existing DataWindows, you may need to manually set this method as the default PDF method using one of the ways described in section Saving as PDF using NativePDF! method with PDFlib.
Using Ghostscript
Starting from PowerBuilder 2019 R3, the Distill! method with Ghostscript is no longer the default method for new DataWindows when you select File>Save Rows As and select PDF as the file type. But for existing DataWindows, the Distill! method is still the default option in order to keep compatibility with the existing logics.
When using Ghostscript, the data is printed to a PostScript file first and then distilled to PDF using Ghostscript.
Installing Ghostscript and PostScript drivers
For licensing reasons, Ghostscript and the PostScript drivers required to use the Distill! method are not installed with PowerBuilder. You (and your users) must download and install them before you can use this technique. See System requirements for the Distill! method.
Using XSL-FO and Java printing
Building on the ability to save data as XML, PowerBuilder can also save the DataWindow object's data and presentation to PDF by generating XSL Formatting Objects (XSL-FO). This option provides a platform-independent solution by rendering the DataWindow using a Java process rather than the Microsoft GDI. It also offers the possibility of customizing the PDF file at the XSL-FO stage. Saving as PDF using XSL-FO is particularly useful if you want to print DataWindow objects on a UNIX operating system by using Java printing. The Ghostscript method and the PDFlib method are not supported on UNIX.
The XSL (Extensible Stylesheet Language) W3C Recommendation has two parts, XSLT and XSL-FO. XSLT provides the transformation typically used to present XML documents as HTML in a browser. XSL-FO provides extensive formatting capabilities that are not dependent on the output format.
For more information about XSL, see the latest version of the Extensible Stylesheet Language (XSL) at http://www.w3.org/TR/xsl/.
Limitations and unsupported features
The Ghostscript method and the PDFlib method currently do not support OLE DataWindow objects. The XSL-FO method currently does not support OLE, graph, and composite DataWindow objects.
The PDFlib method currently does not support the DataWindow object's background.property and the DataWindow object's margin settings.
The RichText DataWindow (no matter it uses the TX Text Control or the obsolete TE Edit Control) can directly generate a PDF file (using the DataWindow SaveAs function) without needing to specify the PDF method first, because it uses the PDF solution provided by TX Text Control or TE Edit Control, rather than using PDFlib, Ghostscript, or XSL-FO. Therefore, you can directly execute the following script to generate a PDF in the RichText DataWindow: dw_1.SaveAs ("c:\dw_one.pdf", PDF!, false).
For new DataWindows, if you want to save to PDF using PDFlib, you do not need to change any properties. The PDFlib method is used by default when you select Save Rows As from the File menu in the DataWindow painter and select PDF as the file type, or when you use the SaveAs method with PDF! as the file type.
But for existing DataWindows which are kept the same as before to use the Distill! method with Ghostscript as the default method, if you want to save to PDF using NativePDF! with PDFlib, you must set one or more properties. There are several ways to set the property. #1 can set all DataWindows in the current application at one time; #2 or #3 requires you to set each individual DataWindow one by one. These ways are listed in the order of precedence from highest to lowest: #1 > #2 > #3.
Note: the PDF export settings in PB.INI file (added in version 2019) have been removed.
#1: In the Application properties dialog box
This way can set NativePDF! as the default method for all DataWindows in the current application; instead of setting the DataWindows one by one. It has the highest priority over the other ways.
To save PDF output using PDFlib in the Application properties dialog box
-
In the Application painter, select the General tab page.
-
On the General tab page, click the Additional Properties button to display the Application properties dialog box.
-
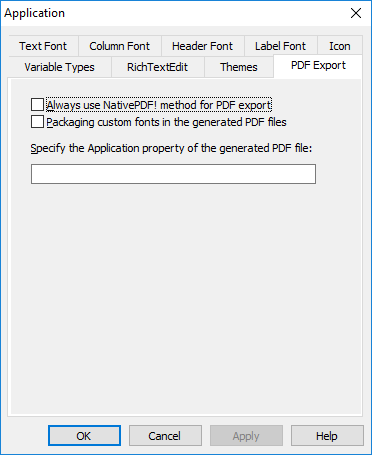
In the Application properties dialog box, select the PDF Export tab, and then select "Always use NativePDF! method for PDF export". It is not selected by default.
Packaging custom fonts in the generated PDF files -- If your DataWindow objects use many custom fonts, and these custom fonts are not supported well by the operating system and Adobe Reader, you can consider packaging these custom fonts with your application. Note that 1) using custom fonts will increase the generated PDF file size; by default, these custom fonts are not packaged with the application; 2) the Font embeddability property of custom fonts must be set to non-restricted; if it is set to restricted, then custom fonts cannot be embedded to the PDF file.
Specify the Application property of the generated PDF file -- Specify a value (normally the application name) as the Application property of the generated PDF file.
-
Click OK to save the settings.
#2: In a script
This way sets NativePDF! as the default method for an individual DataWindow.
In a script, set the Export.PDF.Method property to NativePDF! before saving the DataWindow object as PDF using the SaveAs method with the SaveAsType PDF!.
There are two methods to set the orientation mode and the paper size.
Method 1: set the Export.PDF.NativePDF.UsePrintSpec property to true, and then set the Print.Orientation and Print.Paper.Size properties. For example, to print the PDF file in the landscape mode, set the Print.Orientation property to 1, and to print the file size to Letter, set the Print.Paper.Size property to 1:
dw_1.Object.DataWindow.Export.PDF.NativePDF.UsePrintSpec = 'Yes'
dw_1.Object.DataWindow.Export.PDF.Method = NativePDF!
dw_1.Object.DataWindow.Export.PDF.NativePDF.PDFStandard = 1 //PDF/A-1a
dw_1.Object.DataWindow.Print.Orientation = 1 //Landscape!
dw_1.Object.DataWindow.Print.Paper.Size = 1 //1 – Letter 8 1/2 x 11 in
Method 2: set the Export.PDF.NativePDF.UsePrintSpec property to false, and then set the Export.PDF.NativePDF.CustomOrientation and Export.PDF.NativePDF.CustomSize properties. For example, to print the PDF file in the portrait mode, set the Export.PDF.NativePDF.CustomOrientation property to 2 and to print the file size to A4, set the Export.PDF.NativePDF.CustomSize property to 4:
dw_1.Modify ("DataWindow.Export.PDF.NativePDF.UsePrintSpec = No")
dw_1.Modify ("DataWindow.Export.PDF.Method = NativePDF!")
dw_1.Modify ("DataWindow.Export.PDF.NativePDF.PDFStandard = 1")
dw_1.Modify ("DataWindow.Export.PDF.NativePDF.CustomOrientation = 2")
dw_1.Modify ("DataWindow.Export.PDF.NativePDF.CustomSize = 4")
#3: In the DataWindow painter
This way sets NativePDF! as the default method for an individual DataWindow.
To save PDF output using PDFlib in the DataWindow painter
-
Select the Data Export tab in the Properties view for the DataWindow object.
-
Select PDF from the Format to Configure list and select NativePDF! from the Method list.
For new DataWindows, PDF and NativePDF! will be selected as by default.
-
Select a standard from the PDF Conformance list.
-
Specify the Author, Subject, and/or Keywords (if needed) which will be used as the property for the generated PDF file.
These properties (including the application name property) will not take effect when RichText DataWindows are saved as PDF.
-
Select the paper size and orientation in two methods:
-
method 1: select the "Use Paper Size and Orientation Settings from Print Specification" check box, so it uses the paper size and orientation settings in the Print Specification page;
-
method 2: keep the "Use Paper Size and Orientation Settings from Print Specification" check box unselected, and select from the Paper Size list and the Orientation list in the current Data Export page;
-
-
Save the DataWindow object, then select File>Save Rows As, select PDF as the Save As Type, specify a file name, and click Save.
See also
See the section called “Using the PDFlib generator” in Application Techniques for how to package the required files.
the section called “Export.PDF.Method” in DataWindow Reference
the section called “Export.PDF.NativePDF.Author” in DataWindow Reference
the section called “Export.PDF.NativePDF.CustomOrientation” in DataWindow Reference
the section called “Export.PDF.NativePDF.CustomSize” in DataWindow Reference
the section called “Export.PDF.NativePDF.Keywords” in DataWindow Reference
the section called “Export.PDF.NativePDF.ImageFormat” in DataWindow Reference
the section called “Export.PDF.NativePDF.PDFStandard” in DataWindow Reference
the section called “Export.PDF.NativePDF.Subject” in DataWindow Reference
the section called “Export.PDF.NativePDF.UsePrintSpec” in DataWindow Reference
PowerBuilder uses a PostScript printer driver specifically designed for distilling purposes to configure the PDF output. You can choose to use a different PostScript printer driver if you want to customize your PostScript settings for generating PDF. For more, see the section called “Using the Ghostscript distiller” in Application Techniques.
In the DataWindow painter
To use a custom PostScript printer driver, you must set some properties.
To save customized distilled PDF output in the DataWindow painter
-
Select the Data Export tab in the Properties view for the DataWindow object.
-
Select PDF from the Format to Configure drop-down list, select Distill! from the Method drop-down list, and select the Distill Custom PostScript check box.
-
Select the Print Specifications tab and specify the name of the printer whose settings you want to use in the Printer Name box.
-
Save the DataWindow object, then select File>Save Rows As, select PDF as the Save As Type, specify a file name, and click Save.
In a script
The properties you set in the DataWindow painter are saved with the DataWindow object and are used by default when your application runs, but for more control, specify the properties in a script before saving the DataWindow object. To specify a custom printer driver in a script, set the Export.PDF.Distill.CustomPostScript property to Yes and specify a printer with the DataWindow.Printer property:
int li_ret

dw_1.Object.DataWindow.Export.PDF.Method = Distill!
dw_1.Object.DataWindow.Printer = "\\prntsrvr\pr-6"
dw_1.Object.DataWindow.Export.PDF.Distill.CustomPostScript = "Yes"

li_ret = dw_1.SaveAs("custom.PDF", PDF!, true)
See also
the section called “Export.PDF.Method” in DataWindow Reference
the section called “Printer” in DataWindow Reference
the section called “Export.PDF.Distill.CustomPostScript” in DataWindow Reference
System requirements for the Distill! method
Users must have administrative privileges to create a PDF file.
To support saving as PDF using Ghostscript, you must download and install Ghostscript files on your system as described in the chapter on deploying applications and components in Application Techniques. You also need to install PostScript driver files.
If you have installed a PostScript printer on your computer, the PostScript driver files required to create PDF files, PSCRIPT5.DLL, PS5UI.DLL, and pscript.ntf, are already installed, typically in C:\Windows\System32\DriverStore\FileRepository\ntprint.inf_1a216484\Amd64 on a 64-bit Windows system. You must use the version of these files that is appropriate to the operating system where the PDF file is created. You should copy the files to the %AppeonInstallPath%\PowerBuilder [version]\IDE\drivers directory.
If you have never installed a PostScript printer, use the Printers and Faxes option in the Windows control panel to install a generic PostScript printer. If the Pscript5.dll has never been installed, you may be prompted to insert the Windows install CD.
Other related files are installed in %AppeonInstallPath%\PowerBuilder [version]\IDE\drivers.
When you deploy applications that use the ability to save as PDF with the Distill! method, you must make sure your users have installed Ghostscript and have access to the drivers directory.
See the section called “Using the Ghostscript distiller” in Application Techniques for more information about redistributing these files.
If you want to save to PDF using XSL-FO, you must set one or more properties before saving.
In the DataWindow painter
In the DataWindow painter, you set PDF export properties on the Data Export page in the Properties view.
To save PDF output using XSL-FO in the DataWindow painter
-
Select the Data Export tab in the Properties view for the DataWindow object.
-
Select PDF from the Format to Configure drop-down list and select XSLFOP! from the Method drop-down list.
-
(Optional) If you want simultaneously to send the output directly to a printer using the Java printing option of the Apache FOP processor, select the Print Using XSLFOP check box.
-
Save the DataWindow object, then select File>Save Rows As, select PDF as the Save As Type, specify a file name, and click Save.
PowerBuilder saves the data in the DataWindow object to the file you specified. If you selected the Print Using XSLFOP check box, it also sends the PDF file to the default printer for your system.
In a script
In a script, set the Export.PDF.Method property to XSLFOP! before saving the DataWindow object as PDF using the SaveAs method with the SaveAsType PDF!. To send the PDF file directly to the default printer, set the Export.PDF.XSLFOP.Print property to 1 or Yes before saving:
int li_ret
dw_1.Modify("DataWindow.Export.PDF.Method = XSLFOP! ")
dw_1.Modify("DataWindow.Export.PDF.xslfop.print = '1'")
li_ret = dw_1.SaveAs("printed.pdf", PDF!, true)
See also
the section called “Export.PDF.Method” in DataWindow Reference
the section called “Export.PDF.XSLFOP.Print” in DataWindow Reference
You can also save a DataWindow object as XSL-FO, then use the processor of your choice to convert the XSL-FO string to the format you want, applying your own customizations to the conversion. Processors such as the Apache XSL Formatting Objects processor (FOP) can convert XSL-FO documents into several output formats including PDF, PCL, and AWT.
In the DataWindow painter, select File>Save Rows As and select XSL-FO as the file type. In a script, you can use the SaveAs method with the SaveAsType XSLFO!.
For a DataWindow named dwemp, the following command lines show the FOP syntax for producing a PDF, a print preview rendered on screen (-awt), and printable output rendered and sent to a printer (-print):
Fop dwemp.fo dwemp.pdf
            Fop dwemp.fo -awt
            Fop dwemp.fo -print
For more information about using FOP, see the FOP page of the Apache XML Project website at http://xmlgraphics.apache.org/fop/.
The Apache XSL Formatting Objects processor (FOP) and the Oracle JDK are installed with PowerBuilder to support saving as XSL-FO, saving as PDF using XSL-FO, and Java printing.
When you deploy applications that use XSL-FO or Java printing, your users must have the FOP directory and the Java Runtime Environment installed on their computers. For more information, see the section called “Deploying Applications and Components” in Application Techniques.
On Windows DBCS platforms, you also need to install a file that supports DBCS characters to the Windows font directory, for example, C:\WINDOWS\fonts. To use these fonts, the userconfig.xml file in the FOP conf directory must be modified to give the full path name of the files you use, for example:
<font metrics-file="C:\Program%20Files\Appeon\PowerBuilder 21.0\IDE\fop-0.20.5\conf\cyberbit.xml" kerning="yes" embed-file="C:\WINNT\Fonts\Cyberbit.ttf">
For more information about configuring fonts, see the Apache website at http://xmlgraphics.apache.org/fop/.
HTML Table format is one of the formats in which you can choose to save data. When you save in HTML Table format, PowerBuilder saves a style sheet along with the data. If you use this format, you can open the saved file in a browser such as Internet Explorer. Once you have the file in HTML Table format, you can continue to enhance the file in HTML.
About the results
Some presentation styles translate better into HTML than others. The Tabular, Group, Freeform, Crosstab, and Grid presentation styles produce good results. The Composite, RichText, OLE 2.0, and Graph presentation styles and nested reports produce HTML tables based on the result set (data) only and not on the presentation style. DataWindows with overlapping controls in them might not produce the results you want.
To save a report as an HTML table
-
Open a DataWindow object.
-
Open the Preview view if it is not already open.
-
Select File>Save Rows As from the menu bar.
-
Choose the HTML Table format for the file from the Save As Type drop-down list.
-
Name the file.
PowerBuilder creates a file using the name you supplied and the extension htm.
-
Open a Web browser.
-
Use the browser's file open command to open the HTML file.
For more information about working with DataWindow objects and HTML, see the section called “Using DataWindow Objects” in DataWindow Programmers Guide.
A PSR file is a special file with the extension PSR created by PowerBuilder, InfoMaker, or DataWindow Designer.
Windows and PSR files
When PowerBuilder is installed, the PSR file type is registered with Windows.
A PSR file contains a DataWindow definition (source and object) as well as the data contained in the DataWindow object when the PSR file was created.
About reports
A report is the same as a nonupdatable DataWindow object. For more information, see Reports versus DataWindow objects.
You can use a PSR file to save a complete report (report design and data). This can be especially important if you need to keep a snapshot of data taken against a database that changes frequently.
PowerBuilder creates a PSR file when you save data in the Powersoft report file format. See Saving data in an external file. PSR files are used primarily by InfoMaker, a reporting tool. When an InfoMaker user opens a PSR file, InfoMaker displays the report in the Report painter. If InfoMaker is not already running, opening a PSR file automatically starts InfoMaker.
To open a PSR file in PowerBuilder, open any DataWindow object, then select File>Open File and select the PSR file.
- Changing the DataWindow object style
- Setting colors in a DataWindow object
- Setting gradients and background pictures in a DataWindow object
- Setting transparency properties for a DataWindow object
- Specifying properties of a grid DataWindow object
- Specifying pointers for a DataWindow object
- Defining print specifications for a DataWindow object
- Modifying text in a DataWindow object
- Defining the tab order in a DataWindow object
- Naming controls in a DataWindow object
- Using borders in a DataWindow object
- Specifying variable-height bands in a DataWindow object
- Modifying the data source of a DataWindow object
This section describes the general DataWindow object properties that you can modify.
The general style properties for a DataWindow object include:
-
The unit of measure used in the DataWindow object
-
A timer interval for events in the DataWindow object
-
A background color for the DataWindow object
PowerBuilder assigns defaults when it generates the basic DataWindow object. You can change the defaults.
To change the default style properties
-
Position the pointer in the background of the DataWindow object, display the pop-up menu, and select Properties.
The Properties view displays with the General page on top.
-
Click the unit of measure you want to use to specify distances when working with the DataWindow object:
-
PowerBuilder units (PBUs) Normalized units
-
Pixels (smallest element on the display monitor)
-
Thousandths of an inch
-
Thousandths of a centimeter
Choosing the unit of measure
If you plan to print the contents of the DataWindow object at runtime, change the unit of measure to inches or centimeters to make it easier to specify the margin measurements.
-
-
Specify the number of milliseconds you want between internal timer events in the DataWindow object.
This value determines how often PowerBuilder updates the time fields in the DataWindow object. (Enter 60,000 milliseconds to specify one minute.)
-
On the Background page, select a background color from the Color drop-down list. The default color is the window background color.
You can set different colors for each element of a DataWindow object to enhance the display of information.
To set a solid background color in a DataWindow object
-
Position the mouse on an empty spot in the DataWindow object, display the pop-up menu, and select Properties.
-
On the Background page in the Properties view for the DataWindow object, select Solid from the Brush Mode drop-down list and a color from the Color drop-down list.
To set a solid color for a band in a DataWindow object
-
Position the mouse pointer on the bar that represents the band, display the pop-up menu, then select Properties.
-
On the Background page in the Properties view, select Solid from the Brush Mode drop-down list and a color from the Color drop-down list.
The choice you make here overrides the background color for the DataWindow object.
To set solid colors in controls in a DataWindow object
-
Position the mouse pointer on the control, display the pop-up menu, then select Properties.
You can set colors in the Background page in the Properties view.
For controls that use text, you can set colors for text on the Font page in the Properties view. For drawing controls, you can set colors on the General or Background page in the Properties view.
You can use the background effects to give the DataWindow object more visual interest. For example, you can set a vertical gradient on a header band to differentiate it from the other bands in the DataWindow object:

To set a gradient background in a DataWindow object
-
Position the mouse on an empty spot in the DataWindow object, display the pop-up menu, and select Properties.
-
On the Background page in the Properties view for the DataWindow object, select a type of gradient from the Brush Mode drop-down list.
-
Select the primary (background) color from the Color drop-down list.
-
Select the secondary (gradient) color from the Gradient group Color drop-down list.
To set a picture as the background in a DataWindow object
-
Position the mouse on an empty spot in the DataWindow object, display the pop-up menu, and select Properties.
-
On the Background page in the Properties view for the DataWindow object, select Picture from the Brush Mode drop-down list.
-
Specify the image file in the File field in the Picture group.
-
From the Tile Mode drop-down list, select the style you want to use.
Selections from the drop-down list allow you to display the picture in its original size, stretch the picture in different directions, or tile multiple copies of the picture in a variety of possible patterns.
You can change the transparency settings for colors and pictures.
To set the transparency of a gradient in a DataWindow object
-
Position the mouse on an empty spot in the DataWindow object, display the pop-up menu, and select Properties.
-
On the Background page in the Properties view for the DataWindow object, locate the Gradient group.
-
Move the Gradient group Transparency slider until the gradient (secondary) color is set to the desired transparency.
You can see the appearance in the Design view. The more transparent the gradient color is, the more you will see the primary (background) color.
To set the transparency of a background picture in a DataWindow object
-
Position the mouse on an empty spot in the DataWindow object, display the pop-up menu, and select Properties.
-
On the Background page in the Properties view for the DataWindow object, locate the Picture group.
-
Move the Picture group Transparency slider until the image is set to the desired transparency.
You can see the appearance in the Design view.
In grid DataWindow objects, you can specify:
-
When grid lines are displayed
-
How users can interact with the DataWindow object at runtime
To specify basic grid DataWindow object properties
-
Position the mouse pointer on the background in a grid DataWindow object, display the pop-up menu, and select Properties.
-
Select the options you want in the Grid section on the General page in the Properties view as described in the following table.
Option
Result
On
Grid lines always display
Off
Grid lines never display (users cannot resize columns at runtime)
Display Only
Grid lines display only when the DataWindow object displays online
Print Only
Grid lines display only when the contents of the DataWindow object are printed
Column Moving
Columns can be moved at runtime
Mouse Selection
Data can be selected at runtime (and, for example, copied to the clipboard)
Row Resize
Rows can be resized at runtime
Width.AutoSize
The AutoWidth property takes one of these numeric values:
-
0 - No AutoWidth: This is the default value.
-
1 - AutoWidth is computed for visible rows (monotonic) and does not decrease when the widest column is reduced when scrolling.
-
2 - AutoWidth is computed for visible rows (non-monotonic).
-
3 - AutoWidth is computed for all retrieved rows.
You can set the AutoWidth property:
-
In the painter - in the Properties view, select one of the values in the drop-down list for the AutoWidth property.
-
In scripts - set the AutoWidth property to one of the numeric values.
-
Just as with colors, you can specify different pointers to use when the mouse is over a particular area of the DataWindow object. For example, you might want to change the pointer when the mouse is over a column whose data cannot be changed.
To change the mouse pointer used at runtime
-
Position the mouse over the element of the DataWindow object whose pointer you want to define, display the pop-up menu, and select Properties to display the appropriate Properties view.
You can set a pointer for the entire DataWindow object, specific bands, and specific controls.
-
Select the Pointer tab.
Either choose the pointer from the Stock Pointers list or, if you have a file containing pointer definitions (CUR files), enter a pointer file name.
You can use the Browse button to search for the file.
-
Click OK.
When you are satisfied with the look of the DataWindow object, you can define its print specifications.
To define print specifications for a DataWindow object
-
In the DataWindow painter, select Properties from the DataWindow object's pop-up menu.
-
In the Units box on the General page, select a unit of measure.
It is easier to specify the margins when the unit of measure is inches or centimeters.
-
Select the Print Specifications tab.
The Print Specifications properties use the units of measure you specified on the General page.
-
Specify print specifications for the current DataWindow object.
See the following table for more information.
Setting
Description
Document Name
Specify a name to be used in the print queue to identify the report.
Printer Name
Specify the name of a printer to which this report should be sent. If this box is empty, the report is sent to the default system printer. If the specified printer cannot be found, the report is sent to the default system printer if the Can Use Default Printer check box is selected. If the specified printer cannot be found and the Can Use Default Printer check box is not selected, an error is returned.
Margins
Specify top, bottom, left, and right margins. You can also change margins in the Preview view while you are actually looking at data. If you change margins in the Preview view, the changes are reflected here on the Print Specifications page.
Paper Orientation
Choose one of the following:
-
Default: Uses the default printer setup.
-
Portrait: Prints the contents of the DataWindow object across the width of the paper.
-
Landscape: Prints the contents of the DataWindow object across the length of the paper.
Paper Size
Choose a paper size or leave blank to use the default.
Paper Source
Choose a paper source or leave blank to use the default.
Prompt Before Printing
Select to display the standard Print Setup dialog box each time users make a print request.
Can Use Default Printer
Clear this check box if a printer has been specified in the Printer Name box and you do not want the report to be sent to the default system printer if the specified printer cannot be found. This box is checked by default if a printer name is specified.
Display Buttons - Print Preview
Select to display Button controls in Print Preview. The default is to hide them.
Display Buttons - Print
Select to display Button controls when you print the report. The default is to hide them.
Clip Text
Select to clip static text to the dimensions of a text field when the text field has no visible border setting. The text is always clipped if the text field has visible borders.
Override Print Job
When you print a series of reports using the PrintOpen, PrintDataWindow, and PrintClose methods, all the reports in the print job use the layout, fonts, margins, and other print specifications defined for the computer. Select this check box to override the default print job settings and use the print settings defined for this report.
Collate Copies
Select to collate copies when printing. Collating increases print time because the print operation is repeated to produce collated sets.
Print Preview Shows Outline
Select to display a blue outline to show the location of the margins.
Print Shows Background
Whether the background settings of the DataWindow and controls are included when the DataWindow is printed.
Preview Shows Background
Whether the background settings of the DataWindow and controls display in the print preview.
Newspaper Columns Across and Width
If you want a multiple-column report where the data fills one column on a page, then the second, and so on, as in a newspaper, select the number and width of the columns in the Newspaper Columns boxes. See Printing with newspaper-style columns.
-
When you define a DataWindow object, you can specify that it print in multiple columns across the page, like a newspaper. A typical use of newspaper-style columns is a phone list, where you want to have more than one column of names on a printed page.
Use Print Preview to see the printed output
Newspaper-style columns are used only when the DataWindow object is printed. They do not appear when a DataWindow object runs (or in Preview). Therefore, to see them in PowerBuilder, use Print Preview in the DataWindow painter.
To define newspaper-style columns for a DataWindow object
-
Build a tabular DataWindow object with the data you want.
-
Select Properties from the DataWindow object's pop-up menu.
-
Select the Print Specifications tab.
-
Specify the number of columns across the page and the width of columns in the Newspaper Columns Across and Newspaper Columns Width properties.
For each control in the DataWindow object that you do not want to have appear multiple times on the page (such as headers), select Properties from the control's pop-up menu and select the HideSnaked check box on the General page in the Properties view.
Example
This example describes how to create a newspaper-style DataWindow object using the Employee table in the PB Demo DB.
Create a tabular DataWindow object, selecting the last name, first name, and phone number columns, and add a title, page number, and date.
The Emp_Fname column and the text control holding a comma are defined as Slide Left, so they display just to the right of the Emp_Lname column.
On the Print Specifications page of the DataWindow object's Properties view, specify two columns across and a column width of 3.5 inches in the Newspaper Columns boxes. (Make sure that Units is set to inches on the General property page.)
To view the DataWindow object as it will be printed, place the pointer in the Preview view and select File>Print Preview.
The DataWindow object displays the result set in two columns. Everything above the column headers (which includes page number, title, and date) also shows twice because of the 2-column specification. This information should appear only once per page.
To specify that page number, title, and date appear only once on the page, you need to suppress printing after the first column. For each of these controls, select Properties from the control's pop-up menu. Then set the HideSnaked property.
The finished DataWindow object has one set of page heading information and two columns of column header and detail information.
When PowerBuilder initially generates the basic DataWindow object, it uses the following attributes and fonts:
-
For the text and alignment of column headings and labels, PowerBuilder uses the extended column attributes made in the Database painter.
-
For fonts, PowerBuilder uses the definitions made in the Database painter for the table. If you did not specify fonts for the table, PowerBuilder uses the defaults set in the Application painter.
You can override any of these defaults in a particular DataWindow object.
When PowerBuilder generates the basic DataWindow object, it assigns columns a default tab order, the default sequence in which focus moves from column to column when a user presses the Tab key at runtime. PowerBuilder assigns tab values in increments of 10 in left-to-right and top-to-bottom order.
Tab order is not used in the Design view
Tab order is used when a DataWindow object runs, but it is not used in the DataWindow painter Design view. In the Design view, the Tab key moves to the controls in the DataWindow object in the order in which the controls were placed in the Design view.
If the DataWindow object contains columns from more than one table
If you are defining a DataWindow object with more than one table, PowerBuilder assigns each column a tab value of 0, meaning the user cannot tab to the column. This is because, by default, multitable DataWindow objects are not updatable—users cannot modify data in them. You can change the tab values to nonzero values to allow tabbing in these DataWindow objects.
For more about controlling updates in a DataWindow object, see Controlling Updates in DataWindow objects.
Tab order changes have no effect in grid DataWindow objects
In a grid DataWindow object, the tab sequence is always left to right (except on right-to-left operating systems). Changing the tab value to any number other than 0 has no effect.
To change the tab order
-
Select Format>Tab Order from the menu bar or click the Tab Order button on PainterBar2.
The current tab order displays.
-
Use the mouse or the Tab key to move the pointer to the tab value you want to change.
-
Enter a new tab value in the range 0 to 9999.
0 removes the column from the tab order (the user cannot tab to the column). It does not matter exactly what value you use (other than 0); all that matters is relative value. For example, if you want the user to tab to column B after column A but before column C, set the tab value for column B so it is between the value for column A and the value for column C.
-
Repeat the procedure until you have the tab order you want.
-
Select Format>Tab Order from the menu bar or click the Tab Order button again.
PowerBuilder saves the tab order.
Each time you select Tab Order, PowerBuilder reassigns tab values to include any columns that have been added to the DataWindow object and to allow space to insert new columns in the tab order.
Changing tab order at runtime
To change tab order programmatically at runtime, use the SetTabOrder method.
You use names to identify columns and other controls in validation rules, filters, PowerScript functions, and DataWindow expression functions.
The DataWindow painter automatically generates names for all controls in a DataWindow object. To name columns, labels, and headings, the DataWindow painter uses database and extended attribute information. To name all other controls, it uses a system of prefixes. You can control the prefixes used for automatic name generation and you can specify the name of any control explicitly.
You can place borders around text, columns, graphs, and crosstabs to enhance their appearance. PowerBuilder provides six types of borders: Underline, Box, ResizeBorder, ShadowBox, Raised, and Lowered:

Border appearance varies
Changing the border style may not have the same effect on all Windows operating systems and display settings.
To add a border to a control in a DataWindow object
-
Select one or more controls.
-
Select the border you want from the Border drop-down toolbar in the PainterBar.
PowerBuilder places the border around the selected controls.
You can also specify a border for one or more controls in the Properties view on the General page.
Sometimes DataWindow objects contain columns whose data is of variable length. For example, a Memo column in a table might be a character column that can take up to several thousand characters. Reserving space for that much information for the column in the detail band would make the detail band's height very large, meaning users could see few rows at a time.
The detail band can resize based on the data in the Memo column. If the Memo column has only one line of text, the detail band should be one line. If the Memo column has 20 lines of text, the detail band should be 20 lines high.
To provide a band that resizes as needed, specify that the variable-length columns and the band have Autosize Height.All bands in the DataWindow can be resized, but nested report overflow is supported only in the Detail band. If autosizing would preclude the display of at least one Detail band row per page, other bands cannot be autosized. Autosizing is not supported with the Graph, RichText, OLE, or Label presentation styles.
To create a resizable band in a DataWindow object
-
Select Properties from the pop-up menu of a column that should resize based on the amount of data.
-
Select the Autosize Height check box on the Position page.
-
Clear the Auto Horizontal Scroll check box on the Edit page.
PowerBuilder wraps text in the Preview view instead of displaying text on one scrollable line.
-
Repeat steps 1 to 3 for any other columns that should resize.
-
Select Properties from the band's pop-up menu.
-
Select the Autosize Height check box on the General page.
In the Preview view, the band resizes based on the contents of the columns you defined as having their height sized automatically.
Using the RowHeight function with Autosize Height
When a detail band has Autosize Height set to "true", you should avoid using the RowHeight DataWindow expression function to set the height of any element in the row. Doing so can result in a logical inconsistency between the height of the row and the height of the element. If you need to use RowHeight, you must set the Y coordinate of the element to 0 on the Position page in the Properties view, otherwise the bottom of the element might be clipped. You must do this for every element that uses such an expression. If you move any elements in the band, make sure that their Y coordinates are still set to 0.
You should not use an expression whose runtime value is greater than the value returned by RowHeight. For example, you should not set the height of a column to rowheight() + 30. Such an expression produces unpredictable results at runtime.
Clipping columns
You can have Autosize Height columns without an Autosize Height detail band. If such a column expands beyond the size of the detail band in the Preview view, it is clipped.
When modifying a DataWindow object, you might realize that you have not included all the columns you need, or you might need to define retrieval arguments. You can modify the data source from the DataWindow painter. How you do it depends on the data source.
If the data source is SQL (such as Quick Select, SQL Select, or Query), you can graphically modify the SQL SELECT statement.
To modify a SQL data source
-
Select Design>Data Source from the menu bar.
PowerBuilder returns you to the SQL Select painter. (If you used Quick Select to define the data source, this might be the first time you have seen the SQL Select painter.)
-
Modify the SELECT statement graphically using the same techniques as when creating it.
For more information, see Using SQL Select.
Modifying the statement syntactically
Select Design>Convert to Syntax from the menu bar to modify the SELECT statement syntactically.
-
Click the Return button to return to the painter.
Some changes you make (such as adding or removing columns) require PowerBuilder to modify the update capabilities of the DataWindow object.
For more information about controlling updates in a DataWindow object, see Controlling Updates in DataWindow objects.
Changing the table
If you change the table referenced in the SELECT statement, PowerBuilder maintains the columns in the Design view (now from a different table) only if they match the datatypes and order of the columns in the original table.
Modifying the retrieval arguments
You can add, modify, or delete retrieval arguments when modifying your data source.
To modify the retrieval arguments
-
In the SQL Select painter, select Design>Retrieval Arguments from the menu bar.
The Specify Retrieval Arguments dialog box displays, listing the existing arguments.
-
Add, modify, or delete the arguments.
-
Click OK.
You return to the SQL Select painter, or to the text window displaying the SELECT statement if you are modifying the SQL syntactically.
Reference any new arguments in the WHERE or HAVING clause of the SELECT statement.
For more information about retrieval arguments, see Defining DataWindow Objects.
If the data source is External or Stored Procedure, you can modify the result set description.
To modify a result set
-
If the Column Specification view is not open, select View>Column Specifications from the menu bar.
-
Review the specifications and make any necessary changes.
If the data source is a stored procedure
If you are modifying the result set for a DataWindow object whose data source is a stored procedure, the pop-up menu for the Column Specification view contains the menu item Stored Procedure.
-
Select Stored Procedure from the Column Specification view's pop-up menu to edit the Execute statement, select another stored procedure, or add retrieval arguments. For more information about editing the Execute statement, see Using Stored Procedure.
Usually you retrieve data into a DataWindow object from the database, because the data is changeable and you want the latest information. However, sometimes the data you display in a DataWindow object never changes (as in a list of states or provinces), and sometimes you need a snapshot of the data at a certain point in time. In these situations, you can store the data in the DataWindow object itself. You do not need to go out to the database or other data source to display the data.
The most common reason to store data in a DataWindow object is for use as a drop-down DataWindow where the data is not coming from a database. For example, you might want to display a list of postal codes for entering values in a State or Province column in a DataWindow object. You can store those codes in a DataWindow object and use the DropDownDataWindow edit style for the column.
For more information about using the DropDownDataWindow edit style, see Displaying and Validating Data.
To store data in a DataWindow object:
-
If the Data view is not already displayed, select View > Data from the menu bar.
In the default layout for the DataWindow painter, the Data view displays in a stacked pane under the Properties view. All columns defined for the DataWindow object are listed at the top.
-
Do any of the following:
-
Click the Insert Row button in the PainterBar to create an empty row and type a row of data. You can enter as many rows as you want.
-
Click the Retrieve button in the PainterBar to retrieve all the rows of data from the database. You can delete rows you do not want to save or manually add new rows.
-
Click the Delete button in the PainterBar to delete unwanted rows.
Data changes are local to the DataWindow object
Adding or deleting data here does not change the data in the database. It only determines what data will be stored with the DataWindow object when you save it. The Update DB button is disabled.
-
-
When you have finished, save the DataWindow object.
When you save the DataWindow object, the data is stored in the DataWindow object.
Sharing data with the Preview view
To see changes you make in the Data view reflected in the Preview view, select ShareData from the pop-up menu in the Data view.The Preview view shows data from the storage buffer associated with the Data view.
Saving the DataWindow object without data
If you saved the DataWindow object with data to obtain a snapshot, you usually need to save it again without data. To do so, select Delete All Rows from the pop-up menu in the Data view before saving.
Sharing DataWindow objects with other developers
Storing data in a DataWindow object is a good way to share data and its definition with other developers. They can simply open the DataWindow object on their computers to get the data and all its properties.
Data stored in a DataWindow object is stored within the actual object itself, so when a window opens showing such a DataWindow, the data is already there. There is no need to issue Retrieve to get the data.
PowerBuilder never retrieves data into a drop-down DataWindow that already contains data. For all other DataWindow objects, if you retrieve data into a DataWindow object stored with data, PowerBuilder handles it the same as a DataWindow object that is not stored with data: PowerBuilder gets the latest data by retrieving rows from the database.
In a DataWindow object, you can prompt for retrieval criteria, retrieve rows as needed, and save retrieved rows to disk.
You can define your DataWindow object so that it always prompts for retrieval criteria just before it retrieves data. PowerBuilder allows you to prompt for criteria when retrieving data for a DataWindow control, but not for a DataStore object.
To prompt for retrieval criteria in a DataWindow object
-
If the Column Specifications view is not already displayed, select View > Column Specifications from the menu bar.
In the default layout for the DataWindow painter, the Column Specifications view displays in a stacked pane under the Properties view. All columns defined for the DataWindow object are listed in the view.
-
Select the Prompt check box next to each column for which you want to specify retrieval criteria at runtime.
When you specify prompting for criteria, PowerBuilder displays the Specify Retrieval dialog box just before a retrieval is to be done. (It is the last thing that happens before the SQLPreview event.)
Each column you selected in the Column Specification view displays in the grid. Users can specify criteria here exactly as in the grid in the Quick Select dialog box. Criteria specified here are added to the WHERE clause for the SQL SELECT statement defined for the DataWindow object.
Testing in PowerBuilder
You can test the prompting for criteria by retrieving data in the Preview view of the DataWindow object.
Using edit styles
If a column uses a code table or the RadioButton, CheckBox, or DropDownListBox edit style, an arrow displays in the column header and users can select a value from a drop-down list when specifying criteria:
If you do not want the drop-down list used for a column for specifying retrieval criteria to display, select the Override Edit check box on the General page of the column's Properties view.
Forcing the entry of criteria
If you have specified prompting for criteria for a column, you can force the entry of criteria for the column by selecting the Equality Required check box on the Behavior page of the column's Properties view. PowerBuilder underlines the column header in the grid during prompting. Selection criteria for the specified column must be entered, and the = operator must be used.
For more information
The section Using Quick Select describes in detail how you and your users can specify selection criteria in the grid.
The chapter on dynamic DataWindow objects in the DataWindow Programmers Guide describes how to write code to allow users to specify retrieval criteria at runtime.
If a DataWindow object retrieves hundreds of rows, there can be a noticeable delay at runtime while all the rows are retrieved and before control returns to the user. For these DataWindow objects, PowerBuilder can retrieve only as many rows as it has to before displaying data and returning control to the user.
For example, if a DataWindow object displays only 10 rows at a time, PowerBuilder only needs to retrieve 10 or more rows before presenting the data. Then, as users page through the data, PowerBuilder continues to retrieve what is necessary to display the new information. There may be slight pauses while PowerBuilder retrieves the additional rows, but these pauses are usually preferable to waiting a long time to start working with data.
To specify that a DataWindow object retrieve only as many rows as it needs to
-
Select Rows > Retrieve Options > Rows As Needed from the menu bar.
With this setting, PowerBuilder presents data and returns control to the user when it has retrieved enough rows to display in the DataWindow object.
Retrieve Rows As Needed is overridden if you have specified sorting or have used aggregate functions, such as Avg and Sum, in the DataWindow object. This is because PowerBuilder must retrieve every row before it can sort or perform aggregates.
In a multiuser situation, Retrieve Rows As Needed might lock other people out of the tables.
If you want to maximize the amount of memory available to PowerBuilder and other running applications, PowerBuilder can save retrieved data on your hard disk in a temporary file rather than keep the data in memory. PowerBuilder swaps rows of data from the temporary file into memory as needed to display data.
