About this chapter
This chapter describes how you can customize the PowerBuilder development environment to suit your needs and get the most out of PowerBuilder's productivity features.
When you start PowerBuilder, you might want to resume work on an existing project. You can have PowerBuilder open the workspace that you used last, and even open the painters you had open, with the last Script view you touched open at the code you were working on.
There are three options on the Workspaces page of the System Options dialog box that you can use to determine what displays when you start PowerBuilder.
Opening just the workspace
If you want PowerBuilder to open the last workspace you used at startup, select the Workspaces page and then check Reopen Workspace on Startup.
Opening the workspace, painters, and scripts
If you want PowerBuilder to open the last workspace you used and the painters and editors you were using, check Reopen Workspace on Startup and Reload Painters When Opening Workspace. When you open PowerBuilder, any painters and editors that were open when you closed PowerBuilder are reloaded. If you edited a script before closing PowerBuilder, the Script view is scrolled to show the last line you edited.
Opening with no workspace
If you want PowerBuilder to open without loading a workspace, clear Reopen Workspace on Startup. If you want the painters and editors that were open when you last used a workspace to be reloaded when you reopen it, clear Reopen Workspace on Startup and check Reload Painters When Opening Workspace.
Displaying the Welcome dialog box
If you want to see the Welcome to PowerBuilder dialog box when you start PowerBuilder, check Show Start Dialog at Startup with no Workspace and clear Reopen Workspace on Startup. The Welcome to PowerBuilder dialog box is shown in The PowerBuilder environment.
Double-click a workspace file in Windows Explorer. Workspaces have a .pbw extension. PowerBuilder starts with the workspace open.
You can log in PowerBuilder from a command line (or the Windows Run dialog box) if you have an online license for PowerBuilder.
The syntax is:
directory\pb190.exe {/AC useraccount} {/PW password} {/RC value} {/ALS value} {/SOE value}or
directory\pb190.exe {/LIF loginfile}where directory is the fully qualified name of the directory containing PowerBuilder.
For example,
pb190 /AC test@appeon.com /PW xxxxxxx /RC N /ALS N /SOE Y
or
pb190 /LIF c:\test.ini
|
Option |
Description |
|---|---|
|
/AC |
User Account. |
|
/PW |
User Password. |
|
/RC |
Remember Credentials (Y or N), default is Y. /RC is always Y when /ALS is Y. Therefore, the /RC value will be ignored, if /ALS is set to Y. This parameter takes effect only when both /AC and /PW are set. |
|
/ALS |
Auto Login at Startup (Y or N), default is Y. This parameter takes effect only when both /AC and /PW are set. |
|
/SOE |
Sign Out on Exit (Y or N), default is Y. This parameter takes effect only when both /AC and /PW are set. |
|
/LIF |
The full path to the license login initialization file which contains your encrypted password and other login settings. The file is created by an independent tool (%AppeonInstallPath%\PowerBuilder [version]\Tools\LoginIniFileCreator.exe). You can specify the user account, the password, the login settings, and the file path in this tool. The password will be encrypted in the generated file to protect your login credentials. (If you want to copy the tool to other places, make sure to copy the executable file as well as the msvcp100.dll and msvcr100.dll files under the same folder). |
You can also start PowerBuilder from a command line and optionally open a workspace, target, and/or painter. These are the painters and tools you can open:
-
Application painter
-
Database painter
-
Data Pipeline painter
-
DataWindow painter
-
Debugger
-
File Editor
-
Function painter
-
Library painter
-
Menu painter
-
Query painter
-
Structure painter
-
User Object painter
-
Window painter
The syntax is:
directory\pb190.exe {/workspace workspacepath} {/target targetpath} {/painter paintername} {/output outputpath}where directory is the fully qualified name of the directory containing PowerBuilder.
You can also add one or more of the following options to the command line after /painter paintername to open a specific object or create a new one:
{/library libraryname} {/object objectname} {/inherit objectname} {/new} {/run} {/runonly} {/argument arguments}The syntax statements show the long form of option names. You need only use the initial letter or letters of the option name as long as the option is uniquely identified, as shown in the following table.
|
Option |
Description |
|---|---|
|
/W workspacepath |
Opens the workspace workspacepath. The default is the most recently used workspace if you have selected the Reopen Workspace on Startup check box in the System Options dialog box. If you have not selected this check box, you must specify the /W option before specifying any other options. |
|
/T targetpath |
Opens the target targetpath. |
|
/P paintername |
Opens the painter paintername. The default is the window that displays when you begin a new PowerBuilder session. The painter name must uniquely identify the painter. You do not have to enter the entire name. For example, you can enter q to open the Query painter and datab to open the Database painter. If you enter the full name, omit any spaces in the name (enter UserObject and DataPipeline, for example). The painter name is not case sensitive. To open the file editor, you could set paintername to FI or fileeditor. Except for the /W, /T, and /L switches, other switches must follow /P paintername on the command line, as shown in the examples after the table. |
|
/OU outputpath |
Logs the contents of the Output window to outputpath. |
|
/L libraryname |
Identifies the library that contains the object you want to open. |
|
/O objectname |
Identifies the object, such as a DataWindow object or window, you want to open. |
|
/I objectname |
Identifies the object you want to inherit from. |
|
/N |
Creates a new DataWindow object. |
|
/R |
Runs the DataWindow object specified with /O and allows designing. |
|
/RO |
Runs the DataWindow object specified with /O but does not allow designing. |
|
/A arguments |
Provides arguments for the specified DataWindow object. |
Examples
The following examples assume that the location of the PowerBuilder executable file is in your system path.
This example starts a PowerBuilder session by opening the Window painter in the Client PBL in the Math workspace. The output of the session is sent to a file called math.log. The workspace file, the PBL, and the log file are all in the current directory:
pb190 /w Math.pbw /l Client.pbl /p window /out math.log
Enter this command to start PowerBuilder and open the DataWindow object called d_emp_report in the workspace Emp.pbw:
pb190 /w D:\pbws\Emp.pbw /P dataw /O d_emp_report
Building from the command line
You can also build and deploy a workspace from the command line. For more information, see Building workspaces.
You can change the layout of the PowerBuilder main window in several ways. This section describes:
-
Showing or hiding the System Tree, Output, and Clip windows and changing their locations
-
Showing or hiding views in painters and changing their locations
You can also show or hide toolbars, change their locations, and add custom buttons. See Using toolbars.
Hiding windows
The System Tree, Output, and Clip windows can all be hidden at any time by clicking their buttons on the PowerBar.
Moving windows
You can dock the System Tree, Output, and Clip windows at the top, bottom, left, or right of the PowerBuilder main window by dragging the double bar at the top or side of the windows.
Using the full width or height of the main window
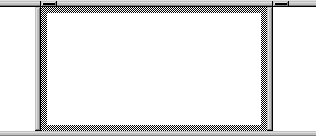
Windows docked at the top or bottom of the main window occupy the full width of the frame. You can change this default by clearing the Horizontal Dock Windows Dominate check box on the General page System Options dialog box. The following screen shows the Output window docked at the bottom of the window. The Horizontal Dock Windows Dominate check box has been cleared so that the System Tree occupies the full height of the window:

Most of the PowerBuilder painters have views. Each view provides a specific way of viewing or modifying the object you are creating or a specific kind of information related to that object. Having multiple views available in a painter window means you can work on more than one task at a time. In the Window painter, for example, you can select a control in the Layout view to modify its properties, and double-click the control to edit its scripts.
Views are displayed in panes in the painter window. Some views are stacked in a single pane. At the bottom of the pane there is a tab for each view in the stack. Clicking the tab for a view pops that view to the top of the stack.
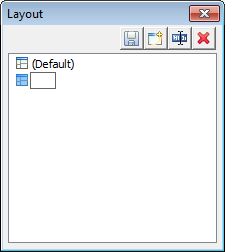
Each painter has a default layout, but you can display the views you choose in as many panes as you want to and save the layouts you like to work with. For some painters, all available views are included in the default layout; for others, only a few views are included.
Each pane has:
-
A title bar you can display temporarily or permanently
-
A handle in the top-left corner you can use to drag the pane to a new location
-
Splitter bars between the pane and each adjacent pane
For most views, a title bar does not permanently display at the top of a pane because it is often unnecessary, but you can display a title bar for any pane either temporarily or permanently.
To display a title bar
-
Place the pointer on the splitter bar at the top of the pane.
The title bar displays.
To display the title bar permanently, click the pushpin at the left of the title bar or select Pinned from its pop-up menu.
-
Click the pushpin again or select Pinned again on the pop-up menu to hide the title bar.
After you display a title bar either temporarily or permanently, you can use the title bar's pop-up menu.
You can move a pane or a view to any location in the painter window. You might find it takes a while to get used to moving panes and views around, but if you do not like a layout, you can always revert to the default layout and start again. To restore the default layout, select View>Layouts>Default.
To move a pane, select and drag the title bar of the view that is at the top of the stack. If the pane contains stacked views, all views in the stack move together. To move one of the views out of the stack, drag the tab for the view you want to move.
To move a pane
-
Place the pointer anywhere on the title bar of the view at the top of the stack, hold down the left mouse button, and start moving the pane.
A gray outline appears around the pane:
-
Drag the outline to the new location.
The outline changes size as you drag it. When the pointer is over the middle of a pane, the outline fills the pane. As you drag the pointer toward any border, the outline becomes a narrow rectangle adjacent to that border. When the pointer is over a splitter bar between two panes, rows, or columns, the outline straddles the splitter bar:
When you move the pointer to a corner
When you move the pointer to a corner, you will find that you have many places where you can drop the outline. To see your options, move the pointer around in all directions in the corner and see where the outline displays as you move it.
-
Release the mouse button to drop the outline in the new location:
To move a pane here
Drop the outline here
Between two panes
On the splitter bar between the panes
Between a border and a pane
At the side of the pane nearest the border
Into a new row
On the splitter bar between two rows or at the top or bottom of the painter window
Into a new column
On the splitter bar between two columns or at the left or right edge of the painter window
Onto a stack of panes
On the middle of the pane (if the pane was not already tabbed, tabs are created)

To move a view in a stacked pane
-
Place the pointer anywhere on the view's tab, hold down the left mouse button, and start moving the view.
You can now move the view as in the previous procedure. If you want to rearrange the views in a pane, you can drag the view to the left or right within the same pane.
Panes are docked by default within a painter window, but some tasks may be easier if you float a pane. A floating pane can be moved outside the painter's window or even outside the PowerBuilder window.
When you open another painter
If you have a floating pane in a painter and then open another painter, the floating pane temporarily disappears. It reappears when the original painter is selected.
You may want to add additional views to the painter window. You can open only one instance of some views, but you can open as many instances as you need of others, such as the Script view. If there are some views you rarely use, you can move them into a stacked pane or remove them. When removing a view in a stacked pane, make sure you remove the view and not the pane.
To add a new view to the painter window
-
Select View from the menu bar and then select the view you want to add.
The view displays in a new pane in a new row.
-
Move the pane where you want it.
For how to move panes, see Moving and resizing panes and views.
To remove a view in its own pane from the painter window
-
If the view's title bar is not displayed, display it by placing the pointer on the splitter bar at the top of the pane.
-
Click the Close button on the title bar.
When you have rearranged panes in the painter window, PowerBuilder saves the layout in the registry. The next time you open the painter window, your last layout displays. You can also save customized layouts so that you can switch from one to another for different kinds of activities.
To save customized layouts for a painter window
-
Select View>Layouts>Manage from the menu bar.
-
Click the New Layout button (second from the left at the top of the dialog box).
-
Type an appropriate name in the text box and click OK.
You can restore the default layout at any time by selecting View>Layout>Default.
Toolbars provide buttons for the most common tasks in PowerBuilder. You can move (dock) toolbars, customize them, and create your own.
PowerBuilder uses three toolbars: the PowerBar, PainterBar, and StyleBar:
|
This toolbar |
Has buttons for |
And (unless hidden) displays |
|---|---|---|
|
PowerBar |
Opening painters and tools |
Always |
|
PainterBar |
Performing tasks in the current painter |
In each painter or editor; some painters have more than one PainterBar |
|
StyleBar |
Changing properties of text, such as font and alignment |
In appropriate painters |
To reduce the size of toolbars, some toolbar buttons have a down arrow on the right that you can click to display a drop-down toolbar containing related buttons.
For example, the down arrow next to the Text button in the DataWindow painter displays the Controls drop-down toolbar, which has a button for each control you can place on a DataWindow object.
Default button replaced
The button you select from a drop-down toolbar replaces the default button on the main toolbar. For example, if you select the Picture button from the Controls drop-down toolbar, it replaces the Text button in the PainterBar.
You can control:
-
Whether to display individual toolbars and where
-
Whether to display text on the buttons
-
Whether to display PowerTips
Choosing to display text and PowerTips affects all toolbars.
To control a toolbar using the pop-up menu
-
Position the pointer on a toolbar and display the pop-up menu.
-
Click the items you want.
A check mark means the item is currently selected.
To control a toolbar using the Toolbars dialog box
-
Select Tools > Toolbars from the menu bar.
The Toolbars dialog box displays.
-
Click the toolbar you want to work with (the current toolbar is highlighted) and the options you want.
PowerBuilder saves your toolbar preferences in the registry and the PowerBuilder initialization file.
You can use the mouse to move a toolbar.
To move a toolbar with the mouse
-
Position the pointer on the grab bar at the left of the toolbar or on any vertical line separating groups of buttons.
-
Press and hold the left mouse button.
-
Drag the toolbar and drop it where you want it.
As you move the mouse, an outlined box shows how the toolbar will display when you drop it. You can line it up along any frame edge or float it in the middle of the frame.
When you first start PowerBuilder, all the toolbars display one above another at the top left of the workspace. When you move a toolbar, you can dock (position) it:
-
At the top or bottom of the workspace, at any point from the left edge to the right edge
-
At the left or right of the workspace, at any point from the top edge to the bottom edge
-
To the left or right of, or above or below, another toolbar
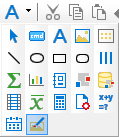
You can customize toolbars with PowerBuilder buttons and with buttons that invoke other applications, such as a clock or text processor.
Adding, moving, and deleting buttons
You can add, move, and delete buttons in any toolbar.
To add a button to a toolbar
-
Position the pointer on the toolbar and display the pop-up menu.
-
Select Customize.
The Customize dialog box displays. The icons that display in the selected palette and current toolbar panes depend on the palette and toolbar you select.
-
Click the palette of buttons you want to use in the Select Palette group box.
-
Choose a button from the Selected Palette box and drag it to the position you want in the Current Toolbar box.
The function of the button you selected displays in the Description at the bottom of the dialog box. If you choose a button from the Custom palette, another dialog box displays so you can define the button.
For more information, see Adding a custom button.

To move a button on a toolbar
-
Position the pointer on the toolbar, display the pop-up menu, and select Customize.
-
In the Current toolbar box, select the button and drag it to its new position.
To delete a button from a toolbar
-
Position the pointer on the toolbar, display the pop-up menu, and select Customize.
-
In the Current toolbar box, select the button and drag it outside the Current toolbar box.
Resetting a toolbar
You can restore the original setup of buttons on a toolbar at any time.
To reset a toolbar
-
Position the pointer on the toolbar, display the pop-up menu, and select Customize.
-
Click the Reset button, then Yes to confirm, then OK.
Clearing or deleting a toolbar
Whenever you want, you can remove all buttons from a toolbar. If you do not add new buttons to the empty toolbar, the toolbar is deleted. You can delete both built-in toolbars and toolbars you have created.
To recreate a toolbar
If you delete one of PowerBuilder's built-in toolbars, you can recreate it easily. For example, to recreate the PowerBar, display the pop-up menu, select New, and then select PowerBar1 in the New Toolbar dialog box.
For information about creating new toolbars and about the meaning of PowerBar1, see Creating new toolbars.
To clear or delete a toolbar
-
Position the pointer on the toolbar, display the pop-up menu, and select Customize.
-
Click the Clear button, then Yes to confirm.
The Current toolbar box in the Customize dialog box is emptied.
-
If you want to add new buttons, select them.
-
Click OK to save the toolbar if you added new buttons, or delete the toolbar if you did not.
You can add a custom button to a toolbar. A custom button can:
-
Invoke a PowerBuilder menu item
-
Run an executable (application) outside PowerBuilder
-
Run a query or preview a DataWindow object
-
Place a user object in a window or in a custom user object
-
Assign a display format or create a computed field in a DataWindow object
To add a custom button
-
Position the pointer on the toolbar, display the pop-up menu, and select Customize.
-
Select Custom in the Select Palette group box.
The custom buttons display in the Selected Palette box.
-
Select a custom button and drag it to where you want it in the Current Toolbar box.
The Toolbar Item Command dialog box displays. Different buttons display in the dialog box depending on which toolbar you are customizing:
-
Fill in the Command Line box using the following table.
In the Item Text box, specify the text associated with the button in two parts separated by a comma: the text that displays on the button and text for the button's PowerTip:
ButtonText, PowerTip
For example:
Save, Save File
If you specify only one piece of text, it is used for both the button text and the PowerTip.
-
In the Item MicroHelp box, specify the text to appear as MicroHelp when the pointer is on the button.
Button action
Toolbar Item Command dialog box entry
Invoke a PowerBuilder menu item
Type @MenuBarItem.MenuItem in the Command Line box. For example, to make the button mimic the Open item on the File menu, type:
@File.Open
If a menu label contains a dot ("."), you must include the tilde ("~") as an escape character to indicate the dot is part of the label and does not invoke a submenu item. For example:
@Tools.Toolbars~.~.~.
You can also use a number to refer to a menu item. The first item in a drop-down or cascading menu is 1, the second item is 2, and so on. Separator lines in the menu count as items. This example creates a button that pastes a FOR...NEXT statement into a script:
@Edit.Paste Special.Statement.6
Run an executable file outside PowerBuilder
Type the name of the executable file in the Command Line box. Specify the full path name if the executable is not in the current search path.
To search for the file name, click the Browse button.
Run a query
Click the Query button and select the query from the displayed list.
Preview a DataWindow object
Click the Report button and select a DataWindow object from the displayed list. You can then modify the command-line arguments in the Command Line box.
Select a user object for placement in a window or custom user object
(Window and User Object painters only) Click the UserObject button and select the user object from the displayed list.
Assign a display format to a column in a DataWindow object
(DataWindow painter only) Click the Format button to display the Display Formats dialog box. Select a data type, then choose an existing display format from the list or define your own in the Format box.
For more about specifying display formats, see Displaying and Validating Data.
Create a computed field in a DataWindow object
(DataWindow painter only) Click the Function button to display the Function for Toolbar dialog box. Select the function from the list.

To modify a custom button
-
Position the pointer on the toolbar, display the pop-up menu, and select Customize.
-
Double-click the button in the Current toolbar box.
The Toolbar Item Command dialog box displays.
-
Make your changes, as described in Adding a custom button.
PowerBuilder has built-in toolbars. When you start PowerBuilder, you see what is called the PowerBar. In each painter, you also see one or more PainterBars. But PowerBar and PainterBar are actually types of toolbars you can create to make it easier to work in PowerBuilder.
PowerBars and PainterBars
A PowerBar is a toolbar that always displays in PowerBuilder, unless you hide it. A PainterBar is a toolbar that always displays in the specific painter for which it was defined, unless you hide it:
|
For this toolbar type |
The default is named |
And you can have up to |
|---|---|---|
|
PowerBar |
PowerBar1 |
Four PowerBars |
|
PainterBar |
PainterBar1PainterBar2and so on |
Eight PainterBars in each painter |
Where you create them
You can create a new PowerBar anywhere in PowerBuilder, but to create a new PainterBar, you must be in the workspace of the painter for which you want to define the PainterBar.
To create a new toolbar
-
Position the pointer on any toolbar, display the pop-up menu, and select New.
The New Toolbar dialog box displays.
About the StyleBar
In painters that do not have a StyleBar, StyleBar is on the list in the New Toolbar dialog box. You can define a toolbar with the name StyleBar, but you can add only painter-specific buttons, not style buttons, to it.
-
Select a PowerBar name or a PainterBar name and click OK.
The Customize dialog box displays with the Current toolbar box empty.
-
One at a time, drag the toolbar buttons you want from the Selected palette box to the Current toolbar box and then click OK.
You can associate your own keyboard shortcuts with PowerBuilder menu items. For example, if you have used another debugger, you may be accustomed to using specific function keys or key combinations to step into and over functions. You can change the default keyboard shortcuts to associate actions in PowerBuilder's Debugger with the keystrokes you are used to.
Tip
Creating keyboard shortcuts means you can use the keyboard instead of the mouse in many common situations, including changing workspaces, objects, or connections. To do this, create shortcuts for the File>Recent menu items.
To associate a keyboard shortcut with a menu item:
-
Select Tools>Keyboard Shortcuts from the menu bar.
The keyboard shortcuts for the current menu bar display.
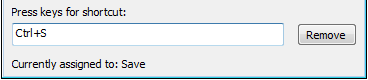
-
Select a menu item with no shortcut or a menu item with a default shortcut that you want to change and then put the cursor in the Press Keys For Shortcut box.
-
Press the keys you want to use for the shortcut.
The new shortcut displays in the text box. If you type a shortcut that is already being used, a message notifies you so you can type a different shortcut or change the existing shortcut.
The following table summarizes the various ways you can change the fonts used in PowerBuilder.
|
Object, painter, or tool |
How to change fonts |
|---|---|
|
A table's data, headings, and labels |
In the Database painter, display the Properties view for the table, and change the font properties on the Data, Heading, and Label Font tabs. |
|
Objects in the User Object, Window, and DataWindow painters |
Select objects and then modify settings in the StyleBar, or, in the Properties view for one or more objects, change the font properties on Font tab page. |
|
Application, Menu, and Library painters, System Tree, Output window, Browser, and MicroHelp |
Select Tools>System Options from the menu bar and change the font properties on the Editor Font and Printer font tab pages. |
|
Function painter, Script view, Interactive SQL view in the Database painter, Source editor, file editor, and Debug window (changes made for one of these apply to all) |
Select Design>Options from the menu bar and change the font properties on the System Font and Printer Font tab pages of the dialog box that displays. In the Debug window, select Debug>Options. |
Use the Printer font tab to set fonts specifically for printing. If you need to print multilanguage characters, make sure you use a font that is installed on your printer.
Changes you make in the Tools>System Options dialog box and from the Design>Options menu selection are used the next time you open PowerBuilder.
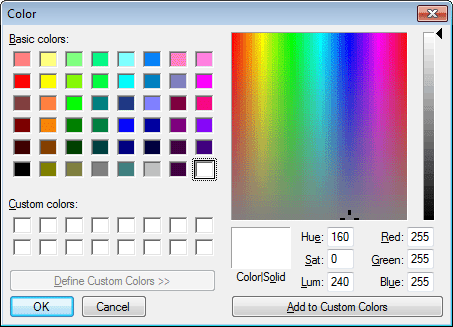
You can define custom colors to use in most painters and in objects you create.
To define custom colors:
-
In a painter that uses custom colors, select Design>Custom Colors from the menu bar.
-
Define your custom colors:
Area of the Color dialog box
What you do
Basic colors
Click the basic color closest to the color you want to define to move the pointer in the color matrix and slider on the right.
Custom colors palette
Modify an existing color -- click a custom color, then modify the color matrix and slider. Define a new color -- click an empty box, define the color, and click Add to Custom Colors.
Color matrix
Click in the color matrix to pick a color.
Color slider
Move the slider on the right to adjust the color's attributes.
Add to Custom Colors button
After you have designed the color, click this button to add the custom color to the Custom colors palette on the left.
PowerBuilder configuration information is stored in both the PowerBuilder initialization file (PB.INI) and the registry. When you start PowerBuilder, it looks in the registry and PB.INI to set up your environment.
Some PowerBuilder features require the use of the PB.INI file, but many features use the registry for getting and storing configuration information. Normally, you should not need to access or modify items in the registry directly.
Information related to your preferences (such as the applications you have created, the way you have arranged your views in the painters, and the shortcut keys you have defined for PowerBuilder menu items) is stored in HKEY_CURRENT_USER/Software/Sybase/PowerBuilder/21.0.
Installation-related information is stored in HKEY_LOCAL_MACHINE/Software/Sybase/PowerBuilder/21.0.
PB.INI is a text file that contains variables that specify your PowerBuilder preferences. These preferences include information such as the last workspace you used and your startup preferences. When you perform certain actions in PowerBuilder, PowerBuilder writes your preferences to PB.INI automatically.
Format of INI files
PB.INI uses the Windows INI file format. It has three types of elements:
-
Section names, which are enclosed in square brackets
-
Keywords, which are the names of preference settings
-
Values, which are numeric or text strings, assigned as the value of the associated keyword
A variable can be listed with no value specified, in which case the default is used.
Some sections are always present by default, but others are created only when you specify different preferences. If you specify preferences for another painter or tool, PowerBuilder creates a new section for it at the end of the file.
Specifying preferences
Normally, you do not need to edit PB.INI. You can specify all your preferences by taking an action, such as resizing a window or opening a new application, or by selecting Design>Options from one of the painters. If a variable does not appear by default in the options sheet for the painter, you can use a text editor to modify the variable in the appropriate section of PB.INI.
Editing the initialization file
Do not use a text editor to edit PB.INI or any preferences file accessed by Profile functions while PowerBuilder or your application is running. PowerBuilder caches the contents of initialization files in memory and overwrites your edited PB.INI when it exits, ignoring changes.
Where the initialization file is kept
PB.INI is installed in the same directory as the PowerBuilder executable file, but is copied to the C:\Users\[username]\AppData\Local\Appeon\PowerBuilder 21.0 for each PowerBuilder user the first time the user opens PowerBuilder. PowerBuilder subsequently uses the PB.INI copy each time the same user starts an instance of PowerBuilder IDE.
Telling PowerBuilder where your initialization file is
You can keep PB.INI in another location and tell PowerBuilder where to find it by specifying the location in the System Options dialog box. You may want to do this if you use more than one version of PowerBuilder or if you are running PowerBuilder over a network.
To record your initialization path
-
Select Tools>System Options from the menu bar.
-
On the General tab page, enter the path of your initialization file in the Initialization Path text box.
PowerBuilder records the path in the Windows registry.
How PowerBuilder finds the initialization file
PowerBuilder looks in the Windows Registry for a path to the initialization file, and then looks for the file in the directory where PowerBuilder is installed. If PowerBuilder cannot find PB.INI using the path in the Registry, it clears the path value.
If the initialization file is missing
If PowerBuilder does not find PB.INI when it starts up, it recreates it. However, if you want to retain any preferences you have set, such as database profiles, keep a backup copy of PB.INI. The recreated file has the default preferences.
