Resources is a set of tools for viewing and configuring server cluster, data sources, temporary files and configuration backups. There are three tools: Cluster, Data Source, and Maintenance.

Once you installed Appeon Server to several application servers, you can use the AEM Cluster tool to create an Appeon Server cluster and configure the load balancing and failover settings of the cluster.
Note that the load balancing and failover features mentioned in this section are implemented using a plug-in specially provided by Appeon. You will need to configure this Appeon plug-in after creating the Appeon Server cluster in AEM. For detailed instructions, refer to Tutorial 5: Configure Appeon Server Cluster in Appeon Mobile Tutorials (Mobile only).
You can also implement the load balancing feature (but not failover) using the plug-in provided by the application server. Detailed instructions can also be found in the Web Server Configuration Guide.

Use the Cluster Server List to create an Appeon Server cluster. The Appeon Servers listed in the Cluster Server List group share the same AEM settings, and can work as a cluster in supporting the requests from their associated Web server.
-
All of the Appeon Servers to be added into the cluster must have the same connection type: HTTP or HTTPS; it cannot be a mix.
-
Use the IP address or machine name of the Appeon Server when adding an Appeon Server. Do not use "localhost" or "127.0.0.1".
-
The IP address or machine name and port number must match the HTTP or HTTPS settings in the application server.
-
Add the server that the current AEM runs on as the first member of the cluster, and if you want to remove all servers from the list, remove it last.
-
To successfully synchronize/save a specific setting to all servers in the list, verify that servers are running before you save it.
-
An application must be deployed to all servers in the cluster to make sure the cluster functions properly. Use the Appeon Developer Deployment Wizard to perform the application deployment. For detailed instructions, refer to the Deploying PowerBuilder Applications in Appeon Developer User Guide.
-
To ensure the most efficiency and stability of the Appeon Server cluster, verify that the environment of all Appeon Servers is identical. For example, the application server (type and version) and Appeon Server (version and license) must be the same.
-
If you need to reinstall the operating system of an Appeon Server in the cluster, be sure to remove the Appeon Server from the cluster first.
Step 1: Select the connection type (HTTP or HTTPS) for the Appeon Server cluster.
All of the Appeon Servers to be added into the cluster must have the same connection type: HTTP or HTTPS.
Step 2: Click the Add Appeon Server button in the Cluster Server List table. The Add Appeon Server page opens.

Step 3: Verify that the Appeon Server to be configured is running and provide the required information (IP address, port, and the AEM login user name and password). For example:
-
IP address: 161.0.0.1
-
Port: 80
-
AEM User Name: admin
-
AEM Password: admin
Step 4: Click the Save and Save and Add button. The program will automatically test the connection and add the Appeon Server if the test is successful.
Adding an Appeon Server will succeed only if:
-
The Appeon Server is new to AEM.
-
The information provided is correct.
-
The Appeon Server is running.
-
The first Appeon Server that you add is the one hosting AEM.
-
The password is correct.
To remove an Appeon Server from the list:
Step 1: Click the Delete button in the Actions column of the Appeon Server in the Appeon Server Cluster table.
Step 2: A message box appears requiring confirmation. Choose OK to proceed with the deletion, or choose Cancel to cancel.
Step 3: By clicking on the OK button, the Appeon Server is removed from the Appeon Server list. AEM no longer interfaces with the Appeon Server.
To remove all Appeon Servers from the list:
Click the Remove All button and then click OK in the popup message box to confirm the deletion.
An Appeon Server in a cluster must be in the "Running" status in order to handle the requests from Web server. Appeon Server has the following status:
-
Shut down: Appeon Server is not started or not available.
-
Ready: Appeon Server is preparing itself to accept user requests by taking the essential initialization process.
-
Running: Appeon Server is started and accepts user requests.
-
Failed: Appeon Server failed to start or failed to verify license.
Load Balancing Settings determine how requests will be distributed among the servers in the cluster to optimize system performance and how servers in the cluster will be picked as peer servers. Appeon Server cluster supports the following two load balancing algorithms:
-
Random -- distributing requests across servers in random order, regardless of the status of servers.
-
Sequence -- directing requests to servers in an allocated order. The sequence algorithm, which is also known as round-robin, is simple, cheap and very predictable.
Either algorithm can provide optimal performance for servers of similar configuration and specification, because it evenly sends requests to each server in the cluster.
Failover Settings determine how the session information in the servers of the cluster is backed up in the system for failover support. With the backup settings, the sessions at a failed server can be continuously supported by the same server after the server is restarted by its status monitor, or supported by another server in the cluster. Because session backup does not back up transaction information, there may be some loss to the operations in the sessions, but the users can continue running the sessions without re-login.
Appeon Server cluster provides two major backup options for failover: session backup and heartbeat backup.
Session backup options enable a session to be backed up when Appeon Server detects that the session status changes or it receives a request from the same session. You can specify the backup with different levels:
-
Session level -- backing up a session when Appeon Server detects that the session is created or destroyed, or when a transaction starts or ends in the session.
-
Request level -- backing up a session each time when Appeon Server receives a request from the same session, regardless of the session status.
Heartbeat backup options enable Appeon Server to automatically back up sessions at the internals you specify.
-
Remote backup: backing up all sessions from the local machine to the peer server (another server in the cluster which was picked randomly or in sequence) at the intervals you specify in the Interval Time box. Remote backup includes mirror backup and rotation backup.
-
Mirror backup: periodically backing up all sessions from the local machine to the peer server. A session is backed up at a fixed peer server. If the peer server fails, the session backup no longer works.
-
Rotation backup: periodically backing up all sessions from the local machine to the peer server. The peer server at which a session is backed up can be changed. That is, if the first peer server fails, another server will be picked as the peer server for the backup.
-
-
Logical Restore with Status Monitor -- backing up all sessions from the local machine to the peer server and allowing both "active" and "passive" sessions to be restored after a failed server is restarted by status monitor. If this option is disabled, only "active" sessions on the failed server will be recovered. Each server in the cluster maintains a list of "active" sessions and a list of "passive" sessions. The server recognizes a session as an "Active" session if it is created here and recognizes a session as a "Passive" session if it is created in another server and backed up here. The interval of this backup option is specified in the configuration file (monitor.props) of Status Monitor.
Once an Appeon Server is added to the Cluster Server list, you can use the AEM which maintains the list to manage all servers in the cluster. Whenever you change the settings of this AEM and click Save, the settings will be saved to the other servers in the cluster. Therefore, you do not need to repeat the configuration in each AEM. However, not all of the AEM settings can be synchronized, because some settings are not necessary to be the same for all servers. The following settings will not be synchronized:
-
Logging: displays the log files on the current server only.
-
Auto cleanup and Manual cleanup in Maintenance: clears the temporary files of the current server only.
-
Deployment Sessions: displays the active deployment sessions of the current server only.
-
Licensing: displays the license information and status of the current server only.
-
Data Source: displays and configures the data source related with the current server only.
-
DataWindow Data Cache: displays and configures the DataWindow data cache related with the current server only.
-
AEM login: displays and configures the login information of AEM on the current server only.
The following action will not be synchronized:
-
Killing active sessions: this action will terminate the session on the current server only.
Each data source specifies the settings used to connect to a database at runtime. You can add a new data source, edit, delete or test an existing data source.

Click Add Data Source below the data source list and specify the data source settings according to the following table.
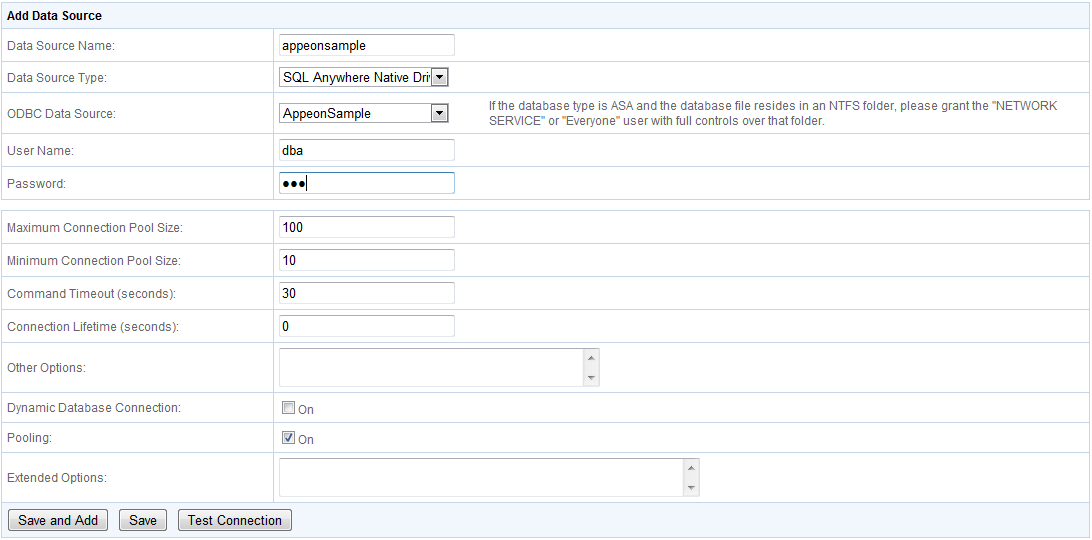
Data source properties vary with different database types. For detailed description for each database type, refer to the Setting up Appeon Server data sources.
Table 22. Data Source Properties
|
Data Source Name |
Type the name of the data source. |
|
Data Source Type |
Select the data source type. The data source options will change according to the selected data source type.
|
|
ODBC Data Source |
Select a system DSN. Appeon supports system DSN only, so only system DSN will be listed here. This option becomes visible when you select ODBC Driver or SQL Anywhere Native Driver from the Data Source Type drop-down list. |
|
NET Service Name |
Select a service name. This option becomes visible when you select Oracle Native Driver from the Data Source Type drop-down list. |
|
IBM Informix Server |
Specify the machine name or IP address of the Informix database server. This option becomes visible when you select IBM Informix Native Driver from the Data Source Type drop-down list. |
|
Database Host |
Specify the machine name or IP address of the database server. This option becomes visible when you select MS SQL Server Native Driver, Teradata Native Driver, MySQL Native Driver, ASE Native Driver, PostgreSQL Native Driver, or IBM DB2 Driver from the Data Source Type drop-down list. |
|
Database Port |
Specify the port number of the database server. This option becomes visible when you select MS SQL Server Native Driver, Teradata Native Driver, MySQL Native Driver, ASE Native Driver, PostgreSQL Native Driver, or IBM DB2 Driver from the Data Source Type drop-down list. |
|
Database Name |
Specify the database name. This option becomes visible when you select MS SQL Server Native Driver, IBM Informix Native Driver, Teradata Native Driver, MySQL Native Driver, ASE Native Driver, PostgreSQL Native Driver, or IBM DB2 Driver from the Data Source Type drop-down list. |
|
User Name |
Type the database login username. The username is set on the database server. |
|
Password |
Type the database login password. The password is set on the database server. |
|
Character Set |
Select the character set according to mapping characters bidirectionally from the client application and Teradata databases. This option becomes visible when you select Teradata Native Driver from the Data Source Type drop-down list. |
|
Session Mode |
Select the session mode according to the duration of the session. The session mode is used on a Teradata Database V2R2.0 or later system. This option becomes visible when you select Teradata Native Driver from the Data Source Type drop-down list. |
|
Maximum Connection Pool Size |
Specify the maximum number of connections Appeon Server opens and pools on startup. |
|
Minimum Connection Pool Size |
Specify the minimum number of connections Appeon Server opens and pools on startup. |
|
Connection Timeout |
Specify the timeout period (in seconds) for the connection. |
|
Command Timeout |
Specify the timeout period (in seconds) for the commands. |
|
Connection Lifetime |
Specify the lifetime period (in seconds) for the pooled connection. To be specific, you can specify the timeout period from the time a connection is created to the time when the connection returns to the pool. If the actual lifetime of a connection exceeds that specified in Connection Lifetime, the connection will be terminated. It is recommended to be used in cluster configuration when forcing the load balancing between a running server and a server just brought online. If the value is set to 0, the pooled connection allows the maximum connection timeout. |
|
Other Options |
Currently, this setting is effective to ASA/SQL Anywhere databases only. Specify the connection_authentication property for ASA/SQL Anywhere databases. The value should be in this format: "authentic_code=###" where "authentic_code" is the key word, text after "=" should be the authorization code. Appeon Server will automatically set the connection_authentication property when connecting with the ASA/SQL Anywhere database. |
|
Dynamic Database Connection |
Select whether to enable dynamic database connection. When it is on, the LogID and LogPass of the Transaction object will be used to connect to the database; when it is off, the user name and password specified in the data source will be used to connect to the database. |
|
Pooling |
Select whether to use the connection pool. This option must be turned on, if Dynamic Database Connection is on. When setting to "true", the connection with database does not release; when setting to "false", the connection with database fully releases. This setting is supported in all the driving types except for ODBC driver. |
| Extended Options |
Specify the connection parameters that are not listed above. The value should be in this format: "parameter_name=###" where "parameter_name" is the name of the connection parameter, for example, TextSize=64000, this sets the maximum size of text or binary data sent or received from ASE to 64 KB. If there are more than one parameter, separate them by semicolon (";").
Appeon provides the ability to specify more connection parameters than those listed above, however, different database types require different connection parameters, and the use of parameters may also depend on the environment, therefore, Appeon cannot guarantee every single parameter specified here would work as expected and thus would highly recommend you test them out thoroughly before adding any parameter into the production use.
|
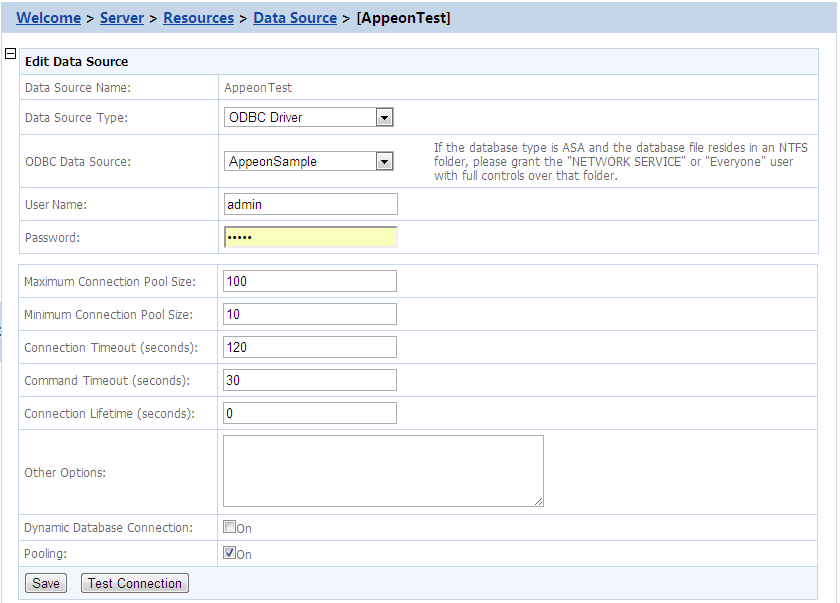
Click Edit and change the settings on the Edit Data Source page. The settings are specified the same way as on the Add Data Source page.
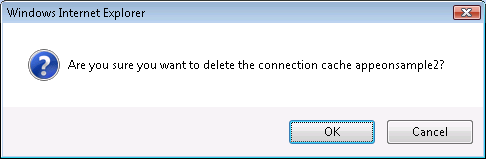
Click Delete and you will be prompted whether to delete the specified data source. Click OK to proceed.
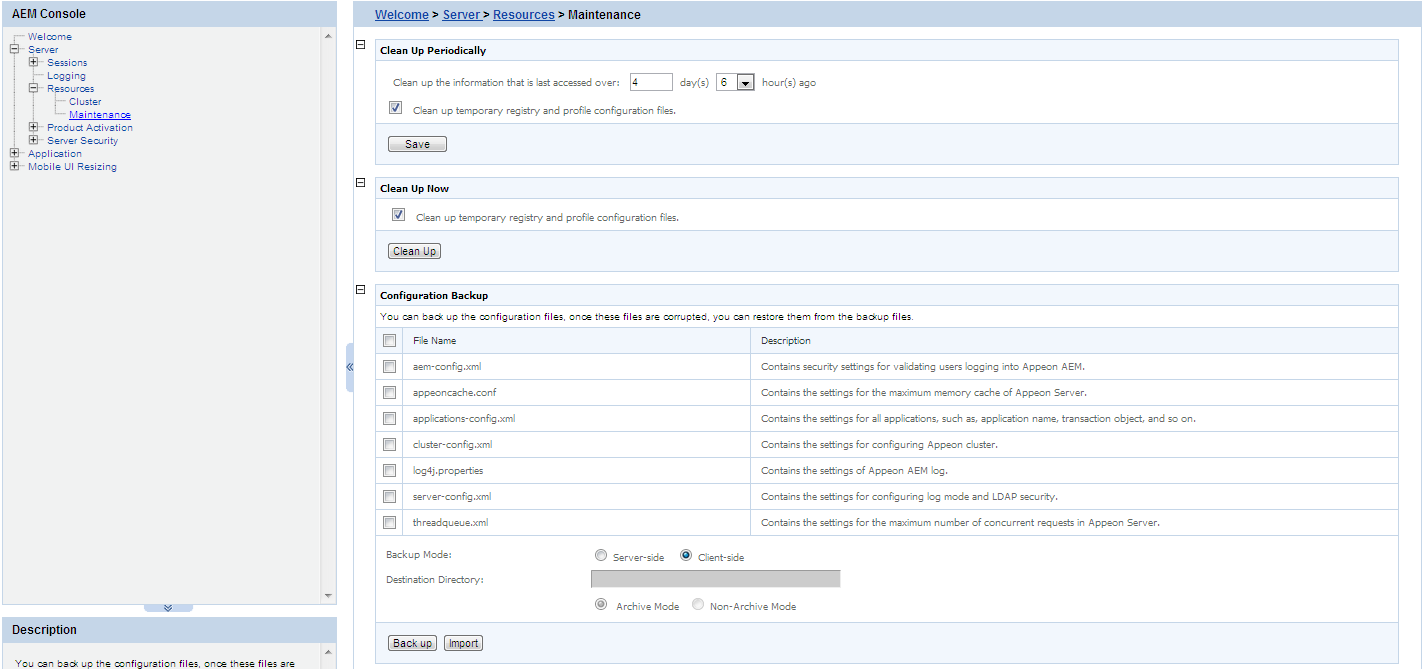
Maintenance is a set of tools for clearing temporary files and backing up configurations.
To perform an auto-cleanup for temporary files in the "Cleanup Periodically" group box:
Step 1: Select the file types to clean up and specify cleanup time.
-
Option 1: Clean up DataWindow data files, DataWindow image files, PDF files
This option is only available for Appeon Server installed to EAServer.
-
Option 2: Clean up temp register and profile config files
Both Option 1 and Option 2 are checked by default. You can choose whether or not to perform these two cleanup jobs by selecting or deselecting these two options.
-
Option 3: Clean up the temporary files ____ days ago at ___ am/pm.
This option is only available for Appeon Server installed to EAServer.
Use this option to specify a particular time for temporary DataWindow data files, DataWindow image files, and PDF files to be cleaned up. For example, "Clean up the temporary files 2 days ago at 8:00am" denotes that all temporary files generated 2 days ago will be cleaned up everyday at 8:00 am.
-
Option 4: Clean up the info that is last accessed: ___ days ___ hours ago.
Use this option to specify a particular time based on which the temporary register and profile configuration files will be cleaned up. For example, "Clean up the info that is last accessed: 2 days 4 hours ago" denotes that all temporary register and profile configuration files that were accessed over 2 days and 4 hours ago will be cleaned up everyday.
Step 2: Click the Save button to apply changes.
This feature is not usually necessary if the auto-cleanup feature is used, but it can be helpful between scheduled cleanups if a sudden increase in activity on the system causes an influx of temporary files resulting in declines in performance.
To perform a manual cleanup in the "Cleanup Now" group box:
Step 1: Select the temporary files to be cleaned up.
Determine which temporary files are to be cleaned up by selecting the following options: "Clean up DataWindow data files, DataWindow image files, PDF files", and "Clean up temp register and profile config files". Both of these options are checked by default.
The "Clean up DataWindow data files, DataWindow image files, PDF files" option is only available for Appeon Server installed to EAServer.
Step 2: Click the Cleanup Now button to commit the cleanup.
The selected temporary files will be deleted immediately from all the Appeon Servers that are configured in the Cluster tool.
The AEM configuration files can be backed up and restored easily using the Configuration Backup tool.
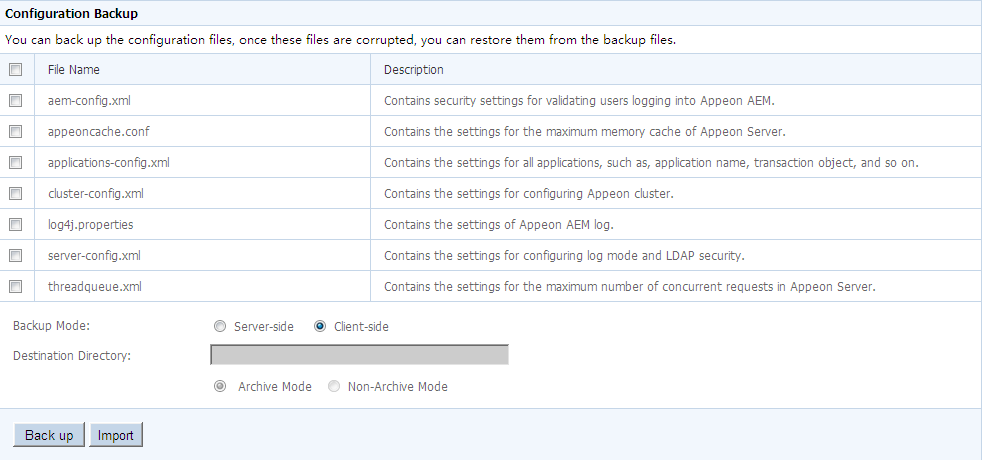
To back up the AEM configuration files:
Step 1: Select one or more configuration file from the file list.
Step 2: Select the backup mode.
-
Server Mode -- Backs up the configuration files and stores on the Appeon Server machine.
-
Client Mode -- Backs up the configuration files and stores on the local client machine. You will be prompted to specify the location to store the backup file after clicking the Back Up button.
Step 3: If you select Server Mode in Step 2, then specify the destination location for the backup files. The destination location must be an existing directory on the Appeon Server machine.
Step 4: Specify the archive mode for the backup files.
-
Archive Mode indicates the backup files will be packaged into a zip file. If Client Mode is selected as the backup mode, Archive Mode will be used by default.
-
Non-Archive Mode indicates the backup files will be existing in separate files.
Step 5: Click the Back Up button to back up files.
To import the AEM configuration files:
Step 1: Click the Import button.
Step 2: In the Import Configuration File page, click Browse to select the backup file to import. The backup file can be a single file or a zip file which contains multiple files.
Step 3: Click Import to import the selected backup file.
