In this lesson you create an executable version of the application for distribution to users. Users can run this executable version of the application just as they can any other application.
You:
How long does it take?
About 10 minutes.
Where you are
Now you create the PBTUTOR Project object. You can then use the Project object to create the executable file for the application.
About machine code
When you deploy an application to users, you may want to take advantage of the execution speed of machine code for some computations, such as loops, floating point or integer arithmetic, and function calls. While you are developing the application, you usually use Pcode because it is faster to generate.
About dynamic libraries
You can also create dynamic libraries for your application. Dynamic libraries can be used to store the objects in the application. By using dynamic libraries, you can break the application into smaller units that are easier to manage and also reduce the size of the executable file.
For small applications like the one that you are working on now, you do not need to use dynamic libraries.
-
Click the New button in the PowerBar.
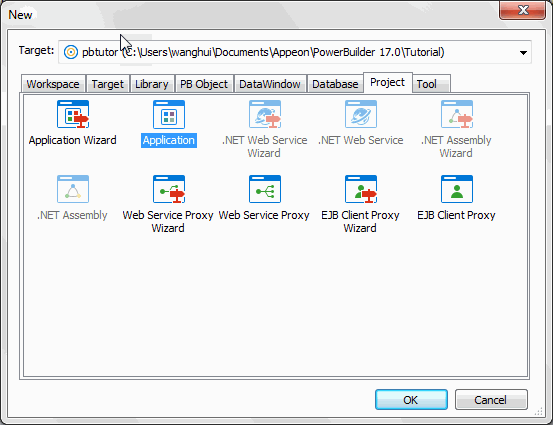
Click the Project tab in the New dialog box.

-
Select the Application Wizard icon and click OK.
Using the Project painter
If you clicked the Application icon on the Project page instead of the Application Wizard icon, you open the Project painter. You can make the same selections in the Project painter that you make with the wizard, but the wizard prompts you for this information.
-
Click Next.
The Specify Destination Library page displays.
-
Select pbtutor.pbl in the Application Libraries list box if it is not already selected.
Click Next until the Specify Build Options page displays.
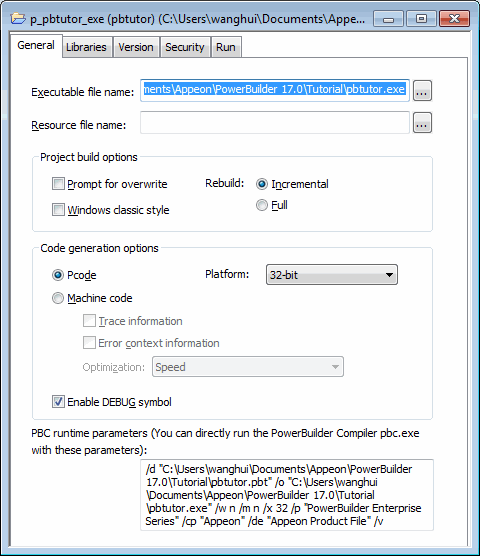
The wizard will generate a project with the following default selections:
Wizard property
Default value
Project name
p_pbtutor_exe
Executable filename
pbtutor.exe
Optional resource file
none
-
Select Incremental Build for the Build Option.
Click Next until the Specify Version Information page displays.
The wizard will generate a project with the following default selections:
-
If you want to, enter your own version information on the Specify Version Information page.
If you do not change the information on this page, the defaults display in Windows Explorer when you look at the properties of the executable.
-
Click Next.
Review the information on the Ready to Create Application page.
-
Click the Finish button.
PowerBuilder creates a Project object for your application and displays it in the Project painter workspace.

After a project is defined, you can easily create an executable version of the application. Using a project saves time when you are working on an application that includes dynamic libraries that you expect to rebuild often. Selecting incremental build means that if you make a few changes, you can rebuild your project quickly, rebuilding only files that have changed or files that depend on files that have changed.
Where you are
Now you create the executable file for your application. The executable file you generate contains definitions for all the objects in the application. For the tutorial application, this includes the bitmap file used in the login window, since you did not include a separate resource file with your project.
You can create the executable in the Project painter, but usually, once you have defined the project, you do not need to open the painter again.
Workspaces and targets in the System Tree have Incremental Build, Full Build, and Deploy items on their pop-up menus that enable you to build and deploy some or all of the projects in a target or in the whole workspace. Incremental Build and Full Build compile your code. Deploy compiles the code and, for applications like the one you built in this tutorial, creates an executable file and optional dynamic libraries.
In this lesson you look at the property sheets where build and deploy options are specified and then create the executable from the PowerBar.
-
Close the Project painter.
Click Yes if prompted to save changes.
-
Right-click the pbtutor target in the System Tree.
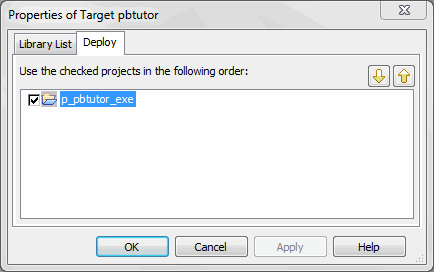
Select Properties and then select the Deploy tab.
This page shows all the projects in this target (currently only one).

If you have more than one project in the target, you can change the order in which they are executed and select which projects you want to build.
-
Leaving p_pbtutor_exe checked, click the Cancel button.
-
Right-click MyWorkspace in the System Tree.
-
Select Properties and select the Deploy Preview tab.
The Deploy Preview page shows all the targets in your workspace and the projects in each that have been selected for deployment, in the order in which they are to be deployed. You cannot change anything on this page -- you use it to check that you have set up deployment options for your workspace the way you want to. All the projects shown on this page are deployed when you click the Deploy button in the PowerBar.
This workspace has only one target and only one project, so you can use the Deploy button to create the executable.
-
Click the Cancel button to close the property sheet.
-
Click the Deploy button (
 ) in the PowerBar.
The process of creating the executable file might take a few moments. While PowerBuilder is working, you can look at the Output window at the bottom of the screen to see what PowerBuilder is doing.
If you wanted to stop the deployment process, you could click the Stop button in the PowerBar. When deployment is complete, the Output window displays the following text: Finished Deploy of workspace MyWorkspace.
Where you are
Now you create a shortcut for the executable file. The icon serves as a shortcut to open the executable file. You can add the shortcut directly to the desktop or to the program group of your choosing.
-
Minimize PowerBuilder.
PowerBuilder is minimized to an icon on the taskbar.
-
Right-click on a blank area of the desktop.
Select New>Shortcut from the pop-up menu.
-
In the Create Shortcut dialog box, click the Browse button and locate pbtutor.exe.
If you accepted the default installation locations, the file is in %SystemDrive%\Users\[username]\Documents\Appeon\PowerBuilder [version]\Tutorial.
-
Click OK, then click Next.
-
Type SportsWear, Inc. as the name of the shortcut.
-
Click Finish to create the shortcut on the desktop.
Now you must modify a property of the shortcut so that you can run the application. You can also change the icon.
-
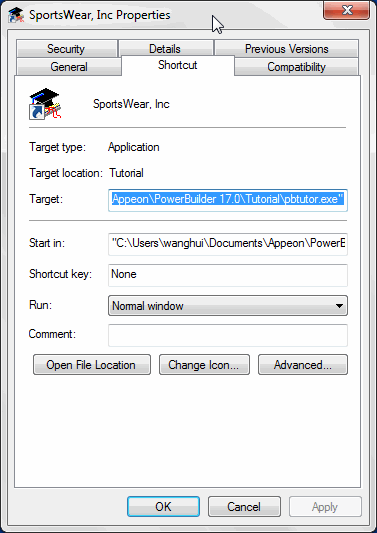
Right-click the SportsWear, Inc. icon on the desktop.
Choose Properties in the pop-up menu.

-
Select the Shortcut tab.
Type the path to the PowerBuilder shared modules in the Start In box.
Click OK.
About the location of the shared modules
When you install PowerBuilder Runtime, the installation process puts the DLLs in the %systemdrive%\Program Files (x86)\Appeon\Common\PowerBuilder\Runtime [version] directory. The default location is: C:\Program Files (x86)\Appeon\Common\PowerBuilder\Runtime [version] (for 32-bit DLLs) and C:\Program Files (x86)\Appeon\Common\PowerBuilder\Runtime [version]\x64 (for 64-bit DLLs).
If you want the user to be able to run the application by double-clicking the executable file, you must include this runtime directory in the system environment path.
Where you are
Now you test the new executable file.
-
Make sure the pbtutor.ini file is in the same directory as the pbtutor.exe executable file.
The default location of the pbtutor.ini file and the pbtutor.exe file is %SystemDrive%\Users\[username]\Documents\Appeon\PowerBuilder [version]\Tutorial.
-
Double-click the icon for the tutorial application.
The application begins running.
-
Test the application.
Notice the changes you made to the customer information.
-
When you have finished testing the application, select File>Exit from the menu bar.
Congratulations. You have completed the client-server part of the tutorial. Now you know the basics of application development with PowerBuilder.
The Preface to this book includes a guide to the PowerBuilder documentation. To further your education, you should continue with these books:
| Users Guide |
| Application Techniques |
| DataWindow Programmers Guide |
All the PowerBuilder books are available in the Documentation Center at https://docs.appeon.com.


