The DataWindow object is one of the most powerful and useful features of PowerBuilder. A DataWindow object can connect to a database, retrieve rows, display the rows in various presentation styles, and update the database.
In this lesson you:
How long does it take?
About 20 minutes.
Where you are
> Create and preview a new DataWindow object
Make cosmetic changes to the first DataWindow object
Create a second DataWindow object
Make cosmetic changes to the second DataWindow object
Now you create a new DataWindow object and display it in the DataWindow painter. Like other painters, the DataWindow painter has an assortment of views that you can open simultaneously.
About the Design view of the DataWindow painter
The Design view in the DataWindow painter is similar to the Layout view in other painters. You can open only one Design view at a time.
The Design view is divided into four areas called bands: header, detail, summary, and footer. You can modify the contents of these bands. For example, you can change their sizes, add objects (controls, text, lines, boxes, or ovals), and change colors and fonts.
In the Preview view of the DataWindow painter, you can see how the object looks in an application at runtime, complete with table data.
-
Click the New button (
 ) in the PowerBar.
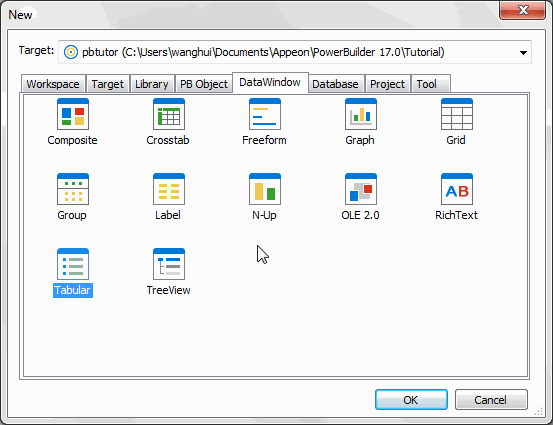
The New dialog box displays.
-
Click the DataWindow tab.
-
Select Tabular from the list of presentation styles.
-
Click OK.
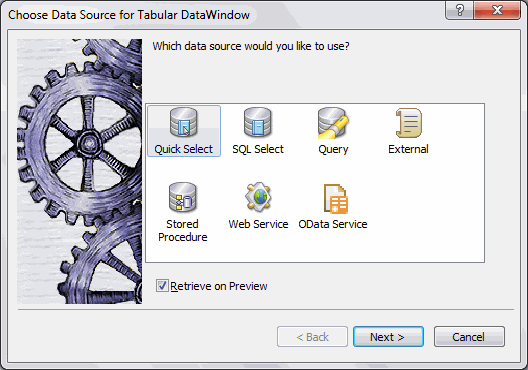
The Choose Data Source for Tabular DataWindow page of the DataWindow wizard displays.
-
Select Quick Select as the data source and select the Retrieve On Preview check box if it is not already selected.
Click Next.
PowerBuilder connects to the Demo Database, and the Quick Select dialog box displays.
-
Click the customer table in the Tables list box.
This opens the table and lists its columns. For this DataWindow, you will select four columns.
-
Click id, fname, and lname in the Columns list box in the order listed.
Scroll down the list and click company_name.
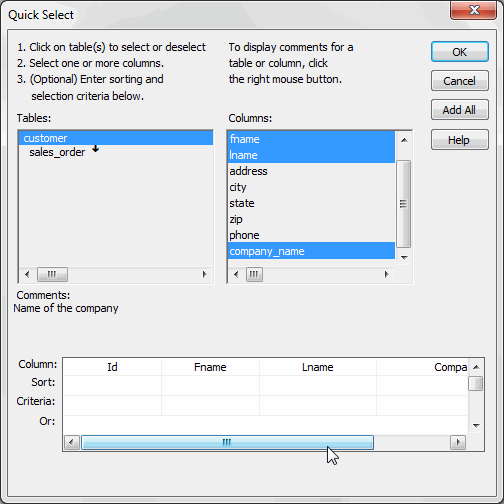
PowerBuilder displays the selected columns in a grid at the bottom of the Quick Select dialog box.
Selection order determines display order
The order in which you select the columns determines their left-to-right display order in the DataWindow object. If you clicked a column by mistake, you can click it again to clear the selection.
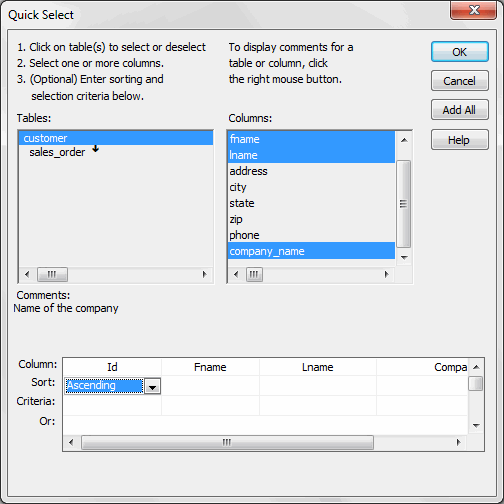
You can use the grid area at the bottom of the dialog box to specify sort criteria (for the SQL ORDER BY clause) and selection criteria (for the SQL WHERE clause). Now you specify sort criteria only. You sort the id column in ascending order.
-
In the grid area of the Quick Select dialog box, click in the cell next to Sort and below Id.
A drop-down list box displays.
-
Choose Ascending from the drop-down list box.
This specifies that the id column is to be sorted in ascending order.
-
Click OK.
The DataWindow wizard asks you to select the colors and borders for the DataWindow object. By default, there are no borders for text or columns.
-
Click Next.
You accept the border and color defaults. The DataWindow wizard summarizes your selections.
-
Click Finish.
PowerBuilder creates the new DataWindow object and opens the DataWindow painter.
In the Design view, PowerBuilder displays a Header band with default headings and a Detail band with the columns you selected:

The Preview view displays the DataWindow as it appears during execution. PowerBuilder displays data for all customers. The data is sorted in ascending order by customer ID, just as you specified.
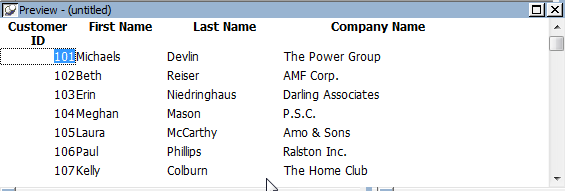
Displaying the Preview view
If the Preview view is not displayed, select View>Preview from the menu bar. If Preview is grayed, it is already displayed and you cannot select it. You can open only one Preview view at a time.
Where you are
Create and preview a new DataWindow object
Make cosmetic changes to the first DataWindow object
Create a second DataWindow object
Make cosmetic changes to the second DataWindow object
Now you name the DataWindow object and save it in the pbtutor.pbl library.
Saving to another library
You can save objects to different application libraries, but to avoid complications, you save all your new tutorial objects in one library. You can also copy or move objects from one library to another using the Library painter.
-
Select File>Save from the menu bar.
The Save DataWindow dialog box displays with the insertion point in the DataWindows box.
-
Make sure pbtutor.pbl is selected in the Application Libraries box.
Type d_custlist in the DataWindows box.
This names the DataWindow object. The prefix d_ is standard for DataWindow objects.
-
(Optional) Type the following comments in the Comments box:
This DataWindow object retrieves customer names and company associations.
-
Click OK.
PowerBuilder saves the DataWindow object and closes the Save DataWindow dialog box.
Where you are
Create and preview a new DataWindow object
> Make cosmetic changes to the first DataWindow object
Create a second DataWindow object
Make cosmetic changes to the second DataWindow object
Now you can make cosmetic changes to the DataWindow. You reposition the columns and column headings to make room for the hand pointer, which displays to the left of the currently selected row. You also move some of the columns to make them line up with their headings.
You make these changes in the Design view. You can keep the Preview view open at the same time to see how the changes you make affect the appearance of the DataWindow at runtime.
-
Select Edit>Select>Select All from the menu bar
or
Press Ctrl+A.
All of the controls in the DataWindow object are selected in the Design view.
-
Position the mouse pointer over one of the selected objects.
Drag the object to the right about one inch.
All of the selected objects move together.
-
Click in a blank area in the Design view.
You clear the object selection.
-
Click the Customer ID header above the Header band.
Hold down the Ctrl key and click the id column above the Detail band.
Release the Ctrl key and drag the id column to the left about one-half inch.
The column and its header move together.
-
Click the Center button (
 ) in the StyleBar.
-
Click in a blank area in the Design view.
This centers the Customer ID column header text and the column data.
-
Click the First Name header.
-
Hold down the Ctrl key and click the Last Name and Company Name headers.
-
Click the Left button (
 ) in the StyleBar.
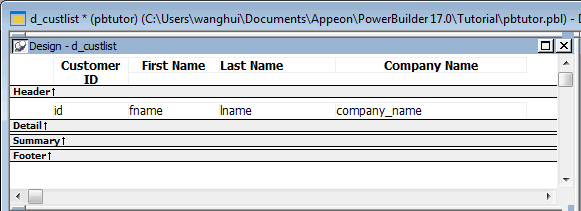
When you have finished, the Design view should look something like this:
-
Select File>Close from the menu bar.
A message box asks if you want to save your changes.
-
Click Yes.
PowerBuilder saves the DataWindow object and closes the DataWindow painter.
Where you are
Create and preview a new DataWindow object
Make cosmetic changes to the first DataWindow object
> Create a second DataWindow object
Make cosmetic changes to the second DataWindow object
When you built the first DataWindow object, you used Quick Select to specify the table and columns. This let you retrieve all the customers without having to use the Select painter.
To build the second DataWindow object, you use the Select painter. You need to define a retrieval argument and WHERE criteria so you can pass an argument to the DataWindow object during execution. In this case, you will pass the customer ID.
In this section, you:
Now you select a data source and define how the data is to be presented.
-
Click the New button (
 ) in the PowerBar.
The New dialog box appears.
-
Click the DataWindow tab if it is not already selected.
Select Freeform from the list of presentation styles and click OK.
-
Select SQL Select as the data source and select the Retrieve On Preview check box if it is not already selected.
Since the data source is SQL Select, you go to the Select painter and the Select Tables dialog box displays.
Selecting the Retrieve On Preview check box allows you to view the data returned by a query in the development environment, but you need to provide initial values for any retrieval arguments that you specify.
-
Click Next.
Now you select the table and the columns to use in the DataWindow object.
-
Select customer in the list of tables and click Open.
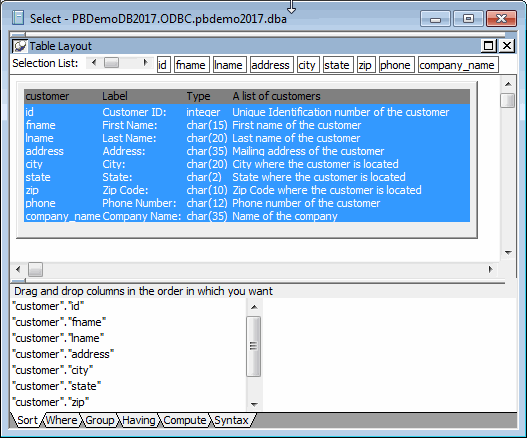
The Select painter displays the customer table and its columns.
Alternative method
If you double-click the customer table instead of selecting it and clicking Open, the Select Tables dialog box remains open. In this case, you must click Cancel to continue.
-
Right-click the header area in the Table Layout view.
Choose Select All from the pop-up menu.
The column names appear in the Selection List area above the table.
The columns appear in the order in which you selected them. Because you selected all the columns at once, the original order of the columns in the database is used. You change the column presentation order later.
You can also see the selection order in the Syntax view: click the Syntax tab at the bottom of the stack of tabbed panes to display the generated Select statement.
Now you define a retrieval argument.
-
Select Design>Retrieval Arguments from the menu bar.
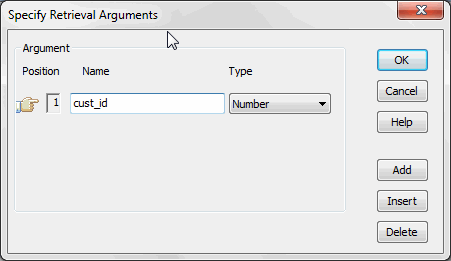
The Specify Retrieval Arguments dialog box displays.
-
Type cust_id in the Name box.
The default data type is Number, which is what you want.
About retrieval argument names
You can choose any name you want for the retrieval argument; it is just a placeholder for the value you pass during execution. Nonetheless, it is a good idea to make the name meaningful.
-
Click OK.
The retrieval argument is defined.
Now you specify a WHERE clause using the retrieval argument to retrieve a specific customer.
-
Click the Where tab in the stack.
The Where view displays.
-
Click in the box below Column in the Where view.
A down arrow displays, and the box becomes a drop-down list box.
-
Select "customer"."id".
Your selection displays immediately below the Column heading. An equal sign (=) appears in the Operator box. This is correct, so do not change it.

-
Right-click in the box below the Value column header in the Where view.
Select Arguments from the pop-up menu, select :cust_id, and click Paste.

-
Click the Syntax tab in the stack.
The Syntax view displays the modified SELECT statement.
-
Scroll down until you see the generated WHERE clause.
You have now created a complete SQL SELECT statement that retrieves data from several columns in the customer table where the id column is equal to an argument that will be supplied during execution.
Now you view the DataWindow in the DataWindow painter using the Design and Preview views.
-
Click the Return button in the PainterBar
or
Select File>Return To DataWindow Painter from the menu bar.
The DataWindow wizard asks you to select the borders and colors for the new DataWindow object.
-
Select Raised from the Border drop-down list box for columns.
Click Next.
You have added raised borders to the DataWindow columns, but not to the labels. The DataWindow wizard summarizes your selections.
-
Click Finish.
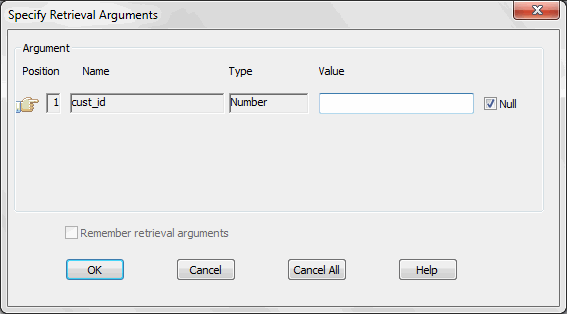
Because you selected the Retrieve On Preview check box and because the Preview view is part of the default layout scheme for the DataWindow painter, the Specify Retrieval Arguments dialog box appears.
This dialog box prompts you for an argument value. When you put this DataWindow object into the tutorial application, you write a script that passes the required argument to the DataWindow object automatically.
-
Type a customer ID (such as 101, 102, or 103) in the Value field.
Click OK.
The DataWindow painter opens. The Design view displays the new DataWindow object.

Changing font sizes
If you cannot see all letters in a label, press Ctrl+A to select all the items in the DataWindow, then select a smaller font size in the StyleBar.
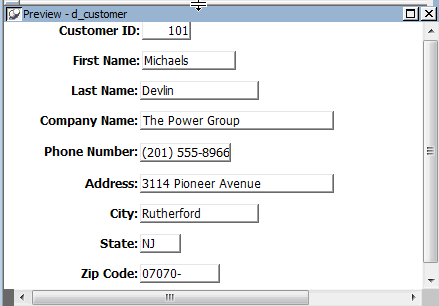
The DataWindow Preview view retrieves the requested customer data.
Retrieving other records
If you want to preview the record for another customer, you can right-click inside the DataWindow Preview view, select Retrieve from the pop-up menu, then specify a different customer ID in the Specify Retrieval Arguments dialog box.
Now you name the DataWindow object and save it. You could wait to save it until you leave the painter, but it is good practice to save your work frequently.
-
Select File>Save from the menu bar.
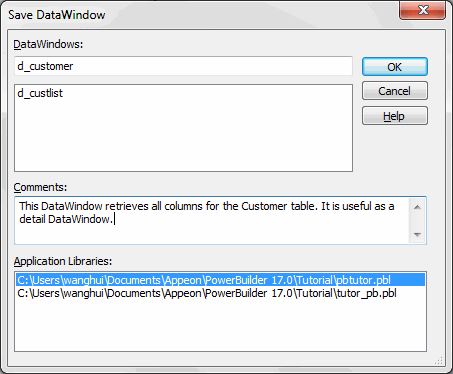
The Save DataWindow dialog box displays.
-
Make sure pbtutor.pbl is selected in the Application Libraries box.
Type d_customer in the DataWindows box.
Earlier you saved a DataWindow object as d_custlist.
-
(Optional) Type the following comments in the Comments box.
This DataWindow retrieves all columns for the Customer table. It is useful as a detail DataWindow.
-
Click OK.
You return to the DataWindow painter.
Where you are
Create and preview a new DataWindow object
Make cosmetic changes to the first DataWindow object
Create a second DataWindow object
> Make cosmetic changes to the second DataWindow object
Now you modify the DataWindow object. You:
Columns on freeform DataWindows
Data fields on freeform DataWindow objects are still called columns, even though they are shown in a nontabular display.
Now you rearrange the columns and labels in the new DataWindow object. You can maximize the Design view for greater ease in manipulating the columns and their labels.
-
Click the Address: label in the Design view.
Hold the Ctrl key and click the address column.
The two items are selected.
-
Keep the Ctrl key pressed and click the following column labels and column controls:
-
If necessary, scroll down until you can see all the columns in the DataWindow.
-
Release the Ctrl key.
-
Position the cursor on one of the selected objects and drag it to the top-right corner of the DataWindow object.
The objects move together.
-
Use the Ctrl+click technique to move the following label and column controls to the location indicated:
Label
Move with column
Move under
Company Name:
company_name
Last Name:
Phone Number:
phone
Company Name:
-
Drag the Detail band up below the last column label.
This removes any extra space at the bottom of the detail area.
Some of the fields might be misaligned. You fix this in the next exercise.
Now you align the columns and labels on the new DataWindow.
-
Select the Zip Code: label in the Design view.
Move left edge of the Zip Code: label's text close to the right edge of the company_name column.
-
While the Zip Code: label is still selected, use the Ctrl+click technique to select the Address:, City:, and State: labels.
-
Select Format>Align from the menu bar.
A cascading menu of align options displays.
-
Select the first option (Align left) (
 ).
).
PowerBuilder aligns the left edges of the selected objects with the left edge of the first item you selected (the Zip Code: label).
Selecting an alignment tool from the PainterBar
You can access a drop-down list of alignment tools by clicking the Align button on PainterBar2.
-
Move the zip column so that it is next to the Zip Code: label.
-
Align the address, city, and state columns with the zip column, just as you aligned the column labels.
The DataWindow should now look like this in the Design view:

The DataWindow Preview view looks like this:

The column for the customer state of residence has a DropdownDataWindow edit style. This is an extended attribute associated with the State column in the Demo Database. The (drop-down) DataWindow with which the column is associated has a list of states and their two-letter postal codes.
You can make the state selection list visible at all times in your application or you can display an arrow at all times to indicate that a selection list is available. Now you change the property for the state column to show the arrow at all times.
-
Click the state column in the Design view.
Make sure the Properties view displays.
The Properties view displays properties of the column.
-
Click the Edit tab in the Properties view.
You might need to click the arrow keys near the top of the Properties view to display the Edit tab before you can click it. Notice that the Style Type selection is DropDownDW.
-
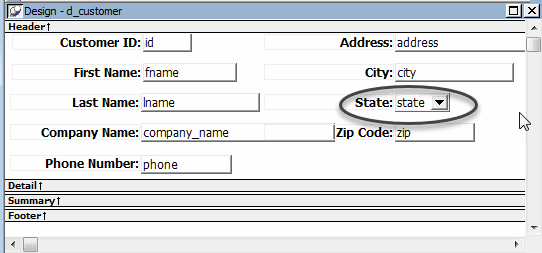
Select the Always Show Arrow check box.
Make sure the state column in the Design view is wide enough to display two characters plus the arrow symbol.
An arrow appears next to the state column in the Design and Preview views. While the column is selected in Design view, you can make the column wider by holding the cursor over the right edge of the column until the cursor symbol changes to a double-headed arrow, then dragging the edge toward the rightmost frame of the view.
-
Click the Save button in PainterBar1.
-
Click the Close button in PainterBar1.


