This lesson provides the information you need in order to become familiar with the PowerBuilder environment and to customize the workspace. This lesson is optional -- you can skip to Lesson 3 if you want to.
In this lesson you:
How long does it take?
About 25 minutes.
Where you are
> Manipulate the System Tree window
The Workspace page in the System Tree provides you with an overview of your work. By expanding the workspace and the objects it contains, you can see the content and structure of your target.
You can work directly with all the objects in the workspace. For example, you can edit, run, search, or regenerate a window using its pop-up menu in the System Tree. In this exercise you reposition, close, and open the System Tree. You can reposition the System Tree in relation to the main window using its drag bar. You can also change the way the System Tree, Clip, and Output windows are arranged.
-
Click the Output button (
 ) in the PowerBar to display the Output window.
-
Select Tools>System Options from the menu bar.
Clear the Horizontal Dock Windows Dominate check box on the General page and click OK.
The System Tree and Clip windows now occupy the full height of the main window.
-
Click and hold the drag bar at the top of the System Tree.
Drag the System Tree to position it above, below, or to the right of the painter workspace.
The painter workspace is the gray (blank) area, initially to the right of the System Tree, where painters display when you open an object.
When you start dragging the System Tree, a gray rectangular outline displays. It indicates the area that the System Tree would occupy if you released the mouse button.
-
When the gray rectangular outline is positioned where you want the System Tree to display, release the mouse button.
The System Tree displays in the new location.
-
Close the System Tree by clicking the SysTree button (
 ) in the PowerBar.
The current workspace remains open, but the System Tree closes. Closing the System Tree leaves more space for the painter workspace views.
-
Reopen the System Tree by clicking the SysTree button in the PowerBar again.
-
Select Tools>System Options from the menu bar.
Select the Horizontal Dock Windows Dominate check box on the General page and click OK.
You change back to the default selection for this design-time property.
-
Close the Clip and Output windows by clicking their buttons on the PowerBar (
 ) or by clicking the small x in the corner of
each window.
-
Right-click MyWorkspace and select Close from the pop-up menu.
The workspace closes. No workspaces display in the System Tree.
Where you are
Manipulate the System Tree window
Now you open an object created by the Template Application wizard.
-
Select File>Recent Workspaces from the menu bar, then MyWorkspace from the cascading menu.
-
In the System Tree, expand MyWorkspace, the pbtutor target, and pbtutor.pbl.
-
Double-click the pbtutor Application object
or
Right-click the pbtutor Application object and select Edit from the pop-up menu.
The Application painter opens. It displays different views of the pbtutor Application object. Your view layout scheme may look different. To display the default layout, select View>Layouts>Default.
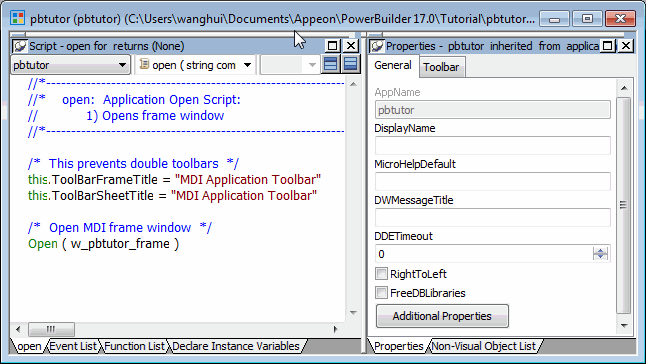
The default Application painter layout displays two stacks of tabbed panes. The left stack contains tabs for a Script view (Open tab -- it is set to the Open event on the Application object), an Event List view, a Function List view, and the Declare Instance Variables view. The right stack contains tabs for the Properties view and a Non-Visual Object List view.
-
Look at the code in the Open event in the Script view.
The PowerScript code that was generated by the wizard in the Application Object Open event calls a PowerScript function to open the main window in the application. You will modify this code later in the tutorial.
Where you are
Manipulate the System Tree window
Now you learn to control the location and appearance of PowerBuilder painter views. You can add views to a painter workspace by selecting them from the View menu in the workspace menu bar.
You can add multiple views of the same type and you can combine views into a stack of panes with selection tabs at the bottom. You can resize a view by grabbing and dragging the separator bars that surround it or that surround neighboring views in the painter workspace.
These exercises demonstrate how you can change the appearance of Application painter views, but you can manipulate views in all painters in the same way.
Now you:
The default Application painter layout actually has two Script views. One of the Script views displays the script for an Application object event, and the other Script view displays the declared variables for the object instance or the entire application. Both of these Script views are in the same stack of tabbed views (panes).
Now you add a third Script view that is not part of a stack of tabbed panes. You can add multiple Script views to your painter layout, but no two Script views can display the same script at the same time.
-
Select View>Script from the menu bar.
A new Script view displays. It is not attached to a stack of tabbed panes. It lists the Application object in the left drop-down list box. The other two drop-down lists are empty and the right drop-down list is grayed out.
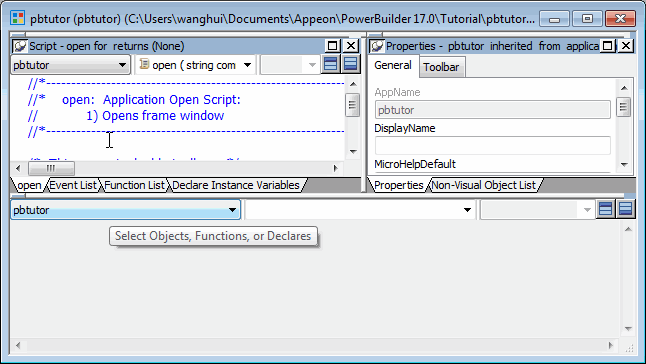
If an existing Script view shows the Open event, the new Script view is empty. Otherwise it displays the Open event.
-
Select the Close event from the second drop-down list box.
If another Script view is already open to the Close event, an error message displays in the PowerBuilder status bar.
Now you display a view title bar by pinning it to the painter workspace background. If a title bar is unpinned, you see it only when your cursor pauses near the top edge of a view.
-
Move the cursor to the top of the extra Script view you just added.
The view title bar rolls down. It contains a pushpin button on the left and a maximize/minimize button and a close button on the right. The name of the view displays on the left side of the title bar, next to the pushpin button.
-
Click the pushpin (
 ) in the title bar
or
Right-click the view title bar and click Pinned from the pop-up menu.
The pushpin button and the Pinned menu item are toggle switches. You can click the pushpin button or the pop-up menu item to pin and unpin the view title bars.
Now you float and dock a view in the painter workspace. Floating a view enables you to move it around outside the painter frame.
-
Right-click the title bar of an unstacked view you want to float
or
Right-click the tab of a view in a stack of tabbed panes.
If the title bar is not pinned, move the cursor over the title bar area and wait until it displays before you right-click it.
-
Click Float in the pop-up menu.
When a view is floated, the Float menu item is not enabled. When a view is docked, the Dock menu item is not enabled.
-
Drag the view around the screen.
Notice that the floating property allows you to move the view outside the painter workspace.
-
Right-click the title bar of the floating view.
Click Dock in the pop-up menu.
The view returns to its original location.
Now you separate a view from a stack of tabbed panes and place it above the stack. You then return it to the stack and change its position in the stack.
-
Press and hold the mouse button on the Function List tab.
Drag the tab onto the separator bar that separates the two default stacks in the Application painter.
Release the mouse button.
When you release the mouse button, the Function List view is no longer part of a stack. If you drag the tab too far and release it over the right stack with the Properties view and Non-Visual Object List, the Function List becomes part of that stack.
Alternate way to float a view from a stack
If you hold the Ctrl or Shift key down as you drag a tabbed pane from a stack, the pane becomes a floating view.
-
Press and hold the mouse button on the Function List title bar.
Drag it over the stack from which you separated it.
Release the mouse button when the gray rectangular outline of the Function List view overlaps the stack.
The Function List view returns to its original stack, but it is added as the last pane in the stack.
-
Press and hold the mouse button on the Function List tab.
Drag it sideways over the other tabs in the same stack.
Release the mouse button when the small gray rectangular outline overlaps another tab in the stack of tabbed panes.
The Function List view moves to the position in the stack where you release the mouse button.
You can save view layout schemes for a PowerBuilder painter and use them every time you open the painter.
-
Arrange the views in the painter as you like.
-
Select View>Layouts>Manage from the menu bar.
-
Click the New Layout button in the Layout dialog box.
-
Enter a name for your layout in the text field, click the background of the dialog box, and then click the x button in the upper right corner of the dialog box to close it.
Your layout scheme is saved. Now, when you select View>Layouts, you see your layout listed on the cascading menu.
Saving the toolbars and System Tree layouts
PowerBuilder saves the customizations you make to the toolbars and System Tree separately from the view layout. It retains those settings and reapplies them to every workspace you access and every view layout you select.
Each PowerBuilder painter has a default view layout scheme. You can always reset the layout scheme to this default layout.
-
Select View>Layouts from the menu bar.
-
Choose Default from the cascading menu.
The default view layout scheme displays in the painter workspace.
Where you are
Manipulate the System Tree window
A painter workspace always includes the PowerBar and other PainterBar toolbars that you can use as you work. The buttons in the toolbars change depending on the type of target or object you are working with. You can also customize the toolbars to include additional functionality.
Now you change the appearance of the toolbars to:
You can learn a toolbar button's function by placing the cursor over it to view its PowerTip. A PowerTip is pop-up text that indicates a button's function.
You can also display a label on each toolbar button.
-
Move the pointer to any button on the PowerBar, but do not click.
The button's PowerTip displays.

-
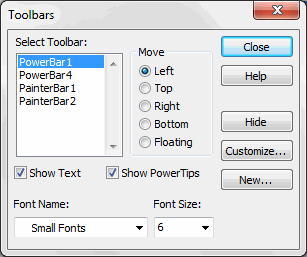
Select Tools>Toolbars from the menu bar.
The Toolbars dialog box displays.
-
Select the Show Text check box, then click the Close button.
PowerBuilder displays a label on each of the buttons in the PowerBar and the PainterBars.
You can float the toolbars so that you can move them around the painter workspace as you work.
-
Right-click anywhere in the PowerBar.
The pop-up menu for the toolbars displays. From the pop-up menu you can set the toolbar's location to the left, top, right, or bottom of the workspace. You can also set it to floating.
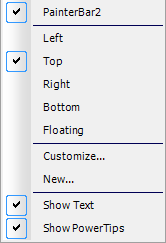
About pop-up menus
Throughout PowerBuilder, pop-up menus provide a fast way to do things. The menu items available in the pop-up depend on the painter you are using and where you are in the workspace when you click the right mouse button.
-
Select Floating from the pop-up menu.
The PowerBar changes to a floating toolbar. You can adjust its shape.

-
Move the pointer to an edge or border area in the PowerBar.
-
Press and drag the PowerBar toward the left side of the workspace.
Release the mouse button when the PowerBar becomes a vertical bar.
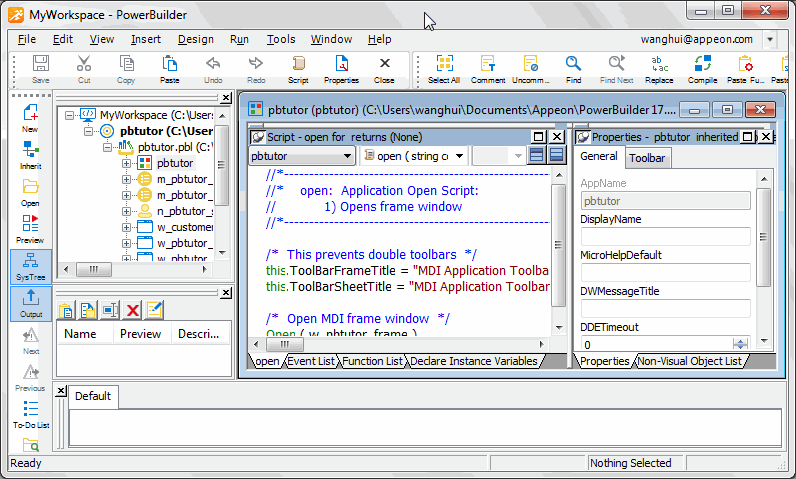
The PowerBar is docked at the left side of the frame.
You can customize the position of the toolbars to suit your work style.
-
Select Tools>Toolbars from the menu bar.
The Toolbars dialog box displays. The selected Move radio button indicates the position of the currently selected toolbar.
-
Click Top.
This repositions the PowerBar at the top of the workspace.
Radio buttons are grayed if a selected toolbar is hidden
If a selected toolbar is hidden (not visible) in the painter, you cannot select where it appears in the workspace. In this case, the radio buttons are grayed and you must first click the Show button before you can select a radio button. The Show button replaces the Hide button when a toolbar is hidden.
-
Click PainterBar1 in the Select Toolbar list box and select Right.
Click Close in the Toolbars dialog box.
-
Right-click PainterBar2 and select Left from the pop-up menu.
You have swapped the locations of the two painter bars.
-
Arrange the toolbars to suit your preferences.
You can also drag the toolbars to the top, bottom, left, or right of the painter workspace. When a toolbar is in a fixed location, it has a drag bar at the left or top of its buttons. You can click the drag bar and drag the mouse to move the toolbar around the painter workspace.
PowerBuilder applies toolbar configuration properties to all painters and saves them for the next PowerBuilder session.
-
Close the Application painter.
If you are not continuing immediately with the tutorial
You can close PowerBuilder or the tutorial workspace if you want. In that case, you must open the tutorial workspace before you continue with the next lesson.


