About this chapter
This chapter explains how to build styles in PowerBuilder and provide them to InfoMaker users.
InfoMaker comes with built-in form styles with which users can build sophisticated forms. You can create your own form styles in PowerBuilder and provide them to InfoMaker users. With these custom form styles, you can enforce certain standards in your forms and provide extra functionality to your InfoMaker users. For example, you might want to:
-
Include your organization's logo in each form
You can do this by creating custom form styles that have the logo in place.
-
Reconfigure the toolbar that is provided with the built-in form styles
You can do this by modifying a built-in form style and saving it as a custom form style.
-
Use drag and drop in forms
-
Include picture buttons, edit controls, and other controls in forms
Almost anything you can do in a PowerBuilder window you can do in a custom form style.
What a form style is
InfoMaker users use forms to maintain data. Users can view, add, delete, and update data in a form. Each form is based on a form style, which specifies:
-
The way the data is presented (for example, in a freeform, grid, or master/detail presentation)
-
The menu and toolbar that are available when users run a form
-
Actions that users can attach to command buttons in the form
How form styles are constructed
You build form styles in PowerBuilder. A form style consists of:
-
A window
-
A menu
Figure: PowerBuilder form style

About the window
The window serves as the foundation of the form. It contains one or more DataWindow controls with special names. It is these DataWindow controls that are the heart of the form style. The user views and changes data in the form through the special DataWindow controls.
This chapter refers to the special DataWindow controls as the central DataWindow controls. You must name the central DataWindow controls using one of a set of supported names.
In addition to the central DataWindow controls, the window can contain any other controls that you can place in a window in PowerBuilder (such as CommandButtons, RadioButtons, user objects, and pictures).
About the menu
When users run forms, they can pick items off a menu. You build the menu in the Menu painter and associate it with the window that the form style is based on.
When building the menu, you can specify which menu items should display in a toolbar when a form is run. The toolbar works like all PowerBuilder toolbars.
About actions
Form styles contain actions that users can attach to command buttons in the form and that you can call in scripts.
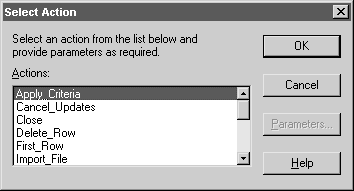
Each public window function you define in the window for the form style is available as an action to users of the form style.
Looking at an example
For example, the built-in form style Freeform consists of:
-
A window named w_pbstyle_freeform
-
A menu named m_pbstyle_freeform
About w_pbstyle_freeform
The window w_pbstyle_freeform contains a DataWindow control named dw_freeform and contains no other controls.
The PowerBuilder window defines many window-level functions:
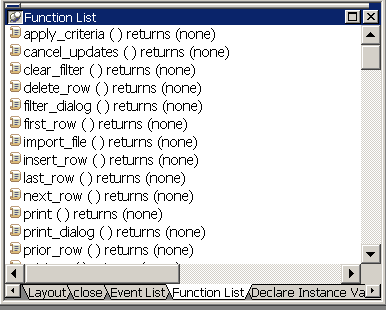
Each of these window functions is available as an action in InfoMaker to users of the Freeform form style:
About m_pbstyle_freeform
The menu named m_pbstyle_freeform provides the menu items and toolbar items available to users when they run forms based on the Freeform style.
For example, m_pbstyle_freeform contains the item Specify Criteria on the Rows menu; the item also displays on the toolbar:

When InfoMaker users run the form, they can select Specify Criteria to enter selection criteria that are used in retrieving rows in the form.
Each form style you define contains one or more central DataWindow controls that are based on DataWindow controls in one of the built-in InfoMaker form styles.
The best way to understand the behavior of these DataWindow controls is to build forms in InfoMaker using each of the built-in styles. Then, when you want to build a form style, choose the DataWindow controls from the built-in style that matches the type of presentation you want in your form style.
For example, to create a basic freeform data entry form, base it on dw_freeform, the DataWindow control found in w_pbstyle_freeform.
When building your form style, you must assign one of the following names to the central DataWindow controls:
-
dw_freeform
-
dw_grid
-
dw_master_12many
-
dw_detail_12many
-
dw_master_many21
-
dw_detail_many21
Valid combinations
You must use one of the four combinations of DataWindow controls in the following table in a form style.
|
Use these DataWindow control names |
To base your form style on this built-in style |
|---|---|
|
dw_freeform only |
Freeform. |
|
dw_grid and dw_freeform |
Grid. dw_grid is the central DataWindow control; dw_freeform shares the result set and serves as the background, allowing users to place computed fields anywhere in the form. |
|
dw_master_12many and dw_detail_12many |
Master Detail/One-To-Many. |
|
dw_master_many21 and dw_detail_many21 |
Master Detail/Many-To-One. |
To build and use a form style:
-
Do one of the following:
-
Copy the window and menu from an existing form style to act as your starting point
-
Begin from scratch by creating a new window and placing in it one or two DataWindow controls that have the supported names
-
-
Save the window with a special comment that indicates that the window serves as the basis for a form style.
-
Enhance the form style by adding controls to the window, modifying the menu, defining window functions to serve as actions, and so on.
-
Copy all objects used in the form style (such as windows, user objects, and menus) to a library that will be defined as a style library for InfoMaker users.
-
Add the style library to the search path for InfoMaker users.
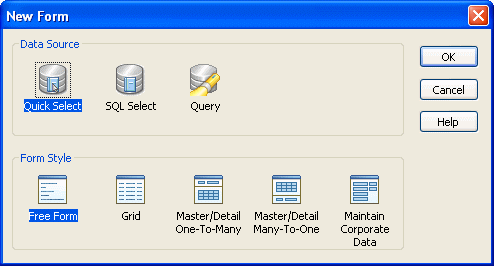
When InfoMaker users create a new form, the form style you defined displays in the New Form dialog box. Users can select the style to build a form based on the style you built.
The rest of this chapter describes these steps.
The easiest way to get started building form styles is to copy an existing form style and work with it. By examining its structure and making small changes, you can quickly understand how form styles work.
To begin by modifying an existing form style:
-
Open the Library painter in PowerBuilder.
-
Copy the window and menu that serve as the foundation for a form style to a library that is on your application's library search path.
Starting from a built-in form style
The windows and menus that serve as the basis for the built-in form styles are in IMSTYLE190.PBL, which is shipped with InfoMaker and installed in the InfoMaker directory. You can make a copy of this PBL and use it as the basis of your own form styles.
-
Open the window in the Window painter and select File>Save As from the menu bar to save it with a new name.
-
Give the window a new name.
You can use any name you want, except that names of windows that define form styles must be unique across all style libraries that are used by an InfoMaker user.
-
Define a special comment for the window (for instructions, see Identifying the window as the basis of a style).
-
Click OK to save the window.
-
Open the menu in the Menu painter and select File>Save As from the menu bar to save it with a new name.
-
Provide a new name and an optional comment, then click OK to save the menu.
You do not need to provide a comment for the menu, but it is a good idea to identify it as being used in the form style you are building.
-
Enhance the form style (for instructions, see Completing the style ).
In order for InfoMaker to recognize that a window in a library serves as the basis for a form style, you must specify a comment for the window that starts with the text Style:
Style: text that describes the style
The text that follows Style: is the text that displays below the icon for the form style in the New Form dialog box in InfoMaker.
For example, if you save a w_pbstyle_freeform window with the comment Style: Maintain corporate data in a style library, InfoMaker users see this when they create a new form:
You can specify the comment either when first saving the window or in the Library painter.
For more information about designing windows, see the section called “Working with Windows” in Users Guide.
Once you understand how form styles work, you can build one from scratch.
To build a form style from scratch:
-
Create a new window.
-
Place a DataWindow control in the window.
-
In the Properties view for the control, name the control using one of the special names.
For the list of special names, see Naming the DataWindow controls in a form style.
-
Change properties for the control as desired.
For example, you can add vertical and horizontal scroll bars.
Do not associate the control with a DataWindow object
InfoMaker users specify the data for the control when they create a new form.
-
If the form style you are building uses two DataWindow controls, place another DataWindow control in the window and name it to conform with the valid combinations.
For the list of valid combinations, see Naming the DataWindow controls in a form style.
-
Save the window and specify a comment for it.
For instructions, see Identifying the window as the basis of a style.
To complete your form style, enhance the window and menu to provide the processing you want. For example, you can:
-
Work with the central DataWindow control
-
Add controls to the window
-
Define actions (functions that appear as actions in your form style)
-
Modify the menu and its associated toolbar
-
Write scripts for the window, its controls, and menu items
-
Add other capabilities, such as drag and drop, to the window
The DataWindow controls with special names are the heart of a form. It is in these controls that users manipulate the data in the form.
You need to understand:
-
How the freeform DataWindow is sized in the form
-
How to retrieve data into the control in the form
How the freeform DataWindow is sized
All form styles you build contain a freeform DataWindow (as do all the built-in styles). Regardless of what size you specify for the freeform DataWindow control in the Window painter in PowerBuilder, the freeform DataWindow fills the entire form in the Form painter in InfoMaker. InfoMaker enlarges the freeform DataWindow so that users can place data (such as computed fields) anywhere in the form.
This means that a window background color that you specify in PowerBuilder is ignored in the form.
Retrieving rows into the central DataWindow control
When an InfoMaker user runs a form, InfoMaker automatically populates the SQLCA Transaction object with the correct values, so you do not have to do that in a script. To retrieve rows into the central DataWindow control, all you have to do is set the Transaction object for the control and then retrieve rows.
For example, to retrieve data into the control named dw_freeform, code:
dw_freeform.SetTransObject(SQLCA)
dw_freeform.Retrieve()
You would code this in the window's Open event to present the data to the user when the form opens.
For more information about Transaction objects, see Using Transaction Objects.
All windows serving as the basis for a form style have at least one DataWindow control. In addition, you can add any other controls that you can add to standard PowerBuilder windows, such as command buttons, user objects, text, edit boxes, pictures, and drawing objects.
Users of the form can move the controls you place in the window, but they cannot delete them.
Users can also add controls to the form in the Form painter. They make CommandButtons and PictureButtons work by associating actions with them. Actions are described next.
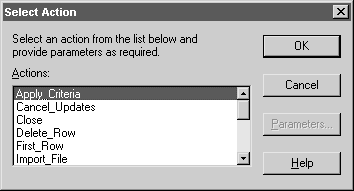
Often users want to add buttons (CommandButtons or PictureButtons) to a form created using a custom form style. When you create the form style, you specify what the added buttons can do by defining actions for the form style. When users place a button, they select the desired action from a list:
Actions are implemented as public window-level functions.
To define an action:
-
In the Script view in the Window painter, select Insert>Function from the menu bar.
-
Define the window-level function (for how, see Users Guide).
If you want the window function to be available to a form user as an action, be sure to define the function as public. Function arguments you define are used as parameters of the action. Each public window function you define is listed as an action in the Select Action dialog box in the Form painter.
Defining functions not available as actions
If you want to define and use window functions that are not available as actions in forms, define them as private.
You specify the menu and toolbar that display when users run a form by defining a menu in the Menu painter and associating it with the window that serves as the basis for your form style.
Each menu item in the menu you define displays when a form is run. In addition, InfoMaker adds Window and Help menus to allow users to manipulate windows and get online Help when running a form in the InfoMaker environment.
Providing online Help
You can define a Help item in the menu bar, then define menu items that display in the Help drop-down menu. The Help items do not display when users run a form within InfoMaker, but they do display when a form is run from an executable. For more information about InfoMaker executable files, see the InfoMaker Users Guide.
Item in a toolbar
As with MDI applications, you can specify that a menu item should display as an item in a toolbar when the form is run.
Scripting
You use the same scripting techniques for menus used in forms as you do for menus used in standard windows. Typically you communicate between a window and its menu by defining user events for the window, then triggering them from the menu using the menu object's ParentWindow property to refer to the form window; this technique is used in the built-in form styles.
For more information
For more information about using menus and user events, see Users Guide.
For more information about associating toolbars with menus, see Building an MDI Application
You write scripts for the window, its controls, and Menu objects the same way you write them for standard windows and menus. When working with DataWindow controls, remember that you do not have to set the properties of the SQLCA Transaction object -- InfoMaker does that automatically when users run a form.
You can define global user-defined functions and structures to support the scripts you code, but note that since InfoMaker does not have an application object, form styles cannot use global variables or global external function declarations.
You can make forms as sophisticated as you want. For example, you can implement drag and drop features, and mail-enable your form.
For complete information about the features you can build into a window, see the the section called “Working with Windows” in Users Guide.
Once you complete a form style (or at least have a version that you want to test), you can put it to use.
To make a style available to InfoMaker users:
-
Make sure the window and menu that define the form style are in a library that is accessible to InfoMaker users (the style library).
-
Add any other PowerBuilder objects that you use in the form style (such as windows, user objects, global user-defined functions, and global structures) to the same library.
-
Add the style library to the path for an InfoMaker user.
For more information, see the InfoMaker Users Guide.
When an InfoMaker user using the style library creates a new form, all custom form styles display in the Form Style box in the New Form dialog box:
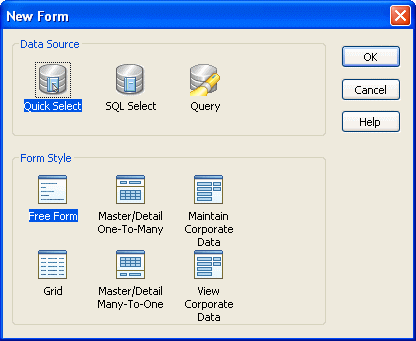
Custom styles display with a generic icon.
InfoMaker users simply select a data source and a custom style to start building a form based on your form style. You should provide documentation to users of your form styles.
Understanding inheritance
When users build a form, they are working with a window that is a descendant of the window that you built for the form style. That is, the form style window you built in PowerBuilder is the ancestor, and the form window used in InfoMaker is the descendant. This means that if you change the form style, the changes are picked up the next time users work with a form using that style.
For example, you can add controls to the form style and have the controls display automatically when users later open existing forms using the style.
Caution
Be careful: do not make changes that invalidate forms already built using the style.
You can store style libraries on the network to make them readily available to all InfoMaker users. You do this with a shared initialization file on a network: you place an InfoMaker initialization file that references the shared style libraries out on the network, then set up InfoMaker users so that they can access the initialization file.
To make style libraries available throughout your organization:
-
Place the style libraries on the network in a directory accessible to InfoMaker users.
-
Open InfoMaker, go to the Library painter, and make sure all style libraries are listed in the search path.
-
Close InfoMaker.
-
Copy your InfoMaker initialization file to a directory on the network that is accessible to all InfoMaker users.
This is the shared initialization file. It records all the style libraries in the StyleLib variable in the [Application] section.
-
Set up InfoMaker users so that they can access the shared initialization file.
Each InfoMaker user needs to specify the location of the shared initialization file in InfoMaker.
For more information, see Specifying the location of the shared InfoMaker initialization file in InfoMaker.
Specifying the location of the shared InfoMaker initialization file in InfoMaker
Once the shared initialization file has been defined in a user's InfoMaker initialization file, the user's style library search path consists of the style libraries defined in the user's local InfoMaker initialization file plus all style libraries defined in the shared initialization file. When the user creates a new form, the form styles defined in all the style libraries display in the New Form dialog box.
Each InfoMaker user needs to tell InfoMaker where to find the shared initialization file.
To specify the location of a shared InfoMaker initialization file:
-
Select Tools>System Options from the InfoMaker menu bar.
-
On the General property page, enter the path for the shared InfoMaker initialization file.
-
Click OK.
InfoMaker saves the path for InfoMaker initialization in the registry.
Preventing the use of built-in styles
You might not want the built-in form styles to be available to InfoMaker users. That is, you might want all forms to be based on one of your organization's user-defined styles. You can ensure this by suppressing the display of the built-in styles in the New Form dialog box.
To suppress the display of built-in styles:
-
Set up a shared initialization file on the network as described in the preceding section.
-
Add this line to the [Window] section of the shared initialization file:
ShowStandardStyles = 0
With this line specified in the shared initialization file, users can choose only from user-defined form styles when creating a new form. (Note that a ShowStandardStyles line in a user's local InfoMaker initialization file is ignored by InfoMaker.)


