About this chapter
This chapter explains how to use rich text in an application, either in a RichText DataWindow object or in a RichTextEdit control.
Before you begin
This chapter assumes you know how to create RichText DataWindow objects and RichTextEdit controls, as described in the section called “Working with Rich Text” in Users Guide. For information about using the RichText edit style in DataWindow objects that do not have the RichText presentation style, see the section called “Displaying and Validating Data” in Users Guide.
Rich text format (RTF) is a standard for specifying formatting instructions and document content in a single ASCII document. An editor that supports rich text format interprets the formatting instructions and displays the text with formatting.
In an application, you may want to:
-
Provide a window for preparing rich text documents
Although not a full-fledged word processor, the RichTextEdit control allows the user to apply formatting to paragraphs, words, and characters.
-
Create a mail-merge application
You or the user can set up boilerplate text with input fields associated with database data.
-
Display reports with formatted text
A RichText DataWindow object is designed for viewing data, rather than entering data. It does not have the edit styles of other DataWindow presentation styles.
-
Store rich text as a string in a database and display it in a RichTextEdit control
Any word processor
You can prepare rich text in any word processor that can save or export rich text format.
Input fields in PowerBuilder only
Although many word processors support some kinds of fields, the fields are usually incompatible with other rich text interpreters. If you want to specify input fields for a PowerBuilder application, you will have to insert them using the PowerBuilder RichTextEdit control.
Rich text in the database
Since rich text is represented by ASCII characters, you can also store rich text in a string database column or string variable. You can retrieve rich text from a string database column and use the PasteRTF function to display the text with formatting in a RichTextEdit control.
English is the currently recommended language for the rich text, as only English is fully tested. The other languages will be listed here after they are fully tested in the future versions.
You can select from the rich text editors supported by PowerBuilder. The selected rich text editor will be applicable to the RichTextEdit control, the RichText DataWindow object, and the RichText edit style. For how to select the rich text editor, see the section called “Specifying a rich text editor” in Users Guide.
For 32-bit application:
-
Built-in TX Text Control ActiveX 15.0
TX Text Control ActiveX 15.0 is added as a built-in rich text editor in PowerBuilder 2019 (not in InfoMaker). It is a special OEM version and is provided at no cost. Note that TX Text Control ActiveX 15.0 supports 32-bit only.
-
Built-in TX Text Control ActiveX 28.0
Recommended.
Starting from PowerBuilder 2019 R3, a special OEM version of TX Text Control ActiveX 28.0 is added as a built-in rich text editor in PowerBuilder, and it is provided at no cost and is highly recommended to be used by all existing PowerBuilder projects (no matter they already make use of the RichTextEdit of SAP PowerBuilder version 12.6 or older, TX Text Control ActiveX 15.0, or TE Edit Control).
-
Built-in Rich Edit Control (TE Edit Control)
Obsolete.
TE Edit Control is added as a built-in rich text editor for free use in PowerBuilder 2017 and InfoMaker 2017. This editor provides almost the same functions/events/properties as the old one used in PowerBuilder 12.6 and earlier. For the difference, refer to Feature difference between TE Edit Control and TX Text Control.
Class name difference
The class name for TE Edit Control is "Ter24Class" in PowerBuilder 2017 and 2017 R2, and "Ter25Class" in PowerBuilder 2017 R3 and later. Please make sure to use the corresponding class name in your API calls or the third-party auto-test scripts.
However, TE Edit Control has the following issues and unsupported features in PowerBuilder:
-
When copying text into the RichTextEdit control, the font used may not be the default font for the RichTextEdit control. PowerBuilder 12.6 has the same issue.
-
It is unsupported to merge the data of two RichTextEdit controls into the third RichTextEdit control. For example, the following code is unsupported:
ls_1 = rte_1.CopyRTF ( false )
ls_2 = rte_2.CopyRTF ( false )
ls_3 = ls_1 + ls_2
ris = rte_3.PasteRTF (ls_3)
-
RichTextEdit control has problems in handling the space width of some fixed width fonts such as Courier and Courier New, which causes text not aligned.
-
In DataWindow preview, content of RichTextEdit controls do not scale like other controls do.
-
In printout of DataWindows, RichTextEdit controls show additional unwanted padding on the top depending on the location on the page.
-
SaveDocument will fail if the specified directory contains non-English characters.
-
SetFont function or setting font via APIs is unsupported.
-
SelectText function supports 98303 as the maximum length. If the length is over 98303, SelectText failed to select any text.
-
-
TX Text Control ActiveX 24.0 Professional/Enterprise
This is the rich text editor used in PowerBuilder 12.6 and earlier versions. If you want to continue using and distributing this editor in PowerBuilder 2017 and later, you will have to purchase it separately from the vendor (http://www.textcontrol.com) and follow the vendor's documentation to package and distribute it to your users.
Only the Professional or Enterprise edition of TX Text Control ActiveX 24.0 is supported by PowerBuilder 2017 and later; Standard edition is not supported.
The SP1, SP2, and SP3 of TX Text Control ActiveX 2400 do not support the RichText edit style any more, although it supports the RichTextEdit control and the RichText DataWindow object. You should use TX Text Control ActiveX 2400 for supporting all of these three features.
For 64-bit application:
-
Built-in TX Text Control ActiveX 28.0
Recommended.
Starting from PowerBuilder 2019 R3, a special OEM version of TX Text Control ActiveX 28.0 is added as a built-in rich text editor in PowerBuilder, and it is provided at no cost and is highly recommended to be used by all existing PowerBuilder projects.
-
Microsoft RichEdit Control
Pay attention to the feature difference between these two 64-bit editors in the following section: Feature difference between TX Text Control 28.0 (64-bit) and Microsoft RichEdit Control (64-bit).
If you intended to build a 64-bit application, it is recommended to select Built-in TX Text Control ActiveX 28.0 (32-bit and 64-bit) which is used as the rich text editor by both 32-bit and 64-bit applications; otherwise, Microsoft RichEdit Control will be used as the 64-bit rich text editor by the 64-bit application.
Pay attention to the following differences between TX Text Control 28.0 (64-bit) and Microsoft RichEdit Control (64-bit).
| Microsoft RichEdit Control (64-bit) | TX Text Control 28.0 (64-bit) |
|---|---|
|
The UI is old fashioned and not updated for long time. |
The UI is more modern and user friendly. |
|
The font and size in the toolbar does not display at initial launch. |
The font and size in the toolbar display at initial launch. |
|
RichText DataWindows cannot successfully retrieve data. |
RichText DataWindows can successfully retrieve data. |
|
The SaveAs of RichText DataWindows only supports save to PDF in Distill! Method, and the method must be specified before save. |
The SaveAs of RichText DataWindows supports save to PDF in Distill! or NativePDF! method. NativePDF! method will be used if none is specified. |
|
The RMB menu of RichTextEdit control and RichText DataWindow only supports inserting files of RTF and TXT formats. The InsertDocument and SaveDocument functions of RichTextEdit control only support files of RTF and TXT formats. Therefore, InsertDocument ("*.htm",true) returns -1 InsertDocument("*.doc",true) returns -1 SaveDocument (string f, {FileTypeDoc!|FileTypeHTML!|FileTypePDF!}) returns -1 and FileExists event is not triggered. |
The RMB menu of RichTextEdit control and RichText DataWindow supports inserting files of RTF/TXT/DOC/DOCX/HTML formats. The InsertDocument function of RichTextEdit control supports files of RTF/TXT/DOC/DOCX/HTML formats. The SaveDocument function of RichTextEdit control supports files of RTF/TXT/DOC/DOCX/HTML/PDF formats and can trigger the FileExists event correctly. |
|
If the document inserted into RichTextEdit control and RichText DataWindow contains tables, tables will not display. |
If the document inserted into RichTextEdit control and RichText DataWindow contains tables, tables can display. |
|
The RMB menu of RichTextEdit control and RichText DataWindow supports 4 RichText presentation settings: Input Fields Names Visible, Returns Visible, Tabs Visible and Spaces Visible. |
The RMB menu of RichTextEdit control and RichText DataWindow supports 3 RichText presentation settings: Input Fields Names Visible, ControlChars Visible (covering Returns Visible, Tabs Visible and Spaces Visible), and Input Fields Visible. |
|
RichTextEdit control and RichText DataWindow do not support the status bar property. |
RichTextEdit control and RichText DataWindow support the status bar property. |
|
When locating the footer through ShowHeadFoot, Position returns the header (which is incorrect); when locating the footer manually, Position returns the correct value. |
When locating the footer through ShowHeadFoot or manually, Position returns the correct value. |
|
The footer and header areas of RichTextEdit control and RichText DataWindow cannot display at the same time as the main content area, unless you call ShowHeaderFooter(true). |
The footer and header areas of RichTextEdit control and RichText DataWindow can display at the same time as the main content area. |
|
Mouse wheel does not scroll a RichTextEdit page. |
Mouse wheel can scroll a RichTextEdit page. |
|
The preview mode of RichTextEdit control and RichText DataWindow is more like a print preview, for example, the left side will show the paper size/margin/page information, and the margin and page settings can be dynamically modified. |
In preview mode of RichTextEdit control and RichText DataWindow, the left side does not show the paper size/margin/page information. |
TE Edit Control (added in PowerBuilder 2017) provides almost the same functions/events/properties as TX Text Control (which has been used since earlier versions of PowerBuilder), except for the following differences and issues (due to the different ways they are designed):
|
Affected area |
Type |
Description |
|---|---|---|
|
Double-byte languages |
Unsupported |
Double-byte languages such as Korean, Japanese are not supported well in TE Edit Control. |
|
InputFieldBackColor property |
Limitation |
For TE Edit Control, this property will not take effect until you save the data into a PDF file or print the data; which means, when you preview the UI in the design view or when you run the UI, you will always see the background color is gray, only when you save the data to a PDF file or print the data, you will see the background color is changed to what you set. |
|
Wordwrap property |
Limitation |
For TE Edit Control, this property is always true (it cannot be set to false). |
|
BackColor property |
Difference |
For TE Edit Control, if you set a negative value for the BackColor property, the returned value will be 0 and the color will be black. For TX Text Control, if you set a negative value for the BackColor property, the returned value will be 16777215 and the color will be white. |
|
BottomMargin/RightMargin/LeftMargin/TopMargin properties |
Difference |
For TE Edit Control, if you set a negative value, the returned value will be 0. For TX Text Control, if you set a negative value, the returned value will be the negative value. |
|
Find function |
Enhancement |
For TE Edit Control, the Find function can not only find the text string, but also can find the carriage return characters and some special characters. |
|
GetTextColor/GetTextStyle functions and font settings |
Difference |
For TE Edit Control, this function will return the settings (text color, font name, text style etc.) of the first character of the selected text if the selected text contains more than one type of settings. For TX Text Control, this property will return empty if the selected text contains more than one type of settings. |
|
GetAlignment/GetSpacing/GetParagraphSetting functions |
Difference |
For TE Edit Control, this function will return the alignment (or spacing or paragraph settings) of the paragraph where the insertion point is located if more than one paragraph are selected. For TX Text Control, this property will return null if more than one paragraph with different alignments (or spacing or paragraph settings) are selected. |
|
GetParagraphSetting function |
Difference |
The returned value is different between TE Edit Control and TX Text Control due to the different units used. |
|
Visio drawings |
New feature |
Visio drawings can be pasted or inserted into TE Edit Control. |
|
Preview |
New feature |
All pages can be previewed (by scrolling) in TE Edit Control; while only the first page can be previewed in TX Text Control. |
|
SelectedPage function |
Limitation |
For TE Edit Control, the SelectedPage function returns the number of the page which is being viewed (rather than where the insertion point is placed). |
|
ShowHeadFoot function |
Difference |
When the document is in preview mode, TX Text Control returns 1; while TE Edit Control returns 1 and closes the preview mode, and when the parameter is true, the insertion point is placed to the header band; when the parameter is false, the insertion point is placed to the detail band. |
|
ReplaceText function |
Limitation |
In TE Edit Control, the text after replaced will take over the settings (such as font name, font size etc.) carried over by the given string. |
|
SaveDocument function |
Limitation |
In TE Edit Control, when saving to HTML, the image will lose some quality and will be saved as individual files separately from the document and the reference to the image file uses the absolute path,. |
|
CopyRTF function |
Difference |
TE Edit Control will return a longer string which contains more types of information. |
|
Insertion point |
Difference |
When the user switches the editor band (e.g. from the header/footer band to the detail band), the insertion point is placed to the last column and last row in TE Edit Control, while the insertion point's last position will be remembered and restored in TX Text Control, if it is the firs time, the insertion point is placed to the first column and first row. |
|
Input field |
Difference |
TE Edit Control limits the length of the input field data to no more than 2000 characters while TX Text Control has no such limitation. |
|
Font |
Difference |
In TE Edit Control, if the user uses a non-English input method to input the English characters, the inserted characters appear like using a different font than the other characters, although they actually use the same font. |
|
Image |
Difference |
In TE Edit Control, when the user tries to manually select an image (only image, no text), the user can only select it by dragging from end to beginning, but cannot select by dragging from beginning to end. |
|
Bullet list alignment |
Issue |
In TE Edit Control, the bullet symbol is cut off in a rich-text edit style column under the preview mode or print mode because the bullet list is not perfectly aligned with the body text. |
To deploy a rich text application to a server or client machine:
-
If using the built-in text editor, you can use the PowerBuilder Runtime Packager to deploy the required rich text files with your application.
For more information on the runtime packager, see PowerBuilder Runtime Packager.
-
If using the old editor (TX Text Control ActiveX), you must follow the vendor's documentation to deploy the required files with your application.
This section discusses:
-
How scrolling differs from other DataWindow styles
-
Problems you may encounter with default values for new rows
-
What happens when the user makes changes
Scrolling
In a RichText DataWindow object, the rich text can consist of more than one page. A row of data can be associated with several pages, making a row larger than a page. In other DataWindow styles, a page consists of one or more than one row -- a page is larger than a row.
For a RichText DataWindow object, the scrolling functions behave differently because of this different meaning for a page:
-
ScrollNextRow and ScrollPriorRow still scroll from row to row so that another row's data is displayed within the document template.
-
ScrollNextPage and ScrollPriorPage scroll among pages of the document rather than pages of rows.
Page flow
As you scroll, the pages appear to flow from one row to the next. Scrolling to the next page when you are on the last page of the document takes you to the first page for the next row. The user gets the effect of scrolling through many instances of the document.
New rows: default data and validation rules
Input fields are invisible when they have no value. Before data is retrieved, PowerBuilder displays question marks (??) in fields to make them visible. For new rows, PowerBuilder assigns an initial value based on the datatype.
If you have specified an initial value for the column, PowerBuilder uses that value; if no value is specified, PowerBuilder uses spaces for string columns or zero for numeric columns.
Possible validation errors
If the default initial value provided by PowerBuilder does not satisfy the validation rule, the user gets a validation error as soon as the new row is inserted. To avoid this, you should specify initial values that meet your validation criteria.
When the user makes changes
Display only
When you check Display Only on the General property page for the Rich Text Object, the user cannot make any changes to the data or the rich text.
If you leave the pop-up menu enabled, the user can turn off the display-only setting and make the DataWindow object editable.
Input fields
In an editable DataWindow object, users change the value of a column input field by displaying the input field's property sheet and editing the Data Value text box. For a computed field input field, the Data Value text box is read-only.
You can let the user display input field names instead of data. You might do this if you were providing an editing environment in which users were developing their own RichText DataWindow object. However, the RichTextEdit control is better suited to a task like this, because you have more scripting control over the user's options.
Rich text
If users edit the text or formatting, they are changing the document template. The changes are seen for every row.
The changes apply to that session only, unless you take extra steps to save the changes and restore them.
To save the changes, you can write a script that uses the CopyRTF function to get all the text, including the named input fields but not the row data, and save the contents of that string in a file or database. Whenever users view the RichText DataWindow object, you can restore their latest version or let them return to the original definition of the DataWindow object's text.
Functions for RichText DataWindow objects
The DataWindow control has many functions.
Functions that behave the same
DataWindow control functions that operate on data, such as Update or Retrieve, have the same behavior for all types of DataWindow objects.
When the object in the control is a RichText DataWindow object, some of the functions do not apply or they behave differently.
Functions that do not apply
Some functions are not applicable when the object is a RichText DataWindow object. The following functions return an error or have no effect:
-
Functions for graph and crosstab DataWindow objects
-
Functions for grouping: GroupCalc, FindGroupChange
-
Functions for code tables: GetValue, SetValue
-
Functions for selecting rows: SelectRow, SetRowFocusIndicator, GetSelectedRow
-
Functions that affect column and detail band appearance: SetBorderStyle, SetDetailHeight
-
ObjectAtPointer
-
OLEActivate
Functions that behave differently
Some functions have different behavior when the object is a RichText DataWindow object:
-
Functions for the clipboard: Copy, Clear, and so on
-
Functions for editable text (they apply to the edit control in other DataWindow styles): LineCount, Position, SelectText, and so on
-
Find and FindNext (the arguments you specify for Find determine whether you want the general DataWindow Find function or the RichText version)
-
Scrolling
A RichTextEdit control in a window or user object lets the user view or edit formatted text. Functions allow you to manipulate the contents of the control by inserting text, getting the selected text, managing input fields, and setting properties for all or some of the contents.
You define RichTextEdit controls in the Window painter or the User Object painter.
In the Window or User Object painter, on the Document page of the RichTextEdit control's property sheet, you can enable or disable the features in the following table.
|
Features |
Details |
|---|---|
|
Editing bars |
A toolbar for text formatting, a ruler bar, and a status bar. |
|
Pop-up menu |
Provides access to the InsertFile and clipboard commands, as well as the property sheet. |
|
Display of nonprinting characters |
Carriage returns, tabs, and spaces. |
|
Display of fields |
Whether fields are visible at all, or whether the field name or data displays. You can also change the background color for fields. |
|
Wordwrap |
Affects newly entered text only. If the user enters new text in an existing paragraph, word wrap is triggered when the text reaches the right edge of the control. To get existing text to wrap within the display, the user can tweak the size of the control (if it is resizable). |
|
Print margins |
Print margins can be set relative to the default page size. |
You can also specify a name for the document that is displayed in the print queue. The document name has nothing to do with a text file you might insert in the control.
Users can change the available tools
When users display the property sheet for the rich text document, they can change the tools that are available to them, which you might not want. For example, they might:
-
Remove the display-only setting so that they can begin editing a document you set up as protected
-
Turn off the tool, ruler, or status bars
-
View input fields' names instead of data
-
Disable the pop-up menu so that they cannot restore tools they turn off
You might want to guard against some of these possibilities. You can reset the property values for these settings in a script. For example, this statement restores the pop-up menu when triggered in an event script:
rte_1.PopMenu = TRUE
Undoing changes
The user can press Ctrl+Z to undo a change. You can also program a button or menu item that calls the Undo function.
If Undo is called repeatedly, it continues to undo changes to a maximum of 50 changes. The script can check whether there are changes that can be undone (meaning the maximum depth has not been reached) by calling the CanUndo function:
IF rte_1.CanUndo() THEN
   rte_1.Undo()
ELSE
   MessageBox("Stop", "Nothing to undo.")
END IF
In the Window painter, you do not enter text in the control. Instead, in your application you can programmatically insert text or let the user enter text using the editing tools.
Setting a default font
The Font tab page in the Properties view for a RichTextEdit control lets you set default font characteristics for the control. When the control first displays at runtime, and you include the toolbar with a RichTextEdit control, the toolbar indicates the default font characteristics that you selected on the Font tab page at design time. Although the application user can change fonts at runtime, or you can use PowerScript to change the font style, you can set the default font at design time only.
Inserting text
From a file
If you have prepared a text file for your application, you can insert it with the InsertDocument function. The file can be rich text or ASCII:
li_rtn = rte_1.InsertDocument  &
   ("c:\mydir\contacts.rtf", FALSE, FileTypeRichText!)
The boolean clearflag argument lets you specify whether to insert the file into existing text or replace it. If you want to include headers and footers from a document that you insert, you must replace the existing text by setting the clearflag argument to TRUE. (The InsertFile command on the runtime pop-up menu is equivalent to the InsertDocument function with the clearflag argument set to FALSE.)
DisplayOnly property must be set to false
You cannot insert a document into a rich text control when the control's DisplayOnly property is set to true. If you try to do this, PowerBuilder displays a runtime error message.
From a database
If you have saved rich text as a string in a database, you can use a DataStore to retrieve the text.
After retrieving data, paste the string into the RichTextEdit control:
ls_desc = dw_1.Object.prod_desc.Primary[1]
rte_1.PasteRTF(ls_desc)
Rich text and the clipboard
The CopyRTF and PasteRTF functions let you get rich text with formatting instructions and store it in a string. If you use the clipboard by means of the Copy, Cut, and Paste functions, you get the text only -- the formatting is lost.
Example of saving rich text in a database
Suppose you have a database table that records tech support calls. Various fields record each call's date, support engineer, and customer. Another field stores notes about the call. You can let the user record notes with bold and italic formatting for emphasis by storing rich text instead of plain text.
The window for editing call information includes these controls:
-
A DataWindow control that retrieves all the data and displays everything except the call notes
-
A RichTextEdit control that displays the call notes
-
A button for updating the database
RowFocusChanged event
As row focus changes, the notes for the current row are pasted into the RichTextEdit control. The RowFocusChanged event has this script:
string ls_richtext

// Get the string from the call_notes column
ls_richtext = dw_1.Object.call_notes[currentrow]

// Prevent flicker
rte_1.SetRedraw(FALSE)

// Replace the old text with text for the current row
rte_1.SelectTextAll()
rte_1.Clear()
rte_1.PasteRTF(ls_richtext)
rte_1.SetRedraw(TRUE)
LoseFocus event
When the user makes changes, the changes are transferred to the DataWindow control. It is assumed that the user will click on the button or the DataWindow control when the user is through editing, triggering the LoseFocus event, which has this script:
string ls_richtext
long l_currow
GraphicObject l_control

// Check whether RichTextEdit still has focus
// If so, don't transfer the text
l_control = GetFocus()

IF TypeOf(l_control) = RichTextEdit! THEN RETURN 0

// Prevent flicker
rte_1.SetRedraw(FALSE)

// Store all the text in string ls_richtext
ls_richtext = rte_1.CopyRTF()

// Assign the rich text to the call_notes column
// in the current row
l_currow = dw_1.GetRow()
dw_1.Object.call_notes[l_currow] = ls_richtext
rte_1.SetRedraw(TRUE)
LoseFocus and the toolbars
A LoseFocus event occurs for the RichTextEdit control even when the user clicks a RichTextEdit toolbar. Technically, this is because the toolbars are in their own windows. However, the RichTextEdit control still has focus, which you can check with the GetFocus function.
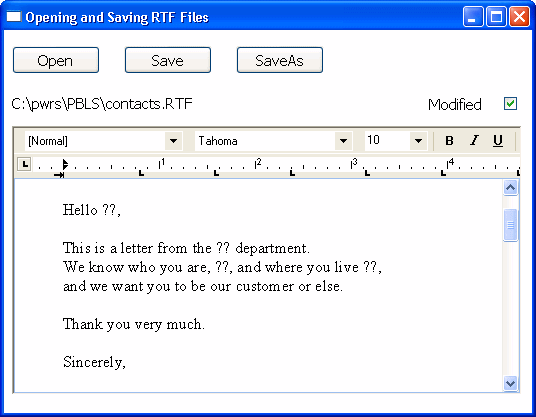
Saving rich text in a file
You can save the rich text in the control, with the input field definitions, with the SaveDocument function. You have the choice of rich text format (RTF) or ASCII:
rte_1.SaveDocument("c:\...\contacts.rtf", &
   FileTypeRichText!)
SaveDocument does not save the data in the input fields. It saves the document template.
Does the file exist?
If the file exists, calling SaveDocument triggers the FileExists event. In the event script, you might ask users if they want to overwrite the file.
To cancel the saving process, specify a return code of 1 in the event script.
Are there changes that need saving?
The Modified property indicates whether any changes have been made to the contents of the control. It indicates that the contents are in an unsaved state. When the first change occurs, PowerBuilder triggers the Modified event and sets the Modified property to TRUE. Calling SaveDocument sets Modified to FALSE, indicating that the document is clean.
Opening a file triggers the Modified event and sets the property because the control's contents changed. Usually, though, what you really want to know is whether the contents of the control still correspond to the contents of the file. Therefore, in the script that opens the file, you can set the Modified property to FALSE yourself. Then when the user begins editing, the Modified event is triggered again and the property is reset to TRUE.
This example consists of several scripts that handle opening and saving files. Users can open existing files and save changes. They can also save the contents to another file. If users save the file they opened, saving proceeds without interrupting the user. If users save to a file name that exists, but is not the file they opened, they are asked whether to overwrite the file:
The example includes instance variable declarations, scripts, functions, and events.
Instance variable declarations
ib_saveas
A flag for the FileExists event. When FALSE, the user is saving to the file that was opened, so overwriting is expected:
boolean ib_saveas=FALSE
is_filename
The current file name for the contents, initially set to "Untitled":
string is_filename
Open Document script
This script opens a file chosen by the user. Since opening a file triggers the Modified event and sets the Modified property, the script resets Modified to FALSE. The Checked property of the Modified check box is set to FALSE too:
integer li_answer, li_result
string ls_name, ls_path

li_answer = GetFileOpenName("Open File", ls_path, &
   ls_name, "rtf", &
   "Rich Text(*.RTF),*.RTF, Text files(*.TXT),*.TXT")

IF li_answer = 1 THEN
   // User did not cancel
   li_result = rte_1.InsertDocument(ls_path, TRUE)

   IF li_result = 1 THEN  // Document open successful
      // Save and display file name
      is_filename = ls_path
      st_filename.Text = is_filename

      // Save and display modified status
      rte_1.Modified = FALSE

      cbx_modified.Checked = rte_1.Modified
   ELSE

      MessageBox("Error", "File not opened.")
   END IF

   END IF
RETURN 0
Scripts that save the document
The user might choose to save the document to the same name or to a new name. These scripts could be assigned to menu items as well as buttons. The Save button script checks whether the instance variable is_filename holds a valid name. If so, it passes that file name to the of_save function. If not, it triggers the SaveAs button's script instead:
integer li_result
string ls_name

// If not associated with file, get file name
IF is_filename = "Untitled" THEN
   cb_saveas.EVENT Clicked()

ELSE
   li_result = Parent.of_save(is_filename)
END IF
RETURN 0
The SaveAs script sets the instance variable ib_saveas so that the FileExists event, if triggered, knows to ask about overwriting the file. It calls of_getfilename to prompt for a file name before passing that file name to the of_save function.
integer li_result
string ls_name

ib_saveas = TRUE

ls_name = Parent.of_getfilename()
// If the user canceled or an error occurred, abort
IF ls_name = "" THEN RETURN -1

li_result = Parent.of_save(ls_name)

ib_saveas = FALSE
RETURN 0
Functions for saving and getting a file name
of_save function
This function accepts a file name argument and saves the document. It updates the file name instance variable with the new name and sets the check box to correspond with the Modified property, which is automatically set to FALSE after you call SaveDocument successfully:
integer li_result

MessageBox("File name", as_name)

// Don't need a file type because the extension
// will trigger the correct type of save
li_result = rte_1.SaveDocument(as_name)

IF li_result = -1 THEN
   MessageBox("Warning", "File not saved.")
   RETURN -1
ELSE
   // File saved successfully
   is_filename = as_name
   st_filename.Text = is_filename
   cbx_modified.Checked = rte_1.Modified
   RETURN 1
END IF
of_getfilename function
The function prompts the user for a name and returns the file name the user selects. It is called when a file name has not yet been specified or when the user chooses Save As. It returns a file name:
integer li_answer
string ls_name, ls_path

li_answer = GetFileSaveName("Document Name", ls_path, &
   ls_name, "rtf", &
   "Rich Text(*.RTF),*.RTF,Text files(*.TXT),*.TXT")

IF li_answer = 1 THEN
   // Return specified file name
   RETURN ls_path
ELSE
   RETURN ""
END IF
Events for saving and closing
FileExists event
When the user has selected a file name and the file already exists, this script warns the user and allows the save to be canceled. The event occurs when SaveDocument tries to save a file and it already exists. The script checks whether ib_saveas is TRUE and, if so, asks if the user wants to proceed with overwriting the existing file:
integer li_answer

// If user asked to Save to same file,
// don't prompt for overwriting
IF ib_saveas = FALSE THEN RETURN 0

li_answer = MessageBox("FileExists", &
   filename + " already exists. Overwrite?", &
   Exclamation!, YesNo!)

// Returning a non-zero value cancels save
IF li_answer = 2 THEN RETURN 1
Modified event
This script sets a check box so the user can see that changes have not been saved. The Modified property is set automatically when the event occurs. The event is triggered when the first change is made to the contents of the control:
cbx_modified.Checked = TRUE
CloseQuery event
This script for the window's CloseQuery event checks whether the control has unsaved changes and asks whether to save the document before the window closes:
integer li_answer

// Are there unsaved changes? No, then return.
IF rte_1.Modified = FALSE THEN RETURN 0

// Ask user whether to save
li_answer = MessageBox("Document not saved", &
   "Do you want to save " + is_filename + "?", &
   Exclamation!, YesNo! )

IF li_answer = 1 THEN
   // User says save. Trigger Save button script.
   cb_save.EVENT Clicked()
END IF
RETURN 0
ActiveX controls can be used to spell check text in a RichTextEdit control. The supported ActiveX spell checking controls include VSSpell from ComponentOne and WSpell from Wintertree Software.
You can use the SelectedStartPos and SelectedTextLength properties of the RichTextEdit control to highlight the current position of a misspelled word in a text string that you are parsing with a supported ActiveX spell checking control. The following procedure uses an ActiveX control to spell check the entire text of the current band of a RichTextEdit control.
To spell check selected text in a RichTextEdit control:
-
On a window with a RichTextEdit control, select Insert>Control>OLE from the window menu.
-
Click the Insert Control tab of the Insert Object dialog box, select the installed ActiveX spell checking control, and click OK.
-
Click inside the window in the Window painter to insert the ActiveX control.
By default, the name of the inserted control is ole_n, where n = 1 when there are no other OLE controls on the window.
-
Add a menu item to a menu that you associate with the current window and change its Text label to Check Spelling.
-
Add the following code to the Clicked event of the menu item, where windowName is the name of the window containing the RichTextEdit and ActiveX controls:
string ls_selected
//get the current band context, and leave select mode
windowName.rte_1.selecttext(0,0,0,0)
windowName.rte_1.SelectTextAll()
ls_selected = windowName.rte_1.SelectedText()
windowName.rte_1.SelectedTextLength = 0
//assign the string content to the ActiveX control
windowName.ole_1.object.text = ls_selected
windowName.ole_1.object.start()
-
Select the ActiveX control in the Window painter and select ReplaceWord from the event list for the control.
-
Add the following code to the ReplaceWord event script:
string str
str = this.object.MisspelledWord
rte_1.SelectedStartPos = this.object.WordOffset
rte_1.SelectedTextLength  = Len(str)
rte_1.ReplaceText(this.object.ReplacementWord)
messagebox("misspelled word", "replaced")
The next time you run the application, you can click the Check Spelling menu item to spell check the entire contents of the current band of the RichTextEdit control.
In a RichText control, there are several user-addressable objects:
-
The whole document
-
Selected text and paragraphs
-
Input fields
-
Pictures
The user can make selections, use the toolbars, and display the property sheets for these objects.
Input fields get values either because the user or you specify a value or because you have called DataSource to associate the control with a DataWindow object or DataStore.
An input field is a named value. You name it and you determine what it means by setting its value. The value is associated with the input field name. You can have several fields with the same name and they all display the same value. If the user edits one of them, they all change.
In this sample text, an input field for the customer's name is repeated throughout:
Hello {customer}!
We know that you, {customer}, will be excited about our new deal. Please call soon, {customer}, and save money now.
In a script, you can set the value of the customer field:
rte_1.InputFieldChangeData("customer", "Mary")Then the text would look like this:
Hello Mary!
We know that you, Mary, will be excited about our new deal. Please call soon, Mary, and save money now.
The user can also set the value. There are two methods:
-
Selecting it and typing a new value
-
Displaying the Input Field property sheet and editing the Data Value text box
Inserting input fields in a script
The InputFieldInsert function inserts a field at the insertion point:
rtn = rte_1.InputFieldInsert("datafield")In a rich text editing application, you might want the user to insert input fields. The user needs a way to specify the input field name.
In this example, the user selects a name from a ListBox containing possible input field names. The script inserts an input field at the insertion point using the selected name:
string ls_field
integer rtn

ls_field = lb_fields.SelectedItem()
IF ls_field <> "" THEN
   rtn = rte_1.InputFieldInsert( ls_field )
   IF rtn = -1 THEN
   MessageBox("Error", "Cannot insert field.")
   END IF
ELSE
   MessageBox("No Selection", &
      "Please select an input field name.")
END IF
Input fields for dates and page numbers
To display a date or a page number in a printed document, you define an input field and set the input field's value.
To include today's date in the opening of a letter, you might:
-
Create an input field in the text. Name it anything you want.
-
In the script that opens the window or some other script, set the value of the input field to the current date.
For example, if the body of the letter included an input field called TODAY, you would write a script like the following to set it:
integer li_rtn
li_rtn = rte_1.InputFieldChangeData( "today", &
   String(Today()) )
For information about setting page number values see What the user sees.
You can make a connection between a RichTextEdit control and a DataWindow control or DataStore object. When an input field in the RichTextEdit control has the same name as a column or computed column in the DataWindow object, it displays the associated data.
Whether or not the RichTextEdit control has a data source, there is always only one copy of the rich text content. While editing, you might visualize the RichTextEdit contents as a template into which row after row of data can be inserted. While scrolling from row to row, you might think of many instances of the document in which the text is fixed but the input field data changes.
To share data between a DataWindow object or DataStore, use the DataSource function:
rte_1.DataSource(ds_empdata)
Example of sharing data
If the DataWindow object associated with the DataStore ds_empdata has the four columns emp_id, emp_lname, emp_fname, and state, the RichTextEdit content might include text and input fields like this:
Sample letter with columns from the employee table
ID: {emp_id}
Dear {emp_fname} {emp_lname}:
We are opening a new plant in Mexico. If you would like to transfer from {state} to Mexico, the company will cover all expenses.
Navigating rows and pages
For the RichTextEdit control, navigation keys let the user move among the pages of the document. However, you must provide scrolling controls so that the user can move from row to row.
You should provide Prior Row and Next Row buttons. The scripts for the buttons are simple. For Next Row:
rte_1.ScrollNextRow()
For Prior Row:
rte_1.ScrollPriorRow()
If you also provide page buttons, then when the user is on the last page of the document for one row, scrolling to the next page moves to the first page for the next row:
rte_1.ScrollNextPage()
Functions provide several ways to find out what is selected and to select text in the RichTextEdit control.
Where is the insertion point or what is selected?
The text always contains an insertion point and it can contain a selection, which is shown as highlighted text. When there is a selection, the position of the insertion point can be at the start or the end of the selection, depending on how the selection is made. If the user drags from beginning to end, the insertion point is at the end. If the user drags from end to beginning, the insertion point is at the beginning.
The Position function provides information about the selection and the insertion point.
For more information, see the section called “Position” in PowerScript Reference.
Changing the cursor image
The Pointer page of the Rich Text Object property sheet has a list box with stock pointers that can be used to indicate cursor position in a RichTextEdit control or RichText DataWindow. Users can change the cursor image at runtime by selecting one of these pointers and clicking OK in the Rich Text Object property sheet.
Selecting text programmatically
There are several functions that select portions of the text relative to the position of the insertion point:
-
SelectTextWord
-
SelectTextLine
-
SelectTextAll
A more general text selection function is SelectText. You specify the line and character number of the start and end of the selection.
Passing values to SelectText
Because values obtained with Position provide more information than simply a selection range, you cannot pass the values directly to SelectText. In particular, zero is not a valid character position when selecting text, although it is meaningful in describing the selection.
For more information, see the section called “Position” in PowerScript Reference.
For an example of selecting words one by one for the purposes of spell checking, see the section called “SelectTextWord” in PowerScript Reference.
Tab order, focus, and the selection
Tab order
For a window or user object, you include the RichTextEdit control in the tab order of controls. However, after the user tabs to the RichTextEdit control, pressing the tab key inserts tabs into the text. The user cannot tab out to other controls. Keep this in mind when you design the tab order for a window.
Focus and the selection
When the user tabs to the RichTextEdit control, the control gets focus and the current insertion point or selection is maintained. If the user clicks the RichTextEdit control to set focus, the insertion point moves to the place the user clicks.
LoseFocus event
When the user clicks on a RichTextEdit toolbar, a LoseFocus event occurs. However, the RichTextEdit control still has focus. You can check whether the control has lost focus with the GetFocus function.
The user can preview the layout and print the contents of the RichTextEdit control. In print preview mode, users see a view of the document reduced so that it fits inside the control. However, you must set the print margins and page size before you display the control in print preview mode.
There are two ways to enter print preview mode:
-
The user can press CTRL+F2 to switch between editing and print preview mode
-
You can call the Preview function in a script:
rte_1.Preview(TRUE)
Users can page through the control contents in print preview mode by using the up arrow and down arrow keys or the Page Up and Page Down keys.
Adjusting the print margins
If you set page margins at design time, or enable headers and footers for a rich text control, application users can adjust the margins of the control at runtime. Users can do this by opening the property sheet for the RichTextEdit control to the Print Specifications tab and modifying the left, right, top, or bottom margins, or by triggering an event that changes the margins in PowerScript code. Adjusting the margins in the Rich Text Object dialog box also affects the display of the RichTextEdit control content in print preview mode.
If you do not set page margins at design time or leave them at 0, any changes the user makes to the margins at runtime are visible in print preview mode only.

Setting page size and orientation
You cannot set the default page size and page orientation at design time. However, users can set these properties at runtime from the Print Specifications tab of the Rich Text Object dialog box. This dialog box is available from the standard view only. You must also enable the pop-up menu on a RichTextEdit control to enable application users to display this dialog box.
Printing
If the RichTextEdit is using DataWindow object data, you can limit the number of rows printed by setting the Print.Page.Range property for the DataWindow control. Its value is a string that lists the page numbers that you want to print. A dash indicates a range.
Example of a page range
Suppose your RichTextEdit control has a data source in the control dw_source. Your rich text document is three pages and you want to print the information for rows 2 and 5. You can set the page range property before you print:
dw_source.Object.DataWindow.Print.Page.Range = &
   "4-6,13-15"
You can also filter or discard rows so that they are not printed.
For more information, see the SetFilter, Filter, RowsMove, and RowsDiscard functions in PowerScript Reference and the Print DataWindow object property in the section called “Print.property” in DataWindow Reference.
Inserting footer text programmatically
This sample code sets the insertion point in the footer and inserts two blank lines, text, and two input fields:
rte_1.SelectText(1, 1, 0, 0, Footer!)
rte_1.ReplaceText("~r~n~r~nRow ")
rte_1.InputFieldInsert("row")
rte_1.ReplaceText(" Page ")
rte_1.InputFieldInsert("page")
rte_1.SetAlignment(Center!)All the editing tools described throughout this chapter and in the section called “Working with Rich Text” in Users Guide can be made available to your users.
What users can do
Users can:
-
Use the toolbars for text formatting
-
Use the pop-up menu, which includes using the clipboard and opening other rich text and ASCII files
-
Edit the contents of input fields
-
Turn the editing tools on and off
What you can make available to users in your code
You can program an application to allow users to:
-
Insert and delete input fields
-
Insert pictures
-
Switch to header and footer editing
-
Preview the document for printing
If a RichTextEdit control shares data with a DataWindow object or DataStore, you can program:
-
Scrolling from row to row (you do not need to program page-to-page scrolling, although you can)
-
Updating the database with changes made in input fields
The best way for you to prepare rich text for use in your application is to become a user yourself and edit the text in an application designed for the purpose. During execution, all the tools for text preparation are available.
The default view is the body text. You can also show header and footer text and a print preview. To show header and footer text, you must select the HeaderFooter property in the rich text control's Properties view at design time. This value cannot be changed during execution, although if you select it at design time, you can programmatically show the header and footer text at runtime.
Header and footer text
For either a RichText DataWindow object or the RichTextEdit control, you can call the ShowHeadFoot function in a menu or button script. To display the header editing panel, you can call:
dw_1.ShowHeadFoot(TRUE)
To display the footer editing panel, you must call:
dw_1.ShowHeadFoot(TRUE, FALSE)
Inserting the current page number in a footer
The following script inserts the current page number in the footer, then returns the focus to the body of the document in the rich text control. The PAGENO field name that you insert must be entered in capital letters only:
rte_1.ShowHeadFoot(true,false)
rte_1.SetAlignment ( Center! )
rte_1.InputFieldInsert("PAGENO")
rte_1.ShowHeadFoot(false,false)
You cannot change the PAGENO field with an InputFieldChangeData call.
In the overloaded function ShowHeadFoot, the second argument defaults to TRUE if a value is not provided. Call the function again to return to normal view.
dw_1.ShowHeadFoot(FALSE)
The document as it would be printed
The user can press CTRL+F2 to switch print preview mode on and off. You can also control print preview mode programmatically.
For a RichTextEdit control, call the Preview function:
rte_1.Preview(TRUE)
For a RichText DataWindow object, set the Preview property:
dw_1.Object.DataWindow.Print.Preview = TRUE
Text elements and formatting
The user can specify formatting for:
-
Selected text
-
Paragraphs
-
Pictures
-
The whole rich text document
To display the property sheet for an object, the user can:
-
Select the object. For example:
-
Drag or use editing keys to select text
-
Click on a picture
-
Set an insertion point (nothing selected) for the rich text document
-
-
Right-click in the workspace and select Properties from the pop-up menu.
To make settings for the paragraphs in the selection:
-
Double-click on the ruler bar
or
Type Ctrl+Shift+S.
Modifying input fields
Unless you have made the rich text object display only, the user can modify the values of input fields.
To modify the value of an input field:
-
Click the input field to select it.
-
Right-click in the workspace and choose Properties from the pop-up menu.
The Input Field Object property sheet displays.
-
On the Input Field page, edit the Data Value text box.
Text formatting for input fields
There are several ways to select the input field and apply text formatting. When the input field is selected, the Font page of the property sheet and the toolbar affect the text. When the input field is part of a text selection, changes affect all the text, including the input field.
The user cannot apply formatting to individual characters or words within the field. When the user selects the input field, the entire field is selected.
Inserting and deleting input fields
You write scripts that let the user insert and delete input fields. The user can also copy and paste existing input fields. All copies of an input field display the same data.
Formatting keys and toolbars
When the toolbar is visible, users can use its buttons to format text, or they can use designated keystrokes to format text in the RichTextEdit control.
For a list of keystrokes for formatting rich text, see the section called “Working with Rich Text” in Users Guide.
