- Displaying libraries and objects
- Using the pop-up menu
- Controlling columns that display in the List view
- Selecting objects
- Filtering the display of objects
- Creating and deleting libraries
- Filtering the display of libraries and folders
- Working in the current library
- Opening and previewing objects
- Copying, moving, and deleting objects
- Setting the root
- Moving back, forward, and up one level
- Modifying comments
The Library painter is designed for working with PowerBuilder libraries.
What you see in the views
In the Tree view, you can expand items and see the folders, libraries, or objects they contain. The List view displays the contents of a selection in the Tree view.
To expand or collapse an item in the Tree view
-
Double-click the item.
If the item contains libraries or objects, they display in the List view.
To display the contents of an item in the List view
-
Select the item in the Tree view or double-click the item in the List view.
Using drag and drop to expand items
You can drag and drop items to expand them and see the contents.
If you drag an item from a Tree view or List view to a List view, the List view sets the item as the root and displays its contents.
If you drag an item from a Tree view or List view to a Tree view, the Tree view expands to display the dragged item.
For example, you can drag a library from the Tree view and drop it in the List view to quickly display the objects the library contains in the List view. If you are using one Tree view and multiple List views, you can drag a specific library from the Tree view to each List view so each List view contains the contents of a specific library.
For information about using drag and drop to copy or move items, see Copying, moving, and deleting objects.
Like other painters, the Library painter has a pop-up menu that provides options that apply to the selected item in the Tree view or the List view. For example, from a library's pop-up menu, you can delete, optimize, or search the library, print the directory, specify the objects that display in the library, and import objects into it.
The actions available from an object's pop-up menu depend on the object type. For PowerBuilder objects that you can work with in painters, you can edit the object in a painter or in the Source editor, copy, move, or delete the object, export it to a text file, search it, regenerate it, or send it to a printer. You can also preview and inherit from some objects. For most of these actions, the object must be in a library in your current workspace.
Actions available from the pop-up menus are also available on the Entry menu on the menu bar.
You can control whether to display the last modification date, compilation date, size, SCC version number, and comments (if a comment was created when an object or library was created) in the List view.
The version number column in the Library painter list view remains blank if the source control system for your workspace does not support the PowerBuilder extension to the SCC API. If your source control system supports this extension and if you are connected to source control, you can override the SCC version number of a PowerScript object in the local copy directory through the property sheet for that object.
For more information about listing the SCC version number and overriding it through the PowerBuilder interface, see Extension to the SCC API.
In the List view, you can select one or more libraries or objects to act on.
You can change what objects display in expanded libraries.
Settings are remembered
PowerBuilder records your preferences in the Library section of the PowerBuilder initialization file so that the next time you open the Library painter, the same information is displayed.
Specifying which objects display in all libraries
In the Tree and List views, the Library painter displays all objects in libraries that you expand, as well as targets, workspaces, folders, and files. You can specify that the Library painter display only specific kinds of objects and/or objects whose names match a specific pattern. For example, you can limit the display to only DataWindow objects, or limit the display to windows that begin with w_emp.
To restrict which objects are displayed
-
Select Design>Options from the menu bar and select the Include tab.
-
Specify the display criteria:
-
To limit the display to entries that contain specific text in their names, enter the text in the Name box. You can use the wildcard characters question mark (?) and asterisk (*) in the string. The ? represents one character; an * represents any string of characters. The default is all entries of the selected types.
-
To limit the display to specific entry types, clear the check boxes for the entry types that you do not want to display. The default is all entries.
-
-
Click OK.
The Options dialog box closes.
In the Tree view, expand libraries or select a library to display the objects that meet the criteria.
Overriding the choices you made for a specific view
In either the Tree view or the List view, you can override your choice of objects that display in all libraries by selecting a library, displaying the library's pop-up menu, and then clearing or selecting items on the list of objects.
A library is created automatically when you create a new target, but you can create as many libraries as you need for your project in the Library painter.
To create a library
-
Click the Create button or select Entry>Library>Create from the menu bar.
The Create Library dialog box displays showing the current directory and listing the libraries it contains.
-
Enter the name of the library you are creating and specify the directory in which you want to store it.
The file is given the extension .PBL.
-
Click Save.
The library properties dialog box displays.
-
Enter any comments you want to associate with the library.
Adding comments to describe the purpose of a library is important if you are working on a large project with other developers.
-
Click OK.
PowerBuilder creates the library.
To delete a library
-
In either the Tree view or the List view, select the library you want to delete.
-
Select Entry>Delete from the menu bar or select Delete from the pop-up menu.
Restriction
You cannot delete a library that is in the current target's library search path.
The Delete Library dialog box displays showing the library you selected.
-
Click Yes to delete the library.
The library and all its entries are deleted from the file system.
Creating and deleting libraries at runtime
You can use the LibraryCreate and LibraryDelete functions in scripts to create and delete libraries. For information about these functions, see the PowerScript Reference.
In either the Tree view or the List view, you can control what displays when you expand a drive or folder. An expanded drive or folder can display folders, workspaces, targets, files, and libraries.
In PowerBuilder, the current library is the library that contains the object most recently opened or edited. That library becomes the default for Open and Inherit. If you click the Open or Inherit button in the PowerBar, the current library is the one selected in the Libraries list.
You can display the current library in the Library painter.
To display objects in the current library
-
Click in the Tree view or the List view.
-
Click the Display Most Recent Object button on the PainterBar or select Most Recent Object from the View menu.
The library that contains the object you opened or edited last displays in the view you selected with the object highlighted.
You can open and preview objects in the current workspace.
Opening PowerBuilder objects
PowerBuilder objects, such as windows and menus, are opened only if they are in a PBL in the current workspace.
To open an object
-
In either the Tree view or the List view, double-click the object, or select Edit from the object's pop-up menu.
PowerBuilder takes you to the painter for that object and opens the object. You can work on the object and save it as you work. When you close it, you return to the Library painter.
Opening other objects
The Library painter allows you to open most of the different file types it displays. When you double-click on an object, PowerBuilder attempts to open it using the following algorithm:
-
PowerBuilder determines if the object can be opened in the File editor. For example, files with the extensions .txt, .ini, and .sr* open in the File editor.
-
PowerBuilder determines if the object can be opened in a painter or HTML editor.
-
PowerBuilder checks to see if the object is associated with a program in the HKEY_CLASSES_ROOT section of the Windows registry and, if so, launches the application.
Previewing PowerBuilder objects
You can run windows and preview DataWindow objects from the Library painter.
As the needs of your target change, you can rearrange the objects in libraries. You can copy and move objects between libraries or delete objects that you no longer need.
To copy objects using drag and drop
-
In the Tree view or the List view, select the objects you want to copy.
-
Drag the objects to a library in either view. If the contents of a library are displaying in the List view, you can drop it there.
PowerBuilder copies the objects. If an object with the same name already exists, PowerBuilder prompts you and if you allow it, replaces it with the copied object.
To move objects using drag and drop
-
In the Tree view or the List view, select the objects you want to move.
-
Press and hold Shift and drag the objects to a library in either view. If the contents of a library are displaying in the List view, you can drop it there.
PowerBuilder moves the objects and deletes them from the source library. If an object with the same name already exists, PowerBuilder prompts you and if you allow it, replaces it with the moved object.
To copy or move objects using a button or menu item
-
Select the objects you want to copy or move to another library.
-
Do one of the following:
-
Click the Copy button or the Move button.
-
Select Copy or Move from the pop-up menu.
-
Select Entry>Library Item>Copy or Entry>Library Item>Move from the menu bar.
The Select Library dialog box displays.
-
-
Select the library to which you want to copy or move the objects and click OK.
To delete objects
-
Select the objects you want to delete.
-
Do one of the following:
-
Click the Delete button.
-
Select Delete from the pop-up menu.
-
Select Entry>Delete from the menu bar.
You are asked to confirm the first deletion.
Being asked for confirmation
By default, PowerBuilder asks you to confirm each deletion. If you do not want to have to confirm deletions, select Design>Options to open the Options dialog box for the Library painter and clear the Confirm on Delete check box in the General tab page.
PowerBuilder records this preference as the DeletePrompt variable in the Library section of the PowerBuilder initialization file.
-
-
Click Yes to delete the entry or Yes To All to delete all entries. Click No to skip the current entry and go on to the next selected entry.
In either the Tree view or the List view, you can set the root location of the view.
To set the root of the current view
-
In either view, select View>Set Root from the menu bar or select Set Root from the pop-up menu to display the Set Root dialog box.
-
If you want the root to be a directory or library, type the path or browse to the path.
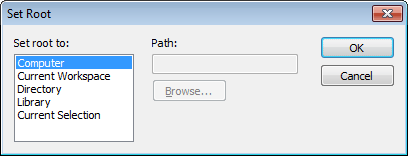
Setting the root to the current workspace
In the System Tree, the default root is the current workspace. If you prefer to work in the Library painter, you may find it convenient to set the root to the current workspace. Using the current workspace as your root is particularly helpful if you are using many libraries in various locations, because they are all displayed in the same tree.
You can also set a new root by moving back to where you were before, moving forward to where you just were, or for the List view, moving up a level.
You can use comments to document your objects and libraries. For example, you might use comments to describe how a window is used, specify the differences between descendant objects, or identify a PowerBuilder library.
You can associate comments with an object or library when you first save it in a painter and add or modify comments in the System Tree or Library painter. If you want to modify comments for a set of objects, you can do so quickly in the List view.
To modify comments for multiple objects
-
In the List view, select the objects you want.
-
Select Entry>Properties from the menu bar or select Properties from the pop-up menu.
PowerBuilder displays the Properties dialog box. The information that displays is for one of the objects you selected. You can change existing comments, or, if there are no comments, you can enter new descriptive text.
-
Click OK when you have finished editing comments for this object.
If you do not want to change the comments for an object, click OK. The next object displays.
-
Enter comments and click OK for each object until you have finished.
If you want to stop working on comments before you finish with the objects you selected, click Cancel. The comments you have entered until the most recent OK are retained and display in the List view.
