When you work in InfoMaker, you can share database profiles among users.
Sharing database profiles between SAP tools
Since the database profiles used by PowerBuilder, InfoMaker, and DataWindow Designer are stored in a common registry location, database profiles you create in any of these tools are automatically available for use by the others, if the tools are running on the same computer.
This section describes what you need to know to set up, use, and maintain shared database profiles in InfoMaker.
What you can do
You can share database profiles in the InfoMaker development environment by specifying the location of a file containing the profiles you want to share. You specify this location in the Database Preferences property sheet in the Database painter.
Where to store a shared profile file
To share database profiles among all InfoMaker users at your site, store a profile file on a network file server accessible to all users.
What happens
When you share database profiles, InfoMaker displays shared database profiles from the file you specify as well as those from your registry.
Shared database profiles are read-only. You can select a shared profile to connect to a database -- but you cannot edit, save, or delete profiles that are shared. (You can, however, make changes to a shared profile and save it on your computer, as described in Making local changes to shared database profiles.)
How to do it
To set up shared database profiles in InfoMaker, you specify the location of the file containing shared profiles in the Database painter's Database Preferences property sheet.
For instructions, see Setting up shared database profiles.
What you do
You set up shared database profiles in the Database Preferences property sheet.
To set up shared database profiles:
-
In the Database painter, select Design>Options from the menu bar.
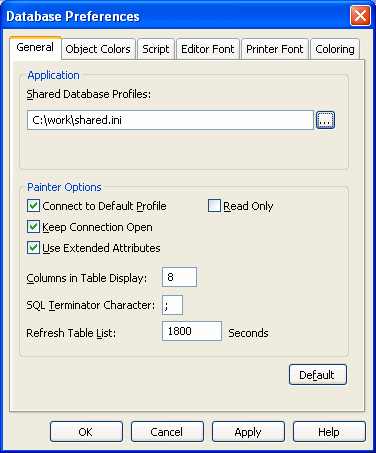
The Database Preferences property sheet displays. If necessary, click the General tab to display the General property page.
-
In the Shared Database Profiles box, specify the location of the file containing the database profiles you want to share. Do this in either of the following ways:
-
Type the location (path name) in the Shared Database Profiles box.
-
Click the Browse button to navigate to the file location and display it in the Shared Database Profiles box.
In the following example, c:\work\share.ini is the location of the file containing the database profiles to be shared:

-
-
Do one of the following:
-
Click Apply to apply the Shared Database Profiles setting to the current connection and all future connections without closing the Database Preferences property sheet.
-
Click OK to apply the Shared Database Profiles setting to the current connection and all future connections and close the Database Preferences property sheet.
InfoMaker saves your Shared Database Profiles setting in the registry.
-
You select a shared database profile to connect to a database the same way you select a profile stored in your registry. You can select the shared profile in the Database Profiles dialog box or from the File>Connect menu.
Database Profiles dialog box
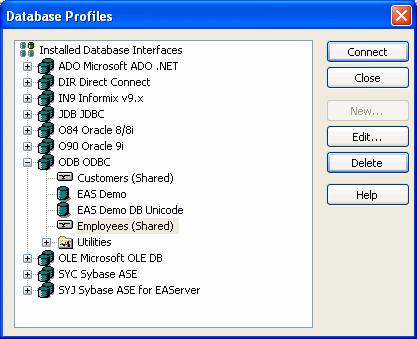
You can select and connect to a shared database profile in the Database Profiles dialog box.
To select a shared database profile in the Database Profiles dialog box:
-
Click the Database Profile button in the PowerBar.
or
Select Tools>Database Profile from the PowerBar.
The Database Profiles dialog box displays, listing both shared and local profiles. Shared profiles are denoted by a network icon and the word (Shared).

-
Select the name of the shared profile you want to access and click Connect.
InfoMaker connects to the selected database and returns you to the painter workspace.
Because shared database profiles can be accessed by multiple users running InfoMaker, you should not make changes to these profiles. However, if you want to modify and save a copy of a shared database profile for your own use, you can edit the profile and save the modified copy in your computer's registry.
To save changes to a shared database profile in your registry:
-
In the Database Profiles dialog box, select the shared profile you want to edit and click the Edit button.
-
In the Database Profile Setup dialog box that displays, edit the profile values as needed and click OK.
A message box displays, asking if you want to save a copy of the modified profile to your computer.
-
Click Yes.
InfoMaker saves the modified profile in your computer's registry.
If you maintain the database profiles for InfoMaker at your site, you might need to update shared database profiles from time to time and make these changes available to your users.
Because shared database profiles can be accessed by multiple users running InfoMaker, it is not a good idea to make changes to the profiles over a network. Instead, you should make any changes locally and then provide the updated profiles to your users.
To maintain shared database profiles at your site:
-
Make and save required changes to the shared profiles on your own computer. These changes are saved in your registry.
For instructions, see Making local changes to shared database profiles.
-
Export the updated profile entries from your registry to the existing file containing shared profiles.
For instructions, see Importing and exporting database profiles.
-
If they have not already done so, have each user specify the location of the new profiles file in the Database Preferences property sheet so that they can access the updated shared profiles on their computer.
For instructions, see Setting up shared database profiles.


